1 Mgr安装配置
安装前环境准备:
|
IP |
端口 |
路径 |
Server-id |
组复制端口 |
主机名 |
操作系统 |
|
192.168.56.131(主) |
23306 |
/usr/local/ |
131 |
23356 |
mysql |
Centos6.5 |
|
192.168.56.130(主) |
23306 |
/usr/local/ |
130 |
23356 |
weblogic |
Centos6.5 |
|
192.168.56.128(主) |
23306 |
/usr/local/ |
128 |
23356 |
oem13c |
Redhat7.4 |
1.1 Mysql5.7安装(三节点机器都安装)
下载mysql-5.7.25-linux-glibc2.12-x86_64.tar安装包上传服务器对应安装目录/usr/local
1.1.1 创建用户
[root@hdp-01 ~]# groupadd mysql
[root@hdp-01 ~]# useradd -g mysql mysql
1.1.2 创建目录
[root@hdp-01 /]# mkdir -pv /app/mysql/
1.1.3 安装
[root@mysql opt]# cd /usr/local/
[root@mysql local]# tar -xvf mysql-5.7.25-linux-glibc2.12-x86_64.tar
mysql-5.7.25-linux-glibc2.12-x86_64.tar.gz
mysql-test-5.7.25-linux-glibc2.12-x86_64.tar.gz
[root@mysql local]# tar -zxvf mysql-5.7.25-linux-glibc2.12-x86_64.tar.gz
解压缩后,建软链接
[root@mysql local]# ln -s mysql-5.7.25-linux-glibc2.12-x86_64 mysql
[root@mysql mysql]# chown mysql:mysql -R /usr/local/mysql
[root@mysql mysql]# chown mysql:mysql -R /app/mysql/
修改mysql配置文件,3个节点除了server_id、loose-group_replication_local_address、report_host 三个参数不一样外,其他保持一致。
[root@mysql ~]# cat /etc/my.cnf
[mysqld]
port=23306
basedir=/usr/local/mysql
datadir=/app/mysql/
socket=/app/mysql/mysql.sock
pid_file=/app/mysql/mysql.pid
server_id=131 ##Mysql服务ID
gtid_mode=ON ##开启全局事务
enforce_gtid_consistency=ON ##强制GTID一致性
binlog_checksum=NONE ##禁用二进制日志校验
log_bin=binlog ##开启二进制日志记录
log_slave_updates=ON ##级联复制打开
binlog_format=ROW ##行格式记录二进制
master_info_repository=TABLE ##master.info元数据保存在系统表中
relay_log_info_repository=TABLE ##relay.info元数据保存在系统表中
transaction_write_set_extraction=XXHASH64
loose-group_replication_group_name="aaaaaaaa-aaaa-aaaa-aaaa-aaaaaaaaaaaa" ##组名
loose-group_replication_start_on_boot=OFF ##不自动启动组复制
loose-group_replication_single_primary_mode= true ##单主模式
loose-group_replication_local_address= "mysql:23356" ##本机ip:端口
loose-group_replication_group_seeds="oem13c:23356,weblogic:23356,mysql:23356" ##MGR组成员
loose-group_replication_bootstrap_group=OFF ##不启用组引导
report_host=mysql
report_port=23306
mysql初始化:
[root@mysql etc]# /usr/local/mysql/bin/mysqld --initialize --basedir=/usr/local/mysql --datadir=/app/mysql --user=mysql
密码:root@localhost: k5h%h9#15ffA
启动msyql:
[root@mysql support-files]# cp /usr/local/mysql/support-files/mysql.server /etc/init.d/mysqld
[root@mysql mysql]# /etc/init.d/mysqld start
Starting MySQL.Logging to '/app/mysql/oem13c.err'.
SUCCESS!
[root@mysql ~]# mysql -uroot -pk5h%h9#15ffA
mysql: [Warning] Using a password on the command line interface can be insecure.
ERROR 2002 (HY000): Can't connect to local MySQL server through socket '/tmp/mysql.sock' (2)
[root@mysql ~]# find /app -name mysql.sock
/app/mysql/mysql.sock
建立软链接解决报错问题。
[root@mysql ~]# ln -s /app/mysql/mysql.sock /tmp/mysql.sock
[root@mysql ~]#
[root@mysql ~]# mysql -uroot -pk5h%h9#15ffA
mysql: [Warning] Using a password on the command line interface can be insecure.
Welcome to the MySQL monitor. Commands end with ; or g.
Your MySQL connection id is 2
Server version: 5.7.25-log
Copyright (c) 2000, 2019, Oracle and/or its affiliates. All rights reserved.
Oracle is a registered trademark of Oracle Corporation and/or its
affiliates. Other names may be trademarks of their respective
owners.
Type 'help;' or 'h' for help. Type 'c' to clear the current input statement.
mysql> show databases;
ERROR 1820 (HY000): You must reset your password using ALTER USER statement before executing this statement.
mysql> set password='mysql123';
Query OK, 0 rows affected (0.01 sec)
mysql> alter user 'root'@'localhost' password expire never;
Query OK, 0 rows affected (0.03 sec)
mysql> flush privileges;
Query OK, 0 rows affected (0.01 sec)
1.1.4 安装MGR插件(3个节点)
mysql> INSTALL PLUGIN group_replication SONAME 'group_replication.so';
Query OK, 0 rows affected (0.09 sec)
mysql> SHOW PLUGINS;
+----------------------------+----------+--------------------+----------------------+---------+
| Name | Status | Type | Library | License |
| group_replication | ACTIVE | GROUP REPLICATION | group_replication.so | GPL |
1.1.5 创建复制用户(3个节点)
进入mysql创建授权用户:
SET SQL_LOG_BIN=0;
mysql> SET SQL_LOG_BIN=0;
Query OK, 0 rows affected (0.01 sec)
mysql> CREATE USER repl@'%' IDENTIFIED BY 'repl';
Query OK, 0 rows affected (0.01 sec)
mysql> GRANT REPLICATION SLAVE ON *.* TO repl@'%';
Query OK, 0 rows affected (0.00 sec)
mysql> FLUSH PRIVILEGES;
Query OK, 0 rows affected (0.00 sec)
mysql> SET SQL_LOG_BIN=1;
Query OK, 0 rows affected (0.00 sec)
mysql> CHANGE MASTER TO MASTER_USER='repl', MASTER_PASSWORD='repl' FOR CHANNEL 'group_replication_recovery';
Query OK, 0 rows affected, 2 warnings (0.02 sec)
mysql>
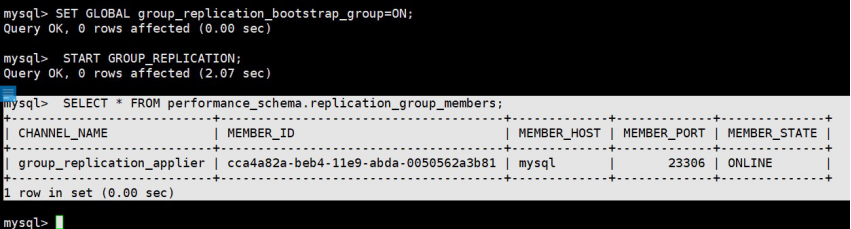
1.1.6 启动Mgr单主模式
#启动:
mysql> SET GLOBAL group_replication_bootstrap_group=ON;
Query OK, 0 rows affected (0.00 sec)
mysql> START GROUP_REPLICATION;
Query OK, 0 rows affected (2.07 sec)
# 查看MGR组信息
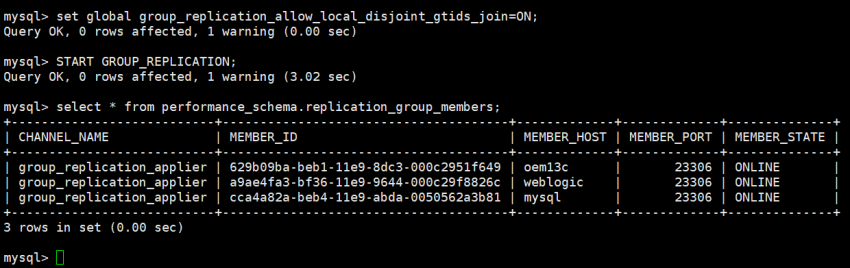
1.1.7 添加其他节点的组复制
添加节点如下:
mysql> set global group_replication_allow_local_disjoint_gtids_join=ON;
Query OK, 0 rows affected, 1 warning (0.00 sec)
mysql> START GROUP_REPLICATION;

2 Mgr组复制数据同步测试验证
在主库新建库,插入表数据,验证在其他节点是否数据同步。
1) 主库操作
mysql> create database uap default character set utf8;
Query OK, 1 row affected (0.02 sec)
mysql> show databases;
+--------------------+
| Database |
+--------------------+
| information_schema |
| mysql |
| performance_schema |
| sys |
| uap |
+--------------------+
5 rows in set (0.00 sec)
mysql> use uap;
Database changed
mysql> create table test(id int,name char(10));
Query OK, 0 rows affected (0.06 sec)
mysql> insert into test(id,name) values(1,'M');
ERROR 3098 (HY000): The table does not comply with the requirements by an external plugin.
插入数据报错,因使用MGR,表必须有主键约束。

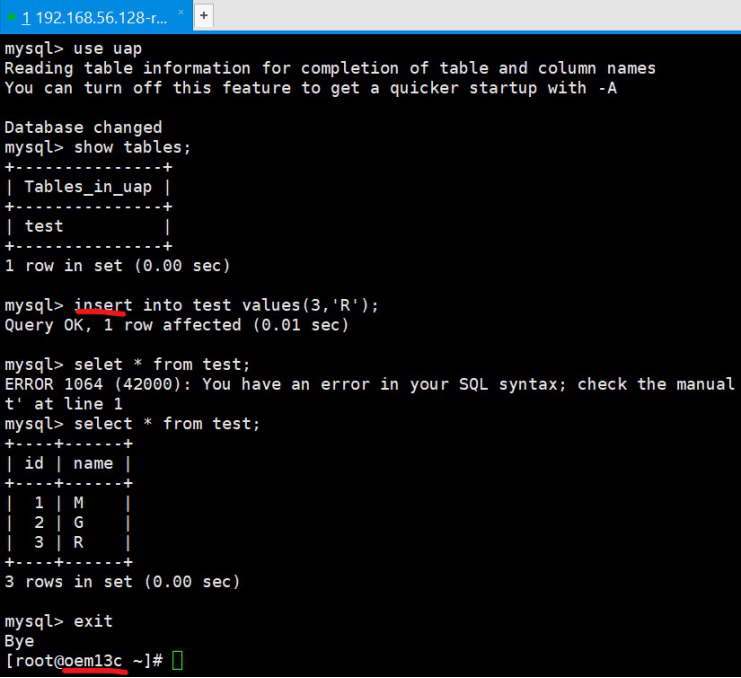
2) 查看备库当前对象状态

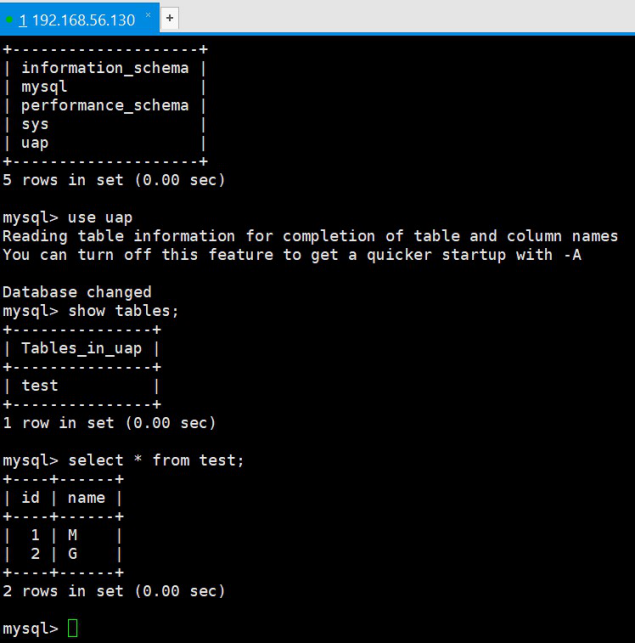
从截图中可用看出uap这个库连同test的这个二维表对象的数据已经同步到MGR组复制中的128,130节点。
mysql> insert into test(id,name) values(4,'R');
ERROR 1290 (HY000): The MySQL server is running with the --super-read-only option so it cannot execute this statement
mysql> delete from test;
ERROR 1290 (HY000): The MySQL server is running with the --super-read-only option so it cannot execute this statement
mysql>
由此可以看出单主模式只有主节点可读可写,MGR中组成员备节点只可读。
3 Mgr主备故障切换
在主备切换环节,主要验证的达到预期效果是,主节点故障了,备节点能自动切换为主节点。
主备切换前状态查看:
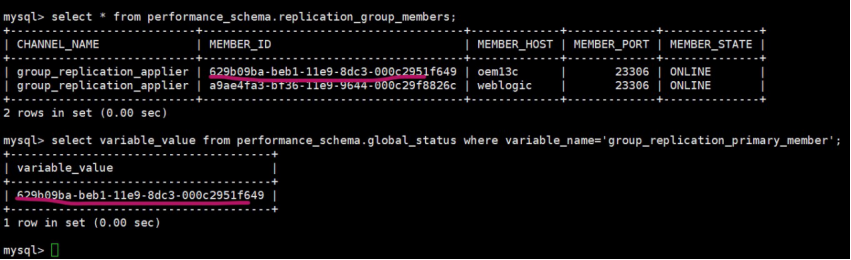
select * from performance_schema.replication_group_members;
select variable_value from performance_schema.global_status where variable_name='group_replication_primary_member';

从上图可以看出主节点是:192.168.56.131(mysql),备节点是:192.168.56.130(weblogic)、192.168.56.128(oem13c)。
模拟主节点故障,把131上mysql服务停止。
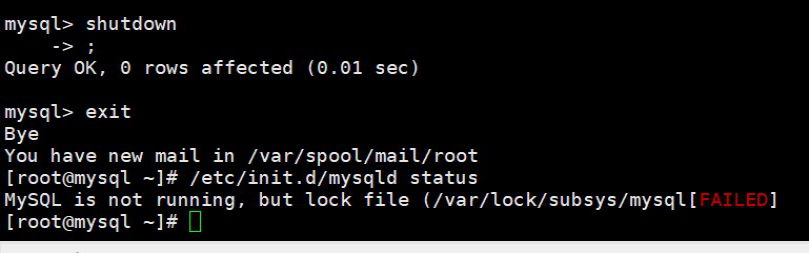
从上图可以看出主节点131mysql服务故障,192.168.56.128(oem13c)备用节点上的mysql 能自动切换为主服务,128上的mysql由只读变成可读可写的主节点服务。
最后把131上mysql服务启动起来,并启动131上的组复制。
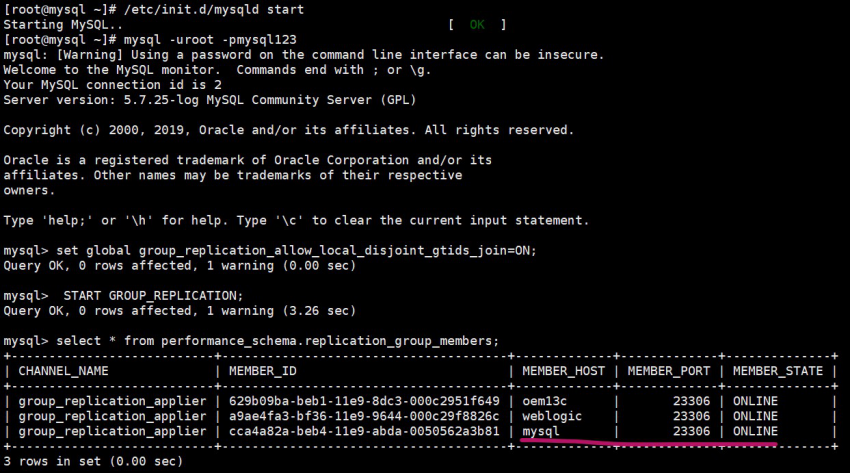
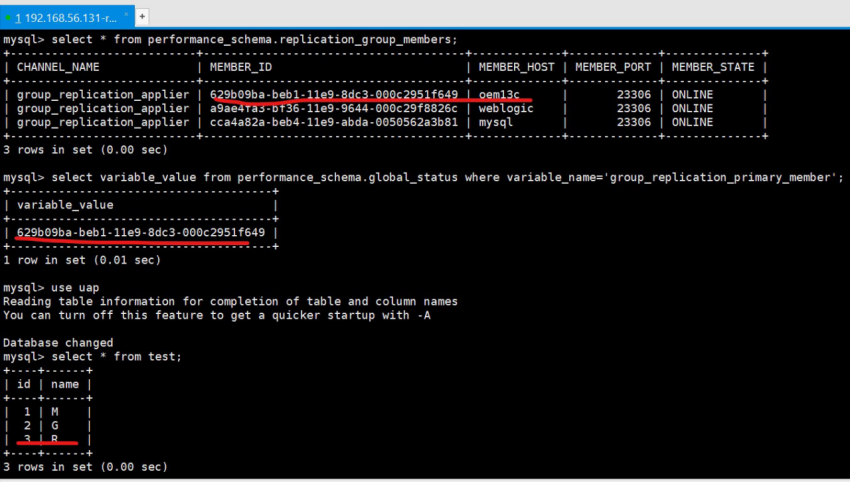
从上图可以看出131上的mysql服务启动后,主节点还是128(oem13c),并且主节点上插入的数据自动同步到故障恢复后的131主机mysql。