应室友需求,这里我打算使用python的scrapy框架去下载“优美图库”上的美图,话不多说这就开始行动。
一、工欲善其事,必先利其器
第一步,配置scrapy爬虫环境,先将pip换到国内阿里云的源。在用户目录下新建pip/pip.ini:
1 [global]
2 index-url = https://mirrors.aliyun.com/pypi/simple
3 trusted-host = mirrors.aliyun.com
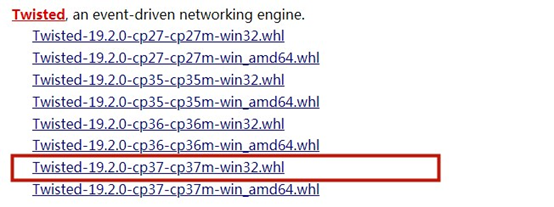
我这里是Windows环境,要手动下载安装Twisted包,否则会提示需要VC++14.0:

下载地址:https://www.lfd.uci.edu/~gohlke/pythonlibs/#twisted
找到和自己python对应版本的包,我这里是python3.7-32(学校机房都是32位系统...),所以应选择:
然后安装scrapy:$ pip install scrapy
此外,由于我们是爬取图片,需要pillow包,使用scrapy shell则要安装win32api,于是这里一并装上:$ pip install pillow pypiwin32
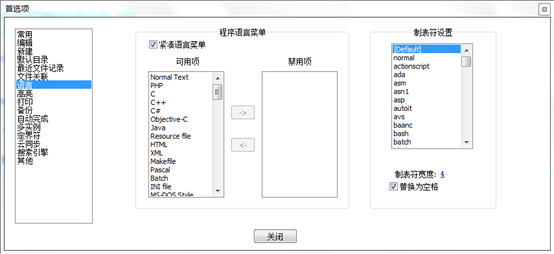
***非常重要***
Python采用缩进来控制代码块,请不要混用tap和空格,否则会报语法错误。我这里使用notepad++编辑器,可在设置>首选项>语言>制表符设置替换为空格:
准备工作完毕以后,现在来开始我们的爬虫之旅。
二、Scrapy基础
首先新建一个项目:$ scrapy startproject girls
其中girls为项目名称,可以看到将会创建一个girls文件夹,目录结构大致如下:
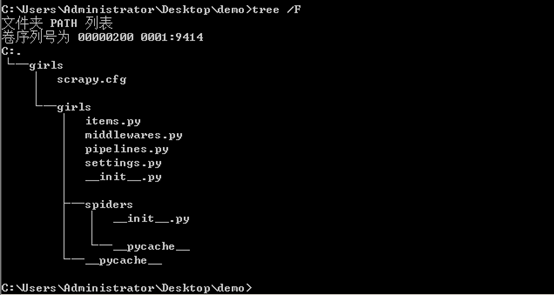
这些文件分别是:
scrapy.cfg:项目的配置文件
girls/items.py:项目的目标文件
girls/pipelines.py:项目的管道文件
girls/settings.py:项目的设置文件
girls/spiders/:存储爬虫代码目录
然后需要明确目标:我们要抓取https://www.umei.cc/tags/meinv.htm网站里的所有美图。打开girls目录下的items.py文件,编辑GirlsItem类:
1 class GirlsItem(scrapy.Item):
2     # define the fields for your item here like:
3     name = scrapy.Field() #图片名
4     image_url = scrapy.Field() #图片链接
5     pass
然后进入到girls目录下输入如下命令创建一个girl爬虫:
$ scrapy genspider girl 'umei.cc'
会看到spiders目录下新增了girl.py文件,主要是编写这个爬虫文件。首先将起始网页修改为:
1 start_urls = ['http://www.umei.cc/tags/meinv.htm']
分析网页的程序在parse方法里编写。
三、下载图片
接下来分析一下目标网页,用谷歌浏览器打开网页,也在控制台用scrapy shell打开网址:
$ scrapy shell http://www.umei.cc/tags/meinv.htm
在浏览器端使用右键检查图片元素可以看到每一页都是一个TypeList列表,找到TypeList下的超链接:

>>> list = response.xpath('//div[@class="TypeList"]/ul/li/a/@href').extract()
可以输出list看看:

随便进入一个超链接:
$ scapy shell https://www.umei.cc/meinvtupian/meinvxiezhen/194087.htm
会看到下面有关于这个主题的一系列图片,我们的目标是把这些图片按标题文件夹分类存放,图片名称则按顺序编号。
于是我们先找到图片:
>>> img = response.xpath('//div[@class="ImageBody"]/p/a/img')
可以看到img的alt属性就是我们要的文件夹名,而src就是要下载的图片,可以把图片地址显示出来看看:

找到当前图片的索引,按顺序编号存放:
>>> index = response.xpath('//li[@class="thisclass"]/a/text()').extract_first()
不排除图片有png或其他格式的,为了写出更健壮的程序,所以应该取出url最后的文件扩展名:
1 # 新建一个图片对象
2 item = GirlsItem()
3 item['image_url'] = img.xpath('@src').extract_first()
4 image_type = item['image_url'].split('.')[-1] # 获取图片扩展名
5 item['name'] = img.xpath('@alt').extract_first() + '/' + index + '.' + image_type
6 yield item
接下来便是获取下一张图片,找到底部分页索引:

提取出下一页的链接:
>>> next_page = response.xpath('//div[@class="NewPages"]/ul/li/a/@href')[-1].extract()
需要注意这是一个相对地址,我们要的是绝对地址,还好scrapy已经帮我们解决了问题:
>>> response.urljoin(next_page)
最前面的首页下面也有一个分页索引,也就是TypeList的分页索引,当然也不能放过:

需要回到上一页的地址,然后:
>>> next_url = response.xpath('//div[@class="NewPages"]/ul/li')[-2].xpath('a/@href').extract_first()
取出“下一页”的链接。
接下来只需要按照上面的流程递归的爬取每一张图片即可,完整的girl.py文件内容如下:
 1 # -*- coding: utf-8 -*-
 2 import scrapy
 3 from girls.items import GirlsItem
 4
 5 class GirlSpider(scrapy.Spider):
 6     name = 'girl'
 7     allowed_domains = ['umei.cc']
 8     start_urls = ['http://www.umei.cc/tags/meinv.htm']
 9
10     def parse(self, response):
11         list = response.xpath('//div[@class="TypeList"]/ul/li/a/@href').extract()
12         for url in list:
13             yield scrapy.Request(response.urljoin(url), callback = self.myParse)
14
15         next_url = response.xpath('//div[@class="NewPages"]/ul/li')[-2].xpath('a/@href').extract_first()
16         if next_url:
17             yield scrapy.Request(response.urljoin(next_url), callback = self.parse)
18
19     # 下载每一个主题内的图片
20     def myParse(self, response):
21         img = response.xpath('//div[@class="ImageBody"]/p/a/img')
22         index = response.xpath('//li[@class="thisclass"]/a/text()').extract_first()
23
24         item = GirlsItem()
25         item['image_url'] = img.xpath('@src').extract_first()
26         image_type = item['image_url'].split('.')[-1]
27         item['name'] = img.xpath('@alt').extract_first() + '/' + index + '.' + image_type
28         yield item
29
30         next_page = response.xpath('//div[@class="NewPages"]/ul/li/a/@href')[-1].extract()
31         if next_page != '#':
32             yield scrapy.Request(response.urljoin(next_page), callback = self.myParse)
重要的是管道文件(pipelines.py)的编写,我们要继承scrapy的ImagesPipeline,先重载get_media_requests方法将文件名封装到元数据(meta)里,然后重载路径函数file_path获取文件名,pipelines.py修改如下:
1 from scrapy.pipelines.images import ImagesPipeline
2 from scrapy import Request
3
4 class GirlsPipeline(ImagesPipeline):
5     def get_media_requests(self, item, info):
6         yield Request(item['image_url'], meta = {'name': item['name']})
7
8     def file_path(self, request, response = None, info = None):
9         return request.meta['name']
然后在配置文件(settings.py)里启用我们的管道文件:
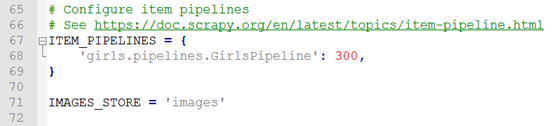
由于只有一个管道,后面的优先级可任意,这里默认的是300。
最后,运行爬虫:$ scrapy crawl girl。无奈学校机房电脑只能用https协议,拿室友电脑跑了一下,将网速限制在10M左右,做一个有素质的爬虫。见下图:
