1、DOM操作
在JS中,所有的事物都是节点,元素、文本等都是节点。
应用场景:可以通过节点进行DOM对象的增删改查
(1)获取DOM节点的方法
//通过id获取,唯一的
var oDiv = document.getElementById('box');
//通过类名获取
var oDiv = document.getElementsByClassName('.box')[0];
//通过标签名获取
var oDiv = document.getElementsByTagName('div')[0];
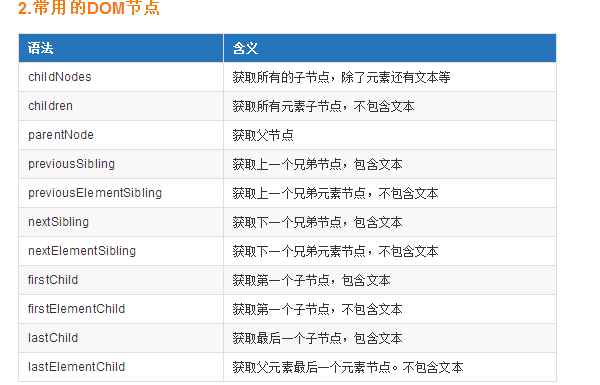
(2)常用的DOM节点
(3)节点的增删改查
<!DOCTYPE html>
<html lang="cn">
<head>
    <meta charset="UTF-8">
    <title>节点的增删改查</title>
</head>
<body>
    <div style="background-color: gray">
        <h3>路飞学城1</h3>
    </div>
    <div id="box">
        <p>alex</p>
        <p>wusir</p>
        <p>egon</p>
        <p>luffy</p>
        <p>alice</p>
    </div>
    <div>
        <h3>路飞学城2</h3>
    </div>

</body>
    <script type="text/javascript">
        var oDiv = document.getElementsByTagName('div')[0];

        // 创建元素节点
        var oH2 = document.createElement('h2');

        // 设置oH2的内容,p标签会被解析成p元素显示到HTML页面中
        oH2.innerHTML = '<p>嘿 hello</p>';

        // 只设置元素内的文本内容,div标签将被当做文本元素
        // oH2.innerText = '哈哈';

        // 将创建好的元素节点添加到指定元素所有内容的后面
        oDiv.appendChild(oH2);

        // 获取元素节点里的所有内容 包括标签和文本
        console.log(oDiv.innerHTML);

        // 表示元素节点的标签名大写
        console.log(oDiv.tagName);

        // 只获取元素内的文本内容,html标签将被忽略
        console.log(oDiv.innerText);

        // 设置id 类名
        oH2.id = 'luffyID';
        oH2.className = 'luffyClassName';
        console.log(oDiv.innerHTML);

        //获取标签属性
        console.log(oH2.getAttribute('class'));

        // 设置标签属性
        oH2.setAttribute('href','www.baidu.com');
        console.log(oDiv.innerHTML);

        // 删除元素上的属性
        oH2.removeAttribute('class');
        console.log(oDiv.innerHTML);

        // 删除创建的对象
        console.log(oDiv.innerHTML);
        oDiv.removeChild(oH2);
        console.log(oDiv.innerHTML);

        // 如果为true 克隆当前元素与元素的所有子节点
        console.log(oH2.cloneNode(true));

        // 父节点.replaceChild(新节点,子节点) 用新节点替换某个子节点
        console.log(oDiv.innerHTML);
        var op = document.createElement('p');
        op.innerText = '我是一个段落';
        oDiv.replaceChild(op,oH2);
        console.log(oDiv.innerHTML);

        // style属性 :css内联样式属性值
        oDiv.style.backgroundColor = 'red';

    </script>
</html>
2、模态框案例
(1)自己写的
<!DOCTYPE html>
<html lang="en">
<head>
    <meta charset="UTF-8">
    <title>Title</title>
</head>
<style type="text/css">
    html, body {
        height: 100%;
    }

    #box0 {
        width: 100%;
        height: 100%;
        background-color: rgba(0, 0, 0, 0.4);
    }

    #box {
        position: relative;
        top: 50%;
        left: 50%;
        height: 200px;
        width: 400px;
        background-color: #ffffff;
    }

    #p1 {
        height: 100%;
        width: 100%;
        color: red;
        line-height: 200px;
        text-align: center;
    }

    .close {
        color: blue;
        font-weight: bold;
        position: absolute;
        top: 0;
        right: 0;
        cursor: pointer;
    }
</style>
<body>

<input type="button" id='btn' value="模态框弹出">

</body>
<script type="text/javascript">
    var oBtn = document.getElementById('btn');


    oBtn.onclick = function () {

        // 1.创建遮罩层
        var oDiv = document.createElement('div');
        oDiv.id = 'box0';

        this.parentNode.insertBefore(oDiv, oBtn);

        //  2.创建对话框box
        var oBox = document.createElement('div');
        oBox.id = 'box';
        oBtn.previousSibling.appendChild(oBox);

        //  4.添加文字
        var oP = document.createElement('p');
        oP.id = 'p1';
        oP.innerText = '模态框弹出';
        oBox.appendChild(oP);

        console.log(this.parentNode);

        //  5.添加关闭按钮
        var oSpan = document.createElement('span');
        oSpan.innerText = 'X';
        oSpan.className = 'close';
        oP.parentNode.insertBefore(oSpan, oP);

        //    6.关闭模态框
        oSpan.onclick = function () {
            console.log(oSpan.parentNode.parentNode.parentNode);
            oSpan.parentNode.parentNode.parentNode.removeChild(oDiv)
        }
    };


</script>

</html>
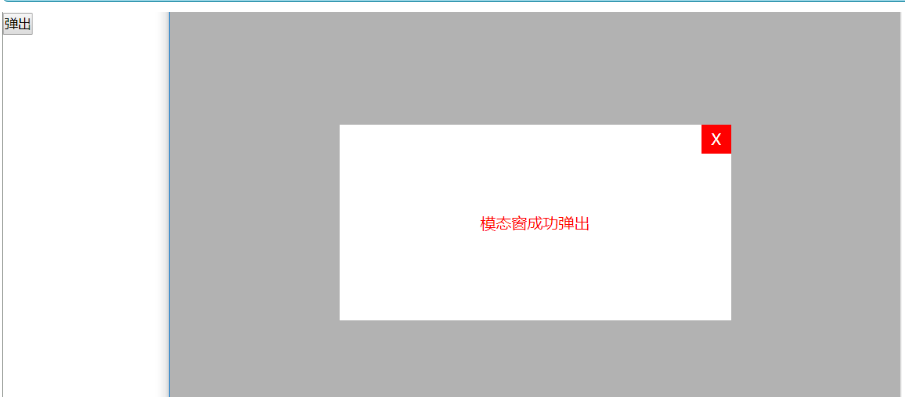
(2)标准答案
<!DOCTYPE html>
<html lang="cn">
<head>
    <meta charset="UTF-8">
    <title>模态框案例</title>
    <style type="text/css">
        *{padding: 0; margin: 0;}
        html,body{ height: 100%;}
        #box{  100%; height: 100%; background-color: rgba(0,0,0,.3)}
        #content{ position: relative; top: 150px;  400px; height: 200px;line-height: 200px;
            text-align: center; background-color: #fff;color: red;margin: 0 auto;}
        #span1{ position: absolute; background-color: red; top: 0; right: 0;  30px; height: 30px;
            line-height: 30px; text-align: center;color: white; cursor: pointer;}

    </style>
</head>
<body>
    <button id="btn">弹出</button>
</body>
    <script type="text/javascript">

        //dom  Document Object Model

        //树状结构
        /*
            html
        head    body  节点
            span div button img ....

          */

        //1.获取dom元素
        var btn = document.getElementById('btn');

        //2.创建divdom元素
        var oDiv = document.createElement('div');
        var oP = document.createElement('p');
        var oSpan = document.createElement('span');

        oDiv.id = 'box';
        oP.id = 'content';
        oP.innerText = '模态窗成功弹出';
        oSpan.id = 'span1';
        oSpan.innerText = 'X';

        oDiv.appendChild(oP);
        oP.appendChild(oSpan);

        //3.给按钮添加点击事件
        btn.onclick = function () {
            this.parentNode.insertBefore(oDiv,btn);
        };
        oSpan.onclick = function () {
            oDiv.parentNode.removeChild(oDiv);
        };

        /*
        * 总结:
        *   获取  创建  设置相应的属性  设置相关内容
        *   innerHTML appendChild  parentNode insertBefore removechild
        * */

    </script>
</html>
3、点击有惊喜
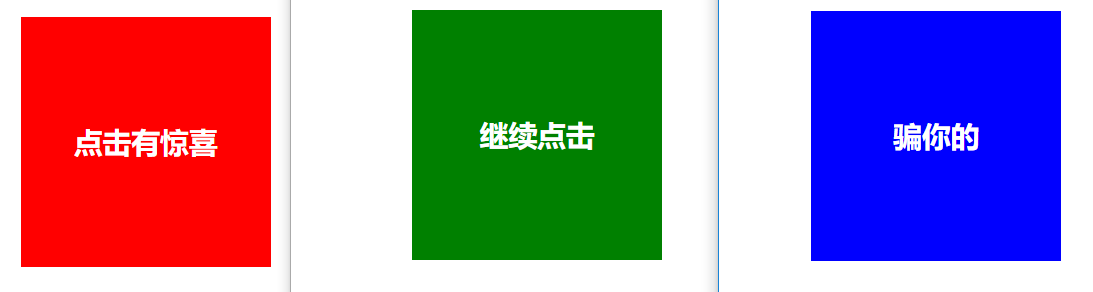
<!DOCTYPE html>
<html>
    <head>
        <meta charset="UTF-8">
        <title></title>
        <style type="text/css">
            *{padding: 0;margin: 0;}
            .box{
                width: 200px;
                height: 200px;
                background: red;
                text-align: center;
                color: white;
                line-height: 200px;
                font-size: 23px;
                font-weight: bold;
                margin: 20px auto;
                }
        </style>
    </head>
    <body>
        <div class="box">
            点击有惊喜!!
        </div>
        <!--<div class="box"></div>-->
    </body>
    <script type="text/javascript">

        var oBox = document.getElementsByClassName('box')[0];
        console.log(oBox.innerText);

        //初始化点击的次数。通过次数的增加来改变DOM的样式
        var a = 0;

        oBox.onclick  = function(){
            a++;
            if(a%4===1){
                this.style.background = 'green';
                this.innerText = '继续点击哦!';
            }else if(a%4==2){
                this.style.background = 'blue';
                this.innerText = '哈哈!骗你的';
            }else if(a%4==3){
                this.style.background = 'transparent';
                this.innerText = '';
            }else{
                this.style.background = 'red';
                this.innerText = '点击有惊喜!!';
            }

        }
        /*
        * 总结:
        * dom操作
        *   创建 获取 设置 追加 属性 点击事件 移除
        * */

    </script>
</html>
4、简易留言板
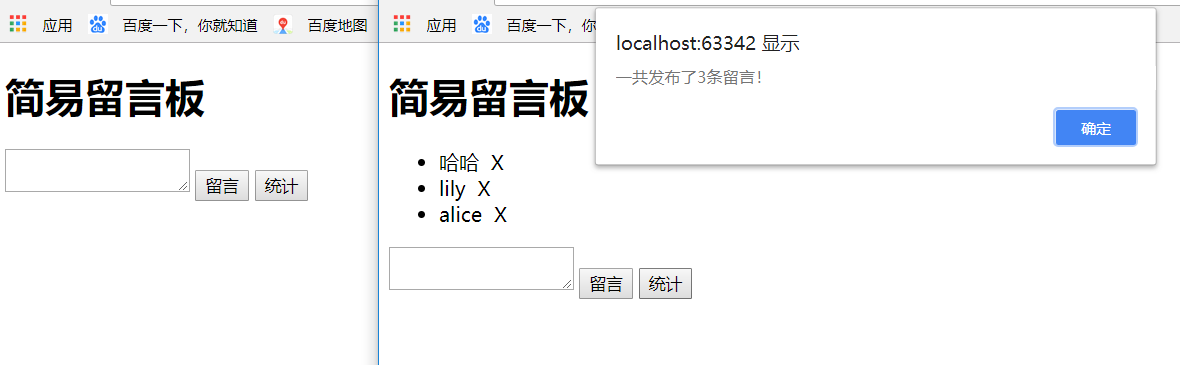
<!DOCTYPE html> <html> <head> <meta charset="UTF-8"> <title>留言板</title> </head> <body> <h1>简易留言板</h1> <div id="box"> <!--<ul> </ul>--> </div> <textarea id="msg"></textarea> <input type="button" id="btn" value="留言"/> <button onclick="sum()">统计</button> </body> <script type="text/javascript"> //1.获取父级元素 var box = document.getElementById('box'); var btn = document.getElementById('btn'); var msg = document.getElementById('msg'); //2.创建ul标签元素 var ul = document.createElement('ul'); box.appendChild(ul); //3.添加事件 var count = 0; btn.onclick = function(){ console.log(msg.value); var li = document.createElement('li'); //设置内容 li.innerHTML = msg.value + "<span> X</span>"; var lis = document.getElementsByTagName('li'); if(lis.length == 0){ ul.appendChild(li); count++; }else{ ul.insertBefore(li,lis[0]); count++; } msg.value = ''; var spans = document.getElementsByTagName('span'); for(var i = 0; i< spans.length; i++){ spans[i].onclick = function(){ ul.removeChild(this.parentNode); count--; } } } function sum(){ alert('一共发布了'+count+'条留言'); } </script> </html>
5、选项卡
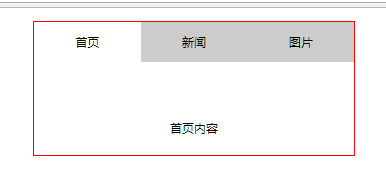
<!DOCTYPE html>
<html>
    <head>
        <meta charset="UTF-8">
        <title></title>
        <style type="text/css">
            *{
                padding: 0;
                margin: 0;
            }
            ul{list-style: none;}
            #tab{
                width: 480px;
                margin: 20px auto;
                border: 1px solid red;
            }
            ul li{
                float: left;
                width: 160px;
                height: 60px;
                line-height: 60px;
                text-align: center;
                background-color: #cccccc;
            }

            ul li a{
                text-decoration: none;
                color:black;
            }
            li.active{
                background-color: #FFFFFF;
            }
            p{
                display: none;
                height: 200px;
                text-align: center;
                line-height: 200px;
                background-color: #FFFFFF;
            }
            p.active{
                display: block;

            }

        </style>
    </head>
    <body>
        <div id="tab">
            <ul>
                <li class="active"><a href="#">首页</a></li>
                <li><a href="#">新闻</a></li>
                <li><a href="#">图片</a></li>

            </ul>
            <p class="active">首页内容</p>
            <p>新闻内容</p>
            <p>图片内容</p>


        </div>
    </body>
    <script type="text/javascript">

        var tabli = document.getElementsByTagName('li');
        var tabContent = document.getElementsByTagName('p')

        for(var i = 0; i < tabli.length; i++){
            //为了保存我的i的变量
            tabli[i].index  = i;
            tabli[i].onclick = function(){

                for(var j = 0; j < tabli.length; j++){
                    tabli[j].className = '';
                    tabContent[j].className = '';
                }
                this.className = 'active'
                console.log(this.index)
                tabContent[this.index].className = 'active';
            }
        }

    </script>
</html>
6、仿淘宝搜索栏
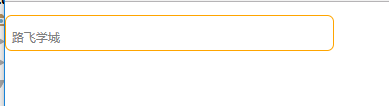
<!DOCTYPE html>
<html>
    <head>
        <meta charset="UTF-8">
        <title></title>
        <style type="text/css">
            *{padding: 0;margin: 0;}

            #search{
                position: relative;
            }

            input{
                outline: none;
                display: block;
                width: 490px;
                height: 50px;
                margin-top: 20px;
                font-size: 20px;
                border: 2px solid orange;
                border-radius: 10px;


            }
            label{
                position: absolute;
                top: 20px;
                left: 10px;
                font-size:8px;
                color: gray;

            }
        </style>
    </head>
    <body>
        <div id="search">
            <input type="text" id="text" />
            <label for="txt" id="msg">路飞学城</label>
        </div>
    </body>

    <script type="text/javascript">
        var txt = document.getElementById('text');
        var msg = document.getElementById('msg');

        //检测用户表单输入的时候
        txt.oninput = function(){

             //控制元素显示隐藏
            if (this.value == '') {
                msg.style.display = 'block'
            }else{
                msg.style.display = 'none'
            }
        }
        /*
        * 总结:
        *   js中所有事件 都带on
        *   检测用户表单输入的时候 oninput
        * */


    </script>
</html>
7、获取当前时间

<!DOCTYPE html>
<html lang="en">
<head>
    <meta charset="UTF-8">
    <title>获取当前时间</title>
</head>
<body>

</body>
    <script type="text/javascript">
        setInterval(function () {
            var date = new Date();
            var y = date.getFullYear();
            var m = date.getMonth();
            var d = date.getDate();
            var h = date.getHours();
            var min = date.getMinutes();
            var s = date.getSeconds();

            document.body.innerHTML = '今天是'+y+'年'+num(m+1)+'月'+num(d)+'日'+num(h)+':'+num(min)+':'+num(s);
        },1000);

        function num(n) {
            if(n<10){
                return '0'+ n;
            }else{
                return n;
            }
        }
    </script>
</html>
8、匀速运动
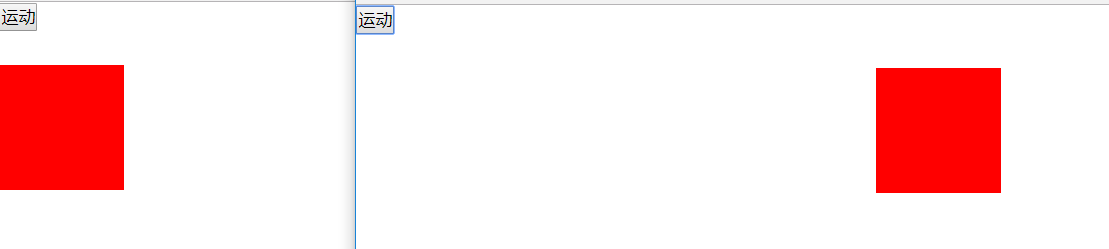
<!DOCTYPE html>
<html lang="en">
<head>
    <meta charset="UTF-8">
    <title>匀速运动</title>
    <style type="text/css">
        *{padding: 0; margin: 0}
        .box{width: 100px; height: 100px;background-color: red; position: absolute;
            top: 50px; left: 0;}

    </style>
</head>
<body>
    <div id="wrap">
        <button id="btn">运动</button>
        <div class="box" id="box1"></div>
    </div>
</body>
    <script type="text/javascript">
        var btn = document.getElementById('btn');
        var box = document.getElementById('box1');

        var count = 0;
        var time = null;
        btn.onclick = function () {
            time = setInterval(function () {
                count += 2;
                if(count>1000){
                    clearInterval(time);
                    box.style.display = 'none';
                }
                box.style.left = count + 'px';
            },10)
        }

    </script>
</html>
9、5秒之后关闭广告
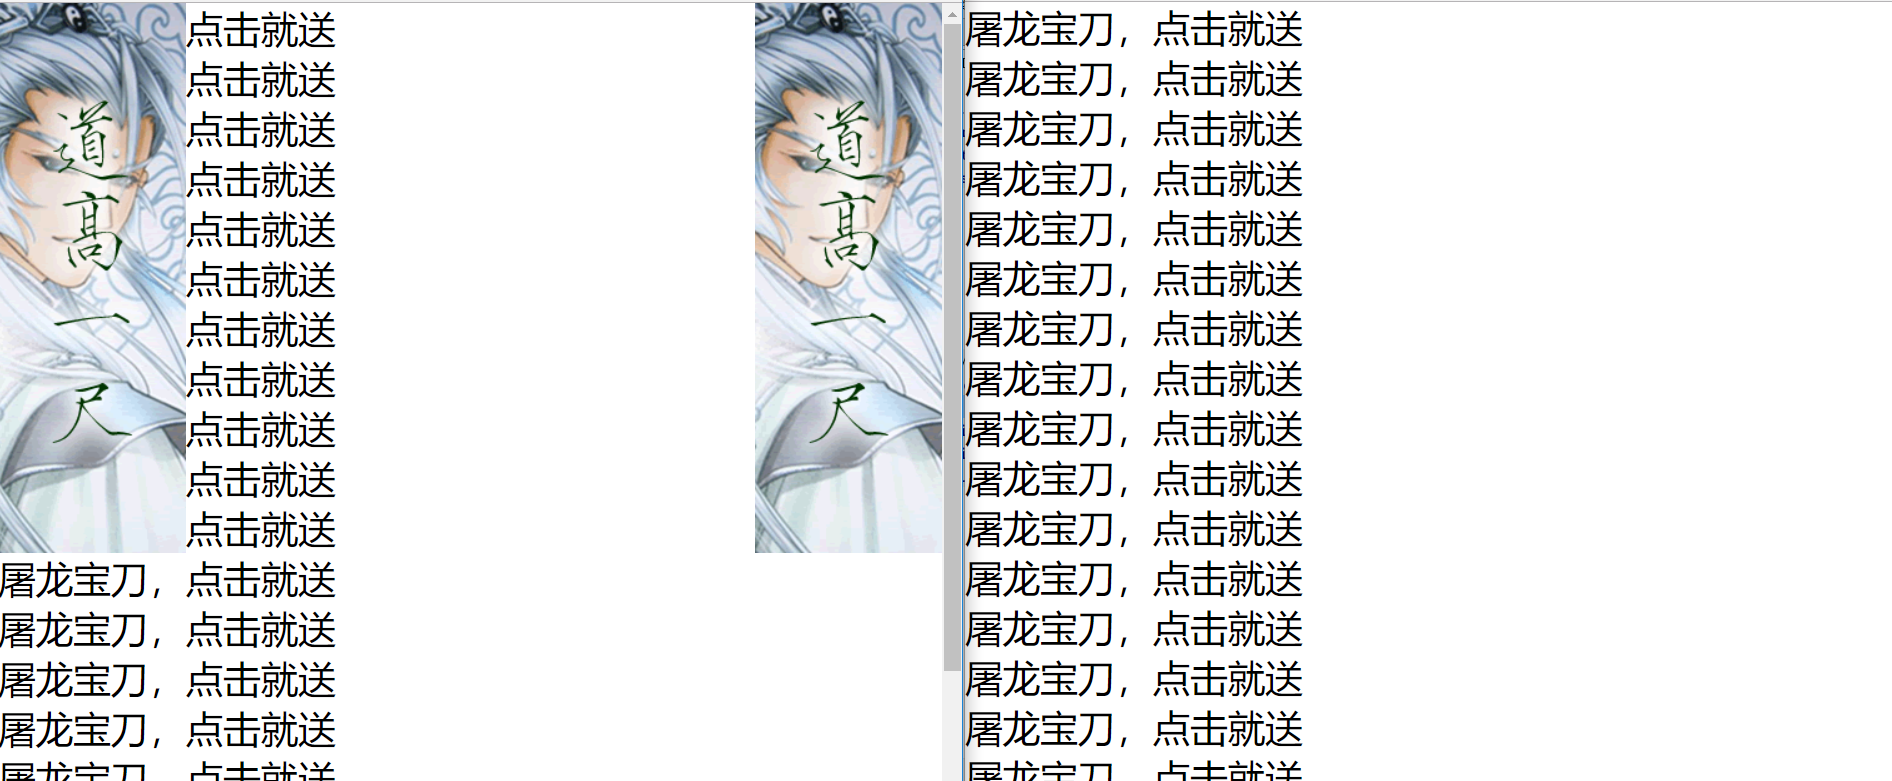
<!DOCTYPE html>
<html lang="en">
<head>
    <meta charset="UTF-8">
    <title>5秒之后关闭广告</title>
    <style type="text/css">
        *{ padding: 0;margin: 0;}
        img{ position: fixed;}
        ul{ list-style: none;}
        ul li{ font-size: 30px;}
        #left{left: 0;}
        #right{right: 0;}

    </style>
</head>
<body>
    <img src="./images/1.gif" id="left" alt="">
    <img src="./images/1.gif" id="right" alt="">
    <ul>
        <li>屠龙宝刀,点击就送</li>
        <li>屠龙宝刀,点击就送</li>
        <li>屠龙宝刀,点击就送</li>
        <li>屠龙宝刀,点击就送</li>
        <li>屠龙宝刀,点击就送</li>
        <li>屠龙宝刀,点击就送</li>
        <li>屠龙宝刀,点击就送</li>
        <li>屠龙宝刀,点击就送</li>
        <li>屠龙宝刀,点击就送</li>
        <li>屠龙宝刀,点击就送</li>
        <li>屠龙宝刀,点击就送</li>
        <li>屠龙宝刀,点击就送</li>
        <li>屠龙宝刀,点击就送</li>
        <li>屠龙宝刀,点击就送</li>
        <li>屠龙宝刀,点击就送</li>
        <li>屠龙宝刀,点击就送</li>
        <li>屠龙宝刀,点击就送</li>
        <li>屠龙宝刀,点击就送</li>
        <li>屠龙宝刀,点击就送</li>
        <li>屠龙宝刀,点击就送</li>
        <li>屠龙宝刀,点击就送</li>
        <li>屠龙宝刀,点击就送</li>
    </ul>
</body>
    <script type="text/javascript">
        // 窗口加载完 执行函数
        window.onload = function () {
            var left = document.getElementById('left');
            var right = document.getElementById('right');

            setTimeout(function () {
                left.style.display = 'none';
                right.style.display = 'none';
            },5000)
        }
    </script>
</html>
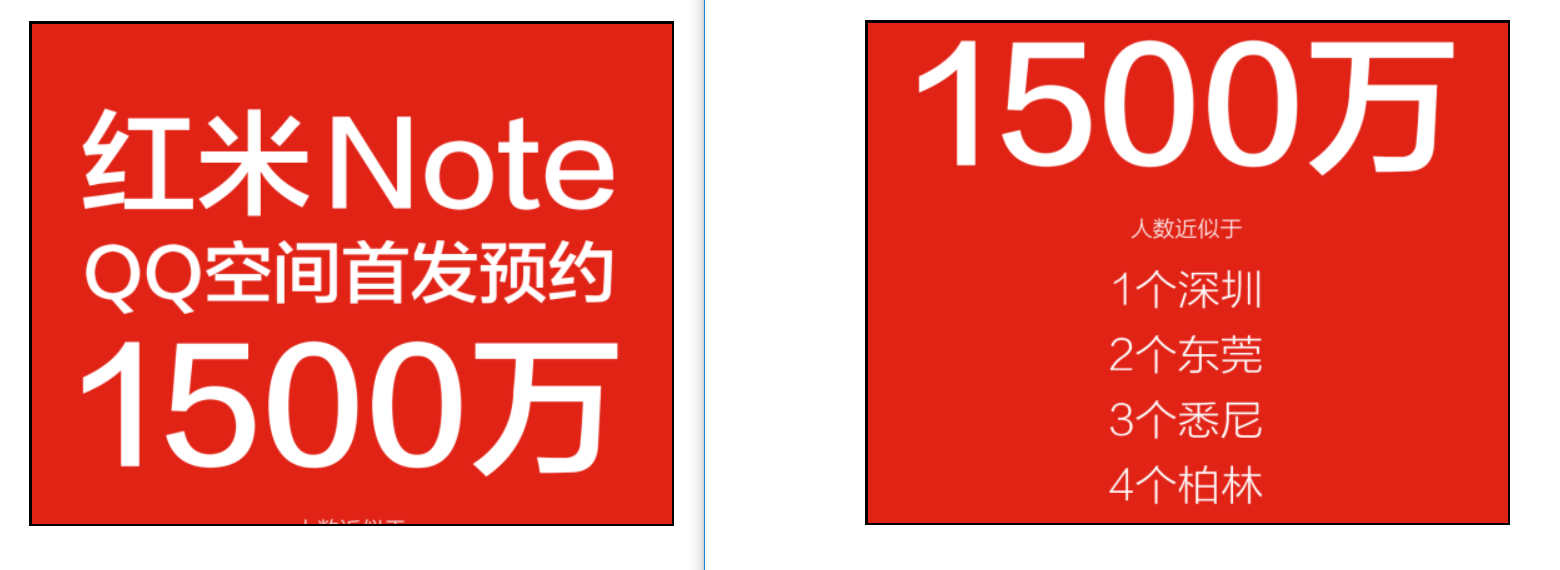
原图:

10、小米滚动
<!DOCTYPE html>
<html lang="en">
<head>
    <meta charset="UTF-8">
    <title>小米滚动</title>
    <style type="text/css">
        *{padding: 0;margin: 0;}
        #box{ position: relative; overflow: hidden; width: 512px;height: 400px; margin: 20px auto;
            border: 2px solid black;}
        #xiaomi{ position: absolute; top: 0; left: 0;}
        .up{ position: absolute; display: block; height: 200px;width: 100%;}
        .down{ position: absolute; display: block;height: 200px;width: 100%; top: 200px;}

    </style>
</head>
<body>
    <div id="box" class="wrap">
        <img src="./images/mi.png" id="xiaomi" alt="">
        <span class="up" id="picUp"></span>
        <span class="down" id="picDown"></span>
    </div>
</body>
    <script type="text/javascript">
        var up = document.getElementById('picUp');
        var down = document.getElementById('picDown');
        var img = document.getElementById('xiaomi');

        var count = 0;
        var time = null;
        up.onmouseover = function () {
            //不管怎么怎样 上来先清定时器;
            clearInterval(time);
            time = setInterval(function () {
                count -= 3;
                count<=-1070 ? clearInterval(time) : img.style.top = count+'px';
            },30)
        };

        down.onmouseover = function () {
            clearInterval(time);
            time = setInterval(function () {
                count += 3;
                count>=0 ? clearInterval(time) : img.style.top = count + 'px';
            },30)
        }

    </script>
</html>
原图:
11、无缝轮播
<!DOCTYPE html>
<html lang="en">
<head>
    <meta charset="UTF-8">
    <title>无缝轮播</title>
    <style type="text/css">
        *{ padding: 0;margin: 0;}
        .box{ position: relative; width: 600px;height: 200px;margin: 50px auto; overflow: hidden;}
        .box ul{ list-style: none; width: 200%; position: absolute;top: 0;left: 0;}
        ul li{ float: left;}

    </style>
</head>
<body>
    <div class="box">
        <ul>
            <li><img src="./images/01.jpg" alt=""></li>
            <li><img src="./images/02.jpg" alt=""></li>
            <li><img src="./images/03.jpg" alt=""></li>
            <li><img src="./images/04.jpg" alt=""></li>
        </ul>
    </div>
</body>
    <script type="text/javascript">
        var box = document.getElementsByClassName('box')[0];
        var ul = box.children[0];

        var count = 0;
        var time = null;

        function autoPlay() {
            count -= 3;
            count <= -600 ? count = 0 : count;
            ul.style.left = count + 'px';
        }

        time = setInterval(autoPlay,30);
        //鼠标移上去
        ul.onmouseover = function () {
            clearInterval(time);
        };
        //鼠标移开
        ul.onmouseout = function () {
            time = setInterval(autoPlay,30);
        };

    </script>
</html>
原图