传统的前景背景分割方法有GrabCut,分水岭算法,当然也包括一些阈值分割的算法。但是这些算法在应用中往往显得鲁棒性较弱,达不到一个好的分割效果。
现代的背景分割算法融入了机器学习的一些方法来提高分类的效果。如KNN,混合高斯(MOG2),Geometric Multigrid。这些算法的基本原理就是对每一帧图像的环境进行学习,从而推断出背景区域。
opencv的BackgroundSubtractor提供了这些现代的背景分割算法。
1.思想
1.定义1个KNN背景分割器对象
2.定义视频对象
while True:
3.一帧帧读取视频
4.计算前景掩码
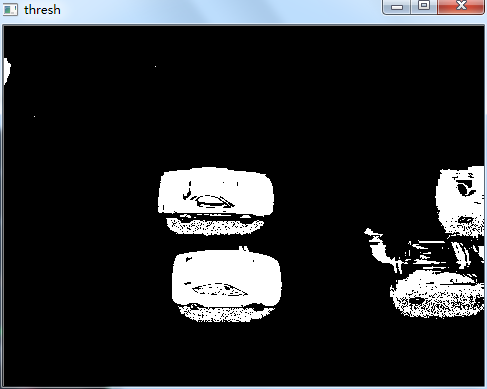
5.二值化操作
6.膨胀操作
7.查找轮廓
8.轮廓筛选
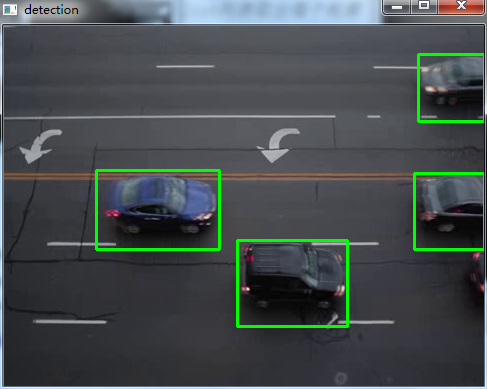
9.画出轮廓(在原图像)
10.显示图像帧,
2。代码
#-*- coding:utf-8 -*-
import cv2
import numpy as np

# 1.常见一个BackgroundSubtractorKNN接口
bs = cv2.createBackgroundSubtractorKNN(detectShadows=True)

#2.读取视频
camera = cv2.VideoCapture('traffic.flv')

#定义卷积核圆形
kernel = cv2.getStructuringElement(cv2.MORPH_ELLIPSE,(3,3))

while True:
    ret,frame = camera.read()

    #3. apply()函数计算了前景掩码
    fgmask = bs.apply(frame)

    #4. 获得前景掩码(含有白色值以及阴影的灰色值),通过设定阈值将非白色(244~255)的所有像素都设为0,而不是1;
    th = cv2.threshold(fgmask.copy(),244,255,cv2.THRESH_BINARY)[1]    #二值化操作

    dilated = cv2.dilate(th,kernel,iterations =2)    #5.膨胀操作
                #cv2.getStructuringElement 构建一个椭圆形的核
                #3x3卷积核中有2个1那就设置为1


    #6. findContours函数参数说明cv2.RETR_EXTERNAL只检测外轮廓,
    # cv2.CHAIN_APPROX_SIMPLE只存储水平,垂直,对角直线的起始点。
    image,contours,hier = cv2.findContours(dilated,cv2.RETR_EXTERNAL,cv2.CHAIN_APPROX_SIMPLE)    #查找轮廓


    for c in contours:    #从list列表取出每个轮廓
        if cv2.contourArea(c) < 1500:    #进行轮廓筛选 轮廓面积小于1500
            continue

        (x,y,w,h) = cv2.boundingRect(c)
        cv2.rectangle(frame,(x,y),(x+w,y+h),(0,255,0),2)


    cv2.imshow("mog",fgmask)
    cv2.imshow("thresh",th)
    cv2.imshow("detection",frame)

    if cv2.waitKey(100) & 0xff == ord("q"):
        break

camera.release()
cv2.destroyAllWindows()
# coding:utf-8
import cv2
import numpy as np
#from MyCvUtils import MyCvUtils

#datapath = "D:/imgData/video/"

bs = cv2.createBackgroundSubtractorKNN(detectShadows=True)
camera = cv2.VideoCapture("traffic.flv")

ret, frame = camera.read()

while True:
    ret, frame = camera.read()
    # 计算前景掩码,包含 前景的白色值 以及 阴影的灰色值
    fgmask = bs.apply(frame)
    # 前景区域二值化,将非白色(0-244)的非前景区域(包含背景以及阴影)均设为0,前景的白色(244-255)设置为255
    th = cv2.threshold(fgmask.copy(), 244, 255, cv2.THRESH_BINARY)[1]
    # 前景区域形态学处理
    th = cv2.erode(th, cv2.getStructuringElement(cv2.MORPH_ELLIPSE, (3, 3)), iterations=2)
    dilated = cv2.dilate(th, cv2.getStructuringElement(cv2.MORPH_ELLIPSE, (8, 3)), iterations=2)
    # 绘制前景图像的轮廓矩形
    image, contours, hier = cv2.findContours(dilated, cv2.RETR_EXTERNAL, cv2.CHAIN_APPROX_SIMPLE)
    for c in contours:
        #       对轮廓设置最小区域,对检测结果降噪
        if cv2.contourArea(c) > 1000:
            (x, y, w, h) = cv2.boundingRect(c)
            cv2.rectangle(frame, (x, y), (x + w, y + h), (255, 255, 0), 2)

    cv2.imshow("mog", fgmask)
    cv2.imshow("thresh", th)
    cv2.imshow("diff", frame & cv2.cvtColor(fgmask, cv2.COLOR_GRAY2BGR))
    cv2.imshow("detection", frame)

    if (cv2.waitKey(30) & 0xFF) == 27:
        break
    if (cv2.waitKey(30) & 0xFF) == ord('q'):
        break

camera.release()
cv2.destroyAllWindows()
3.效果图

4.源码KNN
def createBackgroundSubtractorKNN(history=None, dist2Threshold=None, detectShadows=None): # real signature unknown; restored from __doc__
    """
    createBackgroundSubtractorKNN([, history[, dist2Threshold[, detectShadows]]]) -> retval
    .   @brief Creates KNN Background Subtractor

    .   @param history
Length of the history.
    .   @param dist2Threshold
Threshold on the squared distance between the pixel and the sample to decide whether a pixel is close to that sample. This parameter does not affect the background update.
    .   @param detectShadows
If true, the algorithm will detect shadows and mark them. It decreases the speed a bit, so if you do not need this feature, set the parameter to false.
    """
    pass
@简单创建KNN背景减法器

@param历史
历史长度。

@param dist2threshold
阈值像素和样本之间的平方距离,以决定像素是否接近该样本。此参数不影响后台更新。

@param detectshadows
如果为真,该算法将检测阴影并标记它们。它会稍微降低速度,所以如果您不需要这个特性,请将参数设置为false。