1、APIS
https://docs.saltstack.com/en/latest/topics/api.html
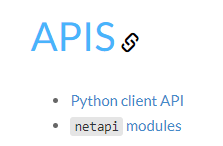
1.python client api
必须运行在master节点上
2. 一般的话,用netapi
基于restful协议的api
1、python client API
>>> import salt.client
>>> local = salt.client.LocalClient()
>>> local.cmd('*', 'cmd.run', ['whoami'])
{'host-192-168-23-21': 'root', 'host-192-168-23-39.openstacklocal': 'root'}
>>>
>>> local.cmd('*','test.arg',['arg1','arg2'],kwarg={'foo':'bar'})
{'host-192-168-23-21': {'args': ['arg1', 'arg2'], 'kwargs': {'foo': 'bar', '__pub_fun': 'test.arg',

'__pub_arg': ['arg1', 'arg2', {'foo': 'bar'}], '__pub_tgt': '*', '__pub_jid': '20190724145719566558', '__pub_ret': '',
 '__pub_tgt_type': 'glob', '__pub_user': 'root'}}, 'host-192-168-23-39.openstacklocal': {'args': ['arg1', 'arg2'],

'kwargs': {'foo': 'bar', '__pub_fun': 'test.arg', '__pub_arg': ['arg1', 'arg2', {'foo': 'bar'}], '__pub_tgt': '*',

'__pub_jid': '20190724145719566558', '__pub_ret': '', '__pub_tgt_type': 'glob', '__pub_user': 'root'}}}
>>>
>>> import salt
>>> salt.__path__
['/usr/lib/python3.6/site-packages/salt']
2、netapi:restful
官方文档:
http://docs.saltstack.cn/ref/netapi/all/index.html#all-netapi-modules
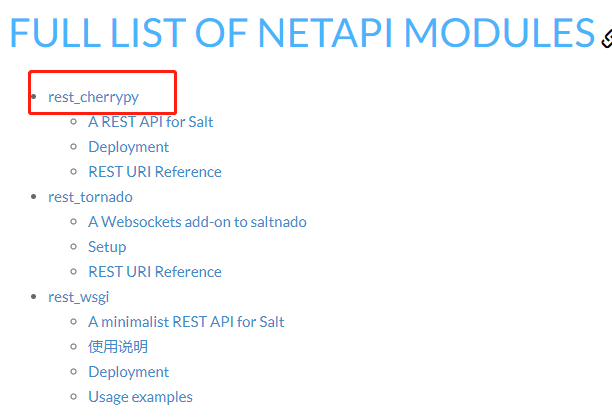
netapi又分三种:rest_cherrypy,rest_tornado,rest_wsgi
rest_cherry和rest_tonado两个模块支持监听所有IP的指定端口接收请求;
rest_wsgi只支持本机访问,只绑定了127.0.0.1
tornado不全
默认 rest_cherrypy
轻量级的web小框架
只支持https,自己做,自签名一个
需要验证,
2、rest_cherrypy
rest-cherrypy
http://docs.saltstack.cn/ref/netapi/all/salt.netapi.rest_cherrypy.html
tips:
cherrypy 一套比较简单的 WEB 开发框架,只含有 WEB 开发框架。
开发很简单,但并不算方便,因为 ORM 和模板等等需要自己来选择和配置。
比较适合开发实验系统或为其他应用提供一个 WEB 管理界面
# 暂时不安装,哪里用到了???  # salt-master安装的时候已经自带了 等会确认下
[root@master ~]# yum install cherry -y
1.安装 salt-api

[root@linux-master ~]# yum install salt-api -y
2、签名证书
salt-api仅仅支持https
自签名 or 官方给的命令
方法1: 官方给的命令 (Error,换方法2)
安装证书包
[root@master ~]# yum install pyOpenSSL -y # 证书包
再执行
本地执行模块,创建了个自签名证书
[root@linux-master ~]# salt-call --local tls.create_self_signed_cert

直接执行报错
[root@linux-node2 ~]# salt-call --local tls.create_self_signed_cert
'tls' __virtual__ returned False: ['PyOpenSSL version 0.10 or later must be installed before this module can be used.']
原因
yum 安装pyOpenSSL 其实已经安装到 python2.7的site-package里面了
/usr/lib/python2.7/site-packages
yum 只支持python2版本,python3作者不更新了
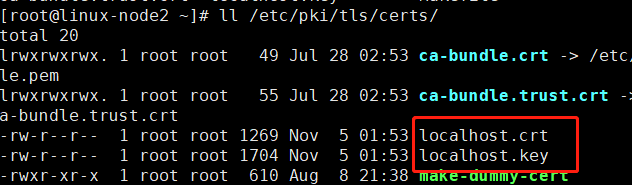
方法2:配置自签名证书
[root@master ~]# cd /etc/pki/tls/certs/
[root@master certs]# make testcert
Enter pass phrase: ==>  #  输入加密短语, 我使用的是saltapi

# 解密key
[root@master certs]# cd /etc/pki/tls/private/
[root@master private]# openssl rsa -in localhost.key -out localhost_nopass.key

Enter pass phrase for localhost.key:  ==> saltapi
writing RSA key
# 生成证书后,修改文件权限
chmod 755 /etc/pki/tls/certs/localhost.crt
chmod 755 /etc/pki/tls/private/localhost.key
chmod 755 /etc/pki/tls/private/localhost_nopass.key
3、对应的配置文件目录
master配置文件目录开关
[root@master master.d]# vim /etc/salt/master

并创建
[root@linux-node2 ~]# mkdir /etc/salt/master.d
4、api.conf 接口配置
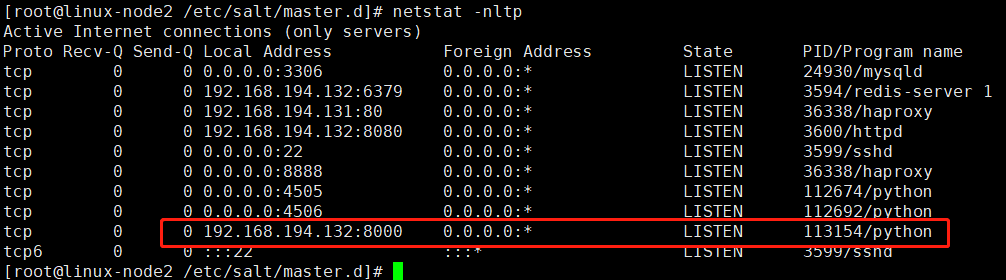
配置api接口 (8000占用可以切换8001)
监听的host,port
[root@master ~]# cd /etc/salt/master.d/
[root@master master.d]# vim api.conf
[root@linux-master /etc/salt/master.d]# cat api.conf
rest_cherrypy:
  host: 192.168.194.132
  port: 8001
  ssl_crt: /etc/pki/tls/certs/localhost.crt
  ssl_key: /etc/pki/tls/private/localhost_nopass.key
可以指定ip,有多个ip地址怎么办,该机器
5、eauth.conf 扩展认证配置
创建saltapi用户
[root@linux-master /etc/salt/master.d]# useradd -M -s /sbin/nologin saltapi

-M  无家目录
-s /sbin/login  只是用这个saltapi,不登录
修改改密码
[root@linux-master /etc/salt/master.d]# echo "saltapi" | passwd saltapi --stdin

# 批量修改密码
[root@linux-master /etc/salt/master.d]# chpasswd

扩展认证eauth
官方示例 https://docs.saltstack.com/en/latest/topics/eauth/index.html#acl-eauth

[root@linux-master /etc/salt/master.d]# vim eauth.conf
[root@linux-master /etc/salt/master.d]# cat eauth.conf
external_auth:
  pam:
    saltapi:       # saltapi用户
      - .*         # 不受限制的使用salt命令
      - '@wheel'   # to allow access to all wheel modules
      - '@runner'  # to allow access to all runner modules
      - '@jobs'    # to allow access to the jobs runner and/or wheel module

6、启动
[root@linux-master /etc/salt/master.d]# systemctl restart salt-master
[root@linux-master /etc/salt/master.d]# systemctl start salt-api
3、使用命令
8000端口调用salt
1、登录获取token
# 获取token
curl -sSk https://192.168.194.131:8001/login
     -H 'Accept: application/x-yaml'
     -d username=saltapi
     -d password=saltapi
     -d eauth=pam


# 返回值
return:
- eauth: pam
  expire: 1572981465.263087
  perms:
  - .*
  - '@wheel'
  - '@runner'
  - '@jobs'
  start: 1572938265.263086
  token: faa213892379c11dbfaa0b291cb51e3203c33345
  user: saltapi
# 以json返回  python -mjson.tool
curl -X POST -k https://127.0.0.1:8001/login
-d username='saltapi'
 -d password='salt'
-d eauth='pam'
|python -mjson.tool
测试连通性,token用上句生成的
# 执行模块 x-yaml格式
curl -k https://192.168.194.131:8001/
-H "Accept: application/x-yaml"
-H "X-Auth-Token: faa213892379c11dbfaa0b291cb51e3203c33345"
-d client='local'
-d tgt='*'
-d fun='test.ping'
2、查询grains
# 查询Grains
curl -k https://192.168.194.131:8001/minions/linux-node1.example.com
-H "Accept: application/json"
-H "X-Auth-Token: faa213892379c11dbfaa0b291cb51e3203c33345"
3、执行模块
# json格式
curl -k https://192.168.194.131:8001/
-H "Accept: application/json"
-H "X-Auth-Token: faa213892379c11dbfaa0b291cb51e3203c33345"
-d client='local'
-d tgt='*'
-d fun='test.ping'

4、带参数的
# 带参数的执行模块
curl -k https://192.168.194.131:8001/
-H "Accept: application/x-yaml"
-H "X-Auth-Token: faa213892379c11dbfaa0b291cb51e3203c33345"
-d client='local'
-d tgt='*'
-d fun='cmd.run'
-d arg='df -h'
# 指定minion的id执行
curl -k https://192.168.194.131:8001
-H "Accept: application/json"
-H "X-Auth-Token: faa213892379c11dbfaa0b291cb51e3203c33345"
-d client='local'
-d tgt='linux-node1*'
-d fun='cmd.run'
-d arg='df -h'
# cmd.run  查看日志文件
curl -k https://192.168.194.131:8001
-H "Accept: application/json"
-H "X-Auth-Token: faa213892379c11dbfaa0b291cb51e3203c33345"
-d client='local'
-d tgt='linux-node1.example.com'
-d fun='cmd.run'
-d arg='tail /var/log/messages'
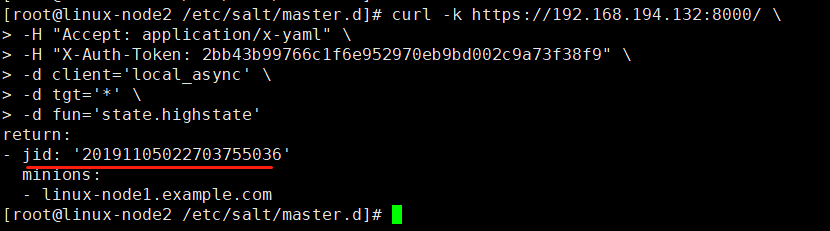
5、异步执行模块
# 异步执行模块
curl -k https://192.168.194.131:8001/
-H "Accept: application/x-yaml"
-H "X-Auth-Token: faa213892379c11dbfaa0b291cb51e3203c33345"
-d client='local_async'
-d tgt='*'
-d fun='state.highstate'
# 返回值
return:
- jid: '20191105030919886531'
  minions:
  - linux-node1.example.com
  - linux-node2.example.com
6、jobs管理
# 获取缓存的jobs列表
curl -k https://192.168.194.131:8001/jobs/
     -H "Accept: application/x-yaml"
     -H "X-Auth-Token: faa213892379c11dbfaa0b291cb51e3203c33345"
# 查询指定的job    20191105024136747884
curl -k https://192.168.194.131:8000//jobs/20191105024136747884
     -H "Accept: application/x-yaml"
     -H "X-Auth-Token: faa213892379c11dbfaa0b291cb51e3203c33345"
二次开发的话:web端,轮询这个jid
执行状态,用local_asyc
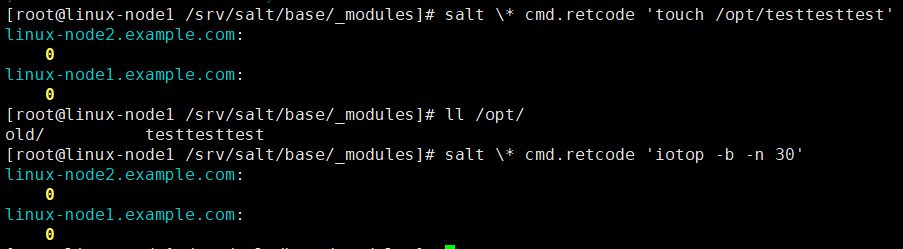
cmd.run直接用 local
7、cmd.recode
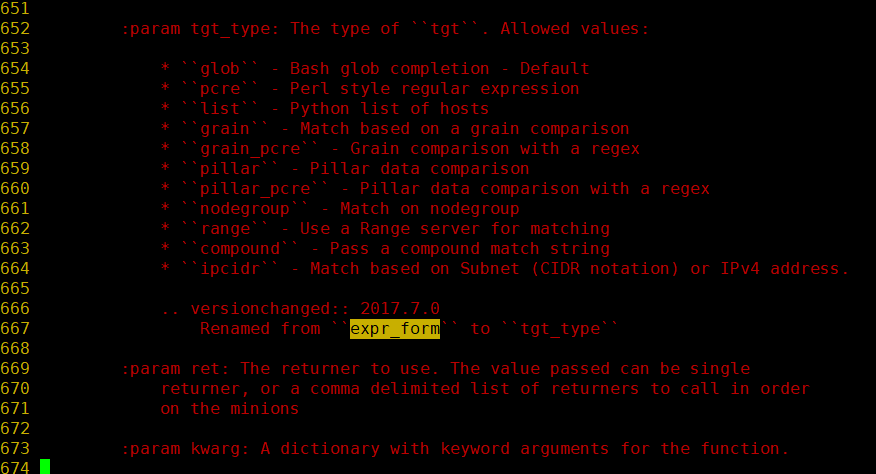
8、指定ip:tgt_type匹配类型
# 执行远程命令
curl -k https://192.168.23.39:8001
-H "Accept: application/json"
-H "X-Auth-Token: a51c5dad2626890d619e6a1deaf9995199cb5f3e"
-d client='local'
-d tgt_type='ipcidr'
-d tgt='192.168.23.21'
-d fun='cmd.run'
-d arg='uptime'
# 查看salt源码
[root@host-192-168-23-39 ~]# vim /usr/lib/python3.6/site-packages/salt/client/__init__.py

 652         :param tgt_type: The type of ``tgt``. Allowed values:
 653
 654             * ``glob`` - Bash glob completion - Default
 655             * ``pcre`` - Perl style regular expression
 656             * ``list`` - Python list of hosts
 657             * ``grain`` - Match based on a grain comparison
 658             * ``grain_pcre`` - Grain comparison with a regex
 659             * ``pillar`` - Pillar data comparison
 660             * ``pillar_pcre`` - Pillar data comparison with a regex
 661             * ``nodegroup`` - Match on nodegroup
 662             * ``range`` - Use a Range server for matching
 663             * ``compound`` - Pass a compound match string
 664             * ``ipcidr`` - Match based on Subnet (CIDR notation) or IPv4 address.

9、key管理
# accept

curl -k https://192.168.23.39:8001
-H "Accept: application/x-yaml"
-H "X-Auth-Token: edadb69593773ff5a2716926b507be688dad046d"
-d client='wheel'
-d fun='key.accept'
-d match='192.168.23.61,192.168.23.44,192.168.23.22'
-d include_rejected='True'


# delete  需要重启minion
curl -k https://192.168.23.39:8001
-H "Accept: application/x-yaml"
-H "X-Auth-Token: edadb69593773ff5a2716926b507be688dad046d"
-d client='wheel'
-d fun='key.delete'
-d match='192.168.23.61,192.168.23.44'


# reject    需要删除在delete在重启
curl -k https://192.168.23.39:8001
-H "Accept: application/x-yaml"
-H "X-Auth-Token: edadb69593773ff5a2716926b507be688dad046d"
-d client='wheel'
-d fun='key.reject'
-d match='192.168.23.61,192.168.23.44,192.168.23.22'
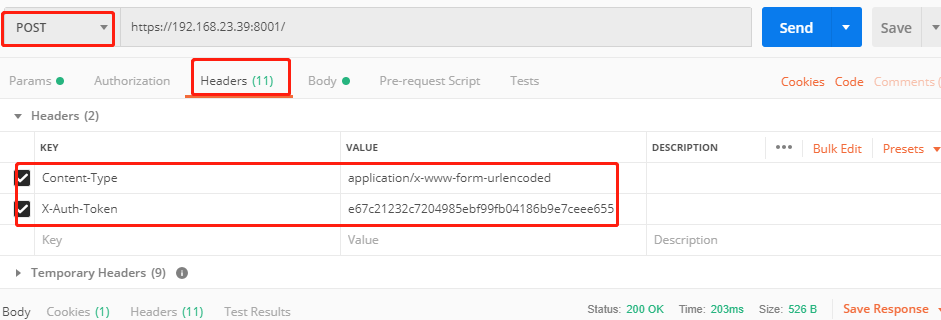
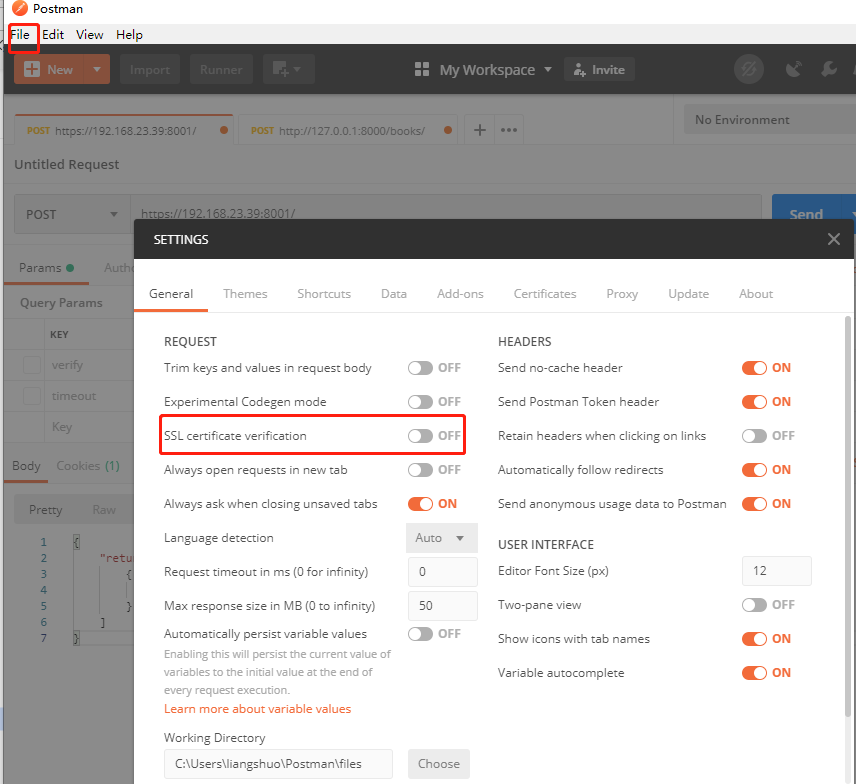
4、使用postman
Postman
https://www.cnblogs.com/hailongchen/p/9902838.html
https://devcentral.f5.com/s/question/0D51T00006i7jFPSAY/postman-ssl-verification-failing
1、关闭ssl验证
2、post请求