模式的定义
将一个复杂对象的构建与它的表示分离,使得同样的构建过程可以创建不同的表示。
使用场景
1、相同的方法,不同的执行顺序,产生不同的事件结果时;
2、多个部件或零件,都可以装配到一个对象中,但是产生的运行结果又不相同时;
3、产品类非常复杂,或者产品类中的调用顺序不同产生了不同的效能,这个时候使用建造者模式非常合适;
UML类图
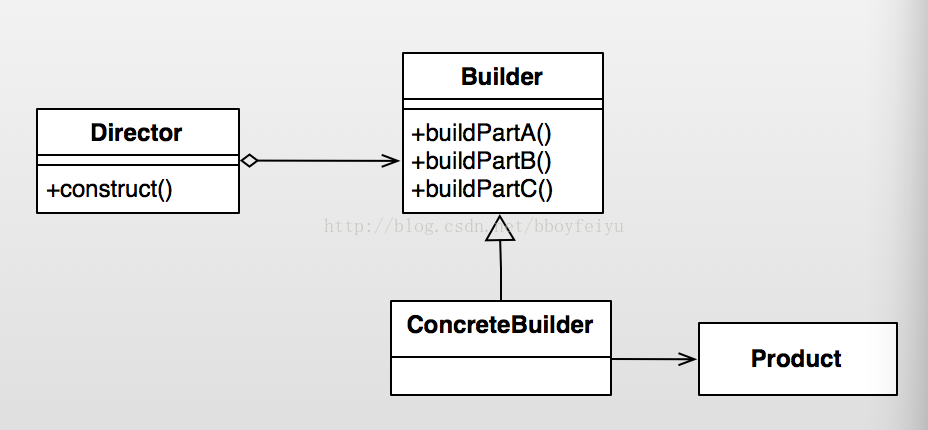
角色介绍
Product 产品类 : 产品的抽象类。
Builder : 抽象类, 规范产品的组建,一般是由子类实现具体的组件过程。
ConcreteBuilder : 具体的构建器.
Director : 统一组装过程(可省略)。
简单示例
下面我们以组装电脑为例来演示一下简单且经典的builder模式。
通过Builder来构建产品对象, 而Director封装了构建复杂产品对象对象的过程,但实现也比较为繁琐。
源码分析
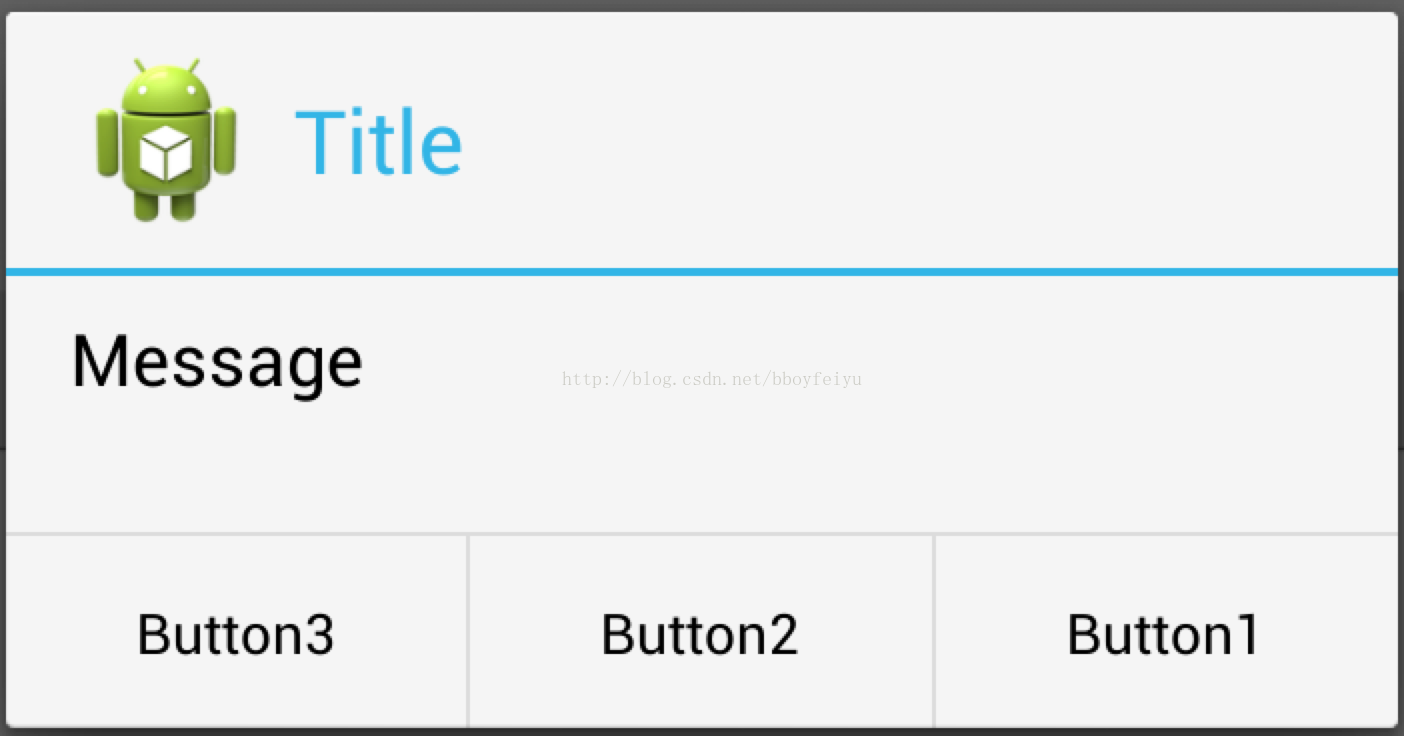
在Android源码中,我们最常用到的Builder模式就是AlertDialog.Builder,
使用该Builder来构建复杂的AlertDialog对象。简单示例如下 :
-
-
private void showDialog(Context context) {
-
AlertDialog.Builder builder = new AlertDialog.Builder(context);
-
builder.setIcon(R.drawable.icon);
-
builder.setTitle("Title");
-
builder.setMessage("Message");
-
builder.setPositiveButton("Button1",
-
new DialogInterface.OnClickListener() {
-
public void onClick(DialogInterface dialog, int whichButton) {
-
setTitle("点击了对话框上的Button1");
-
}
-
});
-
builder.setNeutralButton("Button2",
-
new DialogInterface.OnClickListener() {
-
public void onClick(DialogInterface dialog, int whichButton) {
-
setTitle("点击了对话框上的Button2");
-
}
-
});
-
builder.setNegativeButton("Button3",
-
new DialogInterface.OnClickListener() {
-
public void onClick(DialogInterface dialog, int whichButton) {
-
setTitle("点击了对话框上的Button3");
-
}
-
});
-
builder.create().show(); // 构建AlertDialog, 并且显示
-
}
结果如图所示 :
下面我们看看AlertDialog的部分源码 :
-
-
public class AlertDialog extends Dialog implements DialogInterface {
-
-
private AlertController mAlert;
-
-
-
protected AlertDialog(Context context, int theme) {
-
this(context, theme, true);
-
}
-
-
-
AlertDialog(Context context, int theme, boolean createContextWrapper) {
-
super(context, resolveDialogTheme(context, theme), createContextWrapper);
-
mWindow.alwaysReadCloseOnTouchAttr();
-
mAlert = new AlertController(getContext(), this, getWindow());
-
}
-
-
-
@Override
-
public void setTitle(CharSequence title) {
-
super.setTitle(title);
-
mAlert.setTitle(title);
-
}
-
-
-
public void setCustomTitle(View customTitleView) {
-
mAlert.setCustomTitle(customTitleView);
-
}
-
-
public void setMessage(CharSequence message) {
-
mAlert.setMessage(message);
-
}
-
-
-
-
-
public static class Builder {
-
-
private final AlertController.AlertParams P;
-
-
-
-
-
-
public Builder(Context context) {
-
this(context, resolveDialogTheme(context, 0));
-
}
-
-
-
public Builder(Context context, int theme) {
-
P = new AlertController.AlertParams(new ContextThemeWrapper(
-
context, resolveDialogTheme(context, theme)));
-
mTheme = theme;
-
}
-
-
-
-
-
public Builder setTitle(CharSequence title) {
-
P.mTitle = title;
-
return this;
-
}
-
-
-
public Builder setMessage(CharSequence message) {
-
P.mMessage = message;
-
return this;
-
}
-
-
public Builder setIcon(int iconId) {
-
P.mIconId = iconId;
-
return this;
-
}
-
-
public Builder setPositiveButton(CharSequence text, final OnClickListener listener) {
-
P.mPositiveButtonText = text;
-
P.mPositiveButtonListener = listener;
-
return this;
-
}
-
-
-
public Builder setView(View view) {
-
P.mView = view;
-
P.mViewSpacingSpecified = false;
-
return this;
-
}
-
-
-
public AlertDialog create() {
-
-
final AlertDialog dialog = new AlertDialog(P.mContext, mTheme, false);
-
-
P.apply(dialog.mAlert);
-
dialog.setCancelable(P.mCancelable);
-
if (P.mCancelable) {
-
dialog.setCanceledOnTouchOutside(true);
-
}
-
dialog.setOnCancelListener(P.mOnCancelListener);
-
if (P.mOnKeyListener != null) {
-
dialog.setOnKeyListener(P.mOnKeyListener);
-
}
-
return dialog;
-
}
-
}
-
-
}
可以看到,通过Builder来设置AlertDialog中的title, message, button等参数, 这些参数都存储在类型为AlertController.AlertParams的成员变量P中,AlertController.AlertParams中包含了与之对应的成员变量。在调用Builder类的create函数时才创建AlertDialog,
并且将Builder成员变量P中保存的参数应用到AlertDialog的mAlert对象中,即P.apply(dialog.mAlert)代码段。我们看看apply函数的实现 :
-
public void apply(AlertController dialog) {
-
if (mCustomTitleView != null) {
-
dialog.setCustomTitle(mCustomTitleView);
-
} else {
-
if (mTitle != null) {
-
dialog.setTitle(mTitle);
-
}
-
if (mIcon != null) {
-
dialog.setIcon(mIcon);
-
}
-
if (mIconId >= 0) {
-
dialog.setIcon(mIconId);
-
}
-
if (mIconAttrId > 0) {
-
dialog.setIcon(dialog.getIconAttributeResId(mIconAttrId));
-
}
-
}
-
if (mMessage != null) {
-
dialog.setMessage(mMessage);
-
}
-
if (mPositiveButtonText != null) {
-
dialog.setButton(DialogInterface.BUTTON_POSITIVE, mPositiveButtonText,
-
mPositiveButtonListener, null);
-
}
-
if (mNegativeButtonText != null) {
-
dialog.setButton(DialogInterface.BUTTON_NEGATIVE, mNegativeButtonText,
-
mNegativeButtonListener, null);
-
}
-
if (mNeutralButtonText != null) {
-
dialog.setButton(DialogInterface.BUTTON_NEUTRAL, mNeutralButtonText,
-
mNeutralButtonListener, null);
-
}
-
if (mForceInverseBackground) {
-
dialog.setInverseBackgroundForced(true);
-
}
-
-
-
if ((mItems != null) || (mCursor != null) || (mAdapter != null)) {
-
createListView(dialog);
-
}
-
if (mView != null) {
-
if (mViewSpacingSpecified) {
-
dialog.setView(mView, mViewSpacingLeft, mViewSpacingTop, mViewSpacingRight,
-
mViewSpacingBottom);
-
} else {
-
dialog.setView(mView);
-
}
-
}
-
}
实际上就是把P中的参数挨个的设置到AlertController中, 也就是AlertDialog中的mAlert对象。从AlertDialog的各个setter方法中我们也可以看到,实际上也都是调用了mAlert对应的setter方法。在这里,Builder同时扮演了上文中提到的builder、ConcreteBuilder、Director的角色,简化了Builder模式的设计。
优点与缺点
优点 :
1、良好的封装性, 使用建造者模式可以使客户端不必知道产品内部组成的细节;
2、建造者独立,容易扩展;
3、在对象创建过程中会使用到系统中的一些其它对象,这些对象在产品对象的创建过程中不易得到。
缺点 :
1、会产生多余的Builder对象以及Director对象,消耗内存;
2、对象的构建过程暴露。