D3的全称是Data-Driven Documents(数据驱动的文档),是一个用来做数据可视化的JavaScript函数库,而JavaScript文件的后缀通常为.js,所以D3被称为D3.js。
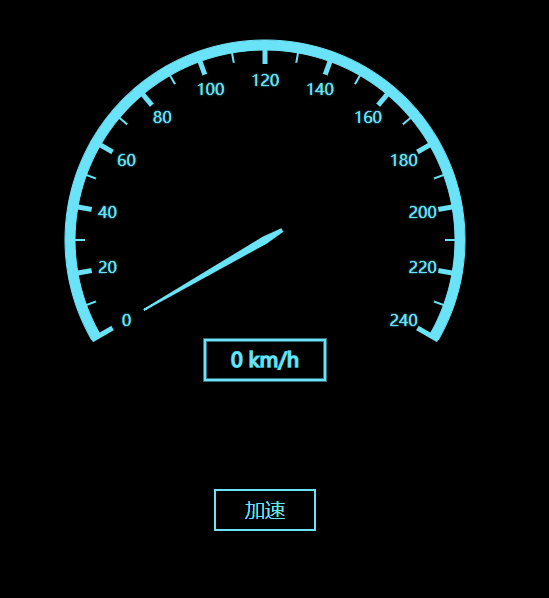
d3.js可以定制出各种图形,今天来用d3.js制作一个简易的仪表盘,废话不多说先上demo,接下来分步讲解。
1.绘制svg,并分组(group)
const height = 600; //画布高度
const width = 1200; //画布宽度
const outerRadius = 200; //仪表盘外半径
const innerRadius = 190; //仪表盘内半径
const svg = d3.select('body').append('svg').attr('width', width).attr('height', height).style('background', '#000000'); // 在body中添加宽高并绘制背景色
const group = svg.append('g').attr('class', 'group').attr('transform', `translate(${width * 0.5}, ${height * 0.5})`); //添加分组并将分组中心移至画布中心
const arc = d3.arc().innerRadius(innerRadius).outerRadius(outerRadius) //编写弧生成器并传入内外半径
const keduListB = [0,1,2,3,4,5,6,7,8,9,10,11,12]; //(大)刻度的数组
const keduListS = [0,1,2,3,4,5,6,7,8,9,10,11]; //(小)刻度的数组
const radiusScaleB = d3.scaleLinear().domain([0, 12]).range([Math.PI * (- 2 / 3), Math.PI * 2 / 3]) //(大)刻度线性比例尺
const radiusScaleS = d3.scaleLinear().domain([0, 11]).range([Math.PI * (- 11 / 18), Math.PI * ( 11 / 18 )]) //(小)刻度线性比例尺
let baseData = 0; //设置基础速度
2.将内容分组
group.append('g').attr('class', 'pan') //绘制仪表盘的圆弧分组
group.append('g').attr('class', 'kedu_b') //绘制大刻度分组
group.append('g').attr('class', 'kedu_s') //绘制小刻度分组
group.append('g').attr('class', 'zhizhen') //绘制指针分组
group.append('g').attr('class', 'shuzi') //绘制刻度数字分组
group.append('g').attr('class', 'show') //绘制速度框和数字分组
group.append('g').attr('class', 'button') //绘制按钮框和数字分组
3.绘制仪表盘的圆弧
group.select('.pan').append('path').attr('d', arc({startAngle: radiusScaleB(0),endAngle: radiusScaleB(12)})).attr('fill', '#6AE3F8').attr('stroke', '#6AE3F8');
4.绘制大刻度
group.select('.kedu_b')
    .selectAll('line')
    .data(keduListB)
    .enter()
    .append('line')
    .attr('x1', d => 200 * Math.sin(radiusScaleB(d)))
    .attr('y1', d => 200 * Math.cos(radiusScaleB(d)) * -1)
    .attr('x2', d => 176 * Math.sin(radiusScaleB(d)))
    .attr('y2', d => 176 * Math.cos(radiusScaleB(d)) * -1)
    .attr('stroke', '#6AE3F8')
    .attr('stroke-width', 5)
5.绘制小刻度
group.select('.kedu_s')
    .selectAll('line')
    .data(keduListS)
    .enter()
    .append('line')
    .attr('x1', d => 200 * Math.sin(radiusScaleS(d)))
    .attr('y1', d => 200 * Math.cos(radiusScaleS(d)) * -1)
    .attr('x2', d => 180 * Math.sin(radiusScaleS(d)))
    .attr('y2', d => 180 * Math.cos(radiusScaleS(d)) * -1)
    .attr('stroke', '#6AE3F8')
    .attr('stroke-width', 2)
6.绘制刻度数字
group.select('.shuzi')
    .selectAll('text')
    .data(keduListB)
    .enter()
    .append('text')
    .attr('x', d => 160 * Math.sin(radiusScaleB(d)))
    .attr('y', d => 160 * Math.cos(radiusScaleB(d)) * -1)
    .attr('text-anchor', 'middle')
    .attr('dy', '0.35em')
    .attr('fill', '#6AE3F8')
    .style('text-shadow', '0px 0px 2px #6AE3F8')
    .text(d => d * 20)
7.绘制指针
group.select('.zhizhen')
    .append('polygon')
    .attr('points', '-2,-20,2,-20,4,0,1,140,-1,140,-4,0')
    .attr('fill', '#6AE3F8')
    .attr('transform', 'rotate(60)')
8.绘制速度框和数字
group.select('.show')
    .attr('transform', 'translate(0, 100)')
    .append('rect')
    .attr('x', -60)
    .attr('y', 0)
    .attr('width', 120)
    .attr('height', 40)
    .attr('fill', 'none')
    .attr('stroke', '#6AE3F8')
    .attr('stroke-width', 3)
group.select('.show')
    .append('text')
    .attr('text-anchor', 'middle')
    .attr('x', 0)
    .attr('y', 20)
    .attr('dy', '0.35em')
    .attr('fill', '#6AE3F8')
    .attr('stroke', '#6AE3F8')
    .attr('font-size', '20px')
    .text(`0 km/h`)
9.绘制按钮框和数字
d3.select('.button')
    .append('rect')
    .attr('x', -50)
    .attr('y', 250)
    .attr('width', 100)
    .attr('height', 40)
    .attr('fill', 'none')
    .attr('stroke', '#6AE3F8')
    .attr('stroke-width', 2)

d3.select('.button')
    .append('text')
    .attr('x', 0)
    .attr('y', 270)
    .attr('text-anchor', 'middle')
    .attr('dy', '.35em')
    .attr('fill', '#6AE3F8')
    .attr('font-size', '20px')
    .text('加速')
10.速度不断减小,并且点击“加速”持续加速
d3.select('.button')
    .attr('cursor', 'pointer')
    .on('click', () => {
        if (baseData < 220) {
            baseData += 20
            change()
        } else if (baseData < 240) {
            baseData = 240;
            change()
        }
    })
setInterval(() => {
    if (baseData > 10) {
        baseData -= 10;
        change();
    } else if (baseData > 0) {
        baseData = 0;
        change()
    }
}, 2000)
11.控制加速的方法(指针旋转,速度数字增加)
const change = () => {
    group.select('.zhizhen')
        .transition()
        .duration(2000)
        .ease(d3.easeLinear)
        .attrTween('transform', function () {
            this._before = typeof this.getAttribute('transform') == 'string' ? this.getAttribute('transform').match(/d+/g)[0] : 0;
            this._after = baseData;
            console.log('this._before',this._before)
            console.log('this._after',this._after)
            let interpolate = d3.interpolate(this._before, this._after);
            return function(t) {
                texts(interpolate(t))
                return `rotate(${interpolate(t)})`
            };
        })
    }

const texts = text => {
    group.select('.show').select('text')
    .attr('text-anchor', 'middle')
    .attr('x', 0)
    .attr('y', 20)
    .attr('dy', '0.35em')
    .attr('fill', '#6AE3F8')
    .attr('stroke', '#6AE3F8')
    .attr('font-size', '20px')
    .text(`${Math.floor(text)} km/h`)
}
这样点击加速就会调用change()方法,而change()方法在过渡是就会调用texts()方法。
这样子就好了,一个基本的仪表盘就绘制好了
原创博客:转载请注明d3.js 入门指南 - 仪表盘