查看系统版本
[root@tz ~]# cat /etc/redhat-release
CentOS release 6.10 (Final)
修改密码
[root@tz ~]# echo "123456" | passwd --stdin oldboy &&history -c
更改用户 oldboy 的密码 。
passwd: 所有的身份验证令牌已经成功更新。
命令提示符由PS1环境变量控制
[root@tz ~]# set | grep PS1
PS1='[u@h W]$ '
永久关闭selinux,重启生效
[root@tz home]# sed -i 's/SELINUX=enforcing/SELINUX=disabled/' /etc/selinux/config
查看是否修改成功
[root@tz ~]# grep SELINUX=disabled /etc/selinux/config
SELINUX=disabled
临时关闭selinux,常跟永久修改一起使用
[root@tz ~]# setenforce 0
setenforce: SELinux is disabled
[root@tz ~]# getenforce
Disabled
查看当前运行级别
默认最小安装为3,图形化为5
[root@tz ~]# grep 3:initdefault /etc/inittab
id:3:initdefault:
[root@tz ~]# runlevel
N 3
[root@tz ~]# init 5
必须开机启动的服务
sshd
rsyslog:日志相关程序
network
sysstat:监测系统性能及效率的软件包
sysstat软件包包括以下工具
iostat:监测CPU使用率,硬盘吞吐率
mpstat:单个或多个处理器相关信息
sar:收集报告并存储系统活跃信息
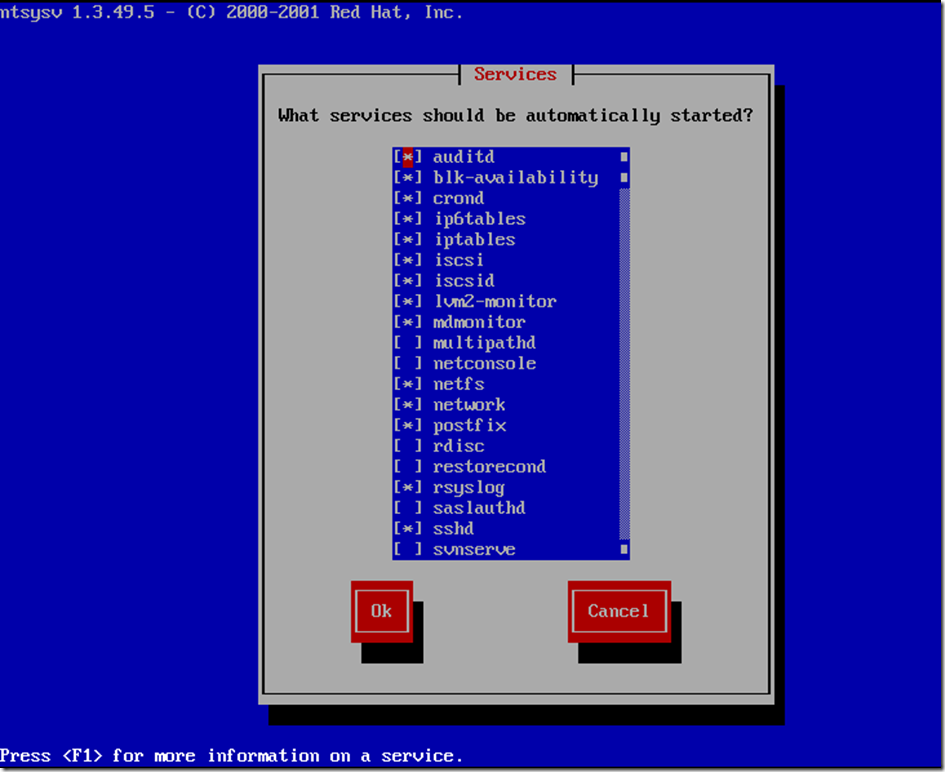
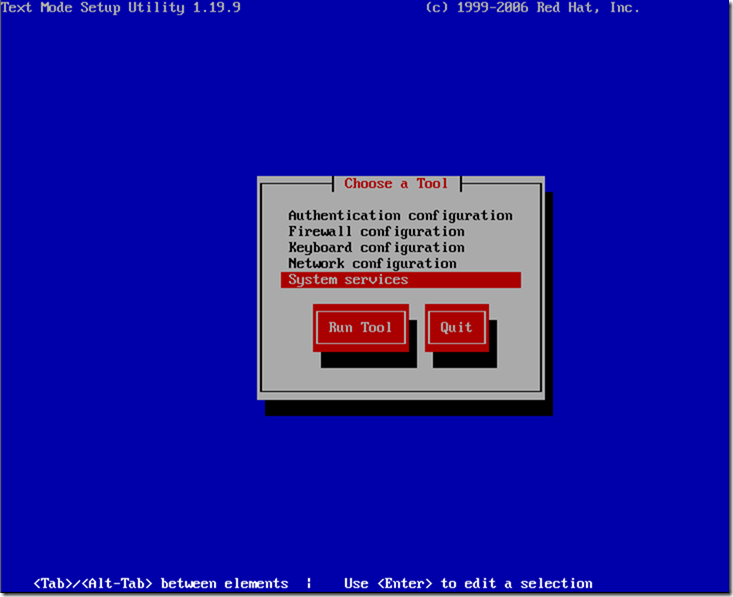
设置开机启动服务
ntsysv命令
setup命令
使用命令查看开启的服务
最小化安装为级别3,查看级别3开启的服务
[root@tz ~]# LANG=en
[root@tz ~]# chkconfig --list|grep 3:on
auditd          0:off   1:off   2:on    3:on    4:on    5:on    6:off
blk-availability        0:off   1:on    2:on    3:on    4:on    5:on    6:off
crond           0:off   1:off   2:on    3:on    4:on    5:on    6:off
ip6tables       0:off   1:off   2:on    3:on    4:on    5:on    6:off
iptables        0:off   1:off   2:on    3:on    4:on    5:on    6:off
iscsi           0:off   1:off   2:off   3:on    4:on    5:on    6:off
iscsid          0:off   1:off   2:off   3:on    4:on    5:on    6:off
lvm2-monitor    0:off   1:on    2:on    3:on    4:on    5:on    6:off
mdmonitor       0:off   1:off   2:on    3:on    4:on    5:on    6:off
netfs           0:off   1:off   2:off   3:on    4:on    5:on    6:off
network         0:off   1:off   2:on    3:on    4:on    5:on    6:off
postfix         0:off   1:off   2:on    3:on    4:on    5:on    6:off
rsyslog         0:off   1:off   2:on    3:on    4:on    5:on    6:off
sshd            0:off   1:off   2:on    3:on    4:on    5:on    6:off
udev-post       0:off   1:on    2:on    3:on    4:on    5:on    6:off
第一种:全部关闭,再开启需要开机启动的服务
[root@tz ~]# LANG=en
[root@tz ~]# for tz in `chkconfig --list|grep 3:on|awk '{print $1}'`;do chkconfig --level 3 $tz off;done
在开启需要开启的服务
[root@tz ~]# for tz in crond network rsyslog sshd;do chkconfig --level 3 $tz on;done
验证,因为我没有sysstat所以没开
[root@tz ~]# chkconfig --list|grep 3:on
crond           0:off   1:off   2:on    3:on    4:on    5:on    6:off
network         0:off   1:off   2:on    3:on    4:on    5:on    6:off
rsyslog         0:off   1:off   2:on    3:on    4:on    5:on    6:off
sshd            0:off   1:off   2:on    3:on    4:on    5:on    6:off
第二种:Shell循环实现
前提情况下,需要保留的服务已经开启,只需关闭不需要的服务即可
[root@tz ~]# for tz in `chkconfig --list|grep "3:on"|awk '{print $1}' |grep -vE "crond|network|sshd|rsyslog"`;do chkconfig $tz off;done
[root@tz ~]# chkconfig --list|grep 3:on
crond           0:off   1:off   2:on    3:on    4:on    5:on    6:off
network         0:off   1:off   2:on    3:on    4:on    5:on    6:off
rsyslog         0:off   1:off   2:on    3:on    4:on    5:on    6:off
sshd            0:off   1:off   2:on    3:on    4:on    5:on    6:off
第三种:
前提情况下,需要保留的服务已经开启,只需关闭不需要的服务即可
先全部开启服务,模拟条件一
[root@tz ~]# for tz in `chkconfig --list|grep 3:off|awk '{print $1}'`;do chkconfig --level 3 $tz on;done
拼接的命令如下
[root@tz ~]# chkconfig --list|grep 3:on|grep -vE "crond|sshd|network|rsyslog|sysstat" |awk '{print "chkconfig " $1 " off"}'
chkconfig auditd off
chkconfig blk-availability off
chkconfig ip6tables off
chkconfig iptables off
chkconfig iscsi off
chkconfig iscsid off
chkconfig lvm2-monitor off
chkconfig mdmonitor off
chkconfig multipathd off
chkconfig netconsole off
chkconfig netfs off
chkconfig postfix off
chkconfig rdisc off
chkconfig restorecond off
chkconfig saslauthd off
chkconfig svnserve off
chkconfig udev-post off
以下命令都可使用
[root@tz ~]# chkconfig --list|grep 3:on|grep -vE "crond|sshd|network|rsyslog|sysstat" |awk '{print "chkconfig " $1 " off"}'|bash
[root@tz ~]# chkconfig --list|grep 3:on|grep -vE "crond|sshd|network|rsyslog|sysstat" |awk '{print $1}'|sed -r 's#(.*)#chkconfig 1 off#g' |bash
关闭iptables防火墙
关闭iptables防火墙开机自启
软件防火墙不常用且耗性能,一般加硬件防火墙
[root@tz ~]# /etc/init.d/iptables stop
[root@tz ~]# chkconfig iptables off
[root@tz ~]# chkconfig --list|grep ipt
iptables        0:off   1:off   2:off   3:off   4:off   5:off   6:off
更改SSH默认端口
先备份配置文件
[root@tz ~]# cp /etc/ssh/sshd_config /etc/ssh/sshd_config_backup
[root@tz ~]#  vi /etc/ssh/ssh_config
修改配置文件
Port 52113
PermitRootLogin no
PermitEmptyPasswords no
UseDNS no
GSSAPIAuthentication no
端口号
是否允许密码为空的用户远程登录
是否允许root登录,可选值,yes,no,without-password
是否对远程主机名进行反向解析,建议no,可加快SSH连接速度
建议no,可加快SSH连接速度
重启sshd服务,不影响正在连接的用户
[root@tz ~]# /etc/init.d/sshd reload
会影响正在连接的用户
[root@tz ~]# /etc/init.d/sshd restart
第二种方法快速修改
[root@tz ~]# sed -ir '13 iPort 52113
PermitRootLogin no
PermitEmptyPasswords no
UseDNS no
GSSAPIAuthentication no' /etc/ssh/sshd_config
验证
[root@tz ~]# sed -n '13,17p' /etc/ssh/sshd_configPort 52113
PermitRootLogin no
PermitEmptyPasswords no
UseDNS no
GSSAPIAuthentication no
重启
[root@tz ~]# /etc/init.d/sshd reload
验证
[root@tz ~]# netstat -an|grep 192.168.213.128
tcp        0     48 192.168.213.128:52113       192.168.213.1:32174         ESTABLISHED
只允许内网地址登录
[root@tz ~]# sed -n '13,20p' /etc/ssh/sshd_config
Port 52113
PermitRootLogin no
PermitEmptyPasswords no
UseDNS no
GSSAPIAuthentication no
ListenAddress 192.168.1.5:52113
#AddressFamily any
#ListenAddress 0.0.0.0
修改防火墙只允许内网地址登录
[root@tz ~]# iptables -I INPUT -p tcp --dport 52113 -s 192.168.1.0/24 -j ACCEPT
通过VPN,获取局域网地址访问服务器提升安全性。
给普通用户临时赋予root权限
执行visudo命令相当于编辑/etc/sudoers配置文件
91 root    ALL=(ALL)       ALL
92 oldboy ALL=(ALL)        ALL
第一个ALL是拥有完全的系统权限,第二个是使用提权命令不需要输入密码
检查
[root@tz ~]# grep oldboy /etc/sudoers
oldboy ALL=(ALL)        NOPASSWD:ALL
效果如下
[oldboy@tz root]$ ls
ls: 无法打开目录.: 权限不够
[oldboy@tz root]$ sudo ls
anaconda-ks.cfg  install.log  install.log.syslog
快速增加sudo授权,先备份配置文件
[root@tz ~]# cp /etc/sudoers /etc/sudoers.backup
[root@tz ~]# echo "oldboy ALL=(ALL) ALL" >> /etc/sudoers
使用-c参数执行语法检查,确认配置/etc/sudoers文件无语法错误
[root@tz ~]# visudo -c
/etc/sudoers:解析正确
使用sudo -l查看当前用户被授予sudo权限集合
[oldboy@tz root]$ sudo -l
匹配此主机上 oldboy 的默认条目:
    !visiblepw, always_set_home, env_reset, env_keep="COLORS DISPLAY HOSTNAME HISTSIZE
    INPUTRC KDEDIR LS_COLORS", env_keep+="MAIL PS1 PS2 QTDIR USERNAME LANG LC_ADDRESS
    LC_CTYPE", env_keep+="LC_COLLATE LC_IDENTIFICATION LC_MEASUREMENT LC_MESSAGES",
    env_keep+="LC_MONETARY LC_NAME LC_NUMERIC LC_PAPER LC_TELEPHONE", env_keep+="LC_TIME
    LC_ALL LANGUAGE LINGUAS _XKB_CHARSET XAUTHORITY",
    secure_path=/sbin:/bin:/usr/sbin:/usr/bin

用户 oldboy 可以在该主机上运行以下命令:
    (ALL) ALL
Linux中文显示
注意服务器配置的字符集需要跟客户端配置的字符集保持一致,如xshell,CRT
[root@tz ~]# cp /etc/sysconfig/i18n /etc/sysconfig/i18n.backup
[root@tz ~]# echo 'LANG="zh_CN.UTF-8"' >/etc/sysconfig/i18n
[root@tz ~]# source /etc/sysconfig/i18n
设置时间同步
Linux时间同步服务器为ntp服务
手动同步,会出现如下问题
[root@tz ~]# /usr/sbin/ntpdate ntp.aliyun.com
 7 Dec 23:38:13 ntpdate[5820]: no server suitable for synchronization found
解决方法很简单,使用windows确认可以同步的时间服务器地址如time.nist.gov
然后虚拟机不要使用NAT,使用桥接网络即可
通过命令查找对应的软件包
[root@tz ~]# yum whatprovides telnet
[root@tz ~]# yum search telnet
设置vi别名
[root@tz yum.repos.d]# echo "alias vi='vim'" >>/etc/profile
[root@tz yum.repos.d]# tail -1 /etc/profile
alias vi='vim'
[root@tz yum.repos.d]# source /etc/profile
自定义登录提示
1、在/etc/motd文件中定义
[root@tz ~]# echo 'Hi! My dear~' > /etc/motd
[root@tz ~]# exit
连接断开
连接成功
Last login: Sat Apr  4 23:11:15 2020 from 192.168.213.1
Hi! My dear~
2、在/etc/profile.d/目录下定义脚本文件
这里注意需要使用echo命令输出
[root@tz ~]# echo 'echo "Hi! My dear2~"' >/etc/profile.d/welcome.sh
[root@tz ~]# exit
连接断开
连接成功
Last login: Sun Apr  5 01:21:02 2020 from 192.168.213.1
Hi! My dear~
Hi! My dear2~
[root@tz ~]# printf "$HOME
"
/root

