 1 @app.route('/')
 2 def hello_world():
 3     return render_template('index.html')
 4
 5
 6 {% macro input(name="",value="",type="text") %}
 7     <input type="{{ type }}" name="{{ name }}" value="{{ value }}">
 8 {% endmacro %}
 9
10 <h1>Jinja2宏</h1>
11 <table>
12     <tbody>
13     <tr>
14         <td>用户名:</td>
15         <td>{{ input('username') }}</td>
16     </tr>
17     <tr>
18         <td>密码:</td>
19         <td>{{ input('username',type="password") }}</td>
20     </tr>
21     <tr>
22         <td></td>
23         <td>{{ input('username',type="submit",value="提交") }}</td>
24     </tr>
25     </tbody>
26 </table>
以上是基本的宏定义方法。
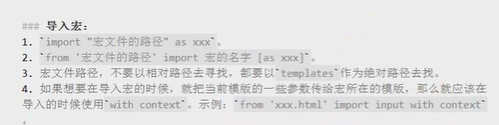
一,导入宏
如果把宏写到其他的html代码中,那么只需要这样引入。
在html中第一行输入:
1, {% from 'macro.html' import input %}
2, {% from 'macro.html' import input as 别名 %}
使用别名后记得把input也改为别名。
3, {% import 'macro.html' as 别名 %}
这里是导入了macro.html这个文件且去了别名,使用的时候为:
别名.input
二,include
作用:每个网页中共同的部分,只写一次,然后引用它。
语法:{% include header.html%}
示例:
{% include header.html%}
content
{% include footer.html%}

三,set和with
使用set语句定义变量。
语法:{% set user =''知了'' %},一旦定义了这个变量,那么在后面的代码中都可以使用这个变量。
示例:
{% set user =''知了'' %}
用户名:{{ user }}
with的用法:只能作用在代码块中,他是带endwidth的。
{% with user =''知了'' %}
用户名:{{ user }}
{% endwith %}
还有一种with和set结合的用法:
{% with %}
{% set classroom = "知了" %}
<p> {{ classroom }} </p>
{% endwidth %}
这样就能够做到把set限定在代码块而非整个文件中。