You’ve probably heard of Java Message Service (JMS). It’s a standard Java API for creating, sending, receiving and reading messages. ActiveMQ, an Apache project, is an open source message broker that supports JMS 1.1. In addition to supporting JMS, it supports other protocols that allow clients to be written in a variety of languages. Look at this page for more information. Sounds good, doesn’t it? Let’s try it out using .NET, C# and Visual Studio 2005.
Download and install the JDK
ActiveMQ is written in Java, so you’ll need a Java Runtime Environment (JRE) to be able to run it. The Java Development Kit (JDK) comes with extra utilities that you’ll find useful later on. I used the Java Development Kit SE 6 update 1, which you can find here.
Download and install ActiveMQ
Get the latest release of ActiveMQ from the downloads section. I used version 4.1.1. Once you have downloaded the zip file, extract the contents to a suitable folder. To test the installation, open a command prompt and use the cd command to set the current folder to be the installation folder (in which you extracted the ActiveMQ files.) Then type the following command:
bin\activemq
All being well, you should see a number of lines of information – the last of which should be something like:
INFO ActiveMQ JMS Message Broker (localhost, ID:your-PC-51222-1140729837569-0:0) has started
The installation notes on the ActiveMQ site point out that there are working directories that get created relative to the current working folder. This means that for ActiveMQ to work correctly, you must start it from the installation folder. To double check, start a new command prompt and type the following command:
netstat -an|find "61616"
The response should be something like the following:
TCP 0.0.0.0:61616 0.0.0.0:0 LISTENING
When you want to stop ActiveMQ, enter <CTRL+C>. For now leave it running.
Download Spring.Messaging.NMS
NMS is the .NET Messaging API. Spring .NET has a messaging library built on NMS. It’s under development, but you can get it here. I used version 20070320-1632. Extract the files from the zip file to somewhere sensible.
The Listener
Create a new console application. I called mine ListenerConsole. You need to add 4 references:
- Spring.Core
- ActiveMQ
- NMS
- Spring.Messaging.NMS
These dlls can all be found in the bin\net\2.0\debug folder of Spring.Messaging.NMS. Here’s the code for the Program class in the listener console:
using System;using System.Collections.Generic;using System.Text;using System.Threading;using ActiveMQ;using Spring.Messaging.Nms;using Spring.Messaging.Nms.Listener;namespace ListenerConsole{ class Program { private const string URI = "tcp://localhost:61616"; private const string DESTINATION = "test.queue"; static void Main(string[] args) { try { ConnectionFactory connectionFactory = new ConnectionFactory(URI); using (SimpleMessageListenerContainer listenerContainer = new SimpleMessageListenerContainer()) { listenerContainer.ConnectionFactory = connectionFactory; listenerContainer.DestinationName = DESTINATION; listenerContainer.MessageListener = new Listener(); listenerContainer.AfterPropertiesSet(); Console.WriteLine("Listener started."); Console.WriteLine("Press <ENTER> to exit."); Console.ReadLine(); } } catch (Exception ex) { Console.WriteLine(ex); Console.WriteLine("Press <ENTER> to exit."); Console.Read(); } } }}
The interesting part of the code is the creation and set up of the SimpleMessageListenerContainer.ConnectionFactory is from the ActiveMQ namespace and implements the IConnectionFactory interface defined in NMS. The Uri of the message broker is passed to the constructor. SimpleMessageListenerContainer is part of Spring.Messaging.NMS (in the Listener namespace.) Note that SimpleMessageListenerContainer implementsIDisposable. The missing part of this puzzle is the Listener class. Create a new class in the project, call it Listener and insert the following code:
using System;using Spring.Messaging.Nms;
using NMS;
namespace ListenerConsole{ class Listener : IMessageListener { public Listener() { Console.WriteLine("Listener created.rn"); }
#region IMessageListener Members public void OnMessage(NMS.IMessage message) { ITextMessage textMessage = message as ITextMessage; Console.WriteLine(textMessage.Text); } #endregion }}
IMessageListener is defined in Spring.Messaging.NMS. Build and run the console.
Start jconsole
The JDK comes with a utility called jconsole. You’ll find it in the bin folder. So, launch a command prompt and cd to the bin folder of the JDK. Then type:
jconsole
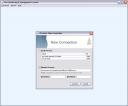
This will launch the Java Monitoring & Management Console. To connect to the running instance of ActiveMQ, select Remote Process as shown below:
Enter the following in the Remote Process text box: service:jmx:rmi:///jndi/rmi://localhost:1099/jmxrmi It’s easier to work out what to enter here than you might think. If you go back to the command prompt in which you launched ActiveMQ and look towards the top of the output, you’ll find a line that reads:
INFO ManagementContext - JMX consoles can connect to service:jmx:ri:///jndi/rmi://localhost:1099/jmxrmi
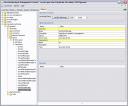
Click Connect. Select the MBeans tab. Navigate to org.apache.activemq->localhost->Queue->test.queue->Operations->sendTextMessage as shown below:
In the text box next to the sendTextMessage button, enter some text. I entered (somewhat unimaginatively) “Hello”. Now, click sendTextMessage. In the .NET console window for the listener, you should see the text you entered. So what just happened? jconsole put a message on the queue using JMS and our console application read it using NMS. Why not send yourself a couple more messages?
The Sender
To complete our foray into messaging with ActiveMQ, let’s create an application that can send messages. Create another Console Application. I called mine SenderConsole. You may have started to notice a pattern in my naming conventions. Add the same references you added to the listener console. Here’s the code for the sender console:
using System;using System.Collections.Generic;using System.Text;using ActiveMQ;using Spring.Messaging.Nms;namespace SenderConsole{ class Program { private const string URI = "tcp://localhost:61616"; private const string DESTINATION = "test.queue"; static void Main(string[] args) { ConnectionFactory connectionFactory = new ConnectionFactory(URI); NmsTemplate template = new NmsTemplate(connectionFactory); template.ConvertAndSend(DESTINATION, "Hello from the sender."); } }}
Run the sender console and you should find that the message “Hello from the sender.” has appeared in the console window of the listener.
Conclusion
Sending and receiving messages using ActiveMQ is enabled by NMS and Spring.Messaging.NMS. We’ve seen how to create a simple set up using .NET that can be extended for real-world needs. JMS is no longer the preserve of Java developers.

