模板使用
页面布局
1> 一个html页面由:head部分,body部分,内部css,内部js,外联css,外联的js这几部分组成。因此,一个布局文件也就需要针对这些进行拆分。

2> 新建一个layout.go的控制器。编写一个引用布局文件的实例。具体代码如下:
package controllers

import (
	"fmt"
	"log"
	"html/template"
	"github.com/gin-gonic/gin"
	"net/http"
)

/**内容页面**/
func Contenthtml(c *gin.Context){

    //模板文件的拼接
	t, err := template.ParseFiles("views/layout.html", "views/head.tpl",
		"views/content.html","views/sidebar.tpl","views/scripts.tpl")
	//备注:参数1》模板页面;参数2》css部分;参数3》内容部分;
	//参数4》底部版权信息部分;参数5》页面中使用到的js部分
    if err != nil {
        log.Fatal(err)
    }
	fmt.Println(t)
	//渲染html文件
	c.HTML(http.StatusOK,"layout.html", gin.H{
		"title": "布局页面",
	})
}
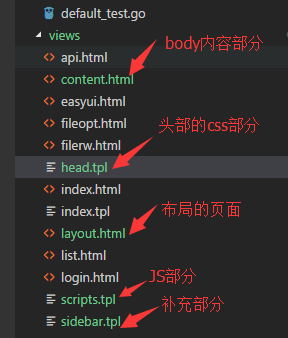
3> 新建布局页面,具体的如下图所示
4> 在路由器中添加代码,编译运行项目,修订错误,查看运行的效果
package routers

import (
  "github.com/gin-gonic/gin"
  . "GinLearn/GinLearn/apis" //api部分
  . "GinLearn/GinLearn/controllers" //constroller部分
 )

func InitRouter() *gin.Engine{
  router := gin.Default()
  //Hello World
  router.GET("/", IndexApi)
  //渲染html页面
  router.LoadHTMLGlob("views/*")

  router.GET("/home/index", ShowHtmlPage)
  //列表页面
  router.GET("/home/list", ListHtml)
  router.POST("/home/PageData", GetDataList)
  router.POST("/home/PageNextData", PageNextData)

  //新增页面
  router.GET("/home/add", AddHtml)
  router.POST("/home/saveadd", AddPersonApi)

   //编辑页面
   router.GET("/home/edit", EditHtml)
   router.POST("/home/saveedit", EditPersonApi)

    //删除
    router.POST("/home/delete", DeletePersonApi)

    //Bootstrap布局页面
    router.GET("/home/bootstrap", Bootstraphtml)

    //文件的上传和下载
    router.GET("/home/fileopt", Fileopthtml)
    router.POST("/home/fileuplaod", Fileupload)
    router.GET("/home/filedown", Filedown)

    //文件的创建删除和读写
    router.GET("/home/filerw", Filerwhtml)
    router.POST("/home/addfile", FilerCreate)//创建文件
    router.POST("/home/writefile", FilerWrite)//写入文件
    router.POST("/home/readfile", FilerRead)//读取文件
    router.POST("/home/deletefile", FilerDelete)//删除文件

    //api调用的部分
    router.GET("/home/api", GetApiHtml)
    router.GET("/api/jsondata", GetJsonData)
    router.GET("/api/xmldata", GetXmlData)
    router.GET("/api/yamldata", GetYamlData)
    router.GET("/api/paramsdata", GetParamsJsonData)

    //布局页面
    router.GET("/home/content", Contenthtml)

    return router
 }
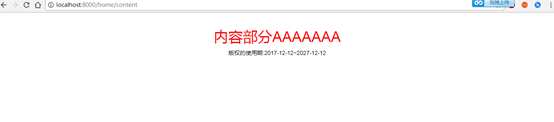
5> 运行效果如下:
6> Layout.html具体的代码如下:
<!DOCTYPE html>
<html>
<head>
    <title>{{ .title }}</title>
    <meta name="viewport" content="width=device-width, initial-scale=1.0">
    <meta http-equiv="Content-Type" content="text/html; charset=utf-8">
    <link rel="stylesheet" href="/static/bootstrap/css/bootstrap.min.css"/>
    <link rel="stylesheet" href="/static/bootstrap/css/bootstrap-theme.min.css"/>
    <script type="text/javascript" src="/static/js/jquery-2.1.1.min.js"></script>
    <script type="text/javascript" src="/static/bootstrap/js/bootstrap.min.js"></script>
    <!--CSS样式文件-->
    {{template "header"}}
</head>
<body>
    <!--内容部分-->
    <div class="container">
        {{template "content"}}
    </div>
    <!--底部版权部分-->
    <div class="sidebar">
       {{template "sidebar"}}
    </div>
    <!--页面JS的引用-->
    {{template "jsfile"}}
</body>
</html>
7> head.tpl的代码如下:
{{define "header"}}

<style>
     body{
         widith:100%;
         height:100%;
         border:none;
     }
     h1 {
        color: red;
        text-align:center;
     }
     .bodydiv{
        widith:100%;
        height:100%;
        text-align:center;
        font-size:14px;
        color:#0f0;
     }
     .sidebar{
        widith:100%;
        height:100%;
        text-align:center;
        font-size:14px;
        color:#000;
     }
</style>
{{end}}
8>content.html的代码如下:
{{ define "content" }}

    <h1>
        内容部分AAAAAAA
    </h1>

{{end}}
9>scripts.tpl的代码如下:
{{define "jsfile"}}
   <script type="text/javascript">
    //页面的初始化
    $(document).ready(function() {
        console.log('页面的初始化')
    });
    console.log('这是JS文件')
</script>
{{end}}
10>sidebar.tpl的代码如下:
{{define "sidebar"}}
    版权的使用期:2017-12-12~2027-12-12
{{end}}
11>下一周进行修整,不写博客了!