1.mysql 安装参考
https://www.cnblogs.com/ttzzyy/p/9063737.html
2. 主mysql,从mysql
指定配置文件启动
mysqld --defaults-file=/etc/my.cnf --user=root
2.1主mysql配置文件my.cnf修改(修改完重启)
#添加在[mysqld]后
# # server-id 唯一的服务辨识号,数值位于 1 到 2^32-1之间.
# # 此值在master和slave上都需要设置.
# # 如果 “master-host” 没有被设置,则默认为1, 但是如果忽略此选项,MySQL不会作为master生效.
server-id=10 #[必须]服务器唯一ID一般取本机IP最后一段,默认是1

# # log-bin 打开二进制日志功能.                                                                                #
# # 在复制(replication)配置中,作为MASTER主服务器必须打开此项                                                   #
# # 如果你需要从你最后的备份中做基于时间点的恢复,你也同样需要二进制日志.                                       #
log-bin=/var/log/mysql/mysql-bin.log #[必须]启用二进制日志   (需要建立文件夹)                                                                #
# # 需要开启生成二进制日志记录相关配置,配置在需要被复制的服务器上,即:master                                 #
binlog-do-db=test_db #指定对名称为test_db的数据库记录二进制日志                                              #
binlog-ignore-db=mysql #指定不对名称为mysql的数据库记录二进制日志                                            #
binlog-ignore-db=information_schema #指定不对名称为information_schema的数据库记录二进制日志                  #
binlog-ignore-db=performance_schema #指定不对名称为performance_schema的数据库记录二进制日志
binlog_format=mixed #binlog日志格式,mysql默认采用,如果从服务器slave有别的slave要复制那么该slave也需要这一项#
expire_logs_days=7 #超过7天的binlog删除###                                                                   #

#skip-external-locking #MySQL选项以避免外部锁定。该选项默认开启
default-storage-engine=InnoDB #默认存储引擎
lower_case_table_names=1 #忽略表大小写
2.2从mysql配置文件my.cnf修改(修改完重启)
#添加在[mysqld]后
# # server-id 唯一的服务辨识号,数值位于 1 到 2^32-1之间.
# # 此值在master和slave上都需要设置.
# # 如果 “master-host” 没有被设置,则默认为1, 但是如果忽略此选项,MySQL不会作为master生效.
server-id=11 #[必须]服务器唯一ID,默认是1

# # replicate-do-db 需要做复制的数据库,如果复制多个数据库,重复设置这选项即可master上不需要此项,slave上需要   #
replicate-do-db=test_db #复制名称为test_db的数据库
replicate-do-db=test_db1 #复制名称为test_db1的数据库
# # replicate-ignore-db 不需要复制的数据库,如果要忽略复制多个数据库,重复设置这个选项即可                     #
replicate-ignore-db=mysql #不需要(忽略)复制名称为mysql的数据库                                             #
replicate-ignore-db=information_schema #不需要(忽略)复制名称为information_schema的数据库                   #
replicate-ignore-db=performance_schema #不需要(忽略)复制名称为information_schema的数据库
#                                                                                                              #
# 如果你在使用链式从服务器结构的复制模式 (A->B->C),                                                            #
# # 你需要在服务器B上打开此项.                                                                                 #
# # 此选项打开在从线程上重做过的更新的日志,                                                                    #
# # 并将其写入从服务器的二进制日志.                                                                            #
# # 默认值为OFF;设置log_slave_updates = 1即表示开启                                                            #
#log_slave_updates = 1                                                                                         #

#skip-external-locking #MySQL选项以避免外部锁定。该选项默认开启
default-storage-engine=InnoDB #默认存储引擎
lower_case_table_names=1 #忽略表大小写
2.3连接主mysql
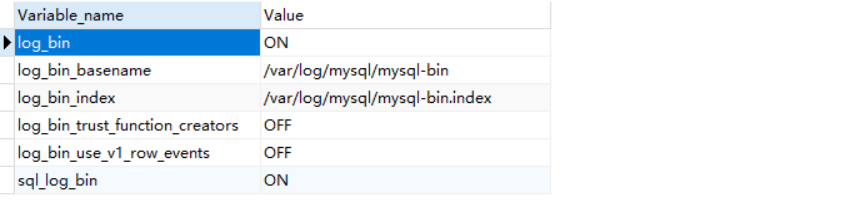
show master status;
show variables like '%log_bin%';

2.4连接从mysql
change master to master_user='root', master_password='root', master_host='192.168.192.10',master_port=3306, master_log_file='mysql-bin.000002',master_log_pos=120;

start slave;

注意:上面的关联配置的信息都是主服务器上的,但是要在slave从服务器上配置,如果master_log_file和master_log_pos不知道可以在master服务器上使用show master status;查看
……………………(省略部分)
Slave_IO_Running: Yes //此状态必须YES
Slave_SQL_Running: Yes //此状态必须YES
……………………(省略部分)
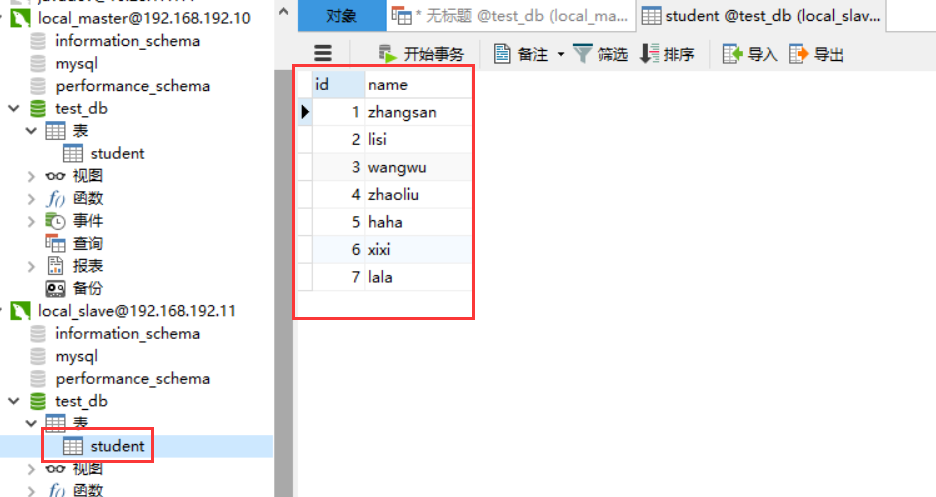
2.5然后可以在主库添加数据了,从库会自动增加数据

create table student(id int not null primary key auto_increment, name varchar(100));
insert into student values(1, 'zhangsan'),(2,'lisi'),(3,'wangwu'),(4,'zhaoliu'),(5,'haha'),(6,'xixi') ,(7,'lala');
#删除也是可以的呦

3. 读写分离(主库写,从库读)mycat中间件
下载地址:http://dl.mycat.io/1.6-RELEASE/
-
第一步:将Mycat-server-1.6-release-20161028204710-linux.tar.gz上传至服务器
-
第二步:将压缩包解压缩。建议将mycat放到/usr/local/mycat目录下。
-
tar -xzvf Mycat-server-1.6-release-20161028204710-linux.tar.gz mv mycat /usr/local -
第三步:修改schema.xml文件:
-
<?xml version="1.0"?> <!DOCTYPE mycat:schema SYSTEM "schema.dtd"> <mycat:schema xmlns:mycat="http://io.mycat/"> <schema name="TESTDB" checkSQLschema="false" sqlMaxLimit="100" dataNode="dn1"></schema> <dataNode name="dn1" dataHost="localhost1" database="test_db" /> <dataHost name="localhost1" maxCon="1000" minCon="10" balance="1" writeType="0" dbType="mysql" dbDriver="native" switchType="-1" slaveThreshold="100"> <heartbeat>select user()</heartbeat> <!-- can have multi write hosts --> <writeHost host="hostM1" url="192.168.192.10:3306" user="root" password="root"> <!-- can have multi read hosts --> <readHost host="hostS2" url="192.168.192.11:3306" user="root" password="root" /> </writeHost> </dataHost> </mycat:schema> -
这里面,有两个参数需要注意,balance和 switchType。
其中,balance指的负载均衡类型,目前的取值有4种:
- balance="0", 不开启读写分离机制,所有读操作都发送到当前可用的writeHost上。
- balance="1",全部的readHost与stand by writeHost参与select语句的负载均衡,简单的说,当双主双从模式(M1->S1,M2->S2,并且M1与 M2互为主备),正常情况下,M2,S1,S2都参与select语句的负载均衡。
- balance="2",所有读操作都随机的在writeHost、readhost上分发。
- balance="3",所有读请求随机的分发到wiriterHost对应的readhost执行,writerHost不负担读压力
switchType指的是切换的模式,目前的取值也有4种:
- switchType='-1' 表示不自动切换
- switchType='1' 默认值,表示自动切换
- switchType='2' 基于MySQL主从同步的状态决定是否切换,心跳语句为 show slave status
- switchType='3'基于MySQL galary cluster的切换机制(适合集群)(1.4.1),心跳语句为 show status like 'wsrep%'。
因此,该配置文件中的balance="1"意味着作为stand by writeHost的hostS1和hostS2将参与select语句的负载均衡,这就实现了主从的读写分离,switchType='-1'意味着当主挂掉的时候,不进行自动切换,即hostS1和hostS2并不会被提升为主,仍只提供读的功能。这就避免了将数据写进slave的可能性,毕竟,单纯的MySQL主从集群并不允许将数据读进slave中,除非配置的是双master。
-
第四步:编辑server.xml文件(读写分离这些就够了)
-
<?xml version="1.0" encoding="UTF-8"?> <!-- - - Licensed under the Apache License, Version 2.0 (the "License"); - you may not use this file except in compliance with the License. - You may obtain a copy of the License at - - http://www.apache.org/licenses/LICENSE-2.0 - - Unless required by applicable law or agreed to in writing, software - distributed under the License is distributed on an "AS IS" BASIS, - WITHOUT WARRANTIES OR CONDITIONS OF ANY KIND, either express or implied. - See the License for the specific language governing permissions and - limitations under the License. --> <!DOCTYPE mycat:server SYSTEM "server.dtd"> <mycat:server xmlns:mycat="http://io.mycat/"> <system> <property name="useSqlStat">1</property> <!-- 1为开启实时统计、0为关闭 --> </system> <user name="root"> <property name="password">root</property> <property name="schemas">TESTDB</property> </user> <user name="user"> <property name="password">user</property> <property name="schemas">TESTDB</property> <property name="readOnly">true</property> </user> </mycat:server> -
第五步:进入mycat目录的bin目录,
-
#启动mycat ./mycat start 或 ./mycat console #停止: ./mycat stop #mycat 支持的命令{ console | start | stop | restart | status | dump } #Mycat的默认端口号为:8066 -

-

-
第六步:使用mycat连接
-
mysql -h192.168.192.10 -uroot -proot -P8066 -DTESTDB -
执行命令
-
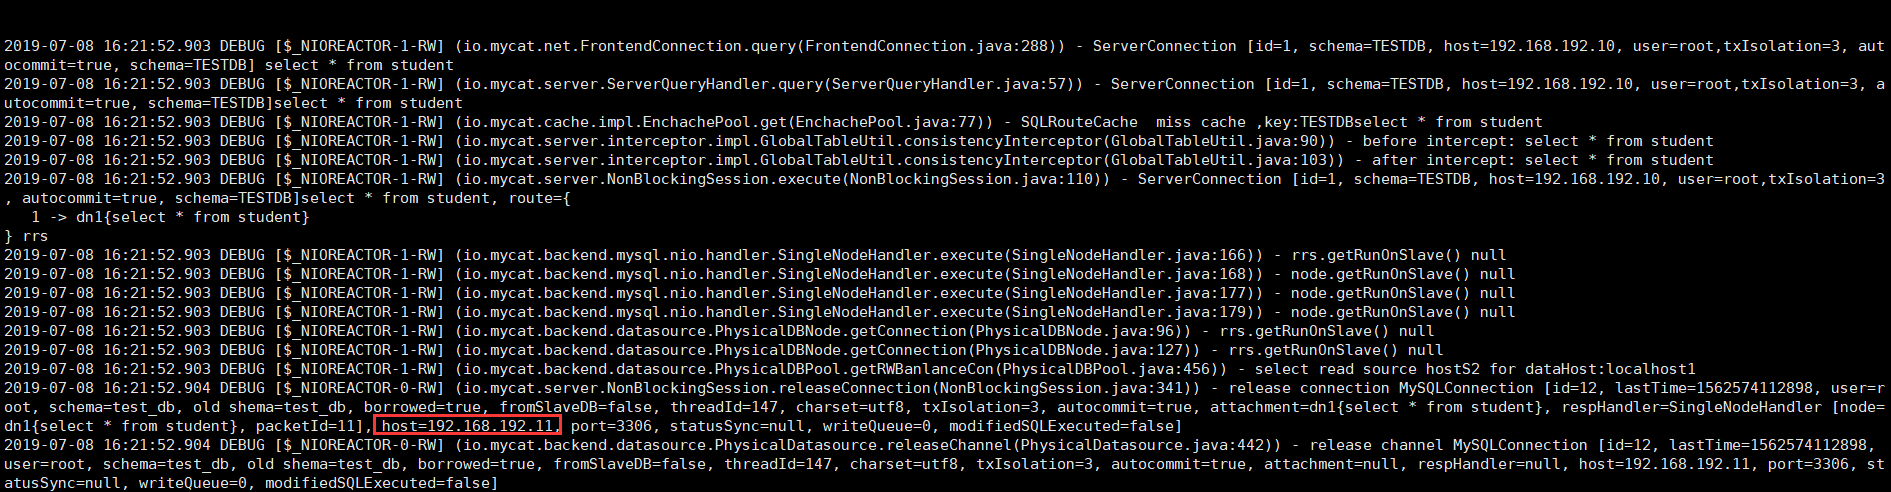
explain select * from student; #看到数据是从dn1节点查的。 -

-
修改log4j.xml监控日志mycat.log
-

-
select * from student #可以看到select 操作被路由到了192.168.192.11也就是我们的slave1节点 -
-
#插入一条数据
insert into student value(11,@@hostname);