最近接触到了生成迷宫的算法,查找了资料了解了迷宫生成的三大经典算法——深度优先、随机Prim、递归分割,本文就深度优先算法的代码进行详细解析,希望能帮助大家理解。
代码来源:https://blog.csdn.net/juzihongle1/article/details/73135920?spm=1001.2014.3001.5506
1. 我理解的迷宫生成算法之一的深度优先算法:
从起点开始对图形进行分析,并把当前所在的格子和走过的格子标记为1,从起始格子出发,找到当前格子下一步能走的路径,然后随机选择一个能走的路径走,直到没有路径可走,那么就返回可以选择其他路径的单元格,继续探索可以的方法,直到把所有的单元格都走完了,迷宫就生成完毕。
2. 储备知识
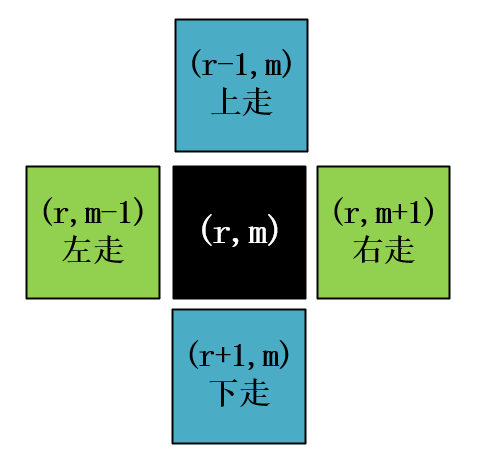
(1)row表示行,缩写是 r;col表示列,缩写是 c
(2)每个单元格有 上 下 左 右 四个的方向可以走,它们的表示方式如下图所示,理解:水平方向上行数是相同的,越往左边列数越小,越往右边列数越大。垂直方向上列数是相同的,越往上行数越小,越往下行数越大。
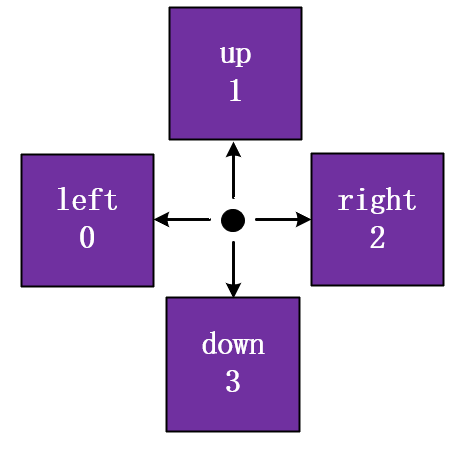
(3)在M变量中,第三维存储的5个值得含义 (LEFT, UP, RIGHT, DOWN, CHECK_IF_VISITED),要理解代码,最好记住每个数字表示得方向,最后一个参数就是表示是否被访问过,如果被访问那么就为1,否则为0
3. 帮助看懂的代码(如果你觉得 print 太多,那你可以从代码来源中复制过来看会比较干净点):
  1 import random
  2 import numpy as np
  3 from matplotlib import pyplot as plt
  4 import matplotlib.cm as cm
  5
  6 # num_rows = int(input("Rows: "))  # number of rows
  7 # num_cols = int(input("Columns: "))  # number of colulmns
  8 num_rows = 4
  9 num_cols = 5
 10
 11 # 数组M将保存每个单元格的数组信息
 12 # 前4个坐标告诉我们这里是否有墙,第五个表示搜索中是否访问了单元格
 13 # M(LEFT, UP, RIGHT, DOWN, CHECK_IF_VISITED)
 14 M = np.zeros((num_rows, num_cols, 5), dtype=np.uint8)
 15
 16 # The array image is going to be the output image to display
 17 image = np.zeros((num_rows * 10, num_cols * 10), dtype=np.uint8)
 18 image1 = np.zeros((num_rows * 10, num_cols * 10), dtype=np.uint8)
 19
 20 # Set starting row and column
 21 r = 0
 22 c = 0
 23 history = [(r, c)]  # The history is the stack of visited locations
 24
 25 # Trace a path though the cells of the maze and open walls along the path.
 26 # We do this with a while loop, repeating the loop until there is no history,
 27 # which would mean we backtracked to the initial start.
 28 while history:
 29     print("===================================")
 30     # 1表示这个位置是已经访问过的,即走过的路,堵的
 31     M[r, c, 4] = 1  # designate this location as visited
 32     # check if the adjacent cells are valid for moving to
 33     check = []
 34     print("r=", r)
 35     print("c=", c)
 36
 37     print("M[r, c-1, 4]=", [r, c-1, 4], M[r, c-1, 4])
 38     # 判断左边是否被堵,不是的话就添加(0表示没有被堵或没有被访问过,1表示有,没有被访问过的我才继续下去)
 39     if c > 0 and M[r, c - 1, 4] == 0:
 40         check.append('L')
 41     print("M[r-1, c, 4]=", [r-1, c, 4], M[r-1, c, 4])
 42     # 判断上边是否被堵,不是的话就添加
 43     if r > 0 and M[r - 1, c, 4] == 0:
 44         check.append('U')
 45     if c < num_cols - 1:
 46         print("M[r, c+1, 4]=", [r, c+1, 4], M[r, c+1, 4])
 47     # 判断右边是否被堵,不是的话就添加
 48     if c < num_cols - 1 and M[r, c + 1, 4] == 0:
 49         check.append('R')
 50     if r < num_rows - 1:
 51         print("M[r+1, c, 4]=", [r+1, c, 4], M[r+1, c, 4])
 52     # 判断下边是否被堵,不是的话就添加
 53     if r < num_rows - 1 and M[r + 1, c, 4] == 0:
 54         check.append('D')
 55
 56     print("check = ", check)
 57
 58     if len(check):  # If there is a valid cell to move to.
 59         # Mark the walls between cells as open if we move
 60         # np.random.seed(1)
 61         history.append([r, c])
 62         print("history = ", history)
 63         move_direction = random.choice(check)
 64         print("move_dirction = ", move_direction)
 65         if move_direction == 'L':
 66             # 如果是往左走,那么列数-1,然后标记右边被堵
 67             M[r, c, 0] = 1
 68             c = c - 1
 69             M[r, c, 2] = 1
 70         if move_direction == 'U':
 71             # 如果是往上走,那么行数-1,然后标记下方被堵
 72             M[r, c, 1] = 1
 73             r = r - 1
 74             M[r, c, 3] = 1
 75         if move_direction == 'R':
 76             # 如果是往右走,那么列数+1,然后标记左方被堵
 77             M[r, c, 2] = 1
 78             c = c + 1
 79             M[r, c, 0] = 1
 80         if move_direction == 'D':
 81             # 如果是往下走,那么行数+1,然后标记上方被堵
 82             M[r, c, 3] = 1
 83             r = r + 1
 84             M[r, c, 1] = 1
 85     else:  # If there are no valid cells to move to.
 86         # retrace one step back in history if no move is possible
 87         r, c = history.pop()
 88         print("history = ", history)
 89
 90 # Open the walls at the start and finish
 91 # 入口的左边(0)设置为通的
 92 M[0, 0, 0] = 1
 93 # 出口的右边(2)设置为通的
 94 M[num_rows - 1, num_cols - 1, 2] = 1
 95 print("M = ", M)
 96 # Generate the image for display
 97 for row in range(0, num_rows):
 98     for col in range(0, num_cols):
 99         print("row = ", row)
100         print("col = ", col)
101         cell_data = M[row, col]
102         print("10 * row + 2, 10 * row + 8 = ( %d, %d )" % (10 * row + 2, 10 * row + 8))
103         print("10 * col + 2, 10 * col + 8 = ( %d, %d )" % (10 * col + 2, 10 * col + 8))
104         for i in range(10 * row + 2, 10 * row + 8):
105             image[i, range(10 * col + 2, 10 * col + 8)] = 255
106             image1[i, range(10 * col + 2, 10 * col + 8)] = 255
107         #     plt.figure(), plt.imshow(image, "gray")
108         # plt.show()
109
110         if cell_data[0] == 1:
111             print("cell_data[0] == 1")
112             print(((10 * row + 2, 10 * row + 8), 10 * col), ((10 * row + 2, 10 * row + 8), 10 * col + 1))
113             image[range(10 * row + 2, 10 * row + 8), 10 * col] = 255
114             # plt.figure()
115             # plt.subplot(1, 2, 1), plt.imshow(image, "gray")
116             image[range(10 * row + 2, 10 * row + 8), 10 * col + 1] = 255
117             # plt.subplot(1, 2, 2), plt.imshow(image, "gray")
118             # plt.show()
119         if cell_data[1] == 1:
120             print("cell_data[1] == 1")
121             print((10 * row, (10 * col + 2, 10 * col + 8)), (10 * row + 1, (10 * col + 2, 10 * col + 8)))
122             image[10 * row, range(10 * col + 2, 10 * col + 8)] = 255
123             # plt.figure()
124             # plt.subplot(1, 2, 1), plt.imshow(image, "gray")
125             image[10 * row + 1, range(10 * col + 2, 10 * col + 8)] = 255
126             # plt.subplot(1, 2, 2), plt.imshow(image, "gray")
127             # plt.show()
128         if cell_data[2] == 1:
129             print("cell_data[2] == 1")
130             print(((10 * row + 2, 10 * row + 8), 10 * col + 9), ((10 * row + 2, 10 * row + 8), 10 * col + 8))
131             image[range(10 * row + 2, 10 * row + 8), 10 * col + 9] = 255
132             # plt.figure()
133             # plt.subplot(1, 2, 1), plt.imshow(image, "gray")
134             image[range(10 * row + 2, 10 * row + 8), 10 * col + 8] = 255
135             # plt.subplot(1, 2, 2), plt.imshow(image, "gray")
136             # plt.show()
137         if cell_data[3] == 1:
138             print("cell_data[3] == 1")
139             print((10 * row + 9, (10 * col + 2, 10 * col + 8)), (10 * row + 8, (10 * col + 2, 10 * col + 8)))
140             image[10 * row + 9, range(10 * col + 2, 10 * col + 8)] = 255
141             # plt.figure()
142             # plt.subplot(1, 2, 1), plt.imshow(image, "gray")
143             image[10 * row + 8, range(10 * col + 2, 10 * col + 8)] = 255
144             # plt.subplot(1, 2, 2), plt.imshow(image, "gray")
145             # plt.show()
146
147 # Display the image
148 plt.figure(), plt.title("image1"), plt.imshow(image1, "gray")
149 plt.figure(), plt.title("maze") plt.imshow(image, cmap=cm.Greys_r, interpolation='none')
150 plt.show()
151 pass
4. 代码理解图

理解:
(1)首先设置了(r, c)=(0, 0)作为起始点,也就是数字为1的位置,接下来,我们要想它能往那里走呢?常识告诉我们,它只有(右,下)两条路可以走,那么看看代码,它满足 check 添加 R 和 D 的条件,所以确实和我们想的 一样。
(2)如果check不为空,那么就可以随机选择一个方向走,我们1格子中随机选到的是 R,所以选择的箭头方向标记为红色,另一个没选择的方向标记为黑色箭头,并且要在执行
M[r, c, 2] = 1
c = c + 1
M[r, c, 0] = 1
三条语句,即把当前单元格(r, c)的右边(因为是2)标记为1表示已经访问过,此外,还要把(r, c+1)的左边(因为是0)标记为1表示已经被访问过。接下来就是按照这个原因一直深入走下去。
(3)如果碰到 check=[ ] , 那么就执行 r, c = history.pop() 语句,即得到选择它们的点,并且把重新做选择。如果还是 check=[ ] , 那么就继续得到选择它们的点,继续重新做选择。直到 history = [ ]
(4)所有的格子都会被选中,最后都会被 pop 出来使得 history = [ ], 在20个单元格以后的 pop 图中没有被标记出来。
5. 生成的迷宫图:

把生成图和理解图的红色箭头对照着看,你就能更好的理解迷宫的生成原理啦。
6. M 值
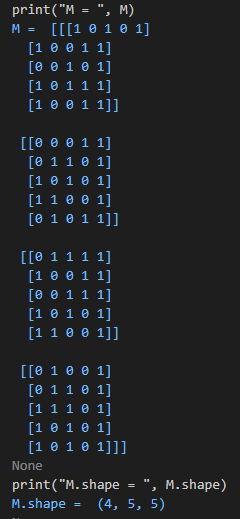
可以看到, 最后的画出迷宫完全就是根据 M 值来画的,那么我们来看看 M 值到底是怎么样的。
(1)首先 M 矩阵的大小是 4 * 5 * 5, 即有4个5*5的矩阵,4表示的是4行,第1个5表示的是5列的数据,第2个5表示的是 (LEFT, UP, RIGHT, DOWN, CHECK_IF_VISITED) 这5个的选择。
(2)我们可以看到所有 5*5 的数组最后一个值都是1,表示每个格子都被访问过。
(3)我们看看第一行的值 [ [1 0 1 0 1], [1 0 0 1 1], [0 0 1 0 1], [1 0 1 1 1], [1 0 0 1 1] ],
其中 [1 0 1 0 1] 表示第一行第一列的情况:我们看1的值,1表示就是可以走的打通的区域,我们只看前4个值,即 [1 0 1 0],首先,第一个1是 M[0, 0, 0] = 1 这条语句添加的,表示添加上路口,其次,看索引2的位置的1,它表示的是right,那么对照着迷宫途中就是第一个(0,0)和(0,1)左右相连。
其中 [1 0 0 1 1] 表示的是第一行第二列的情况:1的位置出现在 index=0 (left)和 index=3(down)(不用管index=4),那么此单元格是左通和下通的
其中 [0 0 1 0 1] 表示的是第一行第三列的情况:1的位置出现在 index=2 (right),那么此单元格就是右通的
其中 [1 0 1 1 1] 表示的是第一行第四列的情况:1的位置出现在 index=0 (left)和 index=2(right)和 index=3(down),那么此单元格就是左通,右通和下通
其中 [1 0 0 1 1] 表示的是第一行第五列的情况:1的位置出现在 index=0 (left) 和 index=3(down),那么此单元格就是左通和下通
以上就是我的理解,如果右什么不当的地方,欢迎大家指正!