一、安装Apache Server
注:使用root安装后,变更拥有者为your-user
1 安装环境
系统:
CentOS release 6.6
软件:
httpd-2.2.31
2 安装步骤
2.1 准备
检查依赖:Perl 5 、 apr / apr-util >= 1.2
脚本(root用户):
#检查是否安装
rpm  -qa | grep  perl
rpm  -qa | grep  apr
rpm  -qa | grep  apr-util

#安装Perl 、 apr / apr-util
yum  -y  install  perl  apr  apr-util
2.2 安装Apache Server
脚本(root用户):
cd  /home/your-user
tar  -zxvf  httpd-2.2.31.tar.gz
cd  httpd-2.2.31

./configure --prefix=/home/your-user/apache-2.2.31
--enable-so  --enable-deflate
--enable-expires  --enable-headers  --enable-modules=most
--with-mpm=worker  --enable-rewrite

make
make  install

ln -s apache-2.2.31/  apache

#测试启动Apache Server
/home/your-user/apache/bin/apachectl  start

#停止Apache Server
/home/your-user/apache/bin/apachectl  stop

#将apache的拥有者置为your-user
chown  -R  your-user:your-user  /home/your-user/apache
su  your-user

#用your-user用户启动Apache Server
/home/your-user/apache/bin/apachectl  start
常见问题:
A、如启动Apache Server后,登陆首页遇到如下情况

查看错误日志:tail -f /home/your-user/apache/logs/error_log (13)Permission denied: access to / denied (filesystem path '/home/your-user/apache') because search permissions are missing on a component of the path
解决:
查看apache所在目录,及其所有父目录的是否都满足755权限,不满足执行:
chmod 755 /home
chmod 755 /home/your-user
B、用your-user启动Apache时报错
(13)Permission denied: make_sock: could not bind to address [::]:80
(13)Permission denied: make_sock: could not bind to address 0.0.0.0:80
no listening sockets available, shutting down
Unable to open logs
解决:
chown root /home/your-user/apache/bin/httpd
chmod u+s /home/your-user/apache/bin/httpd
二、安装PHP
1 安装环境
系统:
CentOS release 6.6
软件:
php-5.5.30.tar.gz
2 安装步骤
2.1 准备
脚本(root用户):
安装依赖
yum install gcc make gd-devel libjpeg-devel libpng-devel libxml2-devel bzip2-devel libcurl-devel -y
2.2 安装PHP
脚本(root用户):
cd  /usr/local
tar  -zxvf  php-5.5.30.tar.gz

./configure  --prefix=/usr/local/php-5.5.30
--with-config-file-path=/usr/local/php-5.5.30/etc --with-bz2 --with-curl
--with-apxs2=/home/your-user/apache/bin/apxs
--enable-ftp --enable-sockets --disable-ipv6 --with-gd
--with-jpeg-dir=/usr/local --with-png-dir=/usr/local
--with-freetype-dir=/usr/local --enable-gd-native-ttf
--with-iconv-dir=/usr/local --enable-mbstring --enable-calendar
--with-gettext --with-libxml-dir=/usr/local --with-zlib
--with-pdo-mysql=mysqlnd --with-mysqli=mysqlnd --with-mysql=mysqlnd
--enable-dom --enable-xml --enable-fpm --with-libdir=lib64 --enable-bcmath

make
make  install
2.3 配置Apache使其支持PHP
使用your-user用户
配置文件:/home/your-user/apache/conf/httpd.conf
操作:
修改DirectoryIndex 为 DirectoryIndex index.html index.php
添加AddType application/x-httpd-php .php
添加LoadModule php5_module modules/libphp5.so
三、安装Zabbix
注:使用root安装后,变更拥有者为your-user
1 安装环境
系统:
CentOS release 6.6
软件:
zabbix-2.4.7.tar.gz
2 安装步骤
2.1 准备
脚本(root用户):
#安装依赖
yum install -y net-snmp-devel
yum install -y perl-DBI
2.2 安装Zabbix
脚本(root用户):
cd  /home/your-user
tar -zxvf  zabbix-2.4.7.tar.gz
cd  zabbix-2.4.7

./configure --prefix=/home/your-user/zabbix-2.4.7/
--enable-server --enable-agent --with-mysql --with-net-snmp --with-libcurl --with-libxml2 -enable-proxy

make
make install
常见问题:
执行./configure命令时,报错 configure: error: MySQL library not found
解决:
#在环境变量中添加mysql lib库
vi  /etc/profile
export  PATH=$PATH:/usr/local/mysql/bin:/usr/local/mysql/lib
source  /etc/profile
2.3 配置MySQL
脚本(root用户):
mysql -uroot -p

#创建数据库和用户
create database zabbix character set utf8;
grant all privileges on *.* to zabbix@'localhost' identified by 'zabbix';
grant all privileges on *.* to zabbix@'%' identified by 'zabbix';
flush privileges;

#导入表结构
mysql -uroot -p zabbix < /home/your-user/zabbix-2.4.7/database/mysql/schema.sql
mysql -uroot -p zabbix < /home/your-user/zabbix-2.4.7/database/mysql/images.sql
mysql -uroot -p zabbix < /home/your-user/zabbix-2.4.7/database/mysql/data.sql
2.4 配置Zabbix
A、配置PHP,为了之后安装Zabbix
cp /usr/local/php-5.5.30/php.ini-production /usr/local/php-5.5.30/etc/php.ini
修改/usr/local/php-5.5.30/etc/php.ini为
max_execution_time = 300
memory_limit = 128M
post_max_size = 16M
upload_max_filesize = 2M
max_input_time = 300
date.timezone = PRC
B、配置zabbix
配置zabbix_server配置文件
vi /home/your-user/zabbix-2.4.7/etc/zabbix_server.conf
DBName=zabbix
DBUser=zabbix
DBPassword=zabbix
DBPort=3306
2.5 添加Zabbix的PHP文件到Apache
脚本(root用户):
cp -rf  /home/your-user/zabbix-2.4.7/frontends/php/  /home/your-user/apache/htdocs/
cd  /home/your-user/apache/htdocs/
mv  php  zabbix

#变更目录权限
chown -R your-user:your-user  /home/your-user/zabbix-2.4.7
chown -R your-user:your-user  /home/your-user/apache/htdocs/zabbix

#重启Apache
su  your-user
/home/your-user/apache/bin/apachectl  restart
2.6 启动Zabbix服务
脚本(your-user用户):
/home/your-user/zabbix-2.4.7/sbin/zabbix_server
常见问题
启动zabbix server时报错:
/home/your-user/zabbix-2.4.7/sbin/zabbix_server: error while loading shared libraries: libmysqlclient.so.18: cannot open shared object file: No such file or directory
解决:
ln -s /usr/local/mysql/lib/libmysqlclient.so.18 /usr/lib64
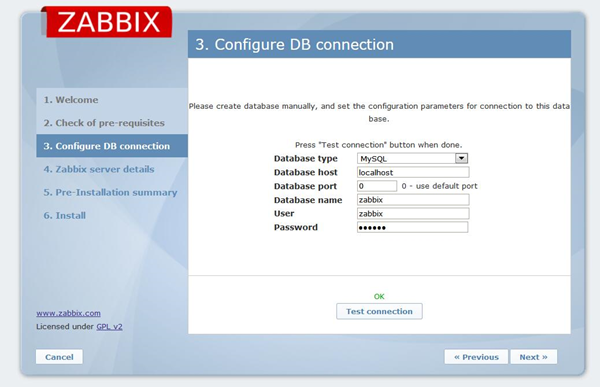
2.7 Zabbix前台配置
在本地浏览器上访问Zabbis Server地址开始web前端配置,http://ServerIP/zabbix
会出现安装界面按提示next

这里的Check of pre-requisites 必须全部项目OK后才能继续配置

测试连接MySQL
此步直接next

配置完成

安装,这里按照提示下载文件,然后放到要求的目录下并改名。完成后点解finish

之后就可以登录Zabbix,用户名/密码:admin/zabbix