1. 简单说明爬虫原理
使用python的requests模块模拟浏览器向服务器发送http请求,服务器接收到请求后向爬虫返回html数据,爬虫将返回的html数据保存下来,并利用bs4进行分析,将需要的数据截取下来并保存。
2. 理解爬虫开发过程
1).简要说明浏览器工作原理
在浏览器的地址栏输入网址并按回车后,浏览器就会向服务器发送http请求,服务器接收到请求后进行业务处理并向浏览器返回请求的资源,浏览器将获取到的返回数据进行解析、渲染,形成网页。
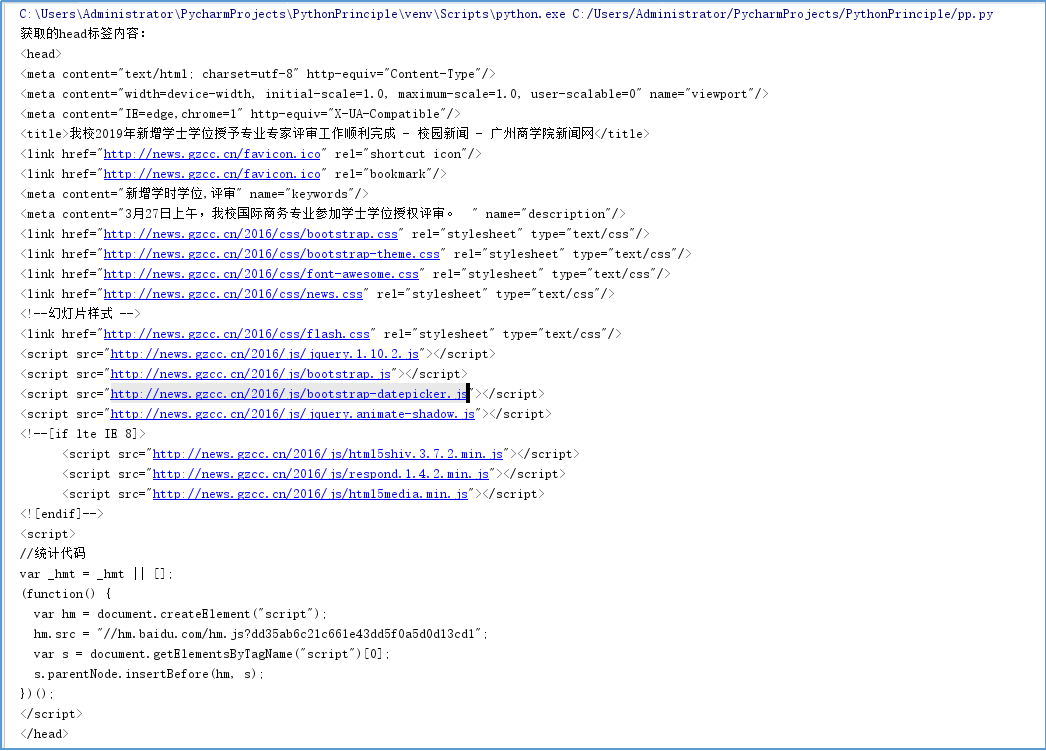
2).使用 requests 库抓取网站数据
requests.get(url) 获取校园新闻首页html代码
1 html_url = 'http://news.gzcc.cn/html/2019/xiaoyuanxinwen_0328/11086.html'
2 resourses = requests.get(html_url)
3 resourses.encoding = 'UTF-8'
4 soup = BeautifulSoup(resourses.text, 'html.parser')
5 print("获取的head标签内容:")
6 print(soup.head)
运行结果:
3).了解网页
写一个简单的html文件,包含多个标签,类,id
1 html = '
2 <html>
3     <body>
4           <h1 id="title">Hello</h1>
5           <a href="# link1" class="link" id="link1"> This is link1</a>
6           <a href="# link2" class="link" id="link2"> This is link2</a>
7     </body>
8 </html> '
4).使用 Beautiful Soup 解析网页;
通过BeautifulSoup(html_sample,'html.parser')把上述html文件解析成DOM Tree
select(选择器)定位数据
找出含有特定标签的html元素
找出含有特定类名的html元素
找出含有特定id名的html元素
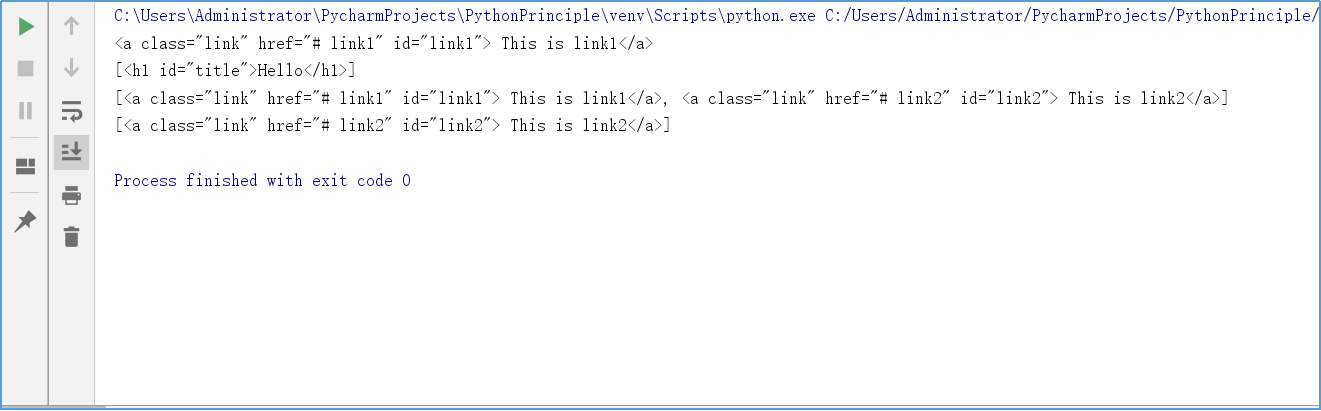
 1 from bs4 import BeautifulSoup
 2
 3 html = '
 4 <html>
 5     <body>
 6           <h1 id="title">Hello</h1>
 7           <a href="# link1" class="link" id="link1"> This is link1</a>
 8           <a href="# link2" class="link" id="link2"> This is link2</a>
 9     </body>
10 </html> '
11 soups = BeautifulSoup(html, 'html.parser')
12 a = soups.a                                       # 获取文档中的第一个与‘a’同名的标签,返回类型为Tag
13 h1 = soups.select('h1')                           # 获取标签名为‘h1’的标签的内容,返回类型为list
14 link_class = soups.select('.link')                # 获取类名为‘link’的标签的内容,返回类型为list
15 link_id = soups.select('#link2')                  # 获取id为‘link2’的标签的内容,返回类型为list
16 print(a)
17 print(h1)
18 print(link_class)
19 print(link_id)
运行效果截图:
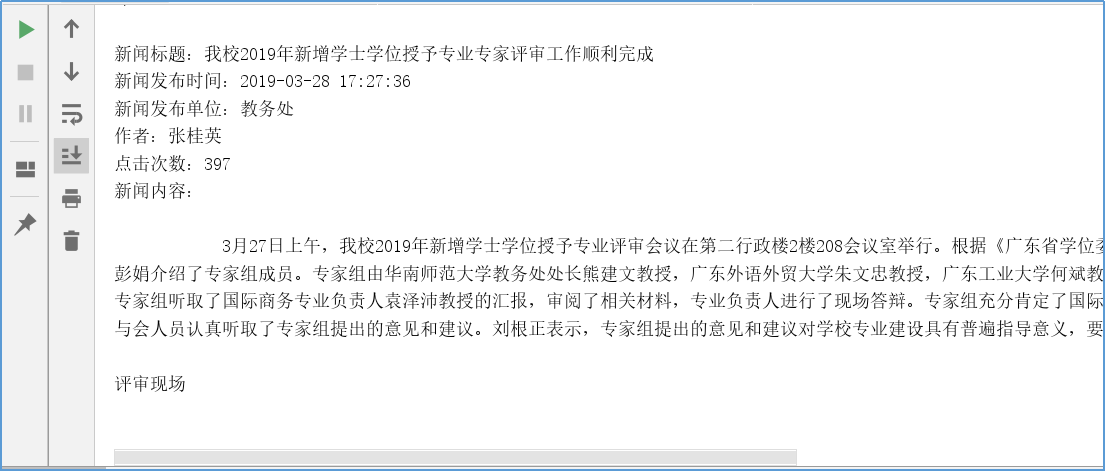
3.提取一篇校园新闻的标题、发布时间、发布单位、作者、点击次数、内容等信息
提取的校园新闻url = 'http://news.gzcc.cn/html/2019/xiaoyuanxinwen_0328/11086.html'
发布时间为datetime类型,点击次数为数值型,其它是字符串类型。


 1 import requests                                                            # 直接导入requests模块
 2 from datetime import datetime                                              # 从datetime包导入datetime模块
 3 from bs4 import BeautifulSoup                                              # 从bs4包导入BeautifulSoup模块
 4
 5 html_url = 'http://news.gzcc.cn/html/2019/xiaoyuanxinwen_0328/11086.html'  # 校园新闻url
 6 resourses = requests.get(html_url)                                         # 发送get请求
 7 resourses.encoding = 'UTF-8'                                               # 以防获取的内容出现乱码,手动指定字符编码为UTF-8
 8 soup = BeautifulSoup(resourses.text, 'html.parser')                        # 调用BeautifulSoup解析功能,解析请求返回的内容,解析器用html.parser
 9 print("获取的head标签内容:")
10 print(soup.head)
11 print("
新闻标题:" + soup.select('.show-title')[0].text)
12 newsDate = soup.select('.show-info')[0].text.split()[0].split(':')[1]      # 使用BeautifulSoup的select方法根据元素的类名来查找元素的内容,返回的是list类型
13 newsTime = soup.select('.show-info')[0].text.split()[1]
14 dt = newsDate + " " + newsTime
15 # datetime模块的strptime能够将文本字符串格式的数据转换成时间格式的数据
16 showtime = datetime.strptime(dt, "%Y-%m-%d %H:%M:%S")                      # strptime():将字符串类型转换成时间类型
17 print("新闻发布时间:", end="")
18 print(showtime)
19 publishing_unit = soup.select('.show-info')[0].text.split()[4].split(':')[1]
20 print("新闻发布单位:", end="")
21 print(publishing_unit)
22 print("作者:", end="")
23 writer = soup.select('.show-info')[0].text.split()[2].split(':')[1]
24 print(writer)
25 # strftime方法能够把时间格式的数据按照我们想要的时间格式输出,比如说输出这个日期的月份名字,星期几等等,扩展性十分强大
26 showtime = datetime.strftime(showtime, '%Y{Y}%m{m}%d{d} %H{H}:%M{M}:%S{s}').format(Y='年', m='月', d='日', H='时',
27                                                                                    M='分', s='秒')   # 将时间类型转换成字符串类型
28 click_num_url = 'http://oa.gzcc.cn/api.php?op=count&id=11086&modelid=80'
29 return_click_num = requests.get(click_num_url)
30 click_info = BeautifulSoup(return_click_num.text, 'html.parser')
31 click_num = int(click_info.text.split('.html')[3].split("'")[1])
32 print("点击次数:", end="")
33 print(click_num)
34 print("新闻内容:" + soup.select('.show-content')[0].text.replace('u3000', ''))
运行效果: