1. 需求分析

(1)初始化查询条件下拉列表

(2)展示客户列表,并且可以根据查询条件过滤查询结果,并且实现分页处理。
(3)修改客户信息:

1)点击客户列表中的“修改”按钮弹出客户信息修改对话框,并初始化客户信息;
2)点击“保存修改”按钮将修改后的结果保存到数据库中。
(4)删除客户
点击客户列表中的删除按钮,提示“警告信息”:
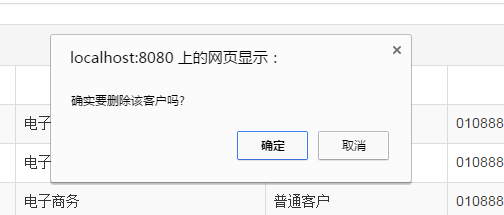
点击确定后删除用户信息,并刷新页面。
2. 数据库表

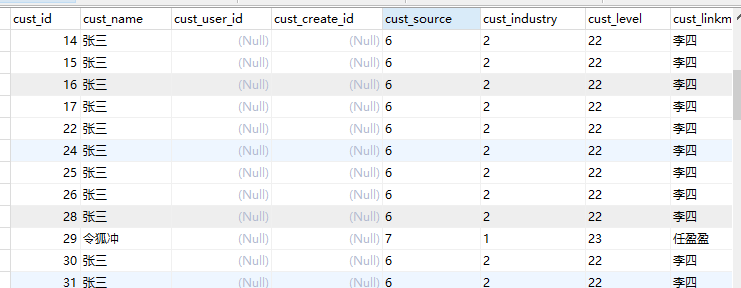
客户表customer:
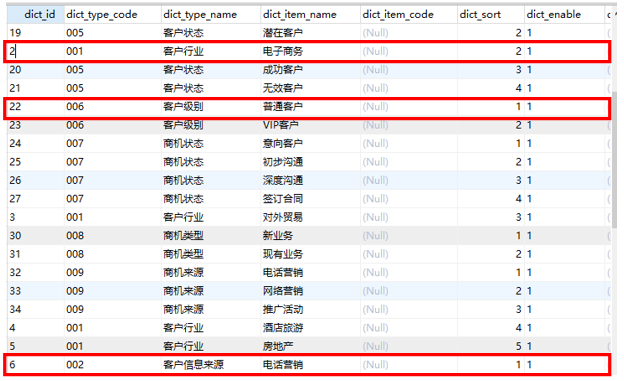
字典查询表base_dict:
3. 工程搭建(SSM整合)
(1)Dao层
pojo和映射文件以及接口手动编写
SqlMapConfig.xml : mybatis核心配置文件
ApplicationContext-dao.xml 整合后spring在dao层的配置:数据源、会话工厂、扫描Mapper
(2)service层
事务 ApplicationContext-trans.xml@Service注解扫描 ApplicationContext-service.xml
(3)controller层
SpringMvc.xml :注解扫描:扫描@Controller注解
注解驱动:替我们显示的配置了最新版的处理器映射器和处理器适配器
视图解析器:显示的配置是为了在controller中不用每个方法都写页面的全路径
(4)web.xml
springMvc前端控制器配置
spring监听
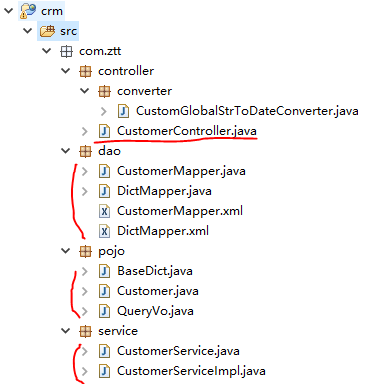
java类结构:
Springmvc、spring、mybatis框架整合:
所有配置文件放在一个config文件夹内,注意config要建成源文件夹(右键src --> new --> Source Folder),这样就可以直接用 classpath:指向要访问的这几个文件(因为源文件夹最后都会被加到classes目录里)。
(1)SqlMapConfig.xml :(不写内容)
<?xml version="1.0" encoding="UTF-8" ?>
<!DOCTYPE configuration
PUBLIC "-//mybatis.org//DTD Config 3.0//EN"
"http://mybatis.org/dtd/mybatis-3-config.dtd">
<configuration>

</configuration>
(2)ApplicationContext-dao.xml :整合后spring在dao层的配置:数据源、会话工厂、扫描Mapper
  <!-- 加载配置文件 -->
    <context:property-placeholder location="classpath:db.properties" />
    <!-- 数据库连接池 -->
    <bean id="dataSource" class="com.alibaba.druid.pool.DruidDataSource"
        destroy-method="close">
        <property name="driverClassName" value="${jdbc.driver}" />
        <property name="url" value="${jdbc.url}" />
        <property name="username" value="${jdbc.username}" />
        <property name="password" value="${jdbc.password}" />
    </bean>

    <!-- mapper配置 -->
    <!-- 让spring管理sqlsessionfactory 使用mybatis和spring整合包中的 -->
    <bean id="sqlSessionFactory" class="org.mybatis.spring.SqlSessionFactoryBean">
        <!-- 数据库连接池 -->
        <property name="dataSource" ref="dataSource" />
        <!-- 加载mybatis的全局配置文件 -->
        <property name="configLocation" value="classpath:SqlMapConfig.xml" />
    </bean>

    <!-- 配置Mapper扫描器 -->
    <bean class="org.mybatis.spring.mapper.MapperScannerConfigurer">
        <property name="basePackage" value="com.ztt.dao"/>
    </bean>
(3)ApplicationContext-service.xml :配置@Service注解扫描
  <!-- @Service扫描 -->
    <context:component-scan base-package="com.ztt.service"></context:component-scan>
(4)ApplicationContext-trans.xml :配置事务
  <!-- 事务管理器 -->
    <bean id="transactionManager"
        class="org.springframework.jdbc.datasource.DataSourceTransactionManager">
        <!-- 数据源 -->
        <property name="dataSource" ref="dataSource" />
    </bean>

    <!-- 通知 -->
    <tx:advice id="txAdvice" transaction-manager="transactionManager">
        <tx:attributes>
            <!-- 传播行为 -->
            <tx:method name="save*" propagation="REQUIRED" />
            <tx:method name="insert*" propagation="REQUIRED" />
            <tx:method name="delete*" propagation="REQUIRED" />
            <tx:method name="update*" propagation="REQUIRED" />
            <tx:method name="find*" propagation="SUPPORTS" read-only="true" />
            <tx:method name="get*" propagation="SUPPORTS" read-only="true" />
        </tx:attributes>
    </tx:advice>

    <!-- 切面 -->
    <aop:config>
        <aop:advisor advice-ref="txAdvice"
            pointcut="execution(* com.ztt.service.*.*(..))" />
    </aop:config>
【注】ApplicationContext-dao.xml 、ApplicationContext-service.xml、ApplicationContext-trans.xml也可以写到一个ApplicationContext.xml中。
(5)SpringMvc.xml:(MyBatis的配置文件),配置@Controller注解扫描、注解驱动(处理映射器和处理适配器)、视图解析器。
  <!-- @Controller注解扫描 -->
    <context:component-scan base-package="cn.ztt.controller"></context:component-scan>

    <!-- 注解驱动: 替我们显示的配置了最新版的注解的处理器映射器和处理器适配器 -->
    <mvc:annotation-driven conversion-service="conversionService"></mvc:annotation-driven>

    <!-- 配置视图解析器
    作用:在controller中指定页面路径的时候就不用写页面的完整路径名称了,可以直接写页面去掉扩展名的名称
    -->
    <bean class="org.springframework.web.servlet.view.InternalResourceViewResolver">
        <!-- 真正的页面路径 =  前缀 + 去掉后缀名的页面名称 + 后缀 -->
        <!-- 前缀 -->
        <property name="prefix" value="/WEB-INF/jsp/"></property>
        <!-- 后缀 -->
        <property name="suffix" value=".jsp"></property>
    </bean>


    <!-- 配置自定义转换器      注意: 一定要将自定义的转换器配置到注解驱动上 -->
    <bean id="conversionService"
        class="org.springframework.format.support.FormattingConversionServiceFactoryBean">
        <property name="converters">
            <set>
                <!-- 指定自定义转换器的全路径名称    CustomerGlobalStrToDataConverter是我们自己写的一个类,实现日期转换-->
                <bean class="com.ztt.controller.converter.CustomGlobalStrToDateConverter"/>
            </set>
        </property>
    </bean>
(6)Web.xml:配置spring监听、springmvc前端控制器(拦截所有.action文件)、Post请求乱码
   <!-- 加载spring容器 -->
    <context-param>
        <param-name>contextConfigLocation</param-name>
        <param-value>classpath:ApplicationContext-*.xml</param-value>
    </context-param>
  <!-- Spring监听器 -->
  <listener>
        <listener-class>org.springframework.web.context.ContextLoaderListener</listener-class>
    </listener>


  <!-- springmvc前端控制器 -->
  <servlet>
      <servlet-name>springMvc</servlet-name>
      <servlet-class>org.springframework.web.servlet.DispatcherServlet</servlet-class>
      <init-param>
          <param-name>contextConfigLocation</param-name>
          <param-value>classpath:SpringMvc.xml</param-value>
      </init-param>
      <!-- 在tomcat启动的时候就加载这个servlet -->
      <load-on-startup>1</load-on-startup>
  </servlet>
  <servlet-mapping>
      <servlet-name>springMvc</servlet-name>
      <!--
      *.action    代表拦截后缀名为.action结尾的
      /             拦截所有但是不包括.jsp
      /*             拦截所有包括.jsp
       -->
      <url-pattern>*.action</url-pattern>
  </servlet-mapping>

  <!-- 配置Post请求乱码 -->
  <filter>
        <filter-name>CharacterEncodingFilter</filter-name>
        <filter-class>org.springframework.web.filter.CharacterEncodingFilter</filter-class>
        <init-param>
            <param-name>encoding</param-name>
            <param-value>utf-8</param-value>
        </init-param>
    </filter>
    <filter-mapping>
        <filter-name>CharacterEncodingFilter</filter-name>
        <url-pattern>/*</url-pattern>
    </filter-mapping>
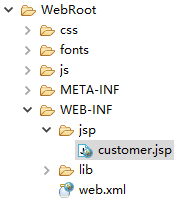
(7)加入jsp:
4. 实现1:查询条件初始化

- 客户来源、所属行业、客户级别分别对象表base_dict中的 dict_type_code=002、001、006
实际操作中我们不要传入这些模糊数字,可以建一个properties资源文件,然后将这些数字与所代表的含义通过 键-值映射 存储。
建立resource.properties资源文件:
customer.dict.source=002
customer.dict.industry=001
customer.dict.level=006
然后在 SpringMvc中引入该文件:
   <!-- 引入字典资源文件 -->
    <context:property-placeholder location="classpath:resource.properties"/>
由controller层调用service层,service层调用dao层,dao层来操作数据库 。下面由DAO->service->controler我们来编写代码:
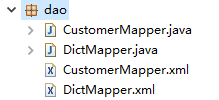
(1)DAO层
cn.ztt.dao包下 :(一个表对应一个mapper,我们用customer、base_dict这两个表,所以建2个mapper)
1)DictMapper.xml 编写数据库查询:
<?xml version="1.0" encoding="UTF-8" ?>
<!DOCTYPE mapper PUBLIC "-//mybatis.org//DTD Mapper 3.0//EN" "http://mybatis.org/dtd/mybatis-3-mapper.dtd" >
<mapper namespace="com.ztt.dao.DictMapper">
    <select id="findDictByCode" parameterType="String" resultType="com.ztt.pojo.BaseDict">
        select * from base_dict b where b.dict_enable=1 and b.dict_type_code=#{code} order by b.dict_sort
    </select>
</mapper>
2)DictMapper接口 上定义 findDictByCode 方法
public interface DictMapper {
    public List<BaseDict> findDictByCode(String code);
}
(2)service层

3)在service层实现 findDictByCode 方法:
先在CustomerService(接口)上编写 findDictByCode 方法
public interface CustomerService {
    public List<BaseDict> findDictByCode(String code);
}
然后在 CustomerServiceImpl 实现类上实现该方法。注意类上要加@Service注解:
@Service
public class CustomerServiceImpl implements CustomerService {

    //因为下面要调用DAO的方法,所以把DAO层的DictMapper传进来
@Autowired
private DictMapper dictMapper;

    @Override
    public List<BaseDict> findDictByCode(String code) {
        List<BaseDict> list = dictMapper.findDictByCode(code);
        return list;
    }
}
(3)Controller层
4)在 CustomerController.java类上调用service层的方法实现:
@Controller
@RequestMapping("/customer")
public class CustomerController {

    @Autowired
    private CustomerService customerService;

    //读取resource.properties中的键并设置名称
    @Value("${customer.dict.source}")
    private String source;
    @Value("${customer.dict.industry}")
    private String industry;
    @Value("${customer.dict.level}")
    private String level;

    //接收QueryVo对象是为了数据回显,接收Model是为了向页面传入参数
    @RequestMapping("/list")
    public String list(QueryVo vo, Model model) throws Exception {
        //客户来源
        List<BaseDict> sourceList = customerService.findDictByCode(source);
        //客户行业
        List<BaseDict> industryList = customerService.findDictByCode(industry);
        //客户级别
        List<BaseDict> levelList = customerService.findDictByCode(level);

        //发送的是get请求,这里要处理get请求乱码,没有解决!
        /*if(vo.getCustName() != null){
            vo.setCustName(new String(vo.getCustName().getBytes("iso8859-1"),"utf-8"));
        }*/

        //将信息响应给页面, 页面上分别使用${fromType}、${industryType}、${levelType}接收
        //高级查询下拉列表数据
        model.addAttribute("fromType", sourceList);
        model.addAttribute("industryType", industryList);
        model.addAttribute("levelType", levelList);

        //QueryVo中封装了custName、custSource、custIndustry、custLevel这几个属性
        //高级查询选中数据回显
        model.addAttribute("custName", vo.getCustName());
        model.addAttribute("custSource", vo.getCustSource());
        model.addAttribute("custIndustry", vo.getCustIndustry());
        model.addAttribute("custLevel", vo.getCustLevel());

     return "customer";
    }
}
上面采用 vo.setCustName(new String(vo.getCustName().getBytes("iso8859-1"),"utf-8")); 的方法没有解决乱码问题:
在输入中文后中文变成了问号:
后来选了另一种方式解决:直接修改tomcat的编码方式:在conf文件夹下的server.xml 文件里指定编码格式为UTF-8
<Connector port="8275" protocol="HTTP/1.1" connectionTimeout="20000" maxHttpHeaderSize ="10240" redirectPort="8443"URIEncoding="UTF-8"/>

5. 实现2:展示客户列表,并且可以根据查询条件过滤查询结果,并且实现分页处理
首先看下 QueryVo类 :
public class QueryVo {

    private String custName;    //客户名称
    private String custSource;  //客户来源
    private String custIndustry;//客户行业
    private String custLevel;   //客户级别
    //分页属性
    private Integer page = 1;   //当前第几页,默认是第1页
    private Integer start;      //这一页从第几个记录开始
    private Integer size = 10;  //一页有几条记录,默认10条

        set/get.......
}
在得到查询条件后,我们传入QueryVo对象进行客户列表查询。
(1)DAO层
1)CustomerMapper.xml 编写数据库查询 :
根据QueryVo对象编写 findCustomerByVo(查询客户列表)、findCustomerByVoCount(查询客户数):
<?xml version="1.0" encoding="UTF-8" ?>
<!DOCTYPE mapper PUBLIC "-//mybatis.org//DTD Mapper 3.0//EN" "http://mybatis.org/dtd/mybatis-3-mapper.dtd" >
<mapper namespace="com.ztt.dao.CustomerMapper">

    <sql id="customer_where">
        <where>
            <if test="custName != null and custName != ''">
                and a.cust_name like '%${custName}%'
            </if>
            <if test="custSource != null and custSource != ''">
                and a.cust_source=#{custSource}
            </if>
            <if test="custIndustry != null and custIndustry != ''">
                and a.cust_industry=#{custIndustry}
            </if>
            <if test="custLevel != null and custLevel != ''">
                and a.cust_level=#{custLevel}
            </if>
        </where>
    </sql>

    <select id="findCustomerByVo" parameterType="com.ztt.pojo.QueryVo" resultType="com.ztt.pojo.Customer">
        select a.cust_id,a.cust_name, b.dict_item_name cust_source, c.dict_item_name cust_industry,
            d.dict_item_name cust_level,a.cust_phone,a.cust_mobile, a.cust_linkman, a.cust_zipcode,
            a.cust_address, a.cust_createtime
        from customer a
        left join base_dict b on a.cust_source = b.dict_id
        left join base_dict c on a.cust_industry = c.dict_id
        left join base_dict d on a.cust_level = d.dict_id

        <include refid="customer_where"></include>
        limit #{start}, #{size}
    </select>

    <select id="findCustomerByVoCount" parameterType="com.ztt.pojo.QueryVo" resultType="int">
        select count(*)
        from customer a
        left join base_dict b on a.cust_source = b.dict_id
        left join base_dict c on a.cust_industry = c.dict_id
        left join base_dict d on a.cust_level = d.dict_id

        <include refid="customer_where"></include>
    </select>

</mapper>
2) DictMapper类 上定义 findCustomerByVo、findCustomerByVoCount方法:
public interface CustomerMapper {
    //查询客户列表
    public List<Customer> findCustomerByVo(QueryVo vo);
    //查询客户人数
    public Integer findCustomerByVoCount(QueryVo vo);
}
(2)Service层
3)在service层实现 findCustomerByVo、findCustomerByVoCount方法:
先在CustomerService(接口)上编写 findCustomerByVo、findCustomerByVoCount 方法
    public List<Customer> findCustomerByVo(QueryVo vo);
    public Integer findCustomerByVoCount(QueryVo vo);
然后在 CustomerServiceImpl 实现类上实现这两个方法:
@Service
public class CustomerServiceImpl implements CustomerService {

    @Autowired
    private DictMapper dictMapper;
    @Autowired
    private CustomerMapper customerMapper;

    @Override
    public List<BaseDict> findDictByCode(String code) {
        List<BaseDict> list = dictMapper.findDictByCode(code);
        return list;
    }

    @Override
    public List<Customer> findCustomerByVo(QueryVo vo) {
        List<Customer> list = customerMapper.findCustomerByVo(vo);
        return list;
    }
    @Override
    public Integer findCustomerByVoCount(QueryVo vo) {
        Integer count = customerMapper.findCustomerByVoCount(vo);
        return count;
    }
}
(3)Controller层
4)在 CustomerController.java类上调用service层的方法实现:
@Controller
@RequestMapping("/customer")
public class CustomerController {

    @Autowired
    private CustomerService customerService;

    //读取resource.properties中的键并设置名称
    @Value("${customer.dict.source}")
    private String source;
    @Value("${customer.dict.industry}")
    private String industry;
    @Value("${customer.dict.level}")
    private String level;

    //接收QueryVo对象是为了数据回显,接收Model是为了向页面传入参数
    @RequestMapping("/list")
    public String list(QueryVo vo, Model model) throws Exception {
        //客户来源
        List<BaseDict> sourceList = customerService.findDictByCode(source);
        //客户行业
        List<BaseDict> industryList = customerService.findDictByCode(industry);
        //客户级别
        List<BaseDict> levelList = customerService.findDictByCode(level);
        //默认当前页为1
        if(vo.getPage() == null){
        vo.setPage(1);
     }
     //设置查询的起始记录条数
        vo.setStart((vo.getPage() - 1) * vo.getSize());

     //查询数据列表和数据总数
        List<Customer> resultList = customerService.findCustomerByVo(vo);
      Integer count = customerService.findCustomerByVoCount(vo);

     //page是我们自己写的封装分页的类,将查询结果封装到该类中
        Page<Customer> page = new Page<Customer>();
     page.setTotal(count);      //数据总数
        page.setSize(vo.getSize());//每页显示条数
        page.setPage(vo.getPage());//当前页数
        page.setRows(resultList);  //数据列表
     //将查询结果返回给页面
        model.addAttribute("page", page);

     //将信息响应给页面, 页面上分别使用${fromType}、${industryType}、${levelType}接收
        //高级查询下拉列表数据
        model.addAttribute("fromType", sourceList);
        model.addAttribute("industryType", industryList);
        model.addAttribute("levelType", levelList);

        //QueryVo中封装了custName、custSource、custIndustry、custLevel这几个属性
        //高级查询选中数据回显
        model.addAttribute("custName", vo.getCustName());
        model.addAttribute("custSource", vo.getCustSource());
        model.addAttribute("custIndustry", vo.getCustIndustry());
        model.addAttribute("custLevel",vo.getCustLevel());

     return "customer";
    }
}
效果:

6.实现3:修改客户信息
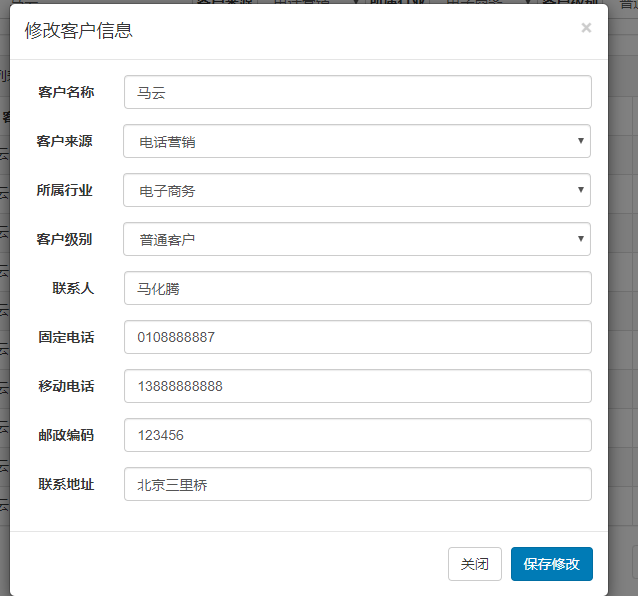
6.1 点击客户列表中的“修改”按钮弹出客户信息修改对话框,并初始化客户信息:
思路:一点击修改就提交controller,交给controller一个id(这条记录的id),然后根据这条记录的id查询这条记录的详细信息,把数据返回回来。
(1)DAO层:
在 CustomerMapper.xml 编写 根据id查询用户信息的sql语句:
  <select id="findCustomerById" parameterType="long" resultType="com.ztt.pojo.Customer">
        select * from customer where cust_id=#{id}
    </select>
在CustomerMapper.java 接口编写 findCustomerById 方法:
  //根据id查询客户信息
    public Customer findCustomerById(Long id);
(2)Service层:
先在CustomerService(接口)上编写 findCustomerBId 方法:
public Customer findCustomerById(Long id);
然后在CustomerServiceImpl 实现类上实现这个方法:
    @Autowired
    private CustomerMapper customerMapper;

    @Override
    public Customer findCustomerById(Long id) {
        Customer customer = customerMapper.findCustomerById(id);
        return customer;
    }
(3)Controller层:
    @Autowired
    private CustomerService customerService;

    @RequestMapping("/detail")
    @ResponseBody  //将Java类自动转为json数据
    public Customer detail(Long id) throws Exception{
        Customer customer = customerService.findCustomerById(id);
        return customer;
    }
customer.jsp相对应的:
。。。。。。
<a href="#" 。。。。。。 onclick="editCustomer(${row.cust_id})">修改</a>
。。。。。。
<script type="text/javascript">
        function editCustomer(id) {
            $.ajax({
                type:"get",
                url:"<%=basePath%>customer/detail.action",
                data:{"id":id},
                success:function(data) {
                    $("#edit_cust_id").val(data.cust_id);
                    $("#edit_customerName").val(data.cust_name);
                    $("#edit_customerFrom").val(data.cust_source)
                    $("#edit_custIndustry").val(data.cust_industry)
                    $("#edit_custLevel").val(data.cust_level)
                    $("#edit_linkMan").val(data.cust_linkman);
                    $("#edit_phone").val(data.cust_phone);
                    $("#edit_mobile").val(data.cust_mobile);
                    $("#edit_zipcode").val(data.cust_zipcode);
                    $("#edit_address").val(data.cust_address);
                }
            });
        }
</script>
效果:点击修改后弹出客户信息修改对话框,并初始化了客户信息:
6.2 点击“保存修改”按钮将修改后的结果保存到数据库中。
(1)DAO层:
在 CustomerMapper.xml 编写 修改 的sql语句:
  <update id="updateCustomerById" parameterType="com.ztt.pojo.Customer">
        update customer
        <!-- set标签作用:第一可以自动添加set关键字, 第二可以去掉最后一个更新的逗号 -->
        <set>
            <if test="cust_name != null and  cust_name != ''">
                cust_name=#{cust_name} ,
            </if>
            <if test="cust_source != null and cust_source  != ''">
                cust_source=#{cust_source},
            </if>
            <if test="cust_industry != null and  cust_industry != ''">
                cust_industry=#{cust_industry},
            </if>
            <if test="cust_level != null and  cust_level != ''">
                cust_level=#{cust_level},
            </if>
            <if test="cust_linkman != null and  cust_linkman != ''">
                cust_linkman=#{cust_linkman},
            </if>
            <if test=" cust_phone != null and  cust_phone != ''">
                cust_phone=#{cust_phone},
            </if>
            <if test="cust_mobile != null and cust_mobile  != ''">
                cust_mobile=#{cust_mobile},
            </if>
            <if test="cust_zipcode != null and  cust_zipcode != ''">
                cust_zipcode=#{cust_zipcode},
            </if>
            <if test="cust_address != null and   cust_address!= ''">
                cust_address=#{cust_address},
            </if>
        </set>
        where cust_id=#{cust_id}
    </update>
在CustomerMapper.java 接口编写 updateCustomerById 方法:
    //修改客户信息
    public void updateCustomerById(Customer customer);
(2)Service层:
先在CustomerService(接口)上编写 updateCustomerById 方法
public void updateCustomerById(Customer customer);
然后在CustomerServiceImpl 实现类上实现这个方法:
    @Autowired
    private CustomerMapper customerMapper;

    @Override
    public void updateCustomerById(Customer customer) {
        customerMapper.updateCustomerById(customer);
    }
(3)Controller层:
    @Autowired
    private CustomerService customerService;

    @RequestMapping("/update")
    public String update(Customer customer) throws Exception{
        customerService.updateCustomerById(customer);
      //前端是ajax的请求,这边返回响应response,把“customer”当成一个页面,页面的所有内容当成字符串返回回去
        return "customer";
    }
customer.jsp相对应的:
。。。。。。
<button type="button" class="btn btn-primary" onclick="updateCustomer()">保存修改</button>
。。。。。。
<script type="text/javascript">
        function updateCustomer() {
            $.post("<%=basePath%>customer/update.action",$("#edit_customer_form").serialize(),function(data){
                alert("客户信息更新成功!");
                window.location.reload();//页面重载
            });
        }
</script>
7. 实现3:删除客户

思路:和修改类似,提交到 controller 的是所选记录的 id
(1)DAO层:
在 CustomerMapper.xml 编写 删除用户信息 的sql语句
  <delete id="deleteCustomerById" parameterType="long">
        delete from customer where cust_id=#{id}
    </delete>
在CustomerMapper.java 接口编写deleteCustomerById方法:
  //删除用户信息
    public void deleteCustomerById(Long id);
(2)Service层:
先在CustomerService(接口)上编写 deleteCustomerById 方法:
public void deleteCustomerById(Long id);
然后在CustomerServiceImpl 实现类上实现这个方法:
  @Autowired
    private CustomerMapper customerMapper;

    @Override
    public void deleteCustomerById(Long id) {
        customerMapper.deleteCustomerById(id);
    }
(3)Controller层:
  @Autowired
    private CustomerService customerService;

    @RequestMapping("/delete")
    public String delete(Long id) throws Exception{
        customerService.deleteCustomerById(id);
        return "customer";
    }
customer.jsp相对应的:
。。。。。。
<a href="#" class="btn btn-danger btn-xs" onclick="deleteCustomer(${row.cust_id})">删除</a>
。。。。。。
<script type="text/javascript">
    function deleteCustomer(id) {
            if(confirm('确实要删除该客户吗?')) {
                $.post("<%=basePath%>customer/delete.action",{"id":id},function(data){
                    alert("客户删除更新成功!");
                    window.location.reload();
                });
            }
        }
</script>