问题:
你想要测试app的Android组件。
解决方案:
使用新的测试类实现JUnit风格的测试。
讨论:
测试像activities,services等的Android组件,需要将app部署到连接的设备或者模拟器上面。测试类基于JUnit,但是严格意义上不是单元测试。它们是集成测试还是功能测试,取决于你怎么使用。
因为看到这里的目的都是驱使部署的app正常运行并且UI正常改变,功能测试在这比较合适。你可以在文档中经常看到集成测试。
Android Testing Support Library通过SDK Manager作为可选依赖添加:
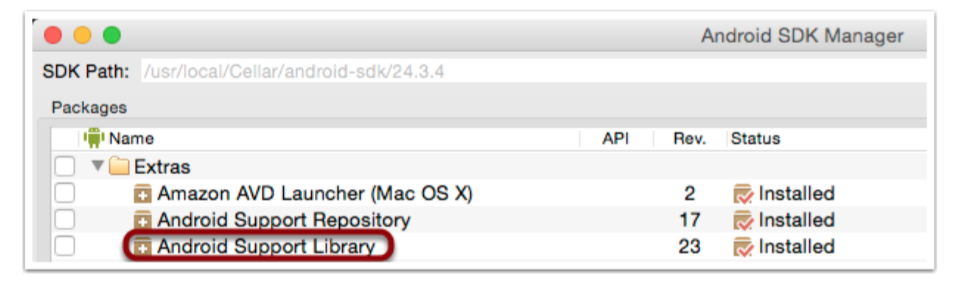
测试时”Android Support Library“的一部分。测试类在android.support.test包下面。
使用dependencies将所有相关类添加到Gradle配置文件里面:

AndroidJUnitRunner类以及支持JUnit4的注解。你可以在你的测试类上面添加JUnit的@RunWith注解,或者在defaultConfig块下面增加设置:

是用test support类可以很方便的测试layout上面的一个labels。例子如下:
@MediumTest @RunWith(AndroidJUnit4.class)
public class MyActivityLayoutTest
    extends ActivityInstrumentationTestCase2<MyActivity> {
  private MyActivity activity;
  private TextView textView;
  private EditText editText;
  private Button helloButton;

   public MyActivityLayoutTest() { super(MyActivity.class);

  @Before
  public void setUp() throws Exception {
    super.setUp()
       injectInstrumentation(InstrumentationRegistry.getInstrumentation());
       activity = getActivity();
       textView = (TextView) activity.findViewById(R.id.text_view);
       editText = (EditText) activity.findViewById(R.id.edit_text);
       helloButton = (Button) activity.findViewById(R.id.hello_button);
  }
  @After
  public void tearDown() throws Exception {
    super.tearDown();
  }
  @Test
  public void testPreconditions() {
    assertNotNull("Activity is null", activity);
    assertNotNull("TextView is null", textView);
    assertNotNull("EditText is null", editText);
    assertNotNull("HelloButton is null", helloButton);
  }
  @Test
  public void textView_label() {
    final String expected = activity.getString(R.string.hello_world);
    final String actual = textView.getText().toString();
    assertEquals(expected, actual);
  }
  @Test
  public void editText_hint() {
    final String expected = activity.getString(R.string.name_hint);
    final String actual = editText.getHint().toString();
     assertEquals(expected, actual);
  }
  @Test
  public void helloButton_label() {
    final String expected = activity.getString(R.string.hello_button_label);
    final String actual = helloButton.getText().toString();
    assertEquals(expected, actual);
  }

}
新的AndroidJUnitRunner是Android Support Test Library的一部分。它增加了对JUnit4的支持,所以可以注解替代老的JUnit3的命名惯例。它有其他额外的能力。详细信息可以查看https://google.github.io/android-testing-support-library/。
属性代表用户界面上的组件。@Before方法查找组件,并将它们分配给属性。文档推荐使用testPreconditions测试,演示组件被找到。测试和其它没有什么区别,只是失败后会很容易找到哪里出错了。
其它测试都从string资源里面查找字符串,和labels里面的值进行比较。注意任何东西都没有被修改,测试大体上是只读的。
最后,@MediumTest注解被用来指示测试方法的大小。只要很短时间的测试用@SmallTest标记,耗时超过100毫秒的是@MediumTest,更长的使用@LargeTest。
通过Gradle,运行那些需要连接设备或者模拟器的测试可以通过connectedCheck任务完成。
例子如下:
> ./gradlew connectedCheck
:app:preBuild UP-TO-DATE
:app:preDebugBuild UP-TO-DATE
:app:checkDebugManifest
:app:prepareDebugDependencies
// ... lots of tasks ...
:app:packageDebugAndroidTest UP-TO-DATE
:app:assembleDebugAndroidTest UP-TO-DATE
:app:connectedDebugAndroidTest
:app:connectedAndroidTest
:app:connectedCheck
BUILD SUCCESSFUL
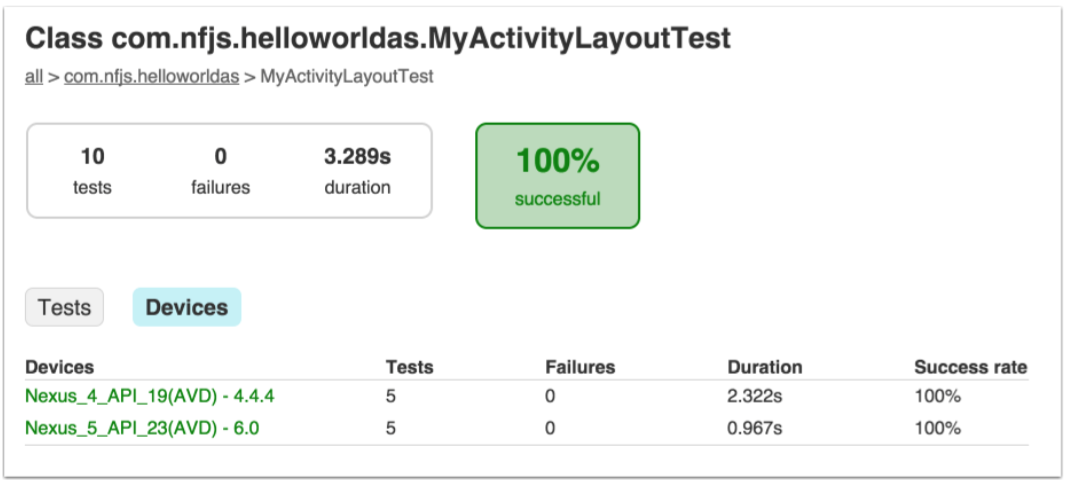
输出的报告在app/build/reports/androidTests/connected目录下面。实例报告如下:
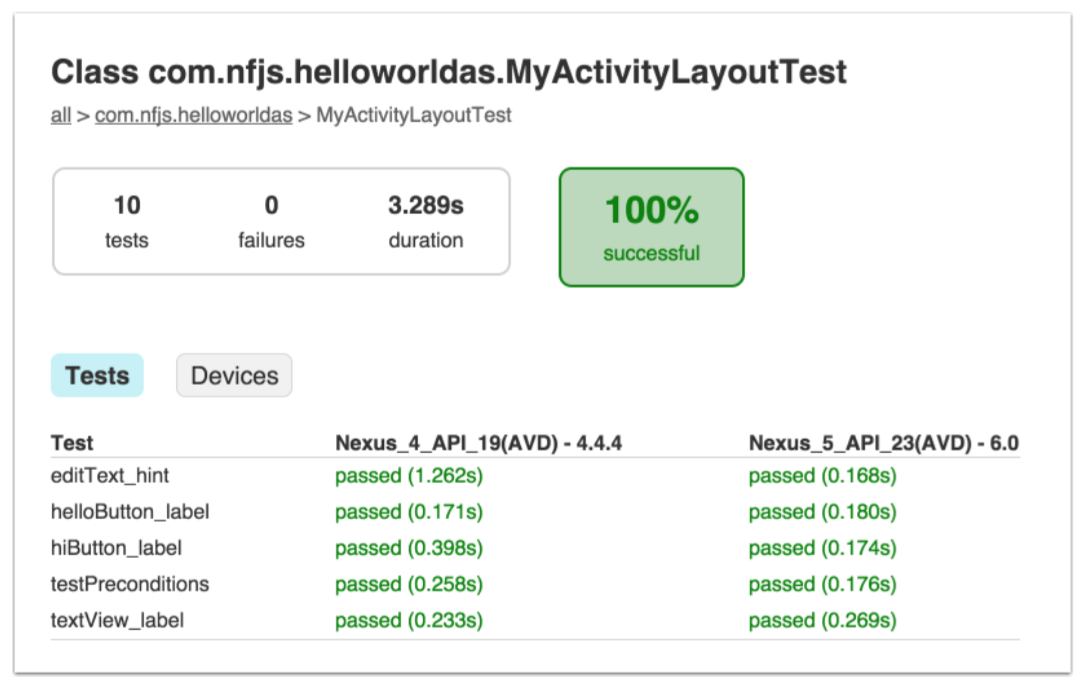
实例显示了模拟器的名字,和所有测试的结果。点击”Devices“按钮来切换视图:
Android Support Test Library里面的类可以做更多,并且非常的块。当你想要通过增加数据,点击按钮来驱动UI,有像Robotium和Espresso这样的可以库。