新一代数据订阅系统部署手册
1.系统介绍
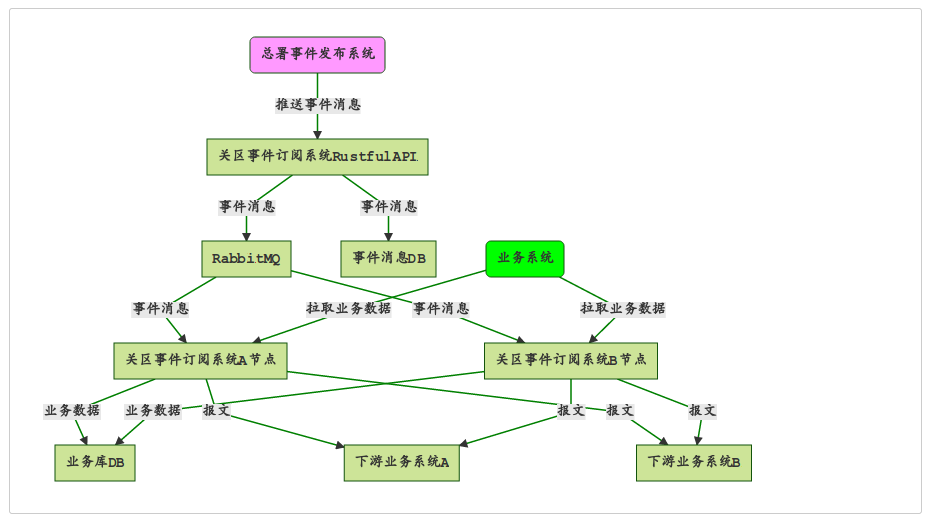
关区新一代数据订阅系统采用SpringBoot技术开发,基本的架构如下:
2.部署准备工作
首先将程序打包为一个单体JAR包,名为:event-process-0.0.1-SNAPSHOT.jar,将程序和全局配置文件application.yml放到当前目录下,在当前目录下编写Dockerfile,如下:
FROM cantara/alpine-openjdk-jdk8
WORKDIR /usr/myapp
COPY event-process-0.0.1-SNAPSHOT.jar /usr/myapp/
COPY ./application.yml /usr/myapp/config/
CMD  java -jar /usr/myapp/event-process-0.0.1-SNAPSHOT.jar
将上述代码保存至Dockerfile中,然后在当前目录下执行如下指令:
docker build . -t myevent
执行无误后程序将打包为docker镜像,然后用如下命令启动docker镜像:
docker run -d -p 9091:8080 --name=myevent1 -v /home/conf/event:/usr/myapp/config -v /etc/localtime:/etc/localtime --hostname=myevent1 --restart=always myevent
镜像启动后,可以使用如下命令从开发机上到导出镜像文件:
docker export 镜像ID -o myevent.tar
将myevent.tar文件copy至生产环境备用。
3.部署
部署将使用两台CentOS 7.6 linux主机,IP地址分别为10.77.9.112和10.77.9.113,并使用10.77.9.114作为共享的虚拟IP对外提供服务。其中112和113主机上分别安装了docker引擎和keepalived的软件,并有nginx的docker镜像。
3.1目录规划和相关配置文件的放置
在两台主机上分别创建目录,目录创建命令如下:
mkdir /home/conf
mkdir /home/conf/nginx
mkdir /home/conf/nginx/conf.d
mkdir /home/conf/nginx/check_sh
mkdir /home/conf/event
3.2放置配置文件
在两台主机想分别放置如下目录:
将application.yml放置到目录/home/conf/event;
在目录/home/conf/nginx中创建文件nginx.conf;
在目录/home/conf/nginx/conf.d中创建文件default.conf;
在目录/home/conf/nginx/创建文件nginx_check.sh。
3.3启动docker镜像
3.3.1导入myevent.tar镜像
分别在两台主机上导入myevent镜像文件,命令如下:
docker import myevent.tar myevent
3.3.2 修改配置文件
按照部署要求修改两台主机上的application.yml,将数据库链接和RabbitMQ的配置更新至生产环境。
3.3.2.1修改112的nginx相关配置
修改nginx.conf如下:
user  nginx;
worker_processes  1;

error_log  /var/log/nginx/error.log warn;
pid        /var/run/nginx.pid;


events {
    worker_connections  1024;
}


http {

    upstream tomcat_server {
        server 10.77.9.112:9090;
        server 10.77.9.112:9091;
        server 10.77.9.113:9090;
        server 10.77.9.113:9091;
    }
    include       /etc/nginx/mime.types;
    default_type  application/octet-stream;

    log_format  main  '$remote_addr - $remote_user [$time_local] "$request" '
                      '$status $body_bytes_sent "$http_referer" '
                      '"$http_user_agent" "$http_x_forwarded_for"';

    access_log  /var/log/nginx/access.log  main;

    sendfile        on;
    #tcp_nopush     on;

    keepalive_timeout  65;

    #gzip  on;

    include /etc/nginx/conf.d/*.conf;
}
修改default.conf如下:
server {
    listen       80;
    server_name  10.77.9.112;

    #charset koi8-r;
    #access_log  /var/log/nginx/host.access.log  main;

    location / {
        #root   /usr/share/nginx/html;
        #index  index.html index.htm;
        proxy_pass http://tomcat_server;
        proxy_set_header Host $host;
        proxy_set_header X-Real-IP $remote_addr;
        proxy_set_header X-Forwarded-For $proxy_add_x_forwarded_for;
    }

    #error_page  404              /404.html;

    # redirect server error pages to the static page /50x.html
    #
    error_page   500 502 503 504  /50x.html;
    location = /50x.html {
        root   /usr/share/nginx/html;
    }

    # proxy the PHP scripts to Apache listening on 127.0.0.1:80
    #
    #location ~ .php$ {
    #    proxy_pass   http://127.0.0.1;
    #}

    # pass the PHP scripts to FastCGI server listening on 127.0.0.1:9000
    #
    #location ~ .php$ {
    #    root           html;
    #    fastcgi_pass   127.0.0.1:9000;
    #    fastcgi_index  index.php;
    #    fastcgi_param  SCRIPT_FILENAME  /scripts$fastcgi_script_name;
    #    include        fastcgi_params;
    #}

    # deny access to .htaccess files, if Apache's document root
    # concurs with nginx's one
    #
    #location ~ /.ht {
    #    deny  all;
    #}
}
编写nginx_check.sh,保存后给予可执行权限chmod +x nginx_check.sh如下:
#!/bin/bash
A=$(ps -C nginx --no-header|wc -l)
if [ $A -eq 0 ]
then
   docker start nginx1
   sleep 8
   B=$(ps -C nginx --no-header | wc -l)
   if [ $B -eq 0 ]
   then
        systemctl stop keepalived.service
   fi
fi
3.3.2.2修改113的nginx相关配置
修改nginx.conf如下:
user  nginx;
worker_processes  1;

error_log  /var/log/nginx/error.log warn;
pid        /var/run/nginx.pid;


events {
    worker_connections  1024;
}


http {

    upstream tomcat_server {
        server 10.77.9.112:9090;
        server 10.77.9.112:9091;
        server 10.77.9.113:9090;
        server 10.77.9.113:9091;
    }
    include       /etc/nginx/mime.types;
    default_type  application/octet-stream;

    log_format  main  '$remote_addr - $remote_user [$time_local] "$request" '
                      '$status $body_bytes_sent "$http_referer" '
                      '"$http_user_agent" "$http_x_forwarded_for"';

    access_log  /var/log/nginx/access.log  main;

    sendfile        on;
    #tcp_nopush     on;

    keepalive_timeout  65;

    #gzip  on;

    include /etc/nginx/conf.d/*.conf;
}
修改default.conf如下:
server {
    listen       80;
    server_name  10.77.9.113;

    #charset koi8-r;
    #access_log  /var/log/nginx/host.access.log  main;

    location / {
        #root   /usr/share/nginx/html;
        #index  index.html index.htm;
        proxy_pass http://tomcat_server;
        proxy_set_header Host $host;
        proxy_set_header X-Real-IP $remote_addr;
        proxy_set_header X-Forwarded-For $proxy_add_x_forwarded_for;
    }

    #error_page  404              /404.html;

    # redirect server error pages to the static page /50x.html
    #
    error_page   500 502 503 504  /50x.html;
    location = /50x.html {
        root   /usr/share/nginx/html;
    }

    # proxy the PHP scripts to Apache listening on 127.0.0.1:80
    #
    #location ~ .php$ {
    #    proxy_pass   http://127.0.0.1;
    #}

    # pass the PHP scripts to FastCGI server listening on 127.0.0.1:9000
    #
    #location ~ .php$ {
    #    root           html;
    #    fastcgi_pass   127.0.0.1:9000;
    #    fastcgi_index  index.php;
    #    fastcgi_param  SCRIPT_FILENAME  /scripts$fastcgi_script_name;
    #    include        fastcgi_params;
    #}

    # deny access to .htaccess files, if Apache's document root
    # concurs with nginx's one
    #
    #location ~ /.ht {
    #    deny  all;
    #}
}
编写nginx_check.sh,保存后给予可执行权限chmod +x nginx_check.sh如下:
#!/bin/bash
A=$(ps -C nginx --no-header|wc -l)
if [ $A -eq 0 ]
then
   docker start nginx2
   sleep 8
   B=$(ps -C nginx --no-header | wc -l)
   if [ $B -eq 0 ]
   then
        systemctl stop keepalived.service
   fi
fi
3.3.2.3修改keepalived配置
分别修改112和113主机路径/etc/keepalived/keepalived.conf文件。
112修改如下:
! Configuration File for keepalived

global_defs {
   router_id LVS_52
   vrrp_skip_check_adv_addr
   #vrrp_strict
   vrrp_garp_interval 0
   vrrp_gna_interval 0
}

vrrp_script chk_nginx {
   script "/home/conf/nginx/check_sh/nginx_check.sh"
   interval 2
   weight -5
   fall 3
   rise 2
}

vrrp_instance VI_1 {
    state MASTER
    interface ens32 #主机上的网卡编号
    virtual_router_id 151 #主备必须相同
    mcast_src_ip 10.77.9.112
    priority 100 #主机的必须大于备机
    advert_int 1
    authentication {
        auth_type PASS
        auth_pass 1111
    }
    track_script {
        chk_nginx
    }
    virtual_ipaddress {
        10.77.9.114 #虚拟ip,主备相同
    }
}

virtual_server 10.77.9.114 80 {
    delay_loop 6
    lb_algo rr
    lb_kind NAT
    nat_mask 255.255.255.0
    persistence_timeout 50
    protocol TCP

    real_server 10.77.9.112 8000 {
        weight 1
         TCP_CHECK{
                connect_timeout 5
                ng_get_retry 3
                delay_before_retry 3
                connect_port 8000
        }
    }
    real_server 10.77.9.113 8000 {
        weight 1
        TCP_CHECK{
                connect_timeout 5
                ng_get_retry 3
                delay_before_retry 3
                connect_port 8000
        }

    }
}
113修改如下:
! Configuration File for keepalived

global_defs {
   router_id LVS_53
   vrrp_skip_check_adv_addr
   #vrrp_strict
   vrrp_garp_interval 0
   vrrp_gna_interval 0
}

vrrp_script chk_nginx {
   script "/home/conf/nginx/check_sh/nginx_check.sh"
   interval 2
   weight -5
   fall 3
   rise 2
}

vrrp_instance VI_1 {
    state MASTER
    interface ens32
    virtual_router_id 151
    mcast_src_ip 10.77.9.113
    priority 100
    advert_int 1
    authentication {
        auth_type PASS
        auth_pass 1111
    }
    track_script {
        chk_nginx
    }
    virtual_ipaddress {
        10.77.9.114
    }
}

virtual_server 10.77.9.114 80 {
    delay_loop 6
    lb_algo rr
    lb_kind NAT
    nat_mask 255.255.255.0
    persistence_timeout 50
    protocol TCP

    real_server 10.77.9.112 8000 {
        weight 1
         TCP_CHECK{
                connect_timeout 5
                ng_get_retry 3
                delay_before_retry 3
                connect_port 8000
        }
    }
    real_server 10.77.9.113 8000 {
        weight 1
        TCP_CHECK{
                connect_timeout 5
                ng_get_retry 3
                delay_before_retry 3
                connect_port 8000
        }

    }
}
3.3.2.4修改hosts文件
分别在112,113主机的/etc/hosts文件中加入如下域名解析:
10.266.33.242 frame.h2018.hg.cn
10.99.27.223 app-api-test.h2018.com
3.3.2.5修改docker配置文件daemon.json
分别在112,113两台主机的/etc/docker/daemon.json文件中加入域名解析:
{"dns":["10.77.9.112","10.77.9.113"]}
重启docker引擎:systemctl restart docker
3.3.3创建容器并运行
3.3.3.1创建myevent容器并运行
在112主机上分别执行如下命令:
docker run -d -p 9091:8080 --name=myevent1 -v /home/conf/event:/usr/myapp/config -v /etc/localtime:/etc/localtime --hostname=myevent1 --restart=always  myevent /bin/sh -c 'java -jar -Duser.timezone=GMT+8 /usr/myapp/event-process-0.0.1-SNAPSHOT.jar'

docker run -d -p 9090:8080 --name=myevent2 -v /home/conf/event:/usr/myapp/config -v /etc/localtime:/etc/localtime --hostname=myevent2 --restart=always  myevent /bin/sh -c 'java -jar -Duser.timezone=GMT+8 /usr/myapp/event-process-0.0.1-SNAPSHOT.jar'
在113主机上分别执行如下命令:
docker run -d -p 9091:8080 --name=myevent3 -v /home/conf/event:/usr/myapp/config -v /etc/localtime:/etc/localtime --hostname=myevent3 --restart=always  myevent /bin/sh -c 'java -jar -Duser.timezone=GMT+8 /usr/myapp/event-process-0.0.1-SNAPSHOT.jar'

docker run -d -p 9090:8080 --name=myevent4 -v /home/conf/event:/usr/myapp/config -v /etc/localtime:/etc/localtime --hostname=myevent4 --restart=always  myevent /bin/sh -c 'java -jar -Duser.timezone=GMT+8 /usr/myapp/event-process-0.0.1-SNAPSHOT.jar'
3.3.3.2创建nginx容器并运行
在112主机上执行如下命令:
docker run -d -p 8000:80 --restart=always --hostname=nginx1 --name=nginx1 --link=myevent1:myevent_1 --link=myevent2:myevent_2 -v /etc/localtime:/etc/localtime -v /home/conf/nginx/nginx.conf:/etc/nginx/nginx.conf -v /home/conf/nginx/conf.d/default.conf:/etc/nginx/conf.d/default.conf nginx
在113主机上执行如下命令:
docker run -d -p 8000:80 --restart=always --hostname=nginx2 --name=nginx2 -v /etc/localtime:/etc/localtime -v /home/conf/nginx/nginx.conf:/etc/nginx/nginx.conf -v /home/conf/nginx/conf.d/default.conf:/etc/nginx/conf.d/default.conf nginx
3.4关闭linux系统防火墙
分别在两台linux主机上执行如下命令:
 systemctl stop firewalld.service

 systemctl disable firewalld.service
3.5安装域名解析服务
分别在两台linux主机上执行如下命令:
yum install dnsmasq
systemctl enable dnsmasq.service
systemctl restart dnsmasq.service