【转】cuck hash https://coolshell.cn/articles/17225.html
(感谢网友 @我的上铺叫路遥 投稿)

对于海量数据处理业务,我们通常需要一个索引数据结构,用来帮助查询,快速判断数据记录是否存在,这种数据结构通常又叫过滤器(filter)。考虑这样一个场景,上网的时候需要在浏览器上输入URL,这时浏览器需要去判断这是否一个恶意的网站,它将对本地缓存的成千上万的URL索引进行过滤,如果不存在,就放行,如果(可能)存在,则向远程服务端发起验证请求,并回馈客户端给出警告。
索引的存储又分为有序和无序,前者使用关联式容器,比如B树,后者使用哈希算法。这两类算法各有优劣:比如,关联式容器时间复杂度稳定O(logN),且支持范围查询;又比如哈希算法的查询、增删都比较快O(1),但这是在理想状态下的情形,遇到碰撞严重的情况,哈希算法的时间复杂度会退化到O(n)。因此,选择一个好的哈希算法是很重要的。
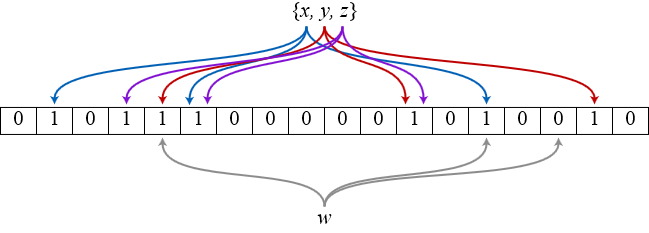
时下一个非常流行的哈希索引结构就是bloom filter,它类似于bitmap这样的hashset,所以空间利用率很高。其独特的地方在于它使用多个哈希函数来避免哈希碰撞,如图所示(来源wikipedia),bit数组初始化为全0,插入x时,x被3个哈希函数分别映射到3个不同的bit位上并置1,查询x时,只有被这3个函数映射到的bit位全部是1才能说明x可能存在,但凡至少出现一个0表示x肯定不存在。
但是,bloom filter的这种位图模式带来两个问题:一个是误报(false positives),在查询时能提供“一定不存在”,但只能提供“可能存在”,因为存在其它元素被映射到部分相同bit位上,导致该位置1,那么一个不存在的元素可能会被误报成存在;另一个是漏报(false nagatives),同样道理,如果删除了某个元素,导致该映射bit位被置0,那么本来存在的元素会被漏报成不存在。由于后者问题严重得多,所以bloom filter必须确保“definitely no”从而容忍“probably yes”,不允许元素的删除。
关于元素删除的问题,一个改良方案是对bloom filter引入计数,但这样一来,原来每个bit空间就要扩张成一个计数值,空间效率上又降低了。
Cuckoo Hashing
为了解决这一问题,本文引入了一种新的哈希算法——cuckoo filter,它既可以确保该元素存在的必然性,又可以在不违背此前提下删除任意元素,仅仅比bitmap牺牲了微量空间效率。先说明一下,这个算法的思想来源是一篇CMU论文,笔者按照其思路用C语言做了一个简单实现(Github),附上对一段文本数据进行导入导出的正确性测试。
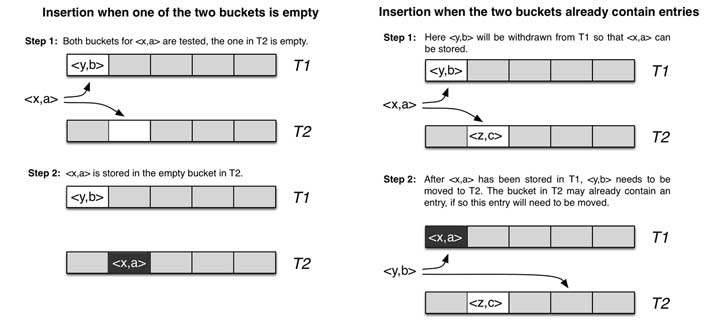
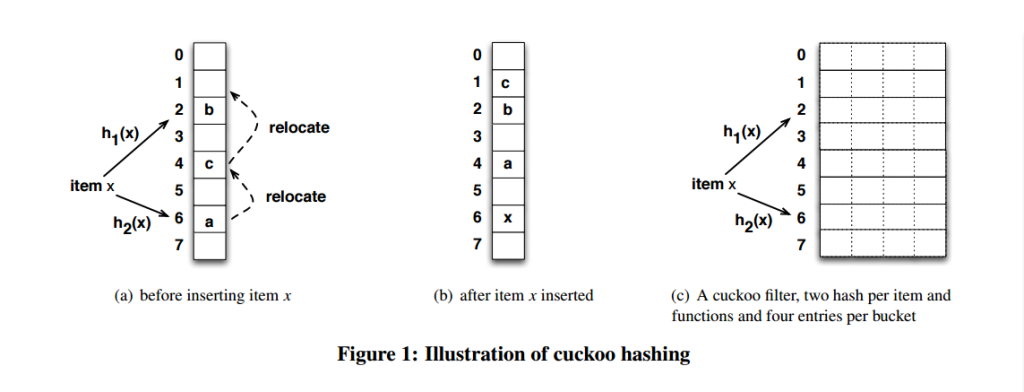
接下来我会结合自己的示例代码讲解哈希算法的实现。我们先来看看cuckoo hashing有什么特点,它的哈希函数是成对的(具体的实现可以根据需求设计),每一个元素都是两个,分别映射到两个位置,一个是记录的位置,另一个是备用位置。这个备用位置是处理碰撞时用的,这就要说到cuckoo这个名词的典故了,中文名叫布谷鸟,这种鸟有一种即狡猾又贪婪的习性,它不肯自己筑巢,而是把蛋下到别的鸟巢里,而且它的幼鸟又会比别的鸟早出生,布谷幼鸟天生有一种残忍的动作,幼鸟会拼命把未出生的其它鸟蛋挤出窝巢,今后以便独享“养父母”的食物。借助生物学上这一典故,cuckoo hashing处理碰撞的方法,就是把原来占用位置的这个元素踢走,不过被踢出去的元素还要比鸟蛋幸运,因为它还有一个备用位置可以安置,如果备用位置上还有人,再把它踢走,如此往复。直到被踢的次数达到一个上限,才确认哈希表已满,并执行rehash操作。如下图所示(图片来源):
我们不禁要问发生哈希碰撞之前的空间利用率是多少呢?不幸地告诉你,一维数组的哈希表上跟其它哈希函数没什么区别,也就50%而已。但如果是二维的呢?
一个改进的哈希表如下图所示,每个桶(bucket)有4路槽位(slot)。当哈希函数映射到同一个bucket中,在其它三路slot未被填满之前,是不会有元素被踢的,这大大缓冲了碰撞的几率。笔者自己的简单实现上测过,采用二维哈希表(4路slot)大约80%的占用率(CMU论文数据据说达到90%以上,应该是扩大了slot关联数目所致)。
Cuckoo Filter设计与实现
cuckoo hashing的原理介绍完了,下面就来演示一下笔者自己实现的一个cuckoo filter应用,简单易用为主,不到500行C代码。应用场景是这样的:假设有一段文本数据,我们把它通过cuckoo filter导入到一个虚拟的flash中,再把它导出到另一个文本文件中。flash存储的单元页面是一个log_entry,里面包含了一对key/value,value就是文本数据,key就是这段大小的数据的SHA1值(照理说SHA1是可以通过数据源生成,没必要存储到flash,但这里主要为了测试而故意设计的,万一key和value之间没有推导关系呢)。
- size of each entry is assumed just one sector fit.
/
struct log_entry {
uint8_t sha1[20];
uint8_t data[DAT_LEN];
};
- #define SECTOR_SIZE (1 << 10)
- #define DAT_LEN (SECTOR_SIZE - 20) / minus sha1 size /
- / The log entries store key-value pairs on flash and the
- * size of each entry is assumed just one sector fit.
- */
- struct log_entry {
- uint8_t sha1[20];
- uint8_t data[DAT_LEN];
- };
- size of each entry is assumed just one sector fit.
*/
struct log_entry {
uint8_t sha1[20];
uint8_t data[DAT_LEN];
};
顺便说明一下DAT_LEN设置,之前我们设计了一个虚拟flash(用malloc模拟出来),由于flash的单位是按页大小SECTOR_SIZE读写,这里假设每个log_entry正好一个页大小,当然可以根据实际情况调整。
以上是flash的存储结构,至于哈希表里的slot有三个成员tag,status和offset,分别是哈希值,状态值和在flash的偏移位置。其中status有三个枚举值:AVAILIBLE,OCCUPIED,DELETED,分别表示这个slot是空闲的,占用的还是被删除的。至于tag,按理说应该有两个哈希值,对应两个哈希函数,但其中一个已经对应bucket的位置上了,所以我们只要保存另一个备用bucket的位置就行了,这样万一被踢,只要用这个tag就可以找到它的另一个安身之所。
- cuckoo hashing function and map keys to log entries stored on flash.
/
struct hash_slot_cache {
uint32_t tag : 30; / summary of key /
uint32_t status : 2; / FSM /
uint32_t offset; / offset on flash memory /
};
- enum { AVAILIBLE, OCCUPIED, DELETED, };
- / The in-memory hash bucket cache is to filter keys (which is assumed SHA1) via
- * cuckoo hashing function and map keys to log entries stored on flash.
- /
- struct hash_slot_cache {
- uint32_t tag : 30; / summary of key /
- uint32_t status : 2; / FSM /
- uint32_t offset; / offset on flash memory */
- };
- cuckoo hashing function and map keys to log entries stored on flash.
/
struct hash_slot_cache {
uint32_t tag : 30; / summary of key /
uint32_t status : 2; / FSM /
uint32_t offset; / offset on flash memory */
};
乍看之下size有点大是吗?没关系,你也可以根据情况调整数据类型大小,比如uint16_t,这里仅仅为了测试正确性。
至于哈希表以及bucket和slot的创建见初始化代码。buckets是一个二级指针,每个bucket指向4个slot大小的缓存,即4路slot,那么bucket_num也就是slot_num的1/4。这里我们故意把slot_num调小了点,为的是测试rehash的发生。
- #define ASSOC_WAY (4) /* 4-way association */
- struct hash_table {
- struct hash_slot_cache **buckets;
- struct hash_slot_cache slots;
- uint32_t slot_num;
- uint32_t bucket_num;
- };
- int cuckoo_filter_init(size_t size)
- {
- ...
- / Allocate hash slots /
- hash_table.slot_num = nvrom_size / SECTOR_SIZE;
- / Make rehashing happen /
- hash_table.slot_num /= 4;
- hash_table.slots = calloc(hash_table.slot_num, sizeof(struct hash_slot_cache));
- if (hash_table.slots == NULL) {
- return -1;
- }
- / Allocate hash buckets associated with slots */
- hash_table.bucket_num = hash_table.slot_num / ASSOC_WAY;
- hash_table.buckets = malloc(hash_table.bucket_num * sizeof(struct hash_slot_cache ));
- if (hash_table.buckets == NULL) {
- free(hash_table.slots);
- return -1;
- }
- for (i = 0; i < hash_table.bucket_num; i++) {
- hash_table.buckets[i] = &hash_table.slots[i * ASSOC_WAY];
- }
- }
下面是哈希函数的设计,这里有两个,前面提到既然key是20字节的SHA1值,我们就可以分别是对key的低32位和高32位进行位运算,只要bucket_num满足2的幂次方,我们就可以将key的一部分同bucket_num – 1相与,就可以定位到相应的bucket位置上,注意bucket_num随着rehash而增大,哈希函数简单的好处是求哈希值十分快。
- #define cuckoo_hash_lsb(key, count) (((size_t *)(key))[0] & (count - 1))
- #define cuckoo_hash_msb(key, count) (((size_t *)(key))[1] & (count - 1))
终于要讲解cuckoo filter最重要的三个操作了——查询、插入还有删除。查询操作是简单的,我们对传进来的参数key进行两次哈希求值tag[0]和tag[1],并先用tag[0]定位到bucket的位置,从4路slot中再去对比tag[1]。只有比中了tag后,由于只是key的一部分,我们再去从flash中验证完整的key,并把数据在flash中的偏移值read_addr输出返回。相应的,如果bucket[tag[0]]的4路slot都没有比中,我们再去bucket[tag[1]]中比对(代码略),如果还比不中,可以肯定这个key不存在。这种设计的好处就是减少了不必要的flash读操作,每次比对的是内存中的tag而不需要完整的key。
- static int cuckoo_hash_get(struct hash_table *table, uint8_t *key, uint8_t **read_addr)
- {
- int i, j;
- uint8_t *addr;
- uint32_t tag[2], offset;
- struct hash_slot_cache slot;
- tag[0] = cuckoo_hash_lsb(key, table->bucket_num);
- tag[1] = cuckoo_hash_msb(key, table->bucket_num);
- / Filter the key and verify if it exists. */
- slot = table->buckets[tag[0]];
- for (i = 0; i bucket_num) == slot[i].tag) {
- if (slot[i].status == OCCUPIED) {
- offset = slot[i].offset;
- addr = key_verify(key, offset);
- if (addr != NULL) {
- if (read_addr != NULL) {
- *read_addr = addr;
- }
- break;
- }
- } else if (slot[i].status == DELETED) {
- return DELETED;
- }
- }
- ...
- }
接下来先将简单的删除操作,之所以简单是因为delete除了将相应slot的状态值设置一下之外,其实什么都没有干,也就是说它不会真正到flash里面去把数据清除掉。为什么?很简单,没有必要。还有一个原因,flash的写操作之前需要擦除整个页面,这种擦除是会折寿的,所以很多flash支持随机读,但必须保持顺序写。
- static void cuckoo_hash_delete(struct hash_table *table, uint8_t *key)
- {
- uint32_t i, j, tag[2];
- struct hash_slot_cache *slot;
- tag[0] = cuckoo_hash_lsb(key, table->bucket_num);
- tag[1] = cuckoo_hash_msb(key, table->bucket_num);
- slot = table->buckets[tag[0]];
- for (i = 0; i bucket_num) == slot[i].tag) {
- slot[i].status = DELETED;
- return;
- }
- ...
- }
了解了flash的读写特性,你就知道为啥插入操作在flash层面要设计成append。不过我们这里不讨论过多flash细节,哈希表层面的插入逻辑其实跟查询差不多,我就不贴代码了。这里要贴的是如何判断并处理碰撞,其实这里也没啥玄机,就是用old_tag和old_offset保存一下临时变量,以便一个元素被踢出去之后还能找到备用的安身之所。但这里会有一个判断,每次踢人都会计数,当alt_cnt大于512时候表示哈希表真的快满了,这时候需要rehash了。
- static int cuckoo_hash_collide(struct hash_table *table, uint32_t *tag, uint32_t *p_offset)
- {
- int i, j, k, alt_cnt;
- uint32_t old_tag[2], offset, old_offset;
- struct hash_slot_cache slot;
- / Kick out the old bucket and move it to the alternative bucket. */
- offset = *p_offset;
- slot = table->buckets[tag[0]];
- old_tag[0] = tag[0];
- old_tag[1] = slot[0].tag;
- old_offset = slot[0].offset;
- slot[0].tag = tag[1];
- slot[0].offset = offset;
- i = 0 ^ 1;
- k = 0;
- alt_cnt = 0;
- KICK_OUT:
- slot = table->buckets[old_tag[i]];
- for (j = 0; j < ASSOC_WAY; j++) {
- if (offset == INVALID_OFFSET && slot[j].status == DELETED) {
- slot[j].status = OCCUPIED;
- slot[j].tag = old_tag[i ^ 1];
- p_offset = offset = slot[j].offset;
- break;
- } else if (slot[j].status == AVAILIBLE) {
- slot[j].status = OCCUPIED;
- slot[j].tag = old_tag[i ^ 1];
- slot[j].offset = old_offset;
- break;
- }
- }
- if (j == ASSOC_WAY) {
- if (++alt_cnt > 512) {
- if (k == ASSOC_WAY - 1) {
- / Hash table is almost full and needs to be resized */
- return 1;
- } else {
- k++;
- }
- }
- uint32_t tmp_tag = slot[k].tag;
- uint32_t tmp_offset = slot[k].offset;
- slot[k].tag = old_tag[i ^ 1];
- slot[k].offset = old_offset;
- old_tag[i ^ 1] = tmp_tag;
- old_offset = tmp_offset;
- i ^= 1;
- goto KICK_OUT;
- }
- return 0;
- }
rehash的逻辑也很简单,无非就是把哈希表中的buckets和slots重新realloc一下,空间扩展一倍,然后再从flash中的key重新插入到新的哈希表里去。这里有个陷阱要注意,千万不能有相同的key混进来!虽然cuckoo hashing不像开链法那样会退化成O(n),但由于每个元素有两个哈希值,而且每次计算的哈希值随着哈希表rehash的规模而不同,相同的key并不能立即检测到冲突,但当相同的key达到一定规模后,噩梦就开始了,由于rehash里面有插入操作,一旦在这里触发碰撞,又会触发rehash,这时就是一个rehash不断递归的过程,由于其中老的内存没释放,新的内存不断重新分配,整个程序就如同陷入DoS攻击一般瘫痪了。所以每次插入操作前一定要判断一下key是否已经存在过,并且对rehash里的插入使用碰撞断言防止此类情况发生。笔者在测试中不幸中了这样的彩蛋,调试了大半天才搞清楚原因,搞IT的同学们记住一定要防小人啊~
- static void cuckoo_rehash(struct hash_table *table)
- {
- ...
- uint8_t *read_addr = nvrom_base_addr;
- uint32_t entries = log_entries;
- while (entries--) {
- uint8_t key[20];
- uint32_t offset = read_addr - nvrom_base_addr;
- for (i = 0; i < 20; i++) {
- key[i] = flash_read(read_addr);
- read_addr++;
- }
- /* Duplicated keys in hash table which can cause eternal
- * hashing collision! Be careful of that!
- */
- assert(!cuckoo_hash_put(table, key, &offset));
- if (cuckoo_hash_get(&old_table, key, NULL) == DELETED) {
- cuckoo_hash_delete(table, key);
- }
- read_addr += DAT_LEN;
- }
- ...
- }
到此为止代码的逻辑还是比较简单,使用效果如何呢?我来帮你找个大文件unqlite.c测试一下,这是一个嵌入式数据库源代码,共59959行代码。作为需要导入的文件,编译我们的cuckoo filter,然后执行:
./cuckoo_db unqlite.c output.c
你会发现生成output.c正好也是59959行代码,一分不差,probably yes终于变成了definitely yes。同时也可以看到,cuckoo filter真的很快!如果你想看hashing的整个过程,可以参照README里把调试宏打开。最后,欢迎给这个小玩意提交PR!
参考资料
Cuckoo Filter的论文和PPT:Cuckoo Filter: Practically Better Than Bloom