一.nginx是什么
nginx是一个开源的,支持高性能,高并发的www服务和代理服务软件。它是一个俄罗斯人lgor sysoev开发的,作者将源代码开源出来供全球使用。
nginx比它大哥apache性能改进许多,nginx占用的系统资源更少,支持更高的并发连接,有更高的访问效率。
nginx不但是一个优秀的web服务软件,还可以作为反向代理,负载均衡,以及缓存服务使用。
安装更为简单,方便,灵活。
nginx可以说是非常nb了
回答:
支持高并发,能支持几万并发连接
资源消耗少,在3万并发连接下开启10个nginx线程消耗的内存不到200M
可以做http反向代理和负载均衡
支持异步网络i/o事件模型epoll
二.安装
1.通过yum 安装
#配置表 号域名源之后
yum -y install nginx
2.编译安装
1.卸载yum安装的
#之前通过yum安装过了,但是我们需要自己定制的,所以,要把之前的yum安装的卸载了
yum remove nginx
2.安装依赖
安装nginx需要的依赖库
yum install -y gcc patch libffi-devel python-devel zlib-devel bzip2-devel openssl openssl-devel
 ncurses-devel sqlite-devel readline-devel tk-devel gdbm-devel db4-devel libpcap-devel xz-devel


一. gcc 安装
安装 nginx 需要先将官网下载的源码进行编译,编译依赖 gcc 环境,如果没有 gcc 环境,则需要安装:
yum install gcc-c++

二. PCRE pcre-devel 安装
PCRE(Perl Compatible Regular Expressions) 是一个Perl库,包括 perl 兼容的正则表达式库。nginx 的 http 模块使用 pcre 来解析正则表达式,
所以需要在 linux 上安装 pcre 库,pcre-devel 是使用 pcre 开发的一个二次开发库。nginx也需要此库。命令:
yum install -y pcre pcre-devel

三. zlib 安装
zlib 库提供了很多种压缩和解压缩的方式, nginx 使用 zlib 对 http 包的内容进行 gzip ,所以需要在 Centos 上安装 zlib 库。
yum install -y zlib zlib-devel

四. OpenSSL 安装
OpenSSL 是一个强大的安全套接字层密码库,囊括主要的密码算法、常用的密钥和证书封装管理功能及 SSL 协议,并提供丰富的应用程序供测试或其它目的使用。
nginx 不仅支持 http 协议,还支持 https(即在ssl协议上传输http),所以需要在 Centos 安装 OpenSSL 库。
yum install -y openssl openssl-devel
3.安装软件
1.下载源码包
wget -c https://nginx.org/download/nginx-1.12.0.tar.gz

2.解压缩源码
tar -zxvf nginx-1.12.0.tar.gz

3.指定安装文件夹以及编译安装,开启nginx状态监测功能(进入解压包操作)
./configure --prefix=/opt/nginx1-12/ --with-http_ssl_module --with-http_stub_status_module
make && make install

4.启动nginx,进入sbin目录,找到nginx启动命令(cd  /opt/nginx1-12)就是要进入上一步指定的安装文件夹
cd sbin
./nginx #启动
./nginx -s stop #关闭
./nginx -s reload # 平滑重启 ,修改了nginx.conf之后,可以不重启服务,加载新的配置
或者 /opt/nginx1-12/sbin/nginx -s reload  # 绝对路径平滑重启

5.nginx目录结构


6.nginx配置详解

#定义nginx工作进程数
worker_processes  5;
#错误日志
#error_log  logs/error.log;
#http定义代码主区域
http {
    include       mime.types;
    default_type  application/octet-stream;
    #定义nginx的访问日志功能
    #nginx会有一个accses.log功能,查看用户访问的记录
    log_format  main  '$remote_addr - $remote_user [$time_local] "$request" '
                      '$status $body_bytes_sent "$http_referer" '
                      '"$http_user_agent" "$http_x_forwarded_for"';

    #开启日志功能
    access_log  logs/access.log  main;
    sendfile        on;
    keepalive_timeout  65;
    #开启gzip压缩传输
    gzip  on;
    #虚拟主机1  定义一个 斗鱼网站
    server {
        #定义nginx的访问入口端口,访问地址是  192.168.11.37:80
        listen       80;
        #定义网站的域名www.woshidouyu.tv
        #如果没有域名,就填写服务器的ip地址  192.168.11.37
        server_name  www.woshidouyu.tv;
        #nginx的url域名匹配
        #只要请求来自于www.woshidouyu.tv/111111111
        #只要请求来自于www.woshidouyu.tv/qweqwewqe
        #最低级的匹配,只要来自于www.woshidouyu.tv这个域名,都会走到这个location
        location / {
            #这个root参数,也是关键字,定义网页的根目录
            #以nginx安装的目录为相对路径  /opt/nginx112/html
            #可以自由修改这个root定义的网页根目录
            root   html;
            #index参数定义网站的首页文件名,默认的文件名
            index  index.html index.htm;
        }
        #错误页面的优化(只要是遇到前面4系列的错误,就会直接跳转到相对目录下的40x.html页面)
        error_page  400 401  402  403  404   /40x.html;
    }
}
7.配置一个网页
server {
  listen 80;
  server_name www.qishi2douyu.com;
  #access_log logs/host.access.log main;
  location / {
  root /opt/qishi2douyu/;
  index index.html index.htm;
    }

  #error_page 404 /404.html;
  error_page 500 502 503 504 /50x.html;
  location = /50x.html {
  root html;
    }
}
4.加入环境变量
vim  /etc/profile.d/nginx.sh

加入这句话:
  export PATH=/opt/nginx-112/sbin:$PATH

·然后执行:
.  /etc/profile.d/nginx.sh

nginx -s reload
·
nginx操作一般有:
-s stop
-s reload
-s start
都有-s选项
三.多主机配置
1.在虚拟机机跑三个虚拟主机
在192.168.226.128(我的虚拟机ip)服务器上,跑3个网站出来

 www.qishi2douyu.com

www.qishi2huya.com

www.qishi2jd.com
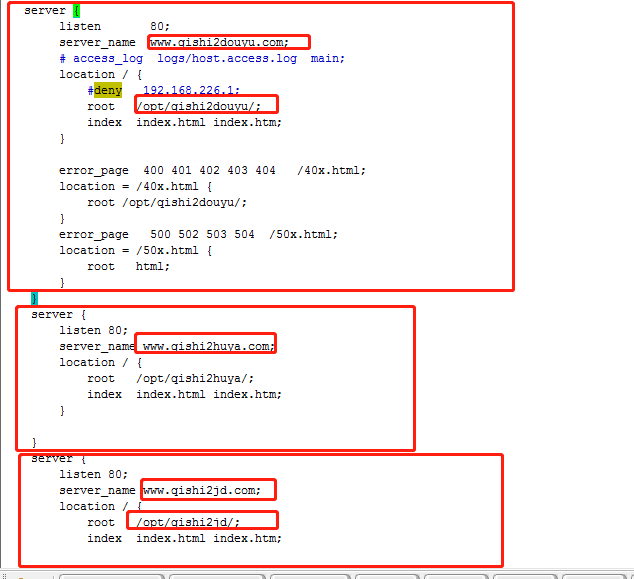
2.修改配置文件
server {
        listen       80;
        server_name  www.qishi2douyu.com;
        #access_log  logs/host.access.log  main;
        location / {
            root   /opt/qishi2douyu/;
            index  index.html index.htm;
        }

        #error_page  404              /404.html;
        error_page   500 502 503 504  /50x.html;
        location = /50x.html {
            root   html;
        }
    }
    server {
        listen 80;
        server_name www.qishi2huya.com;
        location / {
            root   /opt/qishi2huya/;
            index  index.html index.htm;
        }

    }
    server {
        listen 80;
        server_name www.qishi2jd.com;
        location / {
            root   /opt/qishi2jd/;
            index  index.html index.htm;
        }

    }
3.为上面三台虚拟主机的网页文件分别建立各自的文件夹和其索引页index.html
分别在/opt目录下创建qishi2douyu、qishi2huya、qishi2jd这三个目录

分别在目录下创建index.html
4.平滑重启(不断开服务器)
/opt/nginx112/sbin/nginx -s reload #参数s是执行的意思,会重新加载配置文件
5.三台主机分别访问
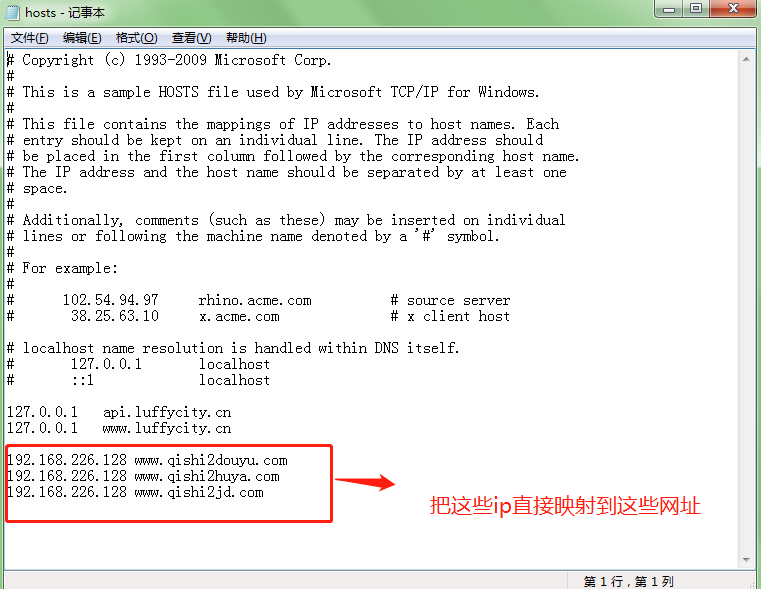
#1.修改物理机的hosts文件


www.qishi2douyu.com

www.qishi2huya.com

www.qishi2jd.com

四.关于nginx的错误页的优化
1.修改配置文件
vim /opt/nginx112/conf/nginx.conf
在www.qishi2douyu.com虚拟主机下添加以下内容(server代码块下)

error_page  400 401 402 403 404   /40x.html;
        location = /40x.html {
            root /opt/qishi2douyu/;
        }
2. 在/opt/qishi2douyu/目录下创建40x.html, 把淘宝的错误页面源代码拷贝过来
vim 40x.html
3.平滑重启nginx
/opt/nginx112/sbin/nginx -s reload
4. 随便访问一个不存在的页面
http://www.qishi2douyu.com/sladfj243

五.nginx的日志功能
1. 打开nginx配置文件nginx.conf
vim /opt/nginx-112/conf/nginx.conf
2. 修改配置文件, 启用日志功能(把注释去掉即可)
log_format  main  '$remote_addr - $remote_user [$time_local] "$request" '
                      '$status $body_bytes_sent "$http_referer" '
                      '"$http_user_agent" "$http_x_forwarded_for"';

    access_log  logs/access.log  main;

3.平滑启动
/opt/nginx112/sbin/nginx -s reload
4.实时输出日志信息
tail -f /opt/nginx112/logs/access.log
5.访问我们的主机就能看到谁访问了我们的主机
六.nginx的限制ip访问
1.编辑配置文件
vim /opt/nginx-112/conf/nginx.conf
2.加入这么一句话
deny 192.168.226.1;

七.ngixn的代理功能
1.分类
1. 正向代理(用的比较少)
  客户端挂了代理


2. 反向代理(保护资源服务器不受攻击)
  服务端挂了代理
2.简单实现一个反向代理
1. 准备两台机器,分别装上nginx
192.168.12.128   # 内部的django服务器
192.168.12.130   # 代理服务器

#就是说:
请求数据: windows ——> 192.168.12.130 ——> 192.168.12.128
返回数据: windows <—— 192.168.12.130 <—— 192.168.12.128
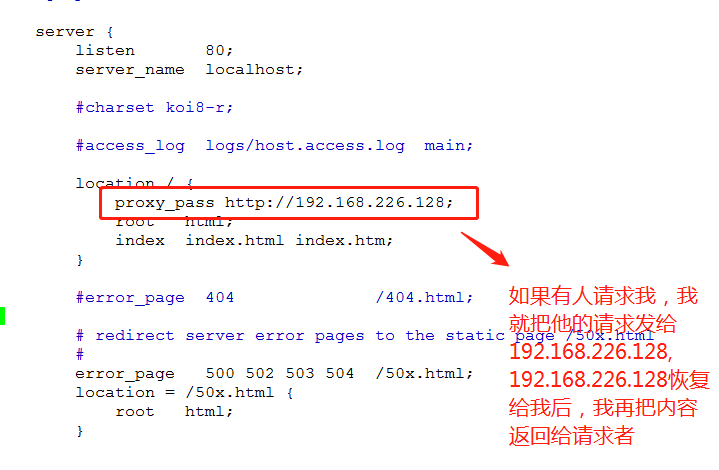
2.在代理服务器的上面修改配置文件(192.168.226.130)
vim /opt/nginx112/conf/nginx.conf


