1.用Eclipse创建一个工程,命名为spring2.0 并添加相应的jar包(我用的是4.0.5的版本)到 lib 包下:
spring-webmvc-4.0.5.RELEASE.jar
spring-web-4.0.5.RELEASE.jar
commons-logging-1.1.jar
spring-aop-4.0.5.RELEASE.jar
spring-context-4.0.5.RELEASE.jar
2.在web.xml中配置好DispatcherServlet。让spring mvc的小心脏跳动起来
web.xml
<?xml version="1.0" encoding="UTF-8"?>
<web-app version="2.5"
 xmlns="http://java.sun.com/xml/ns/javaee"
 xmlns:xsi="http://www.w3.org/2001/XMLSchema-instance"
 xsi:schemaLocation="http://java.sun.com/xml/ns/javaee
 http://java.sun.com/xml/ns/javaee/web-app_2_5.xsd">

  <welcome-file-list>
    <welcome-file>index.jsp</welcome-file>
  </welcome-file-list>

  <context-param>
    <param-name>contextConfigLocation</param-name>
    <!-- 默认为applicationContext.xml -->
    <param-value>/WEB-INF/applicationContext.xml</param-value>
</context-param>
  <servlet>
   <servlet-name>springMVC</servlet-name>
   <!-- DispatcherServlet 会自动加载/wef-inf/下的springMVC-servlet.xml -->
   <servlet-class>org.springframework.web.servlet.DispatcherServlet</servlet-class>
   <load-on-startup>1</load-on-startup>
  </servlet>
  <servlet-mapping>
   <servlet-name>springMVC</servlet-name>
   <url-pattern>/</url-pattern><!-- 意思是拦截所有请求 -->
  </servlet-mapping>
  <!-- 配置spring监听 -->
     <listener>
        <listener-class>org.springframework.web.context.ContextLoaderListener</listener-class>
    </listener>
</web-app>
3.在 WebContent/WEB-INF 下创建两个配置文件
applicationContext.xml(暂时没有用处,但是为了方便程序启动可以先添加)
<?xml version="1.0" encoding="UTF-8"?>
<beans xmlns="http://www.springframework.org/schema/beans"
 xmlns:xsi="http://www.w3.org/2001/XMLSchema-instance"
 xsi:schemaLocation="http://www.springframework.org/schema/beans
 http://www.springframework.org/schema/beans/spring-beans-3.0.xsd">
</beans>
springMVC-servlet.xml
<?xml version="1.0" encoding="UTF-8"?>
<beans
 xmlns="http://www.springframework.org/schema/beans"
 xmlns:context="http://www.springframework.org/schema/context"
 xmlns:p="http://www.springframework.org/schema/p"
 xmlns:mvc="http://www.springframework.org/schema/mvc"
 xmlns:xsi="http://www.w3.org/2001/XMLSchema-instance"
 xsi:schemaLocation="http://www.springframework.org/schema/beans
                    http://www.springframework.org/schema/beans/spring-beans-3.0.xsd
                    http://www.springframework.org/schema/context
                    http://www.springframework.org/schema/context/spring-context-3.0.xsd
                    http://www.springframework.org/schema/mvc
                    http://www.springframework.org/schema/mvc/spring-mvc-3.0.xsd">

                      <!-- 实现支持注解的IOC 这个将会在web层容器启动时自动扫面src下的package v19961996-->
     <context:component-scan base-package="v19961996" />
     <!-- 配置视图解析器 -->
     <bean id="viewResolver" class="org.springframework.web.servlet.view.InternalResourceViewResolver">
         <property name="prefix" value="/"/>
         <property name="suffix" value=".jsp"/>
     </bean>
 </beans>
4.在src下创建一个package , 命名为v19961996
在v19961996下创建一个类 , 命名为 HelloWorldController
HelloWorldController.java
@Controller
@RequestMapping("/Hello")
public class HelloWorldController {
    @RequestMapping("/World") //url将映射到这里
    public ModelAndView SayHi() {
        System.out.println("这是一个springmvc小例子");
        return new ModelAndView("HelloWorld");
    }
}
注解为@Controller是为了让Spring IOC容器初始化时自动扫描到;@RequestMapping是为了映射请求路径,因为类与方法上都有映射所以访问时应该是/Hello/World
5.在WebContent下创建视图
HelloWorld.jsp
<%@ page language="java" import="java.util.*" pageEncoding="UTF-8"%>
<!DOCTYPE HTML PUBLIC "-//W3C//DTD HTML 4.01 Transitional//EN">
<html>
  <head>
    <title>HelloWorld</title>
 <meta http-equiv="pragma" content="no-cache">
 <meta http-equiv="cache-control" content="no-cache">
 <meta http-equiv="expires" content="0">
 <meta http-equiv="keywords" content="keyword1,keyword2,keyword3">
  </head>
  <body>
    HelloWorld!<br>
  </body>
</html>
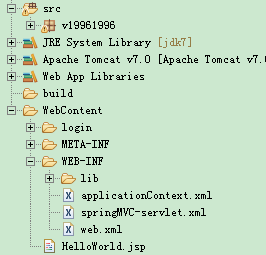
项目图:
6.启动Tomcat,输入 http://localhost:8080/spring2.0/Hello/World