1、域属性注入
创建实体类Student
package com.spring.entity;

public class Student {
    //普通属性
    private  Integer id;
    private String name;

    //域属性
    private Car car;

    public Car getCar() {
        return car;
    }

    public void setCar(Car car) {
        this.car = car;
    }
public Integer getId() {
        return id;
    }

    public void setId(Integer id) {
        this.id = id;
    }

    public String getName() {
        return name;
    }

    public void setName(String name) {
        this.name = name;
    }
}
创建实体类Car类
package com.spring.entity;

public class Car {
    private String type;//汽车的类型
    private  String color;//汽车的颜色

    public String getType() {
        return type;
    }

    public void setType(String type) {
        this.type = type;
    }

    public String getColor() {
        return color;
    }

    public void setColor(String color) {
        this.color = color;
    }
}
(1)byType
<?xml version="1.0" encoding="UTF-8"?>
<beans xmlns="http://www.springframework.org/schema/beans"
       xmlns:xsi="http://www.w3.org/2001/XMLSchema-instance"
       xsi:schemaLocation="http://www.springframework.org/schema/beans
       http://www.springframework.org/schema/beans/spring-beans.xsd">
 <!--使用域属性注入,byType方式-->
    <bean id="car" class="com.spring.entity.Car">
        <property name="color" value="蓝色"></property>
        <property name="type" value="奥迪"></property>
    </bean>

    <!--在Student中装配     autowire:所对应的方式-->
    <bean id="student" class="com.spring.entity.Student" autowire="byType">
        <property name="name" value="张三"></property>
        <property name="id" value="1"></property>
    </bean>
</beans>
运行结果如下
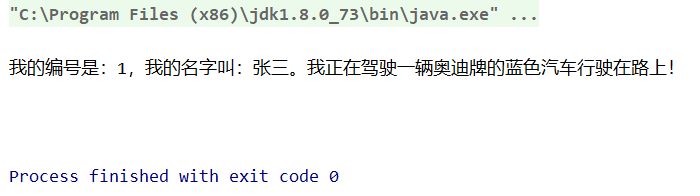
(2)byName
<?xml version="1.0" encoding="UTF-8"?>
<beans xmlns="http://www.springframework.org/schema/beans"
       xmlns:xsi="http://www.w3.org/2001/XMLSchema-instance"
       xsi:schemaLocation="http://www.springframework.org/schema/beans
       http://www.springframework.org/schema/beans/spring-beans.xsd">
 <!--byName方式:要求Car类的id和Student类中的域属性Car对象的对象名一致-->
    <bean id="car" class="com.spring.entity.Car">
        <property name="color" value="红色"></property>
        <property name="type" value="奔驰"></property>
    </bean>

    <bean id="student" class="com.spring.entity.Student" autowire="byName">
        <property name="name" value="李四"></property>
        <property name="id" value="2"></property>
    </bean>
</beans>
运行结果如下

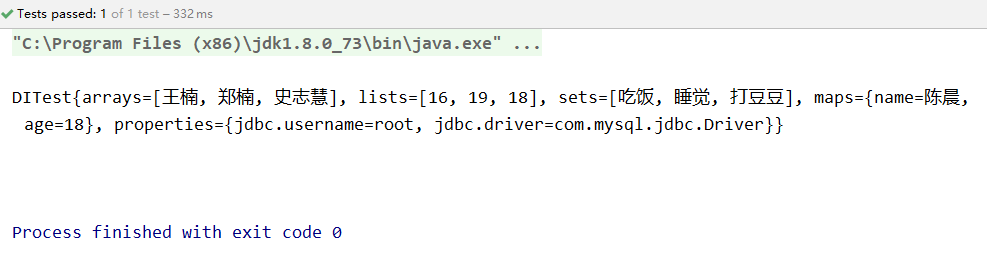
2、数组属性
定义实体类DITest
package com.spring.entity;

import java.util.*;

public class DITest {
    //定义String类型数组
    private String[] arrays;

    //定义一个List集合
    private List<Integer> lists;

    //定义一个Set集合
    private Set<String> sets;

    //定义一个Map集合
    private Map<String,Object> maps;

    //配置
    private Properties properties;

    @Override
    public String toString() {
        return "DITest{" +
                "arrays=" + Arrays.toString(arrays) +
                ", lists=" + lists +
                ", sets=" + sets +
                ", maps=" + maps +
                ", properties=" + properties +
                '}';
    }

    public String[] getArrays() {
        return arrays;
    }

    public void setArrays(String[] arrays) {
        this.arrays = arrays;
    }

    public List<Integer> getLists() {
        return lists;
    }

    public void setLists(List<Integer> lists) {
        this.lists = lists;
    }

    public Set<String> getSets() {
        return sets;
    }

    public void setSets(Set<String> sets) {
        this.sets = sets;
    }

    public Map<String, Object> getMaps() {
        return maps;
    }

    public void setMaps(Map<String, Object> maps) {
        this.maps = maps;
    }

    public Properties getProperties() {
        return properties;
    }

    public void setProperties(Properties properties) {
        this.properties = properties;
    }
}
定义相对应的applicationContextDITest.xml文件
<?xml version="1.0" encoding="UTF-8"?>
<beans xmlns="http://www.springframework.org/schema/beans"
       xmlns:xsi="http://www.w3.org/2001/XMLSchema-instance"

       xmlns:aop="http://www.springframework.org/schema/aop"
       xmlns:p="http://www.springframework.org/schema/p"

       xsi:schemaLocation="http://www.springframework.org/schema/beans
       http://www.springframework.org/schema/beans/spring-beans.xsd

       http://www.springframework.org/schema/aop
       http://www.springframework.org/schema/aop/spring-aop.xsd">
    <bean id="dITest" class="com.spring.entity.DITest">
        <!--数组属性-->
        <property name="arrays">

            <!--String集合-->
            <array>
                <value>王楠</value>
                <value>郑楠</value>
                <value>史志慧</value>
            </array>
        </property>

        <!--list数组-->
        <property name="lists">
            <list>
                <value>16</value>
                <value>19</value>
                <value>18</value>
            </list>
        </property>

        <!--set数组-->
        <property name="sets">
            <set>
                <value>吃饭</value>
                <value>睡觉</value>
                <value>打豆豆</value>
            </set>
        </property>

        <!--map集合-->
        <property name="maps">
            <map>
                <entry key="name" value="陈晨"></entry>
                <entry key="age" value="18"></entry>
            </map>
        </property>

        <!--properties-->
        <property name="properties">
            <props>
                <prop key="jdbc.driver">com.mysql.jdbc.Driver</prop>
                <prop key="jdbc.username">root</prop>
            </props>
        </property>
    </bean>
</beans>
Test测试类对应如下
package com.spring.test;

import com.spring.entity.DITest;
import org.junit.Test;
import org.springframework.context.ApplicationContext;
import org.springframework.context.support.ClassPathXmlApplicationContext;

public class Idtest {
    @Test
    public void say(){
        ApplicationContext cxt=new ClassPathXmlApplicationContext("applicationContextDITest.xml");
        DITest dITest = (DITest) cxt.getBean("dITest");
        System.out.println(dITest.toString());
    }
}
运行结果如下
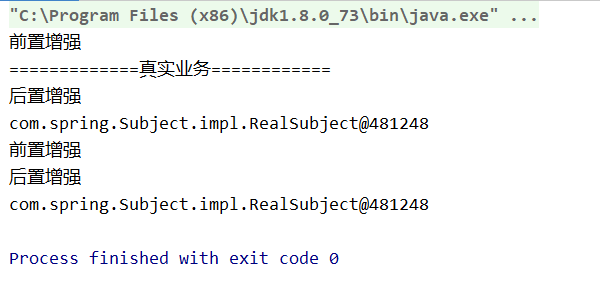
3、静态代理
(1)什么是静态代理:
    说白了,就是创建一个给程序调用的类(代理类),然后用代理类去吊原始对象
 (2)对应的案例
    创建抽象类Subject并定义其方法
package com.spring.Subject;

/**
 * 抽象类:真实业务接口
 */
public interface Subject {
    public void doSome();
}
创建Subject实现类RealSubject
package com.spring.Subject.impl;

import com.spring.Subject.Subject;
/**
 * 真实主题:将业务代码封装到此主题中
 */
public class RealSubject implements Subject {
    @Override
    public void doSome() {
        System.out.println("=============真实业务============");
    }
}
创建中间类ProxySubject
package com.spring.ProxySubject;

import com.spring.Subject.Subject;
import com.spring.Subject.impl.RealSubject;

/**
 * 代理主题:代理类    生成真实主体对象,调用真实主题的方法
 * 程序就不用直接去创建真实主题了,直接调用代理对象
 *
 *
 *
 * 静态代理:说白了,就是创建一个给程序调用的类(代理类),然后用代理类去吊原始对象
 */
public class ProxySubject implements Subject {
    //真实主题
    private Subject subject=new RealSubject();
    @Override
    public void doSome() {
        //AOP思想:增强
        System.out.println("前置增强===============");
        subject.doSome();
        System.out.println("后置增强===============");
    }
}
Test测试类
package com.spring.ProxyTest;

import com.spring.ProxySubject.ProxySubject;

public class ProxyTest {
    public static void main(String[] args) {
        //程序调用代理对象
        ProxySubject proxySubject=new ProxySubject();
        proxySubject.doSome();
    }
}
运行结果如下

4、JDK动态代理
package com.spring.JDK;

import com.spring.Subject.Subject;
import com.spring.Subject.impl.RealSubject;

import java.lang.reflect.InvocationHandler;
import java.lang.reflect.Method;
import java.lang.reflect.Proxy;

public class JDKTest {
    public static void main(String[] args) {
        //JDK动态代理:要求必须有抽象类
        //代表的是代理对象  指定对象的原始类型

        /**
         * ClassLoader loader,   类加载器:应该是代理对象的类加载器
         * Class<?>[] interfaces,   接口:原始对象实现的接口类型
         * InvocationHandler h
         */
        //创建一个原始对象
        final Subject subject=new RealSubject();

        Subject subjectProxy= (Subject) Proxy.newProxyInstance(subject.getClass().getClassLoader(), subject.getClass().getInterfaces(), new InvocationHandler() {
            /**
             *
             * @param proxy     代理对象
             * @param method    目标代理方法
             * @param args      目标代理方法的参数
             * @return
             * @throws Throwable
             */
            @Override
            public Object invoke(Object proxy, Method method, Object[] args) throws Throwable {
                System.out.println("前置增强");
                //如何去调用原始对象的业务方法
                Object invoke=method.invoke(subject,args);
                System.out.println("后置增强");
                return invoke;
            }
        });
        subjectProxy.doSome();
        System.out.println(subject);
        System.out.println(subjectProxy);
    }
}
运行结果如下
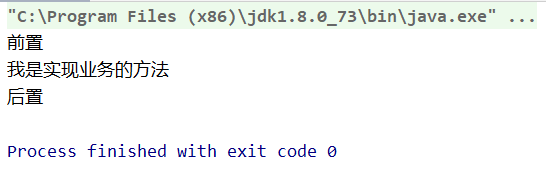
5、CGLIB动态代理
(1)创建IService类
package com.spring.CGLIB;

/**
 * 业务类
 */
public class IService {
    public void doSome(){
        System.out.println("我是实现业务的方法");
    }
}
(2)创建CGLIBTest类
package com.spring.CGLIB;

import org.springframework.cglib.proxy.Enhancer;
import org.springframework.cglib.proxy.MethodInterceptor;
import org.springframework.cglib.proxy.MethodProxy;

import java.lang.reflect.Method;

public class CGLIBTest {
    public static void main(String[] args) {
        //步骤一:目标对象
        final IService iService=new IService();
        //步骤二:通过CGLIB提供的Enhancer类生成代理
        Enhancer enhancer=new Enhancer();
        //步骤三:指定需要代理的目标对象模板(将目标对象放入到代理工厂中,生成代理对象)
        enhancer.setSuperclass(iService.getClass());
        //步骤四:实现增强的处理操作
        enhancer.setCallback(new MethodInterceptor() {
            /**
             *
             * @param o             目标对象
             * @param method        目标对象的方法
             * @param objects       目标对象方法内的参数
             * @param methodProxy   代理目标对象方法
             * @return
             * @throws Throwable
             */
            @Override
            public Object intercept(Object o, Method method, Object[] objects, MethodProxy methodProxy) throws Throwable {
                System.out.println("前置");
                Object invoke = methodProxy.invoke(iService, objects);
                System.out.println("后置");
                return invoke;
            }
        });
        //最后一步:创建代理
        IService iServiceProxy = (IService) enhancer.create();
        iServiceProxy.doSome();
    }
}
运行结果如下