茄子快传数据分析之原理分析及数据清洗
版权声明:闻道有先后,术业有专攻。 https://blog.csdn.net/wlk_328909605/article/details/82227410
需求:联想集团有一款app产品叫茄子快传(有上亿的活跃用户,集中在第三世界国家)
现在需要开发一个数据分析系统,来对app的用户行为数据做各类分析;
原理:
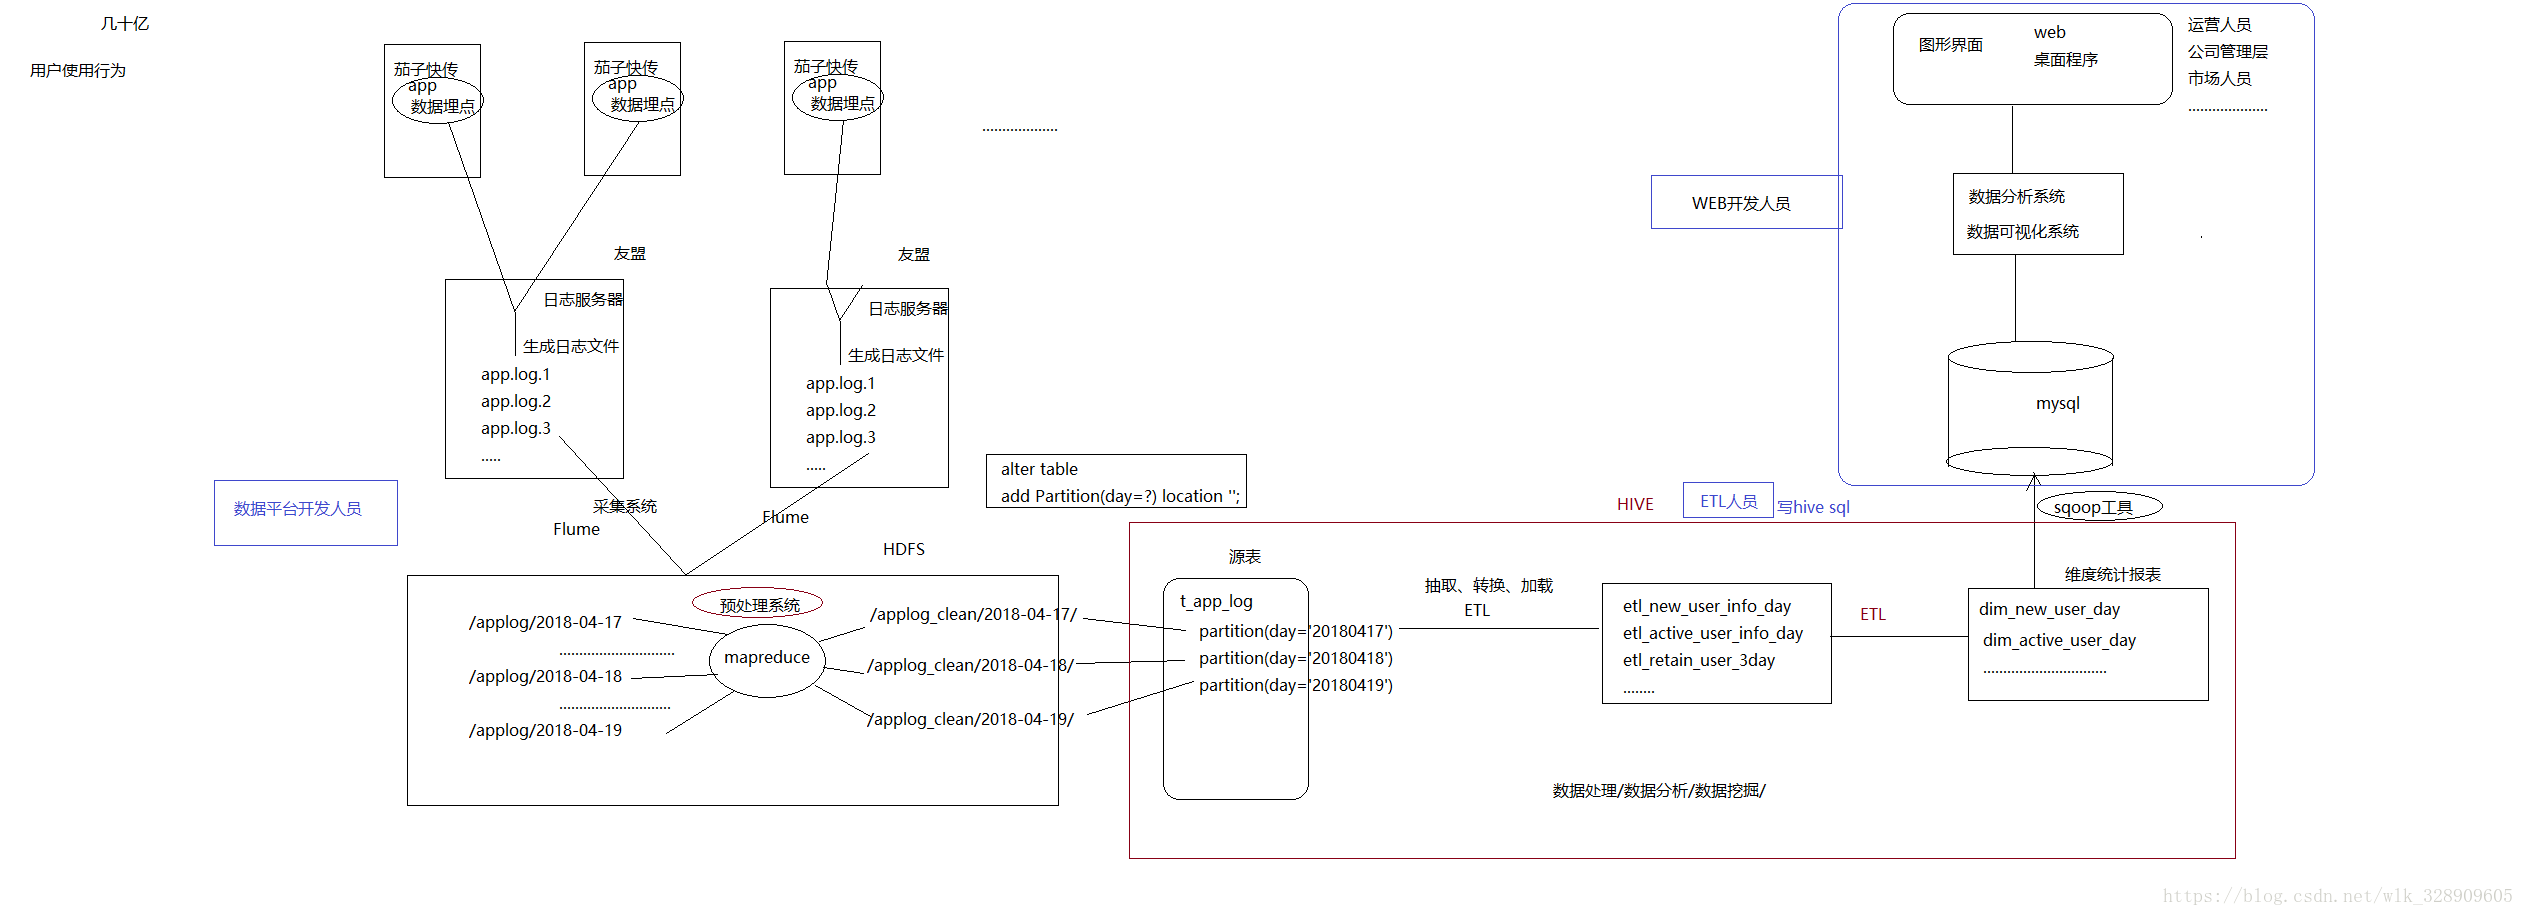
流程如下图:
流程简单介绍:
用户通过茄子的客户端产生数据,
将使用时间,手机号,ip地址,手机的序列号,app的版本,app的下载渠道等重要信息上传到联想的web日志服务器上,服务器的后台系统打印出日志文件,通过flume(一种日志采集工具)将生成的日志上传到hdfs上,先进行数据清洗,将版本,渠道,用户等重要信息丢失的过滤掉,生成新的文件,数据加载到hive中,进行运算处理,处理后的结果通过sqoop(一种数据迁移工具)保存到关系型数据库中,比如MySql,再通过web服务器,将分析出的结果显示到浏览器上。
预处理需求(mapreduce):
1/ 请对app事件请求日志进行预处理:
a) 过滤掉一些不合法数据(缺失device_id,app_ver_name,os_name,app_token,city,release_channel字段需要过滤)
b) 将原格式json,解析成csv(逗号分隔的文本)格式,并去掉”events”字段
c) 在原始数据中,追加一个字段user_id(如果是苹果,就用device_id,如果是android,就用android_id)
数据预处理的时候,只需要map就可以完成,所以就不需要reduce了。
处理要求:device_id,app_ver_name,os_name,app_token,city,release_channel 缺失则过滤
代码如下:
package com.cleanLog;

import java.io.IOException;

import org.apache.commons.lang.StringUtils;
import org.apache.hadoop.conf.Configuration;
import org.apache.hadoop.fs.Path;
import org.apache.hadoop.io.LongWritable;
import org.apache.hadoop.io.NullWritable;
import org.apache.hadoop.io.Text;
import org.apache.hadoop.mapreduce.Job;
import org.apache.hadoop.mapreduce.Mapper;
import org.apache.hadoop.mapreduce.lib.input.FileInputFormat;
import org.apache.hadoop.mapreduce.lib.output.FileOutputFormat;
import org.codehaus.jackson.JsonNode;
import org.codehaus.jackson.map.ObjectMapper;


public class AppLogClean {


    public static class MapTask extends Mapper<LongWritable, Text, Text, NullWritable>{
        @Override
        protected void map(LongWritable key, Text value, Mapper<LongWritable, Text, Text, NullWritable>.Context context)
                throws IOException, InterruptedException {
            String line = value.toString();
            ObjectMapper mapper = new ObjectMapper();
            JsonNode log = mapper.readTree(line);
            JsonNode header = log.get("header");

            if(StringUtils.isBlank(header.get("device_id").getTextValue())||
                    //也可以直接getString()
                    StringUtils.isBlank(header.get("app_ver_name").getTextValue())||
                    StringUtils.isBlank(header.get("os_name").getTextValue())||
                    StringUtils.isBlank(header.get("app_token").getTextValue())||
                    StringUtils.isBlank(header.get("city").getTextValue())||
                    StringUtils.isBlank(header.get("release_channel").getTextValue())) {
                return;
            }else {
                String user_id = "";
                if (header.get("device_id_type").getTextValue().equals("mac")) {
                    user_id = header.get("device_id").getTextValue();
                } else {
                    user_id = header.get("android_id").getTextValue();
                }

                StringBuilder sb = new StringBuilder();
                sb.append(header.get("cid_sn").getTextValue()).append(",");
                sb.append(header.get("mobile_data_type").getTextValue()).append(",");
                sb.append(header.get("os_ver").getTextValue()).append(",");
                sb.append(header.get("mac").getTextValue()).append(",");
                sb.append(header.get("resolution").getTextValue()).append(",");
                sb.append(header.get("commit_time").getTextValue()).append(",");
                sb.append(header.get("sdk_ver").getTextValue()).append(",");
                sb.append(header.get("device_id_type").getTextValue()).append(",");
                sb.append(header.get("city").getTextValue()).append(",");
                sb.append(header.get("android_id").getTextValue()).append(",");
                sb.append(header.get("device_model").getTextValue()).append(",");
                sb.append(header.get("carrier").getTextValue()).append(",");
                sb.append(header.get("promotion_channel").getTextValue()).append(",");
                sb.append(header.get("app_ver_name").getTextValue()).append(",");
                sb.append(header.get("imei").getTextValue()).append(",");
                sb.append(header.get("app_ver_code").getTextValue()).append(",");
                sb.append(header.get("pid").getTextValue()).append(",");
                sb.append(header.get("net_type").getTextValue()).append(