摘要
日志分析是运维工程师解决系统故障,发现问题的主要手段。日志主要包括系统日志、应用程序日志和安全日志。系统运维和开发人员可以通过日志了解服务器软硬件信息、检查配置过程中的错误及错误发生的原因,经常分析日志可以了解服务器的负荷,性能安全性,从而及时采取措施纠正错误。
日志是一个非常庞大的数据,并且常常被分散在不同的设备上,这样排查问题的时候找日志就非常繁琐困难。
这时,一个专门处理日志的系统就非常必要,这里介绍其中的一种,ELK日志分析系统(ELasticsearch+Logstash+Kibana)
日志服务器
提高安全性、集中存放日志、缺陷:对日志分析困难
ELK日志分析系统的日志处理步骤
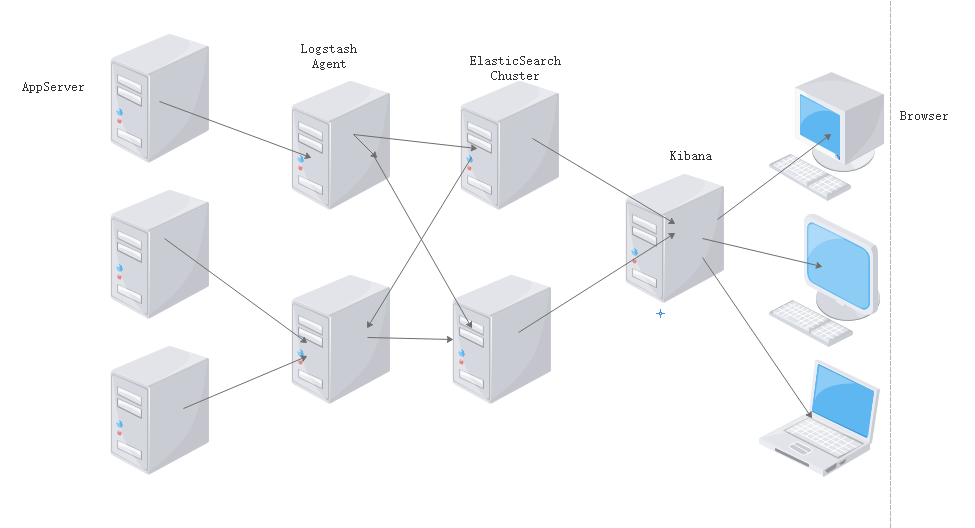
- 首先在集群的每台服务器上都需要安装日记收集工具logstash用于日志的收集工作
- 每个服务器节点会将本地的日志文件输入到LogStash中去。
- LogStash会将日志文件以json的形式输出到ES集群中去。
- 最后可以在可视化界面kibana中对日志进行展示查询操作。
一、Elasticsearch简介
Elasticsearch的概述
提供了一个分布式多用户能力的全文搜索引擎
Elasticsearch核心概念
- 接近实时
- 集群
- 节点
- 索引
- 索引(库)> 类型(表)> 文档(记录)
- 分片和副本
二、Logstash简介
Logstash介绍
- 一款强大的数据处理工具
- 可实现数据传输、格式处理、格式化输出
- 数据输入、数据加工(如过滤,改写等)以及数据输出
LogStash主要组件· - Shipper: 日志收集者。负责监控本地日志文件的变化,及时收集最新的日志文件内容。
- Indexer:日志存储者。负责接收日志并写入到本地文件。
- Broker: 日志Hub。 负责连接多个Shipper 和多个Indexer.
- Search and Storage: 允许对事件进行搜索和存储。
- Web Interface: 基于Web 的展示界面。
在Logstash 中,包括了三个阶段,分别是输入(Input )、处理(Filter, 非必需)和输出(Output) 。
三、Kibana简介
一个针对ELasticsearch的开源分析及可视化平台
搜索、查看存储在Elasticsearch索引中的数据
通过各种图标进行高级数据分析和展示
功能
- Elasticsearch无缝与之集成
- 整合数据,进行复杂数据的分析
- 让团队内的人员更加受益
- 接口灵活,易于分享
- 配置简单,可视化展示多数据源
- 简单数据导出
四、ELK实战分析
4.1、环境部署
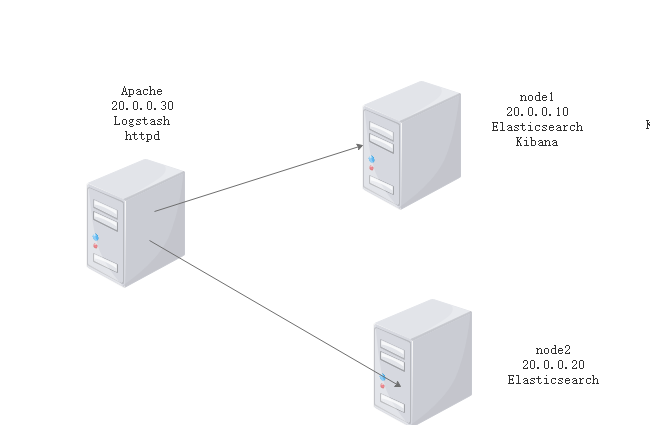
部署两台Elasticsearch做集群,node1做ELK日志分析系统
|
apache |
20.0.0.30 |
httpd |
|
Logstash |
||
|
node1 |
20.0.0.10 |
Elasticsearch |
|
Kinaba |
||
|
node2 |
20.0.0.20 |
Elasticsearch |
4.2、在node1和node2上进行Elasticsearch配置
只在node1上进行演示
[root@node1 ~]# rpm --import https://packages.elastic.co/GPG-KEY-elasticsearch
[root@node1 ~]# cd /etc/yum.repos.d/
[root@node1 yum.repos.d]# vi elasticsearch.repo
[elasticsearch-2.x]
name=Elasticsearch repository for 2.x packages
baseurl=http://packages.elastic.co/elasticsearch/2.x/centos
gpgcheck=1
gpgkey=http://packages.elastic.co/GPG-KEY-elasticsearch
enable=1

[root@node1 ~]# yum list       #查看yum清单
[root@node1 ~]# yum install elasticsearch -y    #安装elasticsearch
[root@node1 ~]# yum install java -y      #安装Java
[root@node1 ~]# java -version           #查看Java版本
openjdk version "1.8.0_131"
OpenJDK Runtime Environment (build 1.8.0_131-b12)
OpenJDK 64-Bit Server VM (build 25.131-b12, mixed mode)
4.3、修改配置文件
[root@node1 ~]# vi /etc/elasticsearch/elasticsearch.yml
cluster.name: elastic  #17行  集群名称

node.name: node1     #第23行  节点名称

path.data: /data/es-data   #第33行  工作目录
path.logs: /var/log/elasticsearch

bootstrap.memory_lock: true  #第43行  防止交换swap分区删除#无需修改

network.host: 0.0.0.0 #第54行 监听网络

http.port: 9200  # 第58 行 端口
4.4、创建目录并开启服务
[root@node1 ~]# mkdir -p /data/es-data
[root@node1 ~]# chown -R elasticsearch:elasticsearch /data/es-data/
[root@node1 ~]# systemctl start elasticsearch.service
[root@node1 ~]# netstat -anpt | grep 9200
tcp6       0      0 :::9200                 :::*                    LISTEN      56017/java
4.4、测试

第二种方法测试
[root@node1 ~]# curl -i -XGET 'http://20.0.0.10:9200/_count?pretty' -d '{
> "query" {
>    "match_all"; {}
> }
> }'
HTTP/1.1 200 OK
Content-Type: application/json; charset=UTF-8
Content-Length: 95

{
  "count" : 0,
  "_shards" : {
    "total" : 0,
    "successful" : 0,
    "failed" : 0
  }
}
4.5。安装elasticsearch插件
[root@node1 ~]# /usr/share/elasticsearch/bin/plugin install mobz/elasticsearch-head
-> Installing mobz/elasticsearch-head...
Trying https://github.com/mobz/elasticsearch-head/archive/master.zip ...
Downloading ...................................................................................................................................................................................................................................................................................................................................................................................................................................................................................................................................................................................................................................................................................................................................................................................................................................................................................................................................................................................................................................DONE
Verifying https://github.com/mobz/elasticsearch-head/archive/master.zip checksums if available ...
NOTE: Unable to verify checksum for downloaded plugin (unable to find .sha1 or .md5 file to verify)
Installed head into /usr/share/elasticsearch/plugins/head
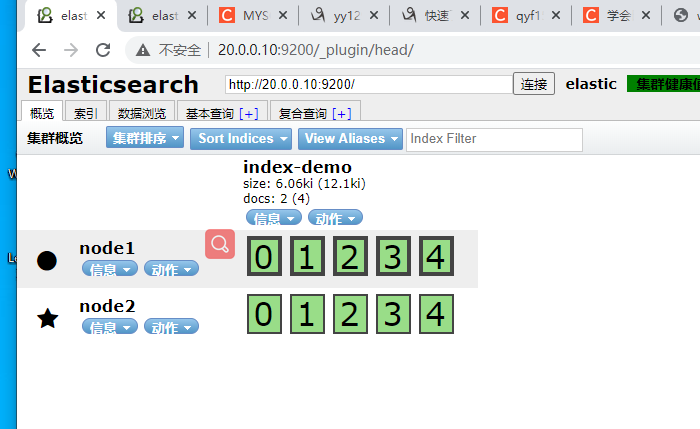
测试

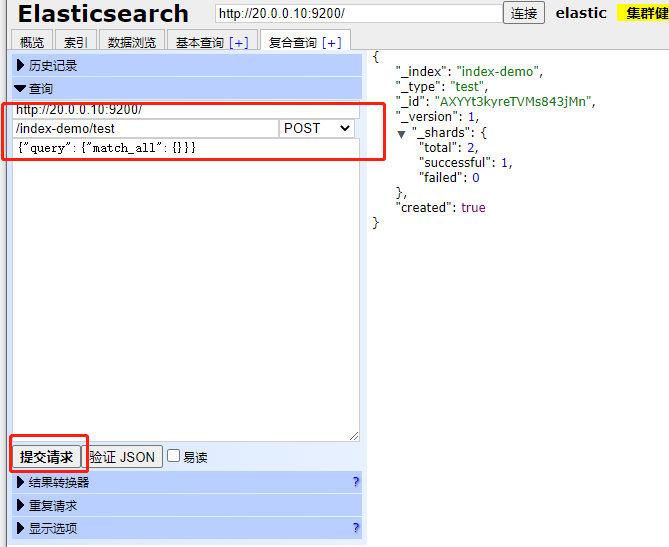
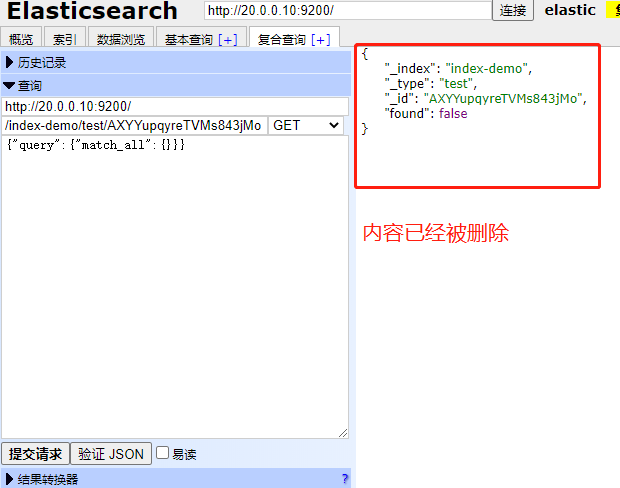
4.6 、复合查询
- 提交请求

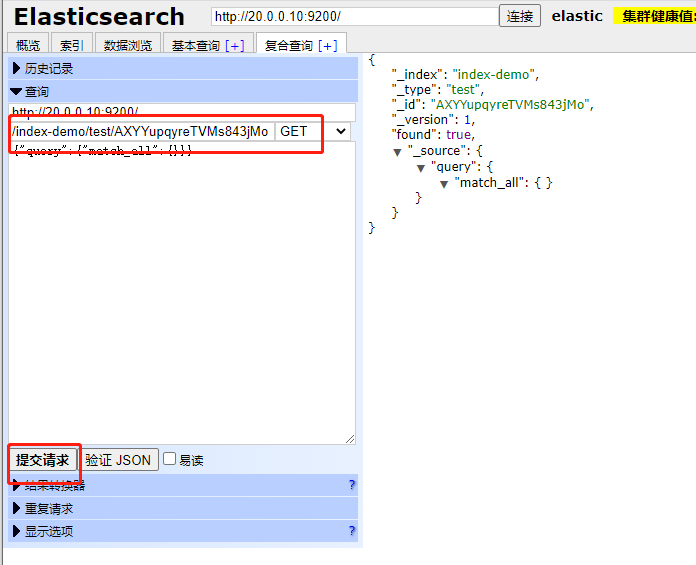
删除后查询


4.7 elasticsearch 集群部署
[root@node1 ~]# vi /etc/elasticsearch/elasticsearch.yml
discovery.zen.ping.unicast.hosts: ["20.0.0.10", "20.0.0.20"] #69 行 单播列表自动发现机制


重启服务

[root@node1 ~]# systemctl restart elasticsearch.service
4.8 测试
4.9、node1和node2日志提示不让锁内存
[root@node1 ~]# less /var/log/elasticsearch/elastic.log
[2020-11-30 18:33:39,167][INFO ][cluster.metadata         ] [node1] [index-demo] creating index, cause [auto(index api)], templates [], shards [5]/[1], mappings []
[2020-11-30 18:33:39,422][INFO ][cluster.routing.allocation] [node1] Cluster health status changed from [RED] to [YELLOW] (reason: [shards started [[index-demo][2], [index-demo][3], [index-demo][3], [index-demo][2], [index-demo][0], [index-demo][0], [index-demo][4]] ...]).
[2020-11-30 18:33:39,485][INFO ][cluster.metadata         ] [node1] [index-demo] create_mapping [test]
[2020-11-30 18:47:09,875][INFO ][node                     ] [node1] stopping ...
[2020-11-30 18:47:09,907][INFO ][node                     ] [node1] stopped
[2020-11-30 18:47:09,907][INFO ][node                     ] [node1] closing ...
[2020-11-30 18:47:09,911][INFO ][node                     ] [node1] clo
修改配置文件
[root@node1 ~]# vi /etc/security/limits.conf
# allow user 'elasticsearch' mlockall
elasticsearch soft memlock unlimited
elasticsearch hard memlock unlimited   #在行尾插入
4.10 安装监控组件
[root@node1 ~]# /usr/share/elasticsearch/bin/plugin install lmenezes/elasticsearch-kopf
测试

4.11 Logstash部署 (apache上部署)
1、安装httpd 并开启服务
yum -y install httpd
[root@apache ~]# systemctl start httpd
[root@apache ~]# netstat -anpt | grep httpd
tcp6       0      0 :::80                   :::*                    LISTEN      61700/httpd
[root@apache ~]# echo '<h1>this is my web!!!!!</h1>' > /var/www/html/index.html
[root@apache ~]# curl http://localhost
<h1>this is my web!!!!!</h1>
2、安装秘钥及logstash源
[root@apache ~]# rpm --import https://packages.elastic.co/GPG-KEY-elasticsearch
[root@apache ~]# vi /etc/yum.repos.d/logstash.repo

[logstash-2.1]
name=Logstash repository for 2.1.x packages
baseurl=http://packages.elastic.co/logstash/2.1/centos
gpgcheck=1
gpgkey=http://packages.elastic.co/GPG-KEY-elasticsearch
enable=1

[root@apache ~]# yum -y install logstash
3、安装java环境。
[root@apache ~]# yum -y install java
[root@apache ~]# java -version
openjdk version "1.8.0_272"
OpenJDK Runtime Environment (build 1.8.0_272-b10)
OpenJDK 64-Bit Server VM (build 25.272-b10, mixed mode)
ln -s /opt/logstash/bin/logstash /usr/local/bin/
4、logstash(apache)与elasticsearch(node)功能是否正常,做对接测试
[root@apache ~]# logstash -e 'input { stdin{} } output { stdout{} }'
Settings: Default filter workers: 1
Logstash startup completed
www.aliyun.com
2020-11-30T14:27:35.958Z apache www.aliyun.com
www.baidu.com
2020-11-30T14:27:41.062Z apache www.baidu.com
1 logstash命令选项解释:
2 -f:指定logstash的配置文件,根据配置文件配置logstash
3 -e:后面跟着字符串,该字符串可以被当做logstash的配置(如果是“ ”,则默认使用stdin做输入,stdout为输出)
4 -t:测试配置文件是否正确,然后退出
5 #输入采用标准输入,输出采用标准输出
5、使用rubydebug显示详细输出,codec为一种解码器
[root@apache ~]# logstash -e 'input { stdin{} } output { stdout{ codec => rubydebug } }'
Settings: Default filter workers: 1
Logstash startup completed
www.baidu.com
{
       "message" => "www.baidu.com",
      "@version" => "1",
    "@timestamp" => "2020-11-30T14:29:58.952Z",
          "host" => "apache"
}
6、使用logstash讲信息输出给elasticsearch
[root@apache ~]
# logstash -e 'input { stdin{} } output { elasticsearch { hosts => ["20.0.0.10:9200"] } }'
Settings: Default filter workers: 1
Logstash startup completed
aaa
bbb
ccc
.7、打开浏览器输入http://20.0.0.10:9200/_plugin/head/,查看索引信息,显示新的数据信息说明输出到elasticsearch成功

8、在apache主机中做对接配置,logstash收集系统日志
[root@apache ~]# chmod o+r /var/log/messages
[root@apache ~]# ll /var/log/messages
-rw----r--. 1 root root 1292470 11月 30 22:30 /var/log/messages


[root@apache ~]# vi /etc/logstash/conf.d/system.conf
input {                    #logstash输入:从/var/log/messages输入,类型为system,起始位                     置为从头开始
        file {
          path => "/var/log/messages"
          type => "system"
          start_position => "beginning"
        }
      }

output {                #logstash输出:输出给elasticsearch(以IP地址指定位置)
        elasticsearch {
        hosts => ["20.0.0.10:9200"]
        index => "system-%{+YYY.MM.dd}"
        }
      }

[root@apache ~]# systemctl restart logstash.service
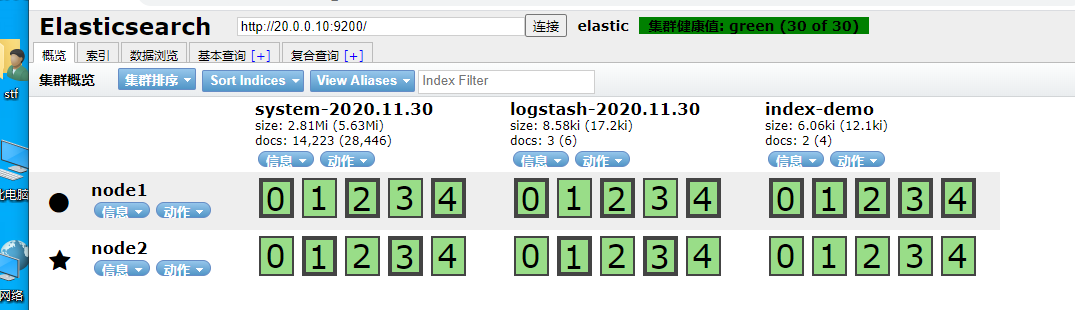
9、打开浏览器输入http://20.0.0.10:9200/_plugin/head/,查看索引信息,显示新的索引信息代表logstash搜集到的日志信息成功输出给elasticsearch
5、在node1主机上安装kibana
[root@node1 ~]# tar zxf kibana-4.3.1-linux-x64.tar.gz
[root@node1 ~]# mv kibana-4.3.1-linux-x64 kibana
[root@node1 ~]# mv kibana /usr/local/
[root@node1 ~]# cd /usr/l
lib/     lib64/   libexec/ local/
[root@node1 ~]# cd /usr/local/kibana/
vi config/kibana.yml
//2行 kibana打开的端口
server.port: 5601

//5行 kibana侦听的地址
server.host: "0.0.0.0"


//12行 和elasticsearch建立联系
elasticsearch.url: "http://20.0.0.10:9200"

//20行 在elasticsearch中添加.kibana索引
kibana.index: ".kibana"

[root@node1 kibana]# yum -y install screen
[root@node1 kibana]# yum -y install screen
启动kibana
[root@node1 kibana]# /usr/local/kibana/bin/kibana
  log   [22:41:10.966] [info][status][plugin:kibana] Status changed from uninitialized to green - Ready
  log   [22:41:10.998] [info][status][plugin:elasticsearch] Status changed from uninitialized to yellow - Waiting for Elasticsearch
  log   [22:41:11.018] [info][status][plugin:kbn_vislib_vis_types] Status changed from uninitialized to green - Ready
  log   [22:41:11.041] [info][status][plugin:markdown_vis] Status changed from uninitialized to green - Ready
  log   [22:41:11.050] [info][status][plugin:metric_vis] Status changed from uninitialized to green - Ready
  log   [22:41:11.065] [info][status][plugin:spyModes] Status changed from uninitialized to green - Ready
  log   [22:41:11.069] [info][status][plugin:statusPage] Status changed from uninitialized to green - Ready
  log   [22:41:11.072] [info][status][plugin:table_vis] Status changed from uninitialized to green - Ready
  log   [22:41:11.095] [info][listening] Server running at http://0.0.0.0:5601
  log   [22:41:16.085] [info][status][plugin:elasticsearch] Status changed from yellow to yellow - No existing Kibana index found
  log   [22:41:18.763] [info][status][plugin:elasticsearch] Status changed from yellow to green - Kibana index ready
5.2 浏览器中登录20.0.0.10:5601,首次登录提示创建一个索引名字:
填入system-*,即对接系统日志文件名

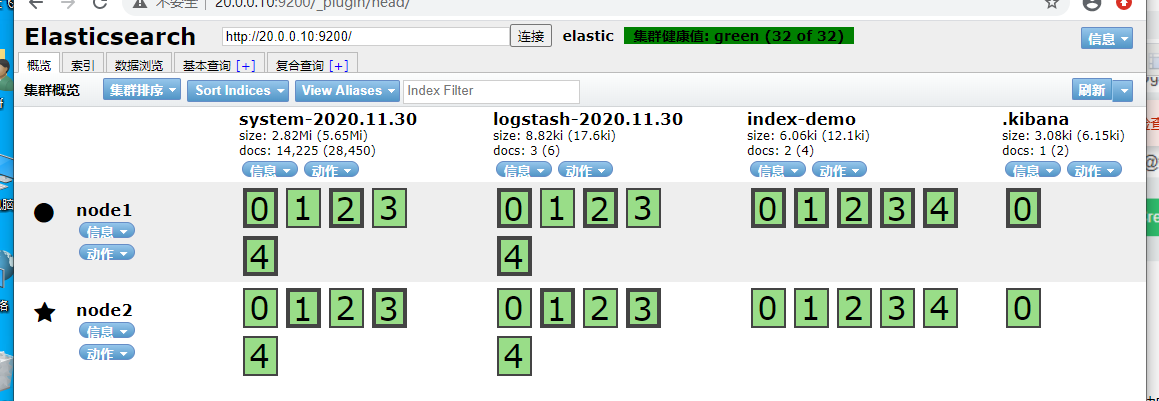
5.3同时也能看到刚才在kibana.yml中添加的在elasticsearch中添加.kibana索引配置生效了(用于验证kibana和elasticsearch是否成功连接)
5.4/ 添加logstash配置,收集apache服务的访问日志和错误日志
中的数据
[root@apache ~]# cd /etc/logstash/conf.d/
[root@apache conf.d]# vi apache_log.conf
input {
        file {
          path => "/etc/httpd/logs/access_log"
          type => "access"
          start_position => "beginning"
        }

        file {
          path => "/etc/httpd/logs/error_log"
          type => "error"
          start_position => "beginning"
        }
   }
output {
        if [type] == "access" {
          elasticsearch {
            hosts => ["20.0.0.10:9200"]
            index => "apache_access-%{+YYY.MM.dd}"
          }
        }
        if [type] == "error" {
          elasticsearch {
            hosts => ["20.0.0.10:9200"]
            index => "apache_error-%{+YYY.MM.dd}"
          }
        }
    }

[root@apache conf.d]# logstash -f apache_log.conf    #指定logstash的配置文件,根据apache_log.conf配置logstash(-f可以不重启加载)
5.5/ 浏览器访问http://20.0.0.10:9200/_plugin/head/,查看apache日志文件的索引是否建立成功
