前言
rsync命令是一个远程数据同步工具,可通过LAN/WAN快速同步多台主机间的文件。rsync使用所谓的“rsync算法”来使本地和远程两个主机之间的文件达到同步,这个算法只传送两个文件的不同部分,而不是每次都整份传送,因此速度相当快。 rsync是一个功能非常强大的工具,其命令也有很多功能特色选项,我们下面就对它的选项一一进行分析说明。
一、配置rsync源服务器
1.1、关于rsync
1.1.1、一款快速增量备份工具
1.1.2、Remote Sync,远程同步
1.1.3、支持本地复制,或者与其他SSH、rsync主机同步
1.1.4、官方网站:http://rsync.samba.org
.2、rsync同步源
指备份操作的远程服务器,也称为备份源
1.3、基本思路
1.3.1、建立rsyncd.conf配置文件、独立的账户文件
1.3.2、启用rsync的--daemon模式
1.4、应用示例
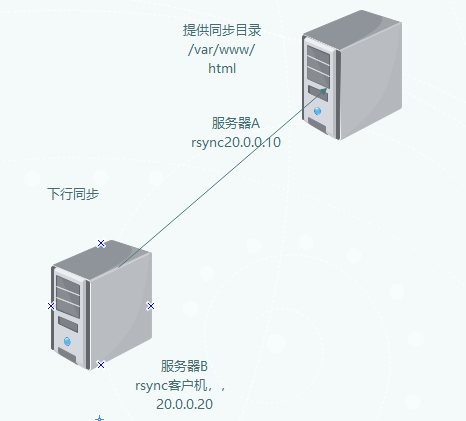
1.4.1、用户backuper,允许下行同步
1.4.2、操作的目录为/var/www/html
1.5、配置文件rsync.conf
1.5.1、需手动建立,语法类似于Samba配置
1.5.2、认证配置auth users、secrets file,不加则为匿名
1.6、rsync账户文件
1.6.1、采用“用户名:密码”的记录格式,每行一个用户记录
1.6.2、独立的账户数据,不依赖于系统账号
1.7、启用rsync服务
通过--daemon独自提供服务
二、使用rsync备份工具
2.1、rsync命令的用法
语法
rsync [选项] 原始位置 目标位置

常用选项
-a:         归档模式,递归并保留对象属性,等同于-rlptgoD
-v:         显示同步过程的详细(verbose)信息
-z:         在传输文件时进行压缩(compress)
-H:         保留硬连接文件
-A:         保留ACL属性信息
-p:         保留文件的权限标记
-t:          保留文件的时间标记
-g:         保留文件的属组标记
-o:         保留文件的属主标记
-delete:    删除目标位置有而原始位置没有的文件
-checksum:  根据对象的校验和来决定是否跳过文件
2.2、配置源的两种表示方法
1 格式1
2 用户名@主机地址::共享模块名
3
4 格式2
5 rsync://用户名@主机地址/共享模块名
2.3、rsync源的免交互处理
使用 --password-file= 密码文件
三、rsync远程同步部署
3.1、环境说明

3.2、配置rsync源服务器A
①检查rsync是否安装
1 [root@rsync ~]# rpm -q rsync
2 rsync-3.0.9-18.el7.x86_64
②修改配置文件
[root@rsync ~]# vi /etc/rsyncd.conf
uid = nobody    #去掉#
gid = nobody    #去掉#
use chroot = yes                   #禁锢在宿主目录中
address = 20.0.0.10              #监听地址
port 873                                    #端口号
pid file = /var/run/rsyncd.pid       #进程文件位置
log file = /var/log/rsyncd.log         #日志文件位置
hosts allow = 20.0.0.0/24               #允许地址范围
dont compress   = *.gz *.tgz *.zip *.z *.Z *.rpm *.deb *.bz2         #不再压缩这几种格式的文件
[wwwroot]
path = /var/www/html                   #同步的目录
read only = yes                        #只读
auth users = backuper
secrets file = /etc/rsyncd_users.db      #用户密码存放位置
③创建backuper用户的密码文件
1 [root@rsync ~]# vi /etc/rsyncd_users.db
2 backuper:abc123
④给密码文件设置执行权限
1 [root@rsync ~]# chmod 600 /etc/rsyncd_users.db
⑤启动rsync
[root@rsync ~]# rsync --daemon
[root@rsync ~]# netstat -anpt | grep rsync
tcp        0      0 20.0.0.10:873           0.0.0.0:*               LISTEN      55836/rsync
⑥安装httpd,有一个/var/www/html的共享目录,也可以自己创建
1 [root@rsync ~]# yum -y install httpd
2 [root@rsync ~]# echo "this is test web" > /var/www/html/index.html
3.3、客户机服务器B测试
①格式一
[root@client ~]# rsync -avz backuper@20.0.0.10::wwwroot /opt
Password:
receiving incremental file list
./
index.html

sent 83 bytes  received 172 bytes  56.67 bytes/sec
total size is 17  speedup is 0.07
[root@client ~]# cat /opt/index.html          #查看是否成功
this is test web
②格式二
删除同步的文件再测试
[root@client ~]# rm -rf /opt/index.html
[root@client ~]# cat /opt/index.html
cat: /opt/index.html: 没有那个文件或目录

同步
[root@client ~]# rsync -avz rsync://backuper@20.0.0.10/wwwroot /opt
Password:
receiving incremental file list
./
index.html

sent 83 bytes  received 172 bytes  56.67 bytes/sec
total size is 17  speedup is 0.07
[root@client ~]# cat /opt/index.html
this is test web
③免密方式登录
创建免密登录文件
[root@client ~]# vi /etc/server.pass
abc123
[root@client ~]# chmod 600 /etc/server.pass
[root@client ~]# rm -rf /opt/index.html
[root@client ~]# rsync -avz --delete --password-file=/etc/server.pass backuper@20.0.0.10::wwwroot /opt
receiving incremental file list
deleting rh/
./
index.html

sent 83 bytes  received 172 bytes  72.86 bytes/sec
total size is 17  speedup is 0.07
[root@client ~]# cat /opt/index.html
this is test web
四、rsync+inotify实时同步
4.1、rsync实时同步
4.1.1、定期同步的不足
①执行备份的时间固定,延迟明显、实时性差
②当同步源长期不变化时,密集的定期任务是不必要的
4.1.2、实时同步的优点
①一旦同步源出现变化,立即启动备份
②只要同步源无变化,则不执行备份
4.2、关于inotify
Linux内核的inotify机制
①从版本2.6.13开始提供
②可以从监控文件系统的变动情况,并做出通知响应
③辅助软件:inotify-tools
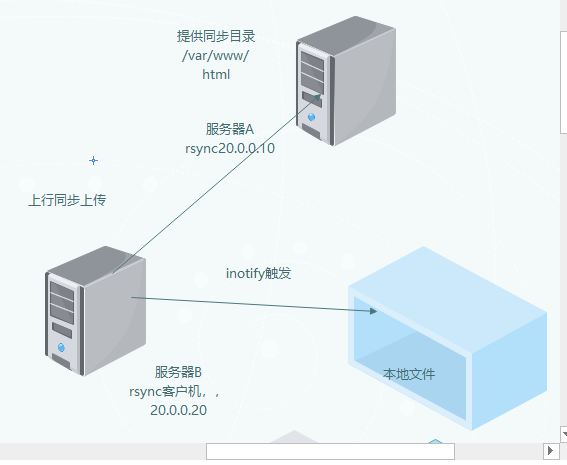
4.3、环境说明

4.4、配置rsync源服务器A
①将只读模式关闭
1 [root@rsync ~]# vi /etc/rsyncd.conf
2 read only = no
②客户端更改内核参数,指定队列大小,最多监控实例数,每个实例最多监控文件数
[root@rsync ~]# cd /var/run
[root@rsync run]# cat rsyncd.pid
14461
[root@rsync run]# kill 14461            #删除pid文件
[root@rsync run]# ll | grep rsync.pid
[root@rsync run]# rsync --daemon
[root@rsync run]# ll | grep rsyncd.pid
-rw-r--r--.  1 root           root              6 11月 12 13:19 rsyncd.pid

[root@rsync run]# cat rsyncd.pid
54028
[root@rsync run]# kill -9 54028        #不删除pid文件,导致启动不了
[root@rsync run]# ll | grep rsyncd.pid
-rw-r--r--.  1 root           root              6 11月 12 13:19 rsyncd.pid
[root@rsync run]# rsync --daemon
[root@rsync run]# failed to create pid file /var/run/rsyncd.pid: File exists

[root@rsync run]# rm -rf rsyncd.pid    #删除pid文件再启动
[root@rsync run]# rsync --daemon
[root@rsync run]# netstat -anpt | grep rsync
tcp        0      0 20.0.0.10:873           0.0.0.0:*               LISTEN      5406
4.5、客户机服务器B配置
①解压缩inotify并安装
inotifywait:用于持续监控,实时输出结果
inotifywatch:用于短期监控,任务完成后再出结果
1 [root@client ~]# tar zxf inotify-tools-3.14.tar.gz
2 [root@client ~]# cd inotify-tools-3.14/
3 [root@client inotify-tools-3.14]# ./configure
4 [root@client inotify-tools-3.14]# make && make install
②测试inotifywait监控命令是否正常使用
1 [root@client inotify-tools-3.14]# mkdir -p /var/www/html
2 [root@client inotify-tools-3.14]# inotifywait -mrq -e modify,create,move,delete /var/www/html
③执行完上面最后一条命令后处于监控状态,不能做输入操作,在开启一个新的终端设备
另一端终端文件测试
[root@client html]# touch 12
[root@client html]# touch 13
[root@client html]# rm -rf b.txt
监控段查看
[root@client ~]# inotifywait -mrq -e modify,create,move,delete /var/www/html
/var/www/html/ MOVED_FROM c.txt
/var/www/html/ MOVED_TO cc.txt
/var/www/html/ CREATE 12
/var/www/html/ CREATE 13
④客户端上编写脚本,将inotify监控和rsync远程同步结合起来
[root@client inotify-tools-3.14]# vi /opt/inotify.sh
#!/bin/bash
INOTIFY="inotifywait -mrq -e modify,create,attrib,move,delete /var/www/html"
RSYNC="rsync -azH --delete --password-file=/etc/server.pass /var/www/html/  backuper@20.0.0.10::wwwroot/"
$INOTIFY | while read DIRECTORY EVENT FILE   #逐条读取监控记录
do
        if [ $(pgrep rsync | wc -l) -le 0 ];then
            $RSYNC
        fi
done

[root@client inotify-tools-3.14]# chmod +x /opt/inotify.sh
[root@client inotify-tools-3.14]# cd /opt/

注:两边的同步目录权限都设置777
[root@rsync run]# chmod 777 /var/www/html/
[root@client html]# chmod 777 /var/www/html/

运行脚本
[root@client opt]# ./inotify.sh
⑤在客户端/var/www/html目录下创建文件,查看源端/var/www/html目录是否同步到
客户端/var/www/html
[root@client html]# vi a.txt
[root@client html]# touch a.txt
[root@client html]# touch b.txt
[root@client html]# touch c.txt
[root@client html]# touch d.txt
查看源端/var/www/html目录。新建的和原来就存在的文件都成功同步,且属主属组均为nobody用户
[root@rsync ~]# cd /var/www/html
-rw-r--r--. 1 nobody nobody   0 11月 12 16:08 a.txt
-rw-r--r--. 1 nobody nobody   0 11月 12 16:08 b.txt
-rw-r--r--. 1 nobody nobody  11 11月 12 12:30 cc.txt
-rw-r--r--. 1 nobody nobody   8 11月 12 12:11 c.html
-rw-r--r--. 1 nobody nobody   0 11月 12 16:08 c.txt
-rw-r--r--. 1 nobody nobody   0 11月 12 16:08 d.txt
drwxrwxrwx. 2 nobody nobody 172 11月 12 15:17 html
-rwxrwxrwx. 1 root   root    21 11月 12 11:07 index.html
五、注意事项
5.1、同步时的注意项
使用如下命令进行上行同步(上传)时,本地目录最后要加上/,否则会将目录同步到对方目标文件夹下,而不仅仅是同步本地目录下的文件
①将上面的脚本源端目录/var/www/html/改成/var/www/html
[root@client opt]# vi /opt/inotify.sh
#!/bin/bash
INOTIFY="inotifywait -mrq -e modify,create,attrib,move,delete /var/www/html"
RSYNC="rsync -azH --delete --password-file=/etc/server.pass /var/www/html  backuper@20.0.0.10::wwwroot"
$INOTIFY | while read DIRECTORY EVENT FILE   #逐条读取监控记录
do
        if [ $(pgrep rsync | wc -l) -le 0 ];then
            $RSYNC
        fi
done

运行脚本
[root@client opt]# ./inotify.sh
②在客户端/var/www/html目录下创建文件,查看源端/var/www/html目录会发现直接同步的时目录
html/
-rw-r--r--. 1 nobody nobody   0 11月 12 15:08 3
-rw-r--r--. 1 nobody nobody   0 11月 12 16:08 a.txt
-rw-r--r--. 1 nobody nobody   0 11月 12 16:08 b.txt
-rw-r--r--. 1 nobody nobody  11 11月 12 12:30 cc.txt
-rw-r--r--. 1 nobody nobody   8 11月 12 12:11 c.html
-rw-r--r--. 1 nobody nobody   0 11月 12 16:08 c.txt
-rw-r--r--. 1 nobody nobody   0 11月 12 16:08 d.txt
html不加/
[root@server2 html]# touch 111
[root@server2 html]# touch 222
[root@server2 html]# touch 333
[root@server2 html]#
服务器上显示
drwxrwxrwx. 2 nobody nobody 4096 11月 12 16:23 html
-rwxrwxrwx. 1 root   root     21 11月 12 11:07 index.html
[root@rsync html]# cd html
[root@rsync html]# ll
-rw-r--r--. 1 nobody nobody  0 11月 12 16:23 111
-rw-r--r--. 1 nobody nobody  0 11月 12 16:23 222
-rw-r--r--. 1 nobody nobody  0 11月 12 16:23 333
5.2、kill pid号和kill -9 pid号的区别
[root@rsync ~]# cd /var/run
[root@rsync run]# cat rsyncd.pid
14461
[root@rsync run]# kill 14461            #删除pid文件
[root@rsync run]# ll | grep rsync.pid
[root@rsync run]# rsync --daemon
[root@rsync run]# ll | grep rsyncd.pid
-rw-r--r--.  1 root           root              6 11月 12 13:19 rsyncd.pid

[root@rsync run]# cat rsyncd.pid
54028
[root@rsync run]# kill -9 54028        #不删除pid文件,导致启动不了
[root@rsync run]# ll | grep rsyncd.pid
-rw-r--r--.  1 root           root              6 11月 12 13:19 rsyncd.pid
[root@rsync run]# rsync --daemon
[root@rsync run]# failed to create pid file /var/run/rsyncd.pid: File exists

[root@rsync run]# rm -rf rsyncd.pid    #删除pid文件再启动
[root@rsync run]# rsync --daemon
[root@rsync run]# netstat -anpt | grep rsync
tcp        0      0 20.0.0.10:873           0.0.0.0:*               LISTEN      5406