工作需要购置树莓派4b板子两块,现记录一下搭建开发环境的过程
一、树莓派系统镜像烧写
1、官网下载最新系统镜像,我下的文件名为:2020-08-20-raspios-buster-armhf.img
2、准备一张16G的内存卡,使用专门的格式化工具SDFormatter格式化SD卡。
3、Windows系统下下载安装烧写镜像工具Win32DiskImager。
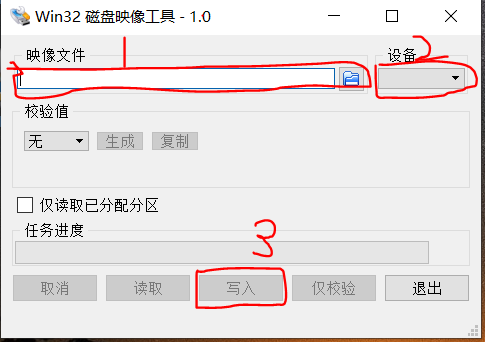
(1)选择下载的系统镜像文件
(2)'设备'选择SD卡盘符.
(3)点击'写入'开始安装系统.安装结束后弹出完成对话框说明安装完成.
PS:在SD卡安装了Linux系统之后,再到Windows系统下查看,只剩下100多兆的容量.这是因为Linux系统下的分区Window是下是看不到的!装了Linux系统后,SD卡会分成三种格式的分区,分别是FAT32、EXT3、SWAP2
EXT3区属于Linux的文件系统,就和Windows的C盘一样;Swap区为Linux的虚拟内存区,主要在物理内存不够用的时候做缓存用的。以上两个,是Linux的分区。FAT32就是Windows看到的那100多兆了。
烧录成功后系统会因为无法识别分区而提示格式化分区,此时不要格式化,直接弹出内存卡即可。
二、启动树莓派
因为我没买显示器,所以我这里要用到 无屏幕有线远程启动树莓派(SSH)
1、开启SSH
将SD卡使用读卡器连接到电脑上,并打开SD卡盘符,新建“ssh”文件(无后缀)即可。
2、获取树莓派IP地址
首先确认连接方式,我这里使用的连接方式为:开发用的Windows电脑通过无线网连接到Internet,而树莓派我同过网线连在了提供无线网的路由器上。
我这里找到3种找到树莓派IP地址的方式:
(1)使用远程登陆软件Advanced IP Scanner ,点击‘扫描’,找到制作商为Raspberry Pi Foundation的地址信息,确认开机状态后记住该条信息的IP。
(2)在windows电脑上打开CMD命令行页面,输入arp -a可以找到树莓派的IP地址,但是这个会出来很多IP地址,你需要从中间选出树莓派的IP。
(3)用手机登陆路由器的后台管理员页面,可以看到已连接设备信息,包括IP地址。
3、使用SSH工具远程登陆树莓派
我这里没有用官方推荐的Putty工具,选择了MobaXterm这个软件,以前学习嵌入式Linux的时候看到韦东山老师用这个软件,发现很好用。
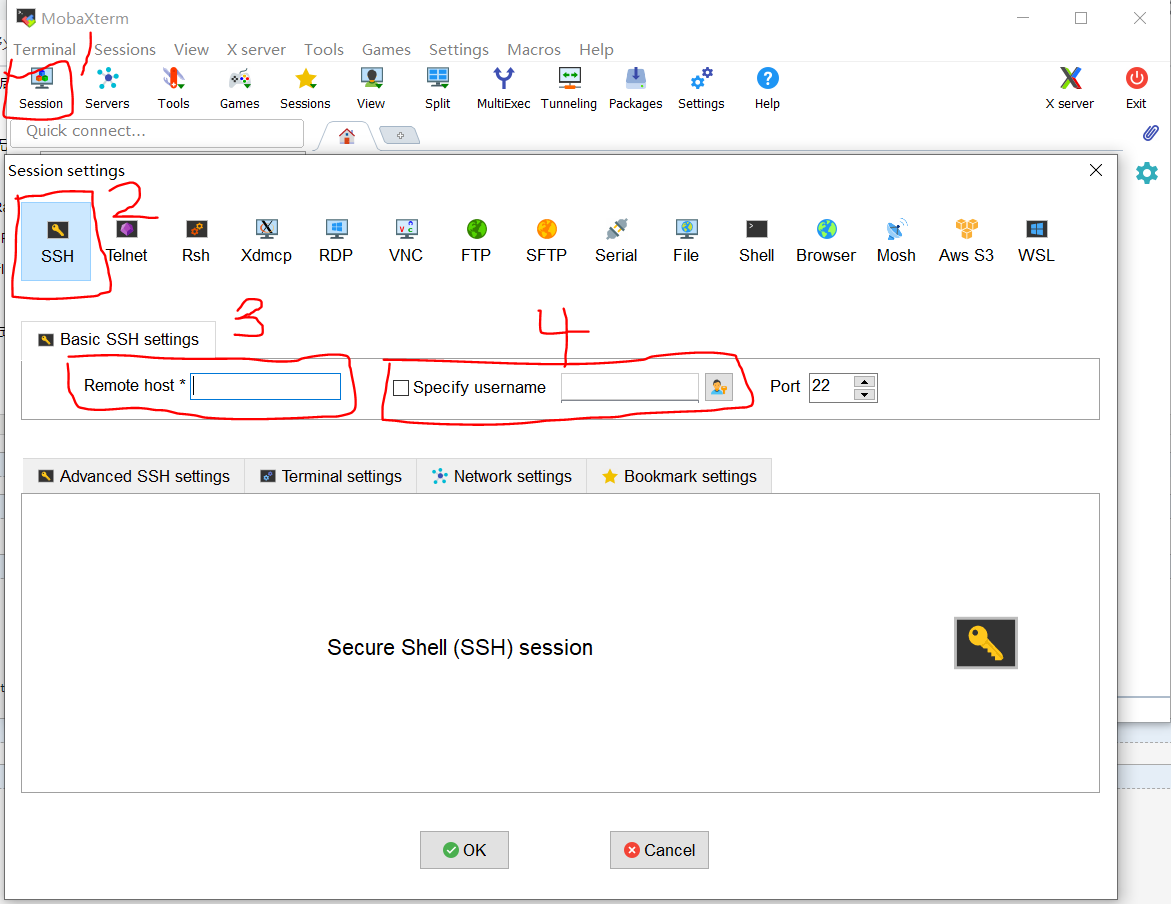
输入刚刚确认的树莓派的IP地址,用户名为pi,密码为raspberry
PS:输入密码的时候是不显示的,输入完直接回车就OK了
如果出现Access denied这个提示,说明你SSH没打开,重新进行一下第二章的第一步开始SSH
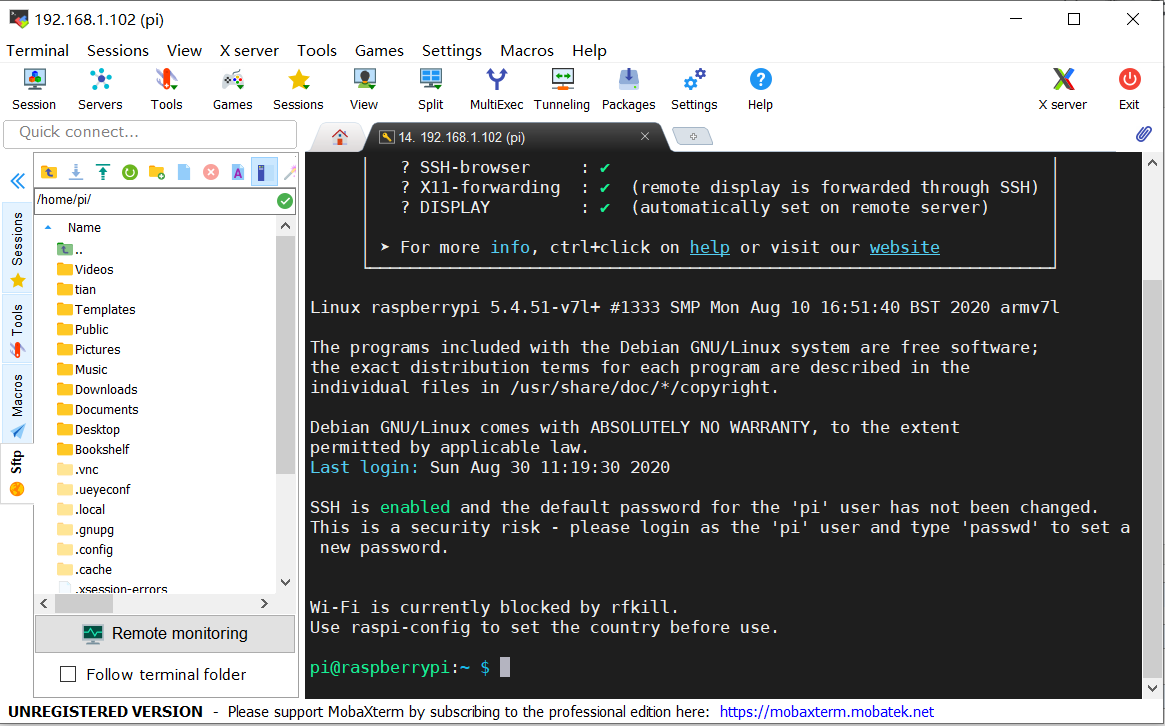
出现下图界面,说明树莓派已经成功启动了!!
因为我需要用它来驱动IDS相机并做图像处理,所以需要配置开发环境
一、安装远程桌面
因为用到相机,想着能看到运行情况会好很多。一般来讲,通过SSH管理树莓派已经足足够用。
(1)在树莓派上安装VNCServer
命令:sudo apt-get install tightvncserver
(2)启动一个VNC流,启动时会要求设置密码。
命令tightvncserver :1
(3)在实际使用的电脑上下载VNCViewer
https://www.realvnc.com/en/connect/download/viewer/windows/
安装完成后启动该程序,输入树莓派的IP地址和VNC流的代号(也就是刚刚的:1)最后输入刚刚设置的密码,就可以使用远程桌面了。
二、安装IDS相机驱动
到IDS官网下载相应型号相机的Linux驱动.我下载到的驱动文件为.tgz格式。通过MobaXterm将驱动文件发送到树莓派中,进入到驱动文件目录下,解压:sudo tar zxvf test.tgz
会得到一个.run文件,suod ./运行这个文件即可开始安装该驱动
三、安装python模块
安装任何软件前都要使用sudo apt-get update命令更新一下软件包。
(1)sudo pip install pyueye
(2)sudo apt-get install libopencv-dev python-opencv 安装opencv,如果出错,就执行一下sudo apt-get update命令
(3)sudo apt-get install python-qt4 python-qt4-doc
四、运行示例程序进行测试
from pyueye import ueye
import numpy as np
import cv2
import sys

#---------------------------------------------------------------------------------------------------------------------------------------

#Variables
hCam = ueye.HIDS(0)             #0: first available camera;  1-254: The camera with the specified camera ID
sInfo = ueye.SENSORINFO()
cInfo = ueye.CAMINFO()
pcImageMemory = ueye.c_mem_p()
MemID = ueye.int()
rectAOI = ueye.IS_RECT()
pitch = ueye.INT()
nBitsPerPixel = ueye.INT(24)    #24: bits per pixel for color mode; take 8 bits per pixel for monochrome
channels = 3                    #3: channels for color mode(RGB); take 1 channel for monochrome
m_nColorMode = ueye.INT()       # Y8/RGB16/RGB24/REG32
bytes_per_pixel = int(nBitsPerPixel / 8)
#---------------------------------------------------------------------------------------------------------------------------------------
print("START")
print()


# Starts the driver and establishes the connection to the camera
nRet = ueye.is_InitCamera(hCam, None)
if nRet != ueye.IS_SUCCESS:
    print("is_InitCamera ERROR")

# Reads out the data hard-coded in the non-volatile camera memory and writes it to the data structure that cInfo points to
nRet = ueye.is_GetCameraInfo(hCam, cInfo)
if nRet != ueye.IS_SUCCESS:
    print("is_GetCameraInfo ERROR")

# You can query additional information about the sensor type used in the camera
nRet = ueye.is_GetSensorInfo(hCam, sInfo)
if nRet != ueye.IS_SUCCESS:
    print("is_GetSensorInfo ERROR")

nRet = ueye.is_ResetToDefault( hCam)
if nRet != ueye.IS_SUCCESS:
    print("is_ResetToDefault ERROR")

# Set display mode to DIB
nRet = ueye.is_SetDisplayMode(hCam, ueye.IS_SET_DM_DIB)

# Set the right color mode
if bytes(sInfo.nColorMode.value) == ueye.IS_COLORMODE_BAYER:
    # setup the color depth to the current windows setting
    ueye.is_GetColorDepth(hCam, nBitsPerPixel, m_nColorMode)
    bytes_per_pixel = int(nBitsPerPixel / 8)
    print("IS_COLORMODE_BAYER: ", )
    print("	m_nColorMode: 		", m_nColorMode)
    print("	nBitsPerPixel: 		", nBitsPerPixel)
    print("	bytes_per_pixel: 		", bytes_per_pixel)
    print()

elif bytes(sInfo.nColorMode.value) == ueye.IS_COLORMODE_CBYCRY:
    # for color camera models use RGB32 mode
    m_nColorMode = ueye.IS_CM_BGRA8_PACKED
    nBitsPerPixel = ueye.INT(32)
    bytes_per_pixel = int(nBitsPerPixel / 8)
    print("IS_COLORMODE_CBYCRY: ", )
    print("	m_nColorMode: 		", m_nColorMode)
    print("	nBitsPerPixel: 		", nBitsPerPixel)
    print("	bytes_per_pixel: 		", bytes_per_pixel)
    print()

elif bytes(sInfo.nColorMode.value) == ueye.IS_COLORMODE_MONOCHROME:
    # for color camera models use RGB32 mode
    m_nColorMode = ueye.IS_CM_MONO8
    nBitsPerPixel = ueye.INT(8)
    bytes_per_pixel = int(nBitsPerPixel / 8)
    print("IS_COLORMODE_MONOCHROME: ", )
    print("	m_nColorMode: 		", m_nColorMode)
    print("	nBitsPerPixel: 		", nBitsPerPixel)
    print("	bytes_per_pixel: 		", bytes_per_pixel)
    print()

else:
    # for monochrome camera models use Y8 mode
    m_nColorMode = ueye.IS_CM_MONO8
    nBitsPerPixel = ueye.INT(8)
    bytes_per_pixel = int(nBitsPerPixel / 8)
    print("else")

# Can be used to set the size and position of an "area of interest"(AOI) within an image
nRet = ueye.is_AOI(hCam, ueye.IS_AOI_IMAGE_GET_AOI, rectAOI, ueye.sizeof(rectAOI))
if nRet != ueye.IS_SUCCESS:
    print("is_AOI ERROR")

width = rectAOI.s32Width
height = rectAOI.s32Height

# Prints out some information about the camera and the sensor
print("Camera model:		", sInfo.strSensorName.decode('utf-8'))
print("Camera serial no.:	", cInfo.SerNo.decode('utf-8'))
print("Maximum image 	", width)
print("Maximum image height:	", height)
print()

#---------------------------------------------------------------------------------------------------------------------------------------

# Allocates an image memory for an image having its dimensions defined by width and height and its color depth defined by nBitsPerPixel
nRet = ueye.is_AllocImageMem(hCam, width, height, nBitsPerPixel, pcImageMemory, MemID)
if nRet != ueye.IS_SUCCESS:
    print("is_AllocImageMem ERROR")
else:
    # Makes the specified image memory the active memory
    nRet = ueye.is_SetImageMem(hCam, pcImageMemory, MemID)
    if nRet != ueye.IS_SUCCESS:
        print("is_SetImageMem ERROR")
    else:
        # Set the desired color mode
        nRet = ueye.is_SetColorMode(hCam, m_nColorMode)


# Activates the camera's live video mode (free run mode)
nRet = ueye.is_CaptureVideo(hCam, ueye.IS_DONT_WAIT)
if nRet != ueye.IS_SUCCESS:
    print("is_CaptureVideo ERROR")

# Enables the queue mode for existing image memory sequences
nRet = ueye.is_InquireImageMem(hCam, pcImageMemory, MemID, width, height, nBitsPerPixel, pitch)
if nRet != ueye.IS_SUCCESS:
    print("is_InquireImageMem ERROR")
else:
    print("Press q to leave the programm")

#---------------------------------------------------------------------------------------------------------------------------------------

# Continuous image display
while(nRet == ueye.IS_SUCCESS):

    # In order to display the image in an OpenCV window we need to...
    # ...extract the data of our image memory
    array = ueye.get_data(pcImageMemory, width, height, nBitsPerPixel, pitch, copy=False)

    # bytes_per_pixel = int(nBitsPerPixel / 8)

    # ...reshape it in an numpy array...
    frame = np.reshape(array,(height.value, width.value, bytes_per_pixel))

    # ...resize the image by a half
    frame = cv2.resize(frame,(0,0),fx=0.5, fy=0.5)

#---------------------------------------------------------------------------------------------------------------------------------------
    #Include image data processing here

#---------------------------------------------------------------------------------------------------------------------------------------

    #...and finally display it
    cv2.imshow("SimpleLive_Python_uEye_OpenCV", frame)

    # Press q if you want to end the loop
    if cv2.waitKey(1) & 0xFF == ord('q'):
        break
#---------------------------------------------------------------------------------------------------------------------------------------

# Releases an image memory that was allocated using is_AllocImageMem() and removes it from the driver management
ueye.is_FreeImageMem(hCam, pcImageMemory, MemID)

# Disables the hCam camera handle and releases the data structures and memory areas taken up by the uEye camera
ueye.is_ExitCamera(hCam)

# Destroys the OpenCv windows
cv2.destroyAllWindows()

print()
print("END")
结果:
