1、本文主要涉及到opencv的视频帧抓拍和验证的相关问题,不包含如何集成opencv
2、主要讲解涉及到opencv中的关键类及一些常用的方法
3、着重讲解代理方法:
- (void)processImage:(cv::Mat &)image
4、集成过程中的注意事项
5、附上抓拍的小demo的下载地址
6、扩展,验证抓拍的图片中是否包含人脸
=====================================分割线==========================================
以下为正文
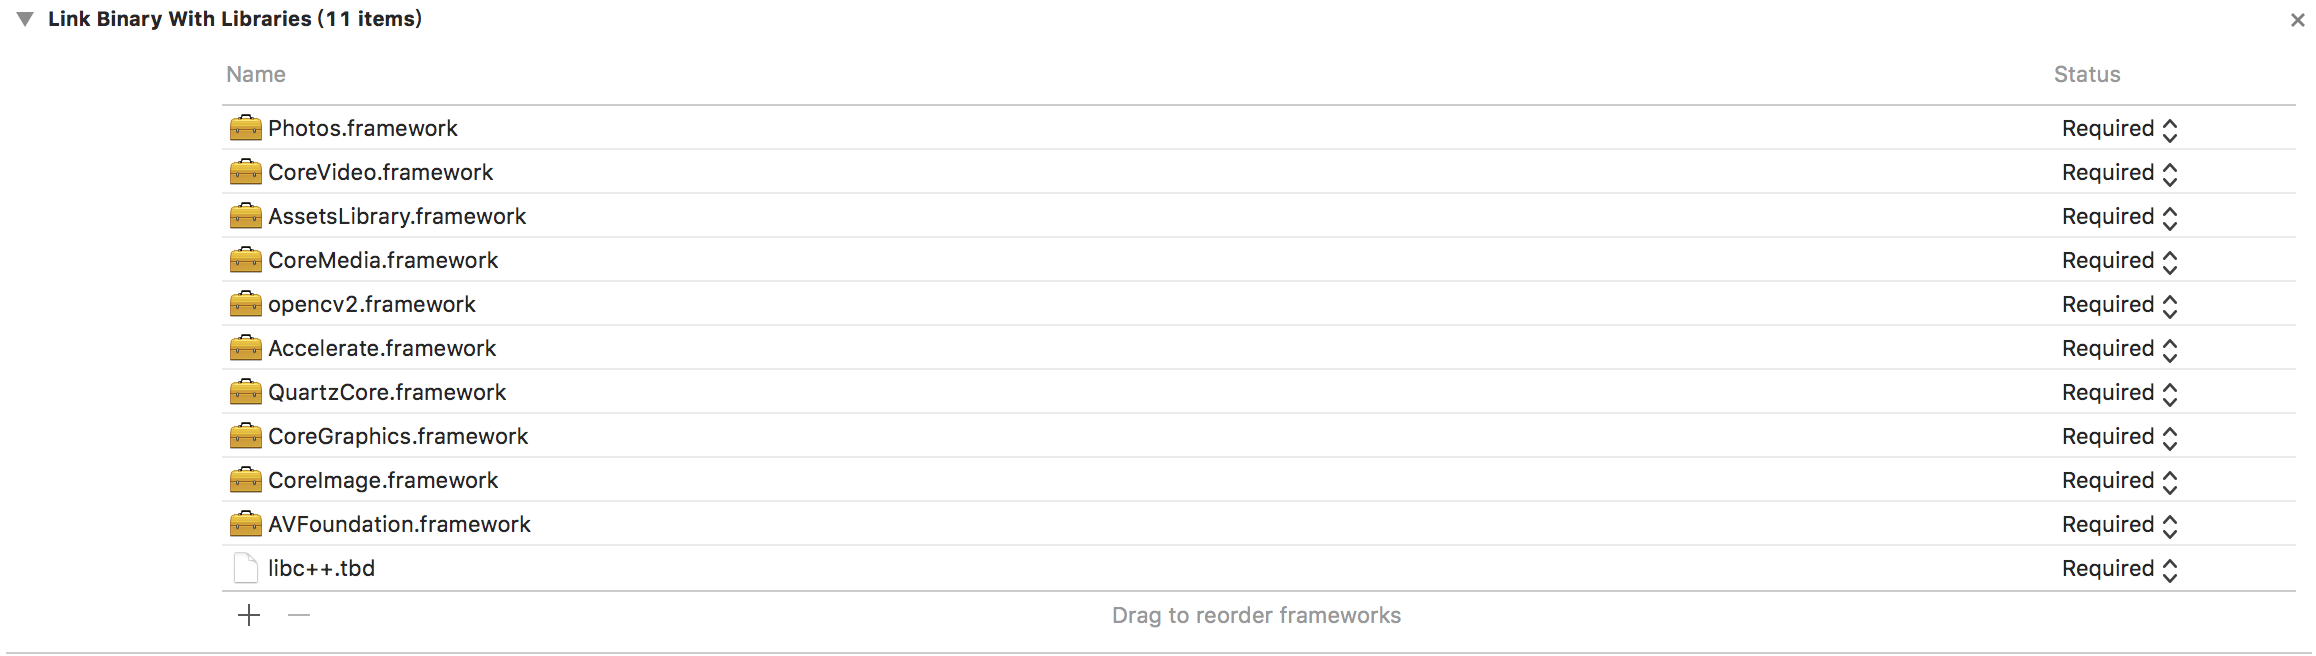
一、集成opencv需要添加的framework和静态库
二、OpenCV使用过程中的关键类及一些常用的方法
1、cap_ios.h、以下为此类的原始代码
/*  For iOS video I/O
 *  by Eduard Feicho on 29/07/12
 *  Copyright 2012. All rights reserved.
 *
 * Redistribution and use in source and binary forms, with or without
 * modification, are permitted provided that the following conditions are met:
 *
 * 1. Redistributions of source code must retain the above copyright notice,
 *    this list of conditions and the following disclaimer.
 * 2. Redistributions in binary form must reproduce the above copyright notice,
 *    this list of conditions and the following disclaimer in the documentation
 *    and/or other materials provided with the distribution.
 * 3. The name of the author may not be used to endorse or promote products
 *    derived from this software without specific prior written permission.
 *
 * THIS SOFTWARE IS PROVIDED BY THE AUTHOR "AS IS" AND ANY EXPRESS OR IMPLIED
 * WARRANTIES, INCLUDING, BUT NOT LIMITED TO, THE IMPLIED WARRANTIES OF
 * MERCHANTABILITY AND FITNESS FOR A PARTICULAR PURPOSE ARE DISCLAIMED. IN NO
 * EVENT SHALL THE AUTHOR BE LIABLE FOR ANY DIRECT, INDIRECT, INCIDENTAL,
 * SPECIAL, EXEMPLARY, OR CONSEQUENTIAL DAMAGES (INCLUDING, BUT NOT LIMITED TO,
 * PROCUREMENT OF SUBSTITUTE GOODS OR SERVICES; LOSS OF USE, DATA, OR PROFITS;
 * OR BUSINESS INTERRUPTION) HOWEVER CAUSED AND ON ANY THEORY OF LIABILITY,
 * WHETHER IN CONTRACT, STRICT LIABILITY, OR TORT (INCLUDING NEGLIGENCE OR
 * OTHERWISE) ARISING IN ANY WAY OUT OF THE USE OF THIS SOFTWARE, EVEN IF
 * ADVISED OF THE POSSIBILITY OF SUCH DAMAGE.
 *
 */

#import <UIKit/UIKit.h>
#import <Accelerate/Accelerate.h>
#import <AVFoundation/AVFoundation.h>
#import <ImageIO/ImageIO.h>
#include "opencv2/core.hpp"

//! @addtogroup videoio_ios
//! @{

/////////////////////////////////////// CvAbstractCamera /////////////////////////////////////

@class CvAbstractCamera;

CV_EXPORTS @interface CvAbstractCamera : NSObject
{
    UIDeviceOrientation currentDeviceOrientation;

    BOOL cameraAvailable;
}

@property (nonatomic, strong) AVCaptureSession* captureSession;
@property (nonatomic, strong) AVCaptureConnection* videoCaptureConnection;

@property (nonatomic, readonly) BOOL running;
@property (nonatomic, readonly) BOOL captureSessionLoaded;

@property (nonatomic, assign) int defaultFPS;
@property (nonatomic, readonly) AVCaptureVideoPreviewLayer *captureVideoPreviewLayer;
@property (nonatomic, assign) AVCaptureDevicePosition defaultAVCaptureDevicePosition;
@property (nonatomic, assign) AVCaptureVideoOrientation defaultAVCaptureVideoOrientation;
@property (nonatomic, assign) BOOL useAVCaptureVideoPreviewLayer;
@property (nonatomic, strong) NSString *const defaultAVCaptureSessionPreset;

@property (nonatomic, assign) int imageWidth;
@property (nonatomic, assign) int imageHeight;

@property (nonatomic, strong) UIView* parentView;

- (void)start;
- (void)stop;
- (void)switchCameras;

- (id)initWithParentView:(UIView*)parent;

- (void)createCaptureOutput;
- (void)createVideoPreviewLayer;
- (void)updateOrientation;

- (void)lockFocus;
- (void)unlockFocus;
- (void)lockExposure;
- (void)unlockExposure;
- (void)lockBalance;
- (void)unlockBalance;

@end

///////////////////////////////// CvVideoCamera ///////////////////////////////////////////

@class CvVideoCamera;

CV_EXPORTS @protocol CvVideoCameraDelegate <NSObject>

#ifdef __cplusplus
// delegate method for processing image frames
- (void)processImage:(cv::Mat&)image;
#endif

@end

CV_EXPORTS @interface CvVideoCamera : CvAbstractCamera<AVCaptureVideoDataOutputSampleBufferDelegate>
{
    AVCaptureVideoDataOutput *videoDataOutput;

    dispatch_queue_t videoDataOutputQueue;
    CALayer *customPreviewLayer;

    CMTime lastSampleTime;

}

@property (nonatomic, weak) id<CvVideoCameraDelegate> delegate;
@property (nonatomic, assign) BOOL grayscaleMode;

@property (nonatomic, assign) BOOL recordVideo;
@property (nonatomic, assign) BOOL rotateVideo;
@property (nonatomic, strong) AVAssetWriterInput* recordAssetWriterInput;
@property (nonatomic, strong) AVAssetWriterInputPixelBufferAdaptor* recordPixelBufferAdaptor;
@property (nonatomic, strong) AVAssetWriter* recordAssetWriter;

- (void)adjustLayoutToInterfaceOrientation:(UIInterfaceOrientation)interfaceOrientation;
- (void)layoutPreviewLayer;
- (void)saveVideo;
- (NSURL *)videoFileURL;
- (NSString *)videoFileString;


@end

///////////////////////////////// CvPhotoCamera ///////////////////////////////////////////

@class CvPhotoCamera;

CV_EXPORTS @protocol CvPhotoCameraDelegate <NSObject>

- (void)photoCamera:(CvPhotoCamera*)photoCamera capturedImage:(UIImage *)image;
- (void)photoCameraCancel:(CvPhotoCamera*)photoCamera;

@end

CV_EXPORTS @interface CvPhotoCamera : CvAbstractCamera
{
    AVCaptureStillImageOutput *stillImageOutput;
}

@property (nonatomic, weak) id<CvPhotoCameraDelegate> delegate;

- (void)takePicture;

@end

//! @} videoio_ios
以上方法从名知意,且命名简洁明了,无需过多的注释说明 ,此为值得我等ITboy学习和观摩的地方
2、关键方法说明
此处不对CvPhotoCamera做说明,主要针对 CvVideoCameraDelegate 的代理方法进行说明
- (void)processImage:(cv::Mat&)image;
此方法视频帧的抓取代理,其中的image对象为非正常的RGB对象,为一个灰度对象,在使用过程中,需要进行色值的转换
- (void)processImage:(cv::Mat &)image
{
    cv::Mat outCopyImg;
    image.copyTo(outCopyImg);
    cv::cvtColor(outCopyImg, outCopyImg, CV_BGR2RGB);
    //此处说明:cv::cvtColor为颜色转换方法,最后一个参数即为我们常用的RGB色值
    if ([self whetherTheImageBlurry:image]) {
     //此为一个清晰度的验证,也是来自于网上的摘录,下方会贴出代码
        [self.videoCamera stop];
        keepMatImg = outCopyImg;

        if (isNeedToCut == YES) {
            CGFloat mianW = UIScreen.mainScreen.bounds.size.width;
            CGFloat  NH = mianW * 1920 / 1080;
            cv::Rect rect(0,(1920 - NH)/2,1080,NH);
            cv::Mat image_roi = outCopyImg(rect);
            self.keepImageAlive = MatToUIImage(image_roi);
       //说明:网上有很多将cv::Mat类型的数据转换为UIimage的方法 ,但是OpenCV本身就提供了此方法 MatToUIImage(),所以此处不再引用其他方法
        }else{
            self.keepImageAlive = MatToUIImage(outCopyImg);
        }

        NSLog(@"keepImageAlive.size = %@",NSStringFromCGSize(self.keepImageAlive.size));
        dispatch_async(dispatch_get_main_queue(), ^{
            if (self.keepImageAlive) {
                self.fuzzyText.text = @"清晰";
                self.resultImageView.image = self.keepImageAlive;
                self.resultImageView.hidden = NO;
            }
        });
    }else{
        dispatch_sync(dispatch_get_main_queue(), ^{
            self.fuzzyText.text = @"模糊";
        });
    }

}
3、清晰度的验证的方法
- (BOOL)whetherTheImageBlurry:(cv::Mat)mat{

    unsigned char *data;
    int height,width,step;

    int Iij;

    double Iave = 0, Idelta = 0;

//    cv::Mat mat = [OpenCVExtension cvMatFromUIImage:image];

    if(!mat.empty()){
        cv::Mat gray;
        cv::Mat outGray;
        // 将图像转换为灰度显示
        cv::cvtColor(mat,gray,CV_RGB2GRAY);

        cv::Laplacian(gray, outGray, gray.depth());

        //        cv::convertScaleAbs( outGray, outGray );

        IplImage ipl_image(outGray);

        data   = (uchar*)ipl_image.imageData;
        height = ipl_image.height;
        width  = ipl_image.width;
        step   = ipl_image.widthStep;

        for(int i=0;i<height;i++)
        {
            for(int j=0;j<width;j++)
            {
                Iij    = (int) data
                [i*width+j];
                Idelta    = Idelta + (Iij-Iave)*(Iij-Iave);
            }
        }
        Idelta = Idelta/(width*height);
        std::cout<<"矩阵方差为:"<<Idelta<<std::endl;
    }

    return (Idelta > IdeltaCount) ? YES : NO;
}
demo下载地址:https://tianlin106@github.com/tianlin106/OpencvAutoTakeImage.git
三、人脸识别的扩展- (void)processImage:(cv::Mat &)image
{
    cv::Mat outCopyImg;
    image.copyTo(outCopyImg);
    cv::cvtColor(outCopyImg, outCopyImg, CV_BGR2RGB);

    if ([self isPhotoContainsFeature:MatToUIImage(outCopyImg)]) {
        if ([self isPhotoIsBrightness:image] == YES) {
            [self disposeCamare];
            keepMatImg = outCopyImg;
            UIImage * resultImage = MatToUIImage(outCopyImg);

            //需要上传
            [self uploadImage:resultImage];
            dispatch_async(dispatch_get_main_queue(), ^{
                [self.imageView removeFromSuperview];
            });
        }
    }
}

- (BOOL)isPhotoContainsFeature:(UIImage *)image{
    CIContext * context = [CIContext contextWithOptions:nil];

    NSDictionary * param = [NSDictionary dictionaryWithObject:CIDetectorAccuracyHigh forKey:CIDetectorAccuracy];

    CIDetector * faceDetector = [CIDetector detectorOfType:CIDetectorTypeFace context:context options:param];
    //此类为Core Image Framework 中的类 ,主要用于识别某些外貌特性,以下语言为其API的描述
  //An image processor that identifies notable features (such as faces and barcodes) in a still image or video.

    CIImage * ciimage = [CIImage imageWithCGImage:image.CGImage];

    NSArray * detectResult = [faceDetector featuresInImage:ciimage];

    return detectResult.count;
}


//此方法计算图像的亮度是否符合要求
- (BOOL)isPhotoIsBrightness:(cv::Mat &)image
{

    cv::Mat imageSobel;
    Sobel(image, imageSobel, CV_16U, 1, 1);

    //图像的平均灰度
    double meanValue = 0.0;
    meanValue = mean(imageSobel)[0];

    if (meanValue > 1.3) {
        return YES;
    }
    return NO;
}
四:集成主要事项:
1、导入OpenCV类目的文件的控制器必须为.mm的C++混编的文件
2、在方法命名和定义形参时,尽量避免使用关键字开头或直接使用关键字,由于OC对此项的检查不是很严格,一旦包含C++的文件以后,对关键字的检测会很强,此为需要注意的事项