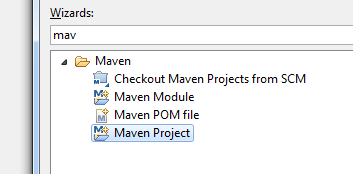
1.创建一个Maven的project
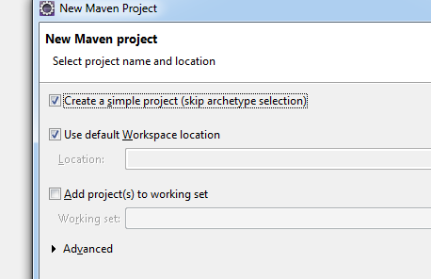
2.不使用骨架,去掉勾
3.这里的Packing 选择 war的形式
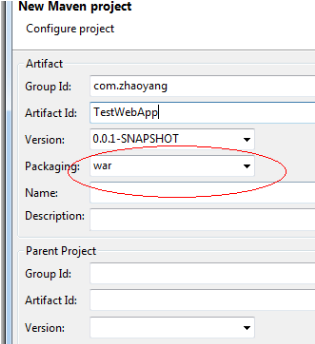
由于packing是war包,那么下面也就多出了webapp的目录
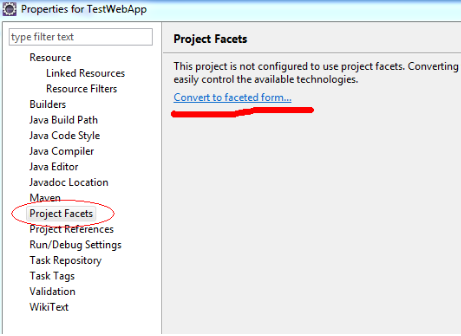
4.由于我们的项目要使用eclipse发布到tomcat下面,这里我们需要先把项目转成dynamic web project
在我们的项目上点击右键,选择properties 并找到 Project Facets ,并点击Convert to faceted form… 如下图
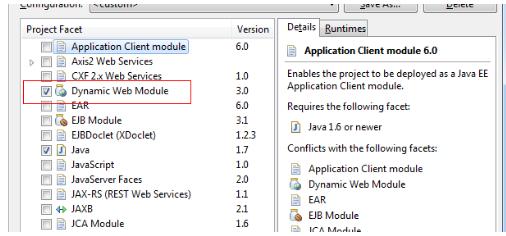
然后勾选Dynamic Web Module 并点击ok 如下图:(3.0只有tomcat7才支持)
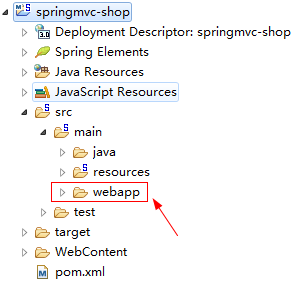
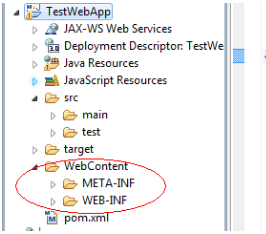
接下来观察我们的项目结构,多了一个WebContent目录
虽然此时我们可以发布到tomcat中,但这不符合maven的结构,我们还要做如下修改
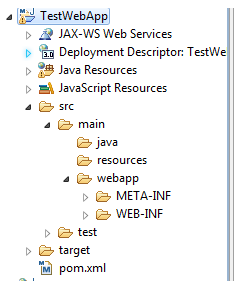
把上图WebContent下面两个目录 META-INF ,WEB-INF 直接剪切到src/main/webapp目录下,并删掉WebContent目录,那么现在的项目结构如下图
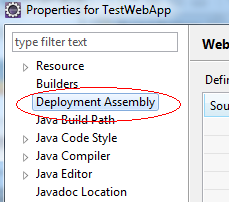
5.然后我们要修改发布规则,右键点击项目, 选择 Deployment Assembly
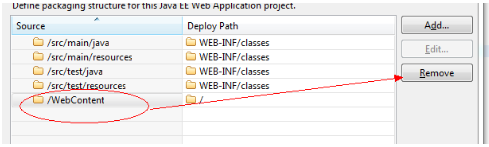
选择WebContent,把它remove掉,测试类我们也不需要发布,test的两个目录页可以remove
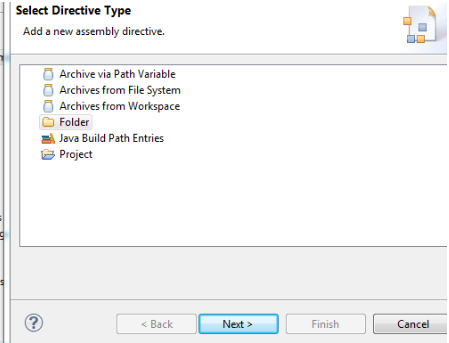
接着重新指定一个web的路径,点击add,选择Folder -- 〉 next
在src下找到webapp目录,然后finish

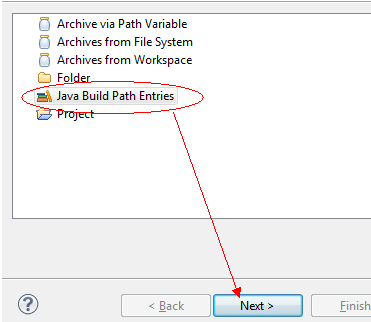
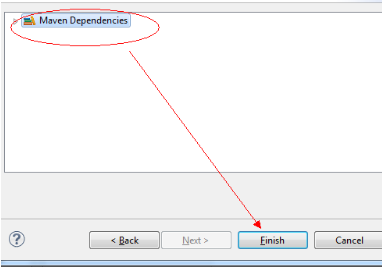
最后一步,我们要把当前的build path 指向 Maven Dependency, 直接点击add,选择Java Build Path Entries 然后next
然后再点击finish完成
完成后如下图:
至此一个基于maven的webapp就建立好了,并可以直接从eclipse中发布到tomcat中
下面新界面测试一下
1.修改pom.xml
添加完代码后,右击项目-》Maven-》Update Project
<project xmlns="http://maven.apache.org/POM/4.0.0" xmlns:xsi="http://www.w3.org/2001/XMLSchema-instance"
  xsi:schemaLocation="http://maven.apache.org/POM/4.0.0 http://maven.apache.org/maven-v4_0_0.xsd">
  <modelVersion>4.0.0</modelVersion>
  <groupId>cn.itsource</groupId>
  <artifactId>springmvc-shop</artifactId>
  <packaging>war</packaging>
  <version>0.0.1-SNAPSHOT</version>
  <name>springmvc-shop Maven Webapp</name>
  <url>http://maven.apache.org</url>

  <properties>
        <project.build.sourceEncoding>UTF-8</project.build.sourceEncoding>
        <spring.version>4.3.13.RELEASE</spring.version>
  </properties>

  <dependencies>
    <dependency>
      <groupId>junit</groupId>
      <artifactId>junit</artifactId>
      <version>3.8.1</version>
      <scope>test</scope>
    </dependency>

    <dependency>
            <groupId>org.springframework</groupId>
            <artifactId>spring-core</artifactId>
            <version>${spring.version}</version>
        </dependency>

        <!-- pring IOC的基础实现,包含访问配置文件、创建和管理bean等 -->
        <dependency>
            <groupId>org.springframework</groupId>
            <artifactId>spring-beans</artifactId>
            <version>${spring.version}</version>
        </dependency>

        <dependency>
            <groupId>org.springframework</groupId>
            <artifactId>spring-context</artifactId>
            <version>${spring.version}</version>
        </dependency>

        <dependency>
            <groupId>org.springframework</groupId>
            <artifactId>spring-context-support</artifactId>
            <version>${spring.version}</version>
        </dependency>

        <dependency>
            <groupId>org.springframework</groupId>
            <artifactId>spring-web</artifactId>
            <version>${spring.version}</version>
        </dependency>

        <dependency>
            <groupId>org.springframework</groupId>
            <artifactId>spring-webmvc</artifactId>
            <version>${spring.version}</version>
        </dependency>

        <dependency>
            <groupId>org.springframework</groupId>
            <artifactId>spring-tx</artifactId>
            <version>${spring.version}</version>
        </dependency>

        <dependency>
            <groupId>org.springframework</groupId>
            <artifactId>spring-aop</artifactId>
            <version>${spring.version}</version>
        </dependency>


        <dependency>
            <groupId>org.springframework</groupId>
            <artifactId>spring-aspects</artifactId>
            <version>${spring.version}</version>
        </dependency>

        <dependency>
            <groupId>org.springframework</groupId>
            <artifactId>spring-jdbc</artifactId>
            <version>${spring.version}</version>
        </dependency>
  </dependencies>
  <build>
    <finalName>springmvc-shop</finalName>
  </build>
</project>
2.修改web.xml配置文件
<?xml version="1.0" encoding="UTF-8"?>
<web-app xmlns:xsi="http://www.w3.org/2001/XMLSchema-instance" xmlns="http://java.sun.com/xml/ns/javaee" xmlns:web="http://java.sun.com/xml/ns/javaee/web-app_2_5.xsd" xsi:schemaLocation="http://java.sun.com/xml/ns/javaee http://java.sun.com/xml/ns/javaee/web-app_3_0.xsd" id="WebApp_ID" version="3.0">
  <display-name>springmvc</display-name>

  <welcome-file-list>
    <welcome-file>index.html</welcome-file>
    <welcome-file>index.htm</welcome-file>
    <welcome-file>index.jsp</welcome-file>
    <welcome-file>default.html</welcome-file>
    <welcome-file>default.htm</welcome-file>
    <welcome-file>default.jsp</welcome-file>
  </welcome-file-list>

  <!-- 配置HiddenHttpMethodFilter,可以把POST请求转为DELETE或PUT请求 -->
  <filter>
      <filter-name>HiddenHttpMethodFilter</filter-name>
      <filter-class>org.springframework.web.filter.HiddenHttpMethodFilter</filter-class>
  </filter>

  <filter-mapping>
      <filter-name>HiddenHttpMethodFilter</filter-name>
      <url-pattern>/*</url-pattern>
  </filter-mapping>

  <!-- 配置DispatcherServlet -->
  <servlet>
      <servlet-name>springDispatcherServlet</servlet-name>
        <servlet-class>org.springframework.web.servlet.DispatcherServlet</servlet-class>
        <!--
          contextConfigLocation配置springmvc加载的配置文件(配置处理器,映射器,适配器等等)
            默认加载的是/WEB-INF/servlet名称-servlet.xml(即springDispatcherServlet-servlet.xml)
        -->
        <init-param>
            <param-name>contextConfigLocation</param-name>
            <param-value>classpath:springmvc.xml</param-value>
        </init-param>
        <load-on-startup>1</load-on-startup>
  </servlet>

  <!--
      第一种:*.action 访问以.action结尾由DispatcherServlet进行解析
      第二种:/. 所有访问的地址都由DispatcherServlet进行解析,对于静态文件的解析需要配置不让DispatcherServlet进行解析
      第三种:/*. 这样配置不对,使用这种配置,最终要转发到一个jsp页面时,仍然会由DispatcherServlet解析jsp地址,不能根据jsp页面找到handler,会报错
   -->
  <servlet-mapping>
      <servlet-name>springDispatcherServlet</servlet-name>
      <url-pattern>/</url-pattern>
  </servlet-mapping>

</web-app>
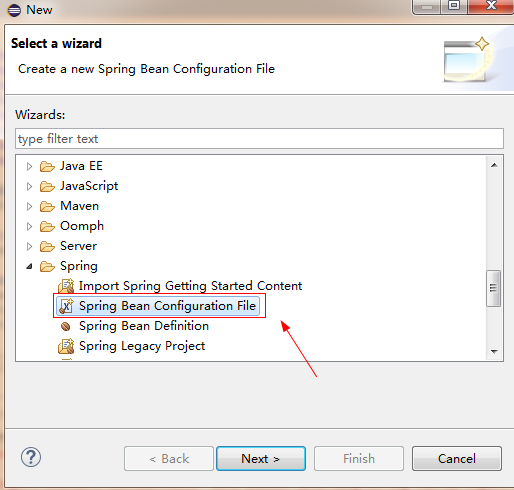
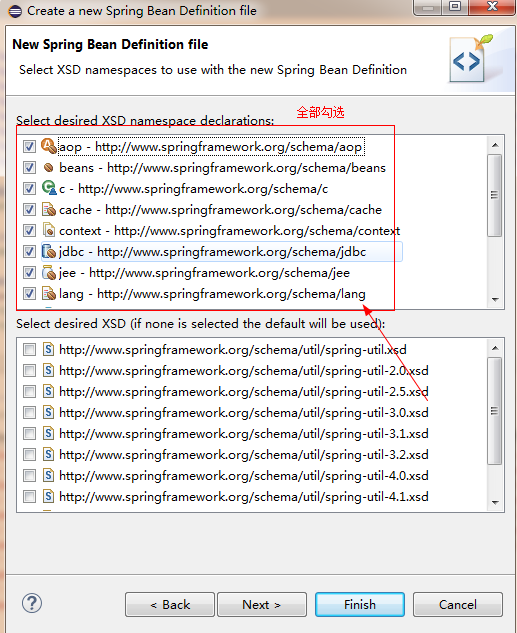
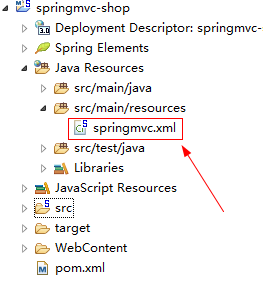
3.添加springmvc.xml文件
<?xml version="1.0" encoding="UTF-8"?>
<beans xmlns="http://www.springframework.org/schema/beans"
    xmlns:xsi="http://www.w3.org/2001/XMLSchema-instance"
    xmlns:aop="http://www.springframework.org/schema/aop"
    xmlns:c="http://www.springframework.org/schema/c"
    xmlns:cache="http://www.springframework.org/schema/cache"
    xmlns:context="http://www.springframework.org/schema/context"
    xmlns:jdbc="http://www.springframework.org/schema/jdbc"
    xmlns:jee="http://www.springframework.org/schema/jee"
    xmlns:lang="http://www.springframework.org/schema/lang"
    xmlns:mvc="http://www.springframework.org/schema/mvc"
    xmlns:p="http://www.springframework.org/schema/p"
    xmlns:task="http://www.springframework.org/schema/task"
    xmlns:tx="http://www.springframework.org/schema/tx"
    xmlns:util="http://www.springframework.org/schema/util"
    xsi:schemaLocation="http://www.springframework.org/schema/beans http://www.springframework.org/schema/beans/spring-beans.xsd
        http://www.springframework.org/schema/aop http://www.springframework.org/schema/aop/spring-aop-4.3.xsd
        http://www.springframework.org/schema/cache http://www.springframework.org/schema/cache/spring-cache-4.3.xsd
        http://www.springframework.org/schema/context http://www.springframework.org/schema/context/spring-context-4.3.xsd
        http://www.springframework.org/schema/jdbc http://www.springframework.org/schema/jdbc/spring-jdbc-4.3.xsd
        http://www.springframework.org/schema/jee http://www.springframework.org/schema/jee/spring-jee-4.3.xsd
        http://www.springframework.org/schema/lang http://www.springframework.org/schema/lang/spring-lang-4.3.xsd
        http://www.springframework.org/schema/mvc http://www.springframework.org/schema/mvc/spring-mvc-4.3.xsd
        http://www.springframework.org/schema/task http://www.springframework.org/schema/task/spring-task-4.3.xsd
        http://www.springframework.org/schema/tx http://www.springframework.org/schema/tx/spring-tx-4.3.xsd
        http://www.springframework.org/schema/util http://www.springframework.org/schema/util/spring-util-4.3.xsd">

    <!-- 配置注解驱动 -->
    <mvc:annotation-driven />

    <!-- 配置自定义扫描的包 -->
    <context:component-scan base-package="com.springmvc"></context:component-scan>

    <!-- 配置视图解析器:如何把handler方法返回值解析为实际的物理视图 -->
    <bean class="org.springframework.web.servlet.view.InternalResourceViewResolver">
        <property name="prefix" value="/WEB-INF/views/"></property>
        <property name="suffix" value=".jsp"></property>
    </bean>

</beans>
4.新建一个HelloWorld的Controller
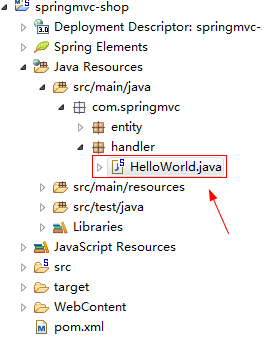
package com.springmvc.handler;

import org.springframework.stereotype.Controller;
import org.springframework.web.bind.annotation.RequestMapping;

/* 指定url地址
 * 通过前缀 + returnValue + 后缀
 * prefix + returnValue + suffix
 * 即:WEB-INF/views/success.jsp
 *
 * */
@Controller
@RequestMapping("/springmvc")
public class HelloWorld {
    private static final String SUCCESS = "success";

    /*
     * 新建方法
     *
     * */
    @RequestMapping(value="/hello")
    public String paramsMethod()
    {
        return SUCCESS;
    }
}
5.添加success.jsp
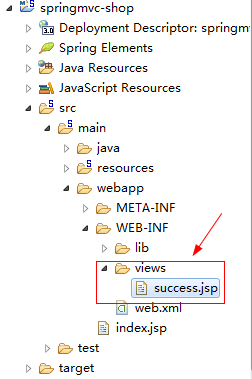
<%@ page language="java" contentType="text/html; charset=utf-8"
    pageEncoding="utf-8"%>
<!DOCTYPE html PUBLIC "-//W3C//DTD HTML 4.01 Transitional//EN" "http://www.w3.org/TR/html4/loose.dtd">
<html>
<head>
<meta http-equiv="Content-Type" content="text/html; charset=utf-8">
<title>Insert title here</title>
</head>
<body>
    <a>success!</a>
</body>
</html>
6.修改index.jsp
<%@ page language="java" contentType="text/html; charset=utf-8"
    pageEncoding="utf-8"%>
<!DOCTYPE html PUBLIC "-//W3C//DTD HTML 4.01 Transitional//EN" "http://www.w3.org/TR/html4/loose.dtd">
<html>
<head>
<meta http-equiv="Content-Type" content="text/html; charset=utf-8">
<title>Insert title here</title>
</head>
<body>
    <a href="springmvc/hello">测试</a>
</body>
</html>
7.右键项目Run As-》Run On Server,启动
测试url
http://localhost:8080/springmvc-shop/
http://localhost:8080/springmvc-shop/springmvc/hello
转载:
https://yq.aliyun.com/articles/326118
.