1.创建相应的目录:
mkdir -p /ansible/roles/{nginx,mysql,tomcat,db,zabbix}/{defaults,files,handlers,meta,tasks,templates,vars}
2 文件结构
[root@MSJTVL-MJSP-A35 etc]# tree ansible/
ansible/
├── ansible.cfg
├── hosts #配置主机相关信息
├── roles
│ ├── db
│ │ ├── defaults
│ │ ├── files
│ │ │ └── stu.sql #要导入的sql
│ │ ├── handlers
│ │ ├── meta
│ │ ├── tasks
│ │ │ └── main.yml #创建数据库和导入SQL
│ │ ├── templates
│ │ └── vars
│ ├── mysql
│ │ ├── defaults
│ │ ├── files
│ │ │ └── mysql_install.sh #mysql源码和安装脚本
│ │ ├── handlers
│ │ ├── meta
│ │ ├── tasks
│ │ │ └── main.yml #安装mysql
│ │ ├── templates
│ │ └── vars
│ ├── nginx
│ │ ├── default
│ │ ├── defaults
│ │ ├── files
│ │ │ ├── install_nginx.sh #nginx安装脚本
│ │ │ ├── nginx-1.10.0.tar.gz #nginx安装程序包
│ │ │ └── ngx_cache_purge-2.3.tar.gz
│ │ ├── handlers
│ │ ├── meta
│ │ ├── tasks
│ │ │ └── main.yml #安装nginx
│ │ ├── templates
│ │ │ └── nginx.conf #nginx配置文件
│ │ └── vars
│ ├── tomcat
│ │ ├── defaults
│ │ ├── files
│ │ ├── handlers
│ │ │ └── main.yml #安装后处理
│ │ ├── meta
│ │ ├── tasks
│ │ │ └── main.yml #安装tomcat
│ │ ├── templates
│ │ └── vars
│ └── zabbix
│ ├── defaults
│ ├── files
│ │ ├── install_zabbix.sh #安装zabbix客户端脚本
│ │ ├── zabbix-3.0.7.tar.gz #zabbix安装包
│ │ └── zabbix_agentd.conf #zabbix客户端配置文件
│ ├── handlers
│ ├── meta
│ ├── tasks
│ │ └── main.yml #安装zabbix
│ ├── templates
│ └── vars
├── web.retry
├── webservice.yml
└── web.yml #总的调用文件
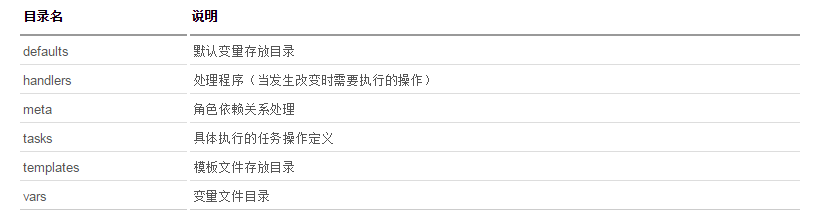
各目录功能说明
3.解决“Aborting, target uses selinux but python bindings (libselinux-python) aren't installed!”问题:
更新python库:
yum -y install libselinux-python
4.playbooks&shell
/etc/ansible/web.yml
- hosts: lzy
  remote_user: root
  roles:
    - nginx
    - zabbix
    - mysql
/etc/ansible/roles/db/tasks/main.yml
---
- name: create db
  mysql_db: name=student state=present login_password=bingoclo123 login_user=root login_unix_socket=/data/mysql/data/mysql.sock
- name: copy sql file
  copy: src=stu.sql dest=/tmp
- name: import sql
  mysql_db: name=student state=import target=/tmp/stu.sql login_password=bingoclo123 login_user=root login_unix_socket=/data/mysql/data/mysql.sock
/etc/ansible/roles/db/files/stu.sql
create table profile(name varchar(20),age tinyint);
 insert into profile(name,age) values('teddy',12);
/etc/ansible/roles/nginx/tasks/main.yml
- name: copy nginx_tar_gz to client
  copy: src=/etc/ansible/roles/nginx/files/nginx-1.10.0.tar.gz dest=/tmp/nginx-1.10.0.tar.gz
- name: copy install_shell to client
  copy: src=/etc/ansible/roles/nginx/files/install_nginx.sh dest=/tmp/install_nginx.sh
- name: copy ngx_cache_purge-2.3.tar.gz to client
  copy: src=/etc/ansible/roles/nginx/files/ngx_cache_purge-2.3.tar.gz dest=/tmp/ngx_cache_purge-2.3.tar.gz
- name: install nginx
  shell: /bin/bash /tmp/install_nginx.sh
/etc/ansible/roles/nginx/files/install_nginx.sh
#!/bin/bash

#yum安装一些依赖的模块
#yum -y install libselinux-python
yum -y install gcc zlib zlib-devel openssl openssl-devel pcre pcre-devel
yum -y install zlib zlib-devel openssl openssl-devel pcre-devel
#groupadd -r nginx
#useradd -s /sbin/nologin -g nginx -r nginx
cd /tmp
tar xf nginx-1.10.0.tar.gz
tar xf ngx_cache_purge-2.3.tar.gz
cd nginx-1.10.0
mkdir -p /opt/nginx/server/sbin
mkdir -p /opt/nginx/server/lib
mkdir -p /opt/nginx/server/log
mkdir -p /opt/nginx/server/run
mkdir -p /opt/nginx/server/cache
mkdir -p /opt/nginx/server/conf
mkdir -p /opt/nginx/server/lib
mkdir -p /opt/nginx/cache
./configure
--prefix=/opt/nginx/server
--sbin-path=/opt/nginx/server/sbin/nginx
--modules-path=/opt/nginx/server/lib/modules
--conf-path=/opt/nginx/server/conf/nginx.conf
--error-log-path=/opt/nginx/server/log/error.log
--http-log-path=/opt/nginx/server/log/access.log
--pid-path=/opt/nginx/server/run/nginx.pid
--lock-path=/opt/nginx/server/run/nginx.lock
--http-client-body-temp-path=/opt/nginx/server/cache/client_temp
--http-proxy-temp-path=/opt/nginx/server/cache/proxy_temp
--http-fastcgi-temp-path=/opt/nginx/server/cache/fastcgi_temp
--http-uwsgi-temp-path=/opt/nginx/server/cache/uwsgi_temp
--http-scgi-temp-path=/opt/nginx/server/cache/scgi_temp
--user=nginx
--group=nginx
--with-http_ssl_module
--with-http_realip_module
--with-http_addition_module
--with-http_sub_module
--with-http_dav_module
--with-http_flv_module
--with-http_mp4_module
--with-http_gunzip_module
--with-http_gzip_static_module
--with-http_random_index_module
--with-http_secure_link_module
--with-http_stub_status_module
--with-http_auth_request_module
--with-threads
--with-stream
--with-stream_ssl_module
--with-http_slice_module
--with-mail
--with-mail_ssl_module
--with-file-aio
--with-http_v2_module
--with-ipv6
--add-module=/tmp/ngx_cache_purge-2.3

make && make install
chown -R nginx:nginx /opt/nginx
#sed  "/^s*index / i proxy_pass http://localhost:8080;" /etc/nginx/nginx.conf
/opt/nginx/server/sbin/nginx
#sed
/etc/ansible/roles/mysql/tasks/main.yml
- name: copy mysql_tar_gz to client
  copy: src=mysql-5.6.27.tar.gz dest=/tmp/mysql-5.6.27.tar.gz
- name: copy install_script to client
  copy: src=mysql_install.sh dest=/tmp/mysql_install.sh owner=root group=root mode=755
- name: install mysql
  shell: /bin/bash /tmp/mysql_install.sh
etc/ansible/roles/tomcat/tasks/main.yml
- name: install java
  yum: name=java-1.7.0-openjdk state=present
- name: group
  group: name=tomcat
- name: user
  user: name=tomcat group=tomcat home=/usr/tomcat
  sudo: True
- name: copy tomcat_tar_gz
  copy: src=apache-tomcat-7.0.65.tar.gz dest=/tmp/apache-tomcat-7.0.65.tar.gz
- name: Extract archive
  command: /bin/tar xf /tmp/apache-tomcat-7.0.65.tar.gz -C /opt/
- name: Symlink install directory
  file: src=/opt/apache-tomcat-7.0.65/ dest=/usr/share/tomcat state=link
- name: Change ownership of Tomcat installation
  file: path=/usr/share/tomcat/ owner=tomcat group=tomcat state=directory recurse=yes
- name: Configure Tomcat users
  template: src=tomcat-users.xml dest=/usr/share/tomcat/conf/
  notify: restart tomcat
- name: Install Tomcat init script
  copy: src=tomcat-initscript.sh dest=/etc/init.d/tomcat mode=0755
- name: Start Tomcat
  service: name=tomcat state=started enabled=yes
etc/ansible/roles/tomcat/handlers/main.yml
- name: restart tomcat
  service: name=tomcat state=restarted
etc/ansible/roles/mysql/files/mysql_install.sh
#!/bin/bash
DBDIR='/data/mysql/data'
PASSWD='bingoclo123'
[ -d $DBDIR ] || mkdir $DBDIR -p
yum install cmake make gcc-c++ bison-devel ncurses-devel -y
id mysql &> /dev/null
if [ $? -ne 0 ];then
 useradd mysql -s /sbin/nologin -M
fi
chown -R mysql.mysql $DBDIR
cd /tmp/
tar xf mysql-5.6.27.tar.gz
cd mysql-5.6.27
cmake . -DCMAKE_INSTALL_PREFIX=/usr/local/mysql
-DMYSQL_DATADIR=$DBDIR
-DMYSQL_UNIX_ADDR=$DBDIR/mysql.sock
-DDEFAULT_CHARSET=utf8
-DEXTRA_CHARSETS=all
-DENABLED_LOCAL_INFILE=1
-DWITH_READLINE=1
-DDEFAULT_COLLATION=utf8_general_ci
-DWITH_EMBEDDED_SERVER=1
if [ $? != 0 ];then
 echo "cmake error!"
 exit 1
fi
make && make install
if [ $? -ne 0 ];then
 echo "install mysql is failed!" && /bin/false
fi
sleep 2
ln -s /usr/local/mysql/bin/* /usr/bin/
cp -f /usr/local/mysql/support-files/my-default.cnf /etc/my.cnf
cp -f /usr/local/mysql/support-files/mysql.server /etc/init.d/mysqld
chmod 700 /etc/init.d/mysqld
/usr/local/mysql/scripts/mysql_install_db  --basedir=/usr/local/mysql --datadir=$DBDIR --user=mysql
if [ $? -ne 0 ];then
 echo "install mysql is failed!" && /bin/false
fi
/etc/init.d/mysqld start
if [ $? -ne 0 ];then
 echo "install mysql is failed!" && /bin/false
fi
chkconfig --add mysqld
chkconfig mysqld on
/usr/local/mysql/bin/mysql -e "update mysql.user set password=password('$PASSWD') where host='localhost' and user='root';"
/usr/local/mysql/bin/mysql -e "update mysql.user set password=password('$PASSWD') where host='127.0.0.1' and user='root';"
/usr/local/mysql/bin/mysql -e "delete from mysql.user where password='';"
/usr/local/mysql/bin/mysql -e "flush privileges;"
if [ $? -eq 0 ];then
 echo "ins_done"
fi
5执行安装&检查
[root@MSJTVL-MJSP-A35 ansible]# ansible-playbook web.yml

PLAY [lzy] *********************************************************************

TASK [setup] *******************************************************************
ok: [10.0.110.91]
ok: [10.0.110.47]

TASK [zabbix : copy zabbix_tar_gz to client] ***********************************
changed: [10.0.110.47]
changed: [10.0.110.91]

TASK [zabbix : copy install_shell to client] ***********************************
changed: [10.0.110.91]
changed: [10.0.110.47]

TASK [zabbix : copy zabbix_agentd.conf to client] ******************************
changed: [10.0.110.91]
changed: [10.0.110.47]

TASK [zabbix : install zabbix] *************************************************
changed: [10.0.110.47]
changed: [10.0.110.91]

PLAY RECAP *********************************************************************
10.0.110.47                : ok=5    changed=4    unreachable=0    failed=0
10.0.110.91                : ok=5    changed=4    unreachable=0    failed=0
6、常见错误
7.补充
1.使用ssh-copy-id命令来复制Ansible公钥到节点中。
ssh-copy-id -i sm01@10.0.110.47