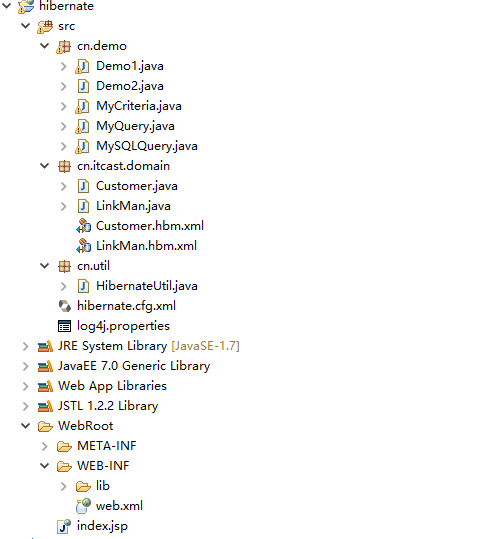
包结构如下图所示(按图标进行对齐):
环境搭好后代码分为以下几步:
 1 /**
 2  * private static  final Configuration CONFIGURATION;
 3  * private static  final SessionFactory SESSION_FACTORY;
 4  * 1、加载配置文件
 5  *   Configuration CONFIGURATION = new Configuration().configure();
 6  * 2、创建 session工厂
 7  *   SessionFactory SESSION_FACTORY =  CONFIGURATION.buildSessionFactory();
 8  * 3、创建session (类似于connection)
 9  *   Session  SESSION_FACTORY.getCurrentSession()
10  * 4、开启事务
11  *   Transaction tx = session.beginTransaction();
12  * 5、操作
13  * 6、提交事务
14  *   tx.commit();(如果  session 不是线程绑定需执行session.close();)
15  * @author Administrator
16  *
17  */
下面进行详细说明:
创建customer javabean
 1 package cn.itcast.domain;
 2
 3 public class Customer {
 4 private long cust_id;
 5 private String cust_name;
 6 private String cust_source;
 7 private String cust_industry;
 8 private String cust_level;
 9 private String cust_phone;
10 private String cust_mobile;
11 public long getCust_id() {
12     return cust_id;
13 }
14 public void setCust_id(long cust_id) {
15     this.cust_id = cust_id;
16 }
17 public String getCust_name() {
18     return cust_name;
19 }
20 public void setCust_name(String cust_name) {
21     this.cust_name = cust_name;
22 }
23 public String getCust_source() {
24     return cust_source;
25 }
26 public void setCust_source(String cust_source) {
27     this.cust_source = cust_source;
28 }
29 public String getCust_industry() {
30     return cust_industry;
31 }
32 public void setCust_industry(String cust_industry) {
33     this.cust_industry = cust_industry;
34 }
35 public String getCust_level() {
36     return cust_level;
37 }
38 public void setCust_level(String cust_level) {
39     this.cust_level = cust_level;
40 }
41 public String getCust_phone() {
42     return cust_phone;
43 }
44 public void setCust_phone(String cust_phone) {
45     this.cust_phone = cust_phone;
46 }
47 public String getCust_mobile() {
48     return cust_mobile;
49 }
50 public void setCust_mobile(String cust_mobile) {
51     this.cust_mobile = cust_mobile;
52 }
53
54 }
在javaBean所在的包下创建映射关系文件Customer.hbm.xml
 1 <?xml version="1.0" encoding="UTF-8"?>
 2 <!DOCTYPE hibernate-mapping PUBLIC
 3 "-//Hibernate/Hibernate Mapping DTD 3.0//EN"
 4 "http://www.hibernate.org/dtd/hibernate-mapping-3.0.dtd">
 5 <hibernate-mapping>
 6 <!-- 建立表和类的映射关系 name类的全路径  table表名 catalog 数据库名(可省略) -->
 7 <class name="cn.itcast.domain.Customer" table="customer" catalog="hibernate">
 8 <!-- id 表示主键      name类属性名 column表中字段名     如果相同可以省略-->
 9 <id name="cust_id" column="cust_id"><generator class="native"/></id>
10 <!-- property 表示表中的普通属性 -->
11 <property name="cust_name" column="cust_name"/>
12 <property name="cust_source" column="cust_source"/>
13 <property name="cust_industry" column="cust_industry"/>
14 <property name="cust_level" column="cust_level"/>
15 <property name="cust_phone" column="cust_phone"/>
16 <property name="cust_mobile" column="cust_moblie"/>
17 <!--  length 字段长度   type  数据类型-->
18 </class>
19 </hibernate-mapping>
在src下创建Hibernate的配置文件 hibernate.cfg.xml
 1 <?xml version="1.0" encoding="UTF-8"?>
 2 <!DOCTYPE hibernate-configuration PUBLIC
 3     "-//Hibernate/Hibernate Configuration DTD 3.0//EN"
 4     "http://hibernate.sourceforge.net/hibernate-configuration-3.0.dtd">
 5 <hibernate-configuration>
 6 <session-factory>
 7     <!-- 必要的配置信息 :连接数据库的基本参数  -->
 8     <property name="connection.driver_class">com.mysql.jdbc.Driver</property>
 9     <property name="connection.url">jdbc:mysql://localhost:3306/Hibernate?characterEncoding=utf8</property>
10     <property name="connection.username">root</property>
11     <property name="connection.password">root</property>
12     <property name="dialect">org.hibernate.dialect.MySQLDialect</property>
13     <!-- 是否输出sql语句 -->
14     <property name="show_sql">true</property>
15     <!-- 是否格式化sql语句 -->
16     <property name="format_sql">true</property>
17     <!-- Hibernat的hbm2ddl(数据定义语言:cteate drop alter ...)-->
18     <!--
19         hbm2ddl.auto的取值:
20         *none       :不用Hibernate自动生成表
21         *create     : 每次都会创建一个新的表(测试)
22         *create-drop:每次都会创建一个表,执行程序结束后删除这个表(测试)
23         *update     :如果数据库中有表使用原来的表,创建一个新表,可以更新表结构
24         *validate   :只会使用原来的表对映射关系进行校验
25     -->
26     <property name="hbm2ddl.auto">update</property>
27     <!-- 配置本地jdbc事务配置 ,通过getCurrentSession创建的session会绑定当前线程
28          thread   对象生命周期会与本地线程绑定
29          jta    对象生命周期与JTA事务绑定
30            managed    Hibernate委托程序管理对象的生命周期
31     -->
32     <property name="current_session_context_class">thread</property>
33
34
35     <!-- hibernate内部维护有一个连接池,如果要使用c3p0 等外部连接池 可以添加相应的jar包后进行配置 -->
36     <!-- 最小连接数 -->
37     <property name="c3p0.min_size">5</property>
38     <!-- 最大连接数 -->
39     <property name="c3p0.max_size">20</property>
40     <!-- 设定数据库连接的过期时间 以秒为单位 -->
41     <property name="c3p0.timeout">120</property>
42     <!--  没3000秒检查所有数据库的空闲连接 以秒为单位-->
43     <property name="c3p0.idle_test_period">3000</property>
44
45
46     <!-- 加载映射 -->
47     <property name="myeclipse.connection.profile"></property>
48     <mapping resource="cn/itcast/domain/Customer.hbm.xml" />
49 </session-factory>
50 </hibernate-configuration>
封装加载配置类为工具类:
 1 package cn.util;
 2
 3
 4 import org.hibernate.Session;
 5 import org.hibernate.SessionFactory;
 6 import org.hibernate.cfg.Configuration;
 7 /**
 8  * 加载配置文件   封装工具类
 9  * @author Administrator
10  *
11  */
12 public class HibernateUtil {
13 private static  final Configuration CONFIGURATION;
14 private static  final SessionFactory SESSION_FACTORY;
15 static{
16     //加载配置文件
17     CONFIGURATION = new Configuration().configure();
18     //创建一个SessionFactory
19     SESSION_FACTORY =  CONFIGURATION.buildSessionFactory();
20 }
21 /**
22  * 提供获得Session的方法
23  */
24 /**
25  * 直接创建新的Session实例 使用完成后需要调用 close方法手动关闭
26  * @return
27  */
28 public static Session openSession() {
29     return SESSION_FACTORY.openSession();
30 }
31 /**
32  * 创建的session会被绑定到当前线程中,它在提交或回滚操作时会自动关闭
33  * @return
34  */
35 public static Session getCurrentSession(){
36
37     return SESSION_FACTORY.getCurrentSession();
38 }
39 }
创建测试类进行测试:
 1 public class Demo1 {
 2
 3 public static void main(String[] args) {
 4 ////获取session
 5 //Session session = HibernateUtil.getCurrentSession();
 6 ////开启事务
 7 //Transaction tx = session.beginTransaction();
 8 //Customer customer= new Customer();
 9 //customer.setCust_name("小王");
10 //customer.setCust_source("网络推广");
11 //session.save(customer);
12 ////事务提交
13 //tx.commit();
14 ////如果采用 openSession 获取实例  还需要  执行session.close();释放资源
15 ////session 为轻量级  Configuration SessionFactory为重量级 之间重建所消耗的资源不同
16
17 //Session session = HibernateUtil.getCurrentSession();
18 //Transaction tx = session.beginTransaction();
19 //Customer customer = session.get(Customer.class,Long.valueOf("1"));
20 //session.delete(customer);
21 //tx.commit();
22
23 Session session =HibernateUtil.getCurrentSession();
24 Transaction tx = session.beginTransaction();
25 Customer customer = session.get(Customer.class,Long.valueOf("2"));
26 customer.setCust_mobile("124575615121");
27 session.update(customer);
28 tx.commit();
29 }
30 }