Robot Framework + Appium
Appium-Python-Client: 与Appium Library和Appium Server的交互
Appium Library通过Appiium-Python-Client请求Appium Server初始化一个Session,请求成功后,Appium Server分配给Appium-Python-Client一个Session ID, 后续所有的交互都是通过这个Session完成。
一、测试用例编写前提
所需的软件列表如下
- Robotframework
- Appium desktop
- Android模拟器--夜神模拟器
- 测试的apk文件
pip install robotframework-python3 / pip install --upgrade robotframework 安装最新版本
pip install --upgrade robotframework-seleniumlibrary 直接安装该包会自动安装selenium和robotframework
pip install --upgrade robotframework-appiumlibrary (1.4.6) 直接安装该包会自动安装Appium-Python-Client和robotframework
1.模拟器/手机连接电脑 adb connect 设备型号 (夜神模拟器对应的设备型号:127.0.0.1:62001)
2、启动appium server (打开 appium desktop即可)
二、测试用例编写步骤
1.创建测试项目
File-New Project,选择类型Directory type

2.创建测试套件
测试项目-New Suite,输入Name,选择类型File type

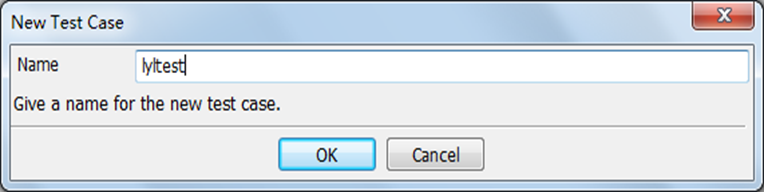
3.创建测试用例
测试套件-New Test Case,输入Name
4.导入测试库AppiumLibrary
测试套件Edit标签页-Library,输入Name:AppiumLibrary
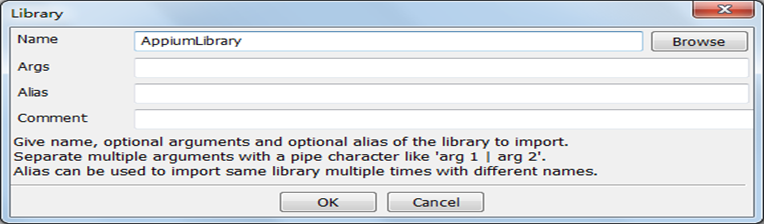
注:导入的库显示为红色时,表示导入的库不存在;如果是黑色,则表示导入成功
5.编写测试用例
测试用例Edit标签页,输入Keywords
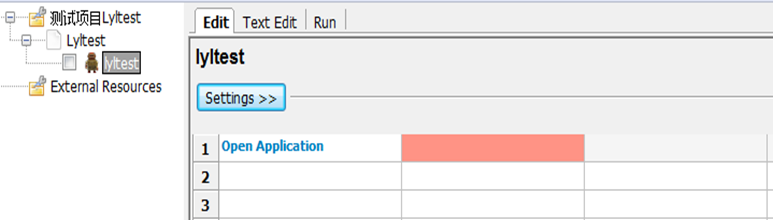
注:关键字显示蓝色,说明它是一个合法的关键字,后面为红色说明需要输入一个参数
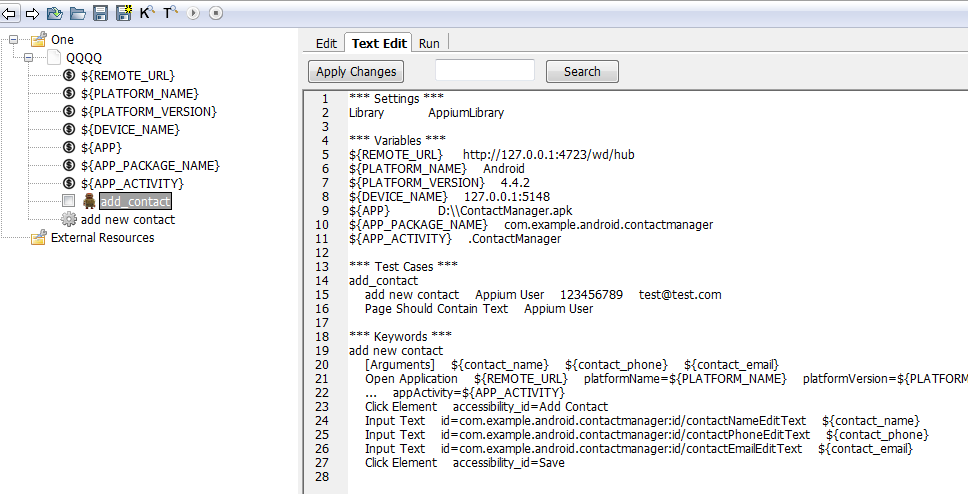
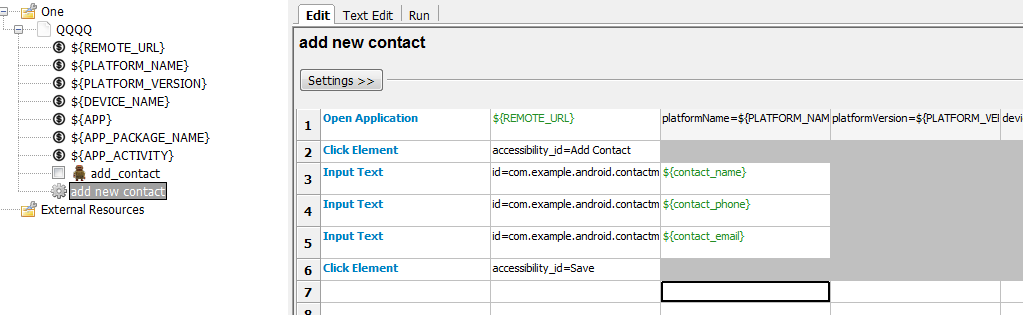
三、关键字封装

封装的所有关键字代码展示如下
*** Settings ***
Library AppiumLibrary
*** Variables ***
{REMOTE_URL} http://127.0.0.1:4723/wd/hub
{PLATFORM_NAME} Android
{PLATFORM_VERSION} 4.4.2
{DEVICE_NAME} 127.0.0.1:5148
{APP} D:\ContactManager.apk
{APP_PACKAGE_NAME} com.example.android.contactmanager
{APP_ACTIVITY} .ContactManager
*** Test Cases ***
add_contact
add new contact Appium User 123456789 test@test.com
Page Should Contain Text Appium User
*** Keywords ***
add new contact
[Arguments] {contact_name} {contact_phone} {contact_email}
Open Application {REMOTE_URL} platformName={PLATFORM_NAME} platformVersion={PLATFORM_VERSION} deviceName={DEVICE_NAME} app={APP} appPackage={APP_PACKAGE_NAME} appActivity={APP_ACTIVITY}
Click Element accessibility_id=Add Contact
Input Textid=com.example.android.contactmanager:id/contactNameEditText contactname
InputTextid=com.example.android.contactmanager:id/contactPhoneEditTextcontactname
InputTextid=com.example.android.contactmanager:id/contactPhoneEditText{contact_phone}
Input Text id=com.example.android.contactmanager:id/contactEmailEditText ${contact_email}
Click Element accessibility_id=Save
注:每个“{ }”前都有一个“$”
1、RF向Android发送keycode键盘事件
如何向Android发送keycode键盘事件,这是在Android测试中必不可少的部分。我们今天要谈到的keyword就是“Press Keycode”,它有2个参数keycode 和 metastate=None。第二个参数metastate,主要代表是否有Shift/Alt这些Function键按下,对于Android而言很少用到,我们在此就不谈了,直接赋值"None"即可。
要向系统发送返回事件,参考代码如下,
${KEYCODE_BACK} 4
Press Keycode ${KEYCODE_BACK} None
注意,需要事先声明“KEYCODE_BACK”,否则robot framework不能识别。
2、RF判断Android屏幕是否含有某个控件
在用RF写测试代码时, 有时需要判断当前屏幕是否含有某个控件, 以便决定下一步的测试步骤。比如, 测试WiFi的时候, 点击某个无线AP的名称, 如果Android机器已经和这个无线AP连接, 则会跳出询问是否忘记与该无线AP的连接; 如果Android机器还没有和这个无线AP连接,则会跳出页面, 要求输入无线AP的密码.。在RF中,我们可以使用关键字 "Get Matching Xpath Count" 来判断当前屏幕是否包含某个控件,这个关键字的输入参数是"xpath", 输出参数是当前屏幕包含此控件的个数。比如, 下面的代码作用是获得当前屏幕中含有文字"Forget"控件的个数, 如果含有这个控件, 说明WiFi已经连接上, 我们则点击 "Forget" 按钮. 示例代码如下,
${count} Get Matching Xpath Count xpath=//*[contains(@text, 'Forget')]
Run Keyword If ${count} > 0 Log WiFi already connected, forget it then re-connect
Run Keyword If ${count} > 0 Click Element xpath=//*[contains(@text, 'Forget')]
3、RF如何等待Android屏幕中的某个控件出现
在用RF写测试代码时, 有时需要等待当前屏幕出现某个控件以便进行下一步的操作,我们可以用"Get Matching Xpath Count"关键字来实现循环等待某个控件的出现,也可以用另外一个更好用的关键字"Wait Until Page Contains Element", 它有三个参数,
参数1 locator --- 指定要等待的控件;
参数2 timeout --- 指定等待超时的时间;
参数3 error --- 等待失败的错误信息, 也可以使用"None"表示不输出错误信息;
比如在测试WiFi时, 我们要刷新等待某一个SSID Name(无线AP的名字)的出现, 则可以使用下面的代码,其含义为:
在10秒内等待某个SSID名称的出现, 如果没有出现则打印错误日志"Can NOT find ${ssid_name}"; 若出现则可以点击这个无线AP的名称进行下一步的操作
Wait Until Page Contains Element xpath=//*[contains(@text, '${ssid_name}')] 10 Can NOT find ${ssid_name}
Click Element xpath=//*[contains(@text, '${ssid_name}')]
4、RF在Android中实现滚屏
在使用RF试Android机器过程中, 经常要用到滚屏操作, 其中一个方法, 就是使用关键字"Swipe", 这个关键字的效果类似模拟操作人员滑动屏幕的效果, 它有5个参数
----start_x: 滑动开始的X坐标;
----start_y: 滑动开始的Y坐标;
----end_x: 滑动结束的X坐标;
----end_y: 滑动结束的Y坐标;
----duration: 滑动持续的时间, 默认是1000ms;
下面的代码表示, 滑动坐标从(400, 1000)开始, 结束于(400, 500), 滑动持续时长为200ms. 只是一个向上滑动的动作.
Swipe 400 1000 400 500 200
在实际操作过程中, 滑动到某个控件出现的位置.如果滑动太少, 则看不到这个控件; 如果滑动太多, 则会划过这个控件. 这时, 我们可以考虑每次滑动的幅度小一些, 同时通过关键字"Get Matching Xpath Count"查看该控件是否已经出现在当前屏幕.示例代码如下,
下面的代码表示, 每次向上划动一点, 然后查看"About phone"是否出现, 如果出现, 则退出循环停止滑动; 否则继续滑动.
: FOR ${i} IN RANGE 20
Swipe 400 1000 400 800 400
${count} Get Matching Xpath Count xpath=//*[contains(@text, 'About phone')]
Exit For Loop If ${count}>0
另外, 也尝试了关键字"Scroll Up"和"Scroll Down", 但是没有效果, 不知道什么地方出现了问题.
5、RF对Android的控件定位
使用R F测试Android的过程中, 一定要经常对Android的控件定位。Appium中提供了Xpath进行定位, 就是通过层级一层一层去定位控件。
Xpath定位, 可以通过下面几种方式定位,
1. 通过文本text定位
举例说明, 用户要点击Setting页面中的"About phone"标签, 可以通过下面的语句实现,
Click Element xpath=//*[contains(@text, 'About phone')]
2. 通过resource-id定位
举例说明, 用户要点击Camera App屏幕上的前后摄像头切换按钮, 可以通过下面的语句实现,
Click Element xpath=//*[contains(@resource-id, 'id/front_back_switcher')]
3. 通过content-desc定位
举例说明, 用户要把Camera App切换成摄影模式, 首先点击Camera模式切换按钮, 下面点击切换到摄像模式, 在切换到摄像模式的时候, 是通过content-desc对控件进行定位,
Click Element xpath=//*[contains(@resource-id, 'id/camera_switcher')]
Sleep 1s
Click Element xpath=//*[contains(@content-desc, 'Switch to video')]
案例一: 测试Android计算器
这个测试的主要目的是测试两个数的相加和相减,然后校验结果。下面是在Ride编辑器上写的代码
*** Settings ***
Suite Setup Open Calculator App
Suite Teardown Close Application
Library AppiumLibrary
*** Variables ***
# Appium Configurations
# Element locators for various objects on calculator app
${DISPLAYED_RESULT} xpath=//*[contains(@resource-id, 'id/result')]
# Test Data
${td_Digit1} 5
${td_Digit2} 2
${td_Expected_Addition_Result} 7
${td_Expected_Subtraction_Result} 3
*** Test Cases ***
Test Case 1: Addition
[Documentation] Tests addition of two numbers on calculator app
[Tags] android addition
Log "STEP 1: Enter two digits to add."
Enter Digits And Operator ${td_Digit1} ${td_Digit2} +
Log "STEP 2: View result"
View Result
Log "STEP 3: Verify result"
Verify Result ${td_Expected_Addition_Result}
Test Case 2: Subtraction
[Documentation] Tests subtraction of two numbers on calculator app
[Tags] android subtraction
Log "STEP 1: Enter two digits to subtract."
Enter Digits And Operator ${td_Digit1} ${td_Digit2} −
Log "STEP 2: View result"
View Result
Log "STEP 3: Verify result"
Verify Result ${td_Expected_Subtraction_Result}
*** Keywords ***
Open Calculator App
[Documentation] Opens the calculator app with a new appium session.
Open Application http://localhost:4723/wd/hub platformName=Android platformVersion=6.0.1
... deviceName=falcon_ironman_mvS appPackage=com.android.calculator2 appActivity=.Calculator
Enter Digits And Operator
[Arguments] ${digit1} ${digit2} ${operator}
[Documentation] Taks two single digit numbers and the operator as input and presses the correspinding buttons on the calcualtor keypad.
Click Element xpath=//*[contains(@text, '${digit1}')]
Click Element xpath=//*[contains(@text, '${operator}')]
Click Element xpath=//*[contains(@text, '${digit2}')]
View Result
[Documentation] Presses the equal to button to view the result of the operation
Click Element xpath=//*[contains(@text, '=')]
Verify Result
[Arguments] ${expected_result}
[Documentation] Verifies the result displayed with the expected answer.
${displayed_result} = Get Element Attribute ${DISPLAYED_RESULT} text
Should Be Equal ${displayed_result} ${expected_result}
案例二: 验证版本信息
分享2个测试suit, 一个是抓取并验证Android的版本信息; 另一个是抓取battery的版本信息.
抓取并验证Android的版本信息.
测试步骤,
1. 打开Setting App;
2. 进入About页面;
3. 验证版本信息
3.1 Test Case 1: 验证Build Number
3.2 Test Case 2: 验证Android Version
3.3 Test Case 3: 验证Model Number
示例代码如下,
*** Settings ***
Suite Setup Open Settings App
Suite Teardown Close Application
Library AppiumLibrary
*** Variables ***
${EXPECTED_BUILD_NUMBER} Build_Number_xxx
${EXPECTED_ANDROID_VERSION} 6.0.1
${EXPECTED_MODEL_NUMBER} Model_Number_xxx
*** Test Cases ***
Test Case 1: Build Number Test
[Tags] System Information
Verify Build Number ${EXPECTED_BUILD_NUMBER}
Test Case 2: Android Version Test
[Tags] System Information
Verify Android Version ${EXPECTED_ANDROID_VERSION}
Test Case 3: Model Number Test
[Tags] System Information
Verify Model Number ${EXPECTED_MODEL_NUMBER}
*** Keywords ***
Open Settings App
Open Application http://localhost:4723/wd/hub platformName=Android platformVersion=6.0.1 deviceName=dev_name appPackage=com.android.settings appActivity=.Settings
Sleep 2s
Open About phone page
Open About phone page
Log Step 1: Scroll down until find "About phone"
: FOR ${i} IN RANGE 20
Swipe 400 1000 400 500 200
${count} Get Matching Xpath Count xpath=//*[contains(@text, 'About phone')]
Exit For Loop If ${count}>0
Log Step 2: Click the "About Phone" Label
Click Element xpath=//*[contains(@text, 'About phone')]
Log Step 3: Scroll down until find "Build number"
: FOR ${i} IN RANGE 20
Swipe 400 1000 400 500 200
${count} Get Matching Xpath Count xpath=//*[contains(@text, 'Build number')]
Exit For Loop If ${count}>0
Verify Build Number
[Arguments] ${expected_build_number}
Log Verify the Page if contains the right build number
Page Should Contain Text ${expected_build_number} INFO
Verify Android Version
[Arguments] ${expected_android_version}
Log Verify the Page if contains the right Android Version
Page Should Contain Text ${expected_android_version} INFO
Verify Model Number
[Arguments] ${expected_Model_Number}
Log Verify the Page if contains the right model number
Page Should Contain Text ${expected_Model_Number} INFO
验证Battery的Part Number和Serial Number
测试步骤如下,
1. 打开Setting App;
2. 进入About phone页面;
3. 进入Battery Information页面;
4. 验证版本信息
4.1 Test Case 1: 验证Battery Part Number
4.2 Test Case 2: 验证Battery Serial Number
示例代码如下,
*** Settings ***
Suite Setup Open Settings App
Suite Teardown Close Application
Library AppiumLibrary
*** Variables ***
${EXPECTED_BATTERY_PART_NUMBER} PartNumber_xxx
${EXPECTED_BATTERY_SERIAL_NUMBER} A4753
*** Test Cases ***
Test Case 1: Battery Part Number Test
[Tags] Battery Management
Verify Battery Part Number ${EXPECTED_BATTERY_PART_NUMBER}
Test Case 2: Battery Serial Number Test
[Tags] Battery Management
Verify Battery Serial Number ${EXPECTED_BATTERY_SERIAL_NUMBER}
*** Keywords ***
Open Settings App
Open Application http://localhost:4723/wd/hub platformName=Android platformVersion=6.0.1 deviceName=dev_name appPackage=com.android.settings appActivity=.Settings
Sleep 4s
Open Battery Information page
Open Battery Information page
Log Step 1: Scroll down until find "About phone"
: FOR ${i} IN RANGE 20
Swipe 400 1000 400 500 200
${count} Get Matching Xpath Count xpath=//*[contains(@text, 'About phone')]
Exit For Loop If ${count}>0
#Scroll Down xpath=//*[contains(@text, 'Display')]
Log Step 2: Click the "About Phone" Label
Click Element xpath=//*[contains(@text, 'About phone')]
Log Step 3: Click the "Battery Information" Label
Click Element xpath=//*[contains(@text, 'Battery Information')]
Sleep 2s
Verify Battery Part Number
[Arguments] ${expected_battery_part_number}
# Scroll down until find "Battery Part Number"
: FOR ${i} IN RANGE 20
Sleep 2s
${count} Get Matching Xpath Count xpath=//*[contains(@text, 'Battery Part Number')]
Exit For Loop If ${count}>0
Swipe 400 1000 400 800 800
Log Verify the Page if contains the right battery part number
Page Should Contain Text ${expected_battery_part_number} INFO
Verify Battery Serial Number
[Arguments] ${expected_battery_serial_number}
# Scroll down until find "Battery Serial Number"
: FOR ${i} IN RANGE 20
Sleep 2s
${count} Get Matching Xpath Count xpath=//*[contains(@text, 'Battery Serial Number')]
Exit For Loop If ${count}>0
Swipe 400 1000 400 800 800
Log Verify the Page if contains the right battery serial number
Page Should Contain Text ${expected_battery_serial_number} INFO
案例四: Camera测试
分享2个测试suit, 一个是测试后置Camera; 另外一个是测试前置Camera.
后置Camera测试, 完成拍照20次, 录像20s
测试步骤如下,
1. 打开Camera App;
2.1 Test Case 1: 拍照20次;
2.2 Test Case 2: 打开录像功能, 录像20s.
示例代码如下,
*** Settings ***
Suite Setup Open Camera App
Suite Teardown Close Application
Library AppiumLibrary
*** Variables ***
${IMAGE_CAPTURE_TIMES} 20
${VIDEO_RECORDING_DURATION} 20s
*** Test Cases ***
Test Case 1: Capture Image Test
[Tags] Rear Camera
Switch to photo
: FOR ${i} IN RANGE ${IMAGE_CAPTURE_TIMES}
Log Capture image ${i} times
Click Element xpath=//*[contains(@resource-id, 'id/shutter_button')]
Sleep 2s
Test Case 2: Video Recording Test
[Tags] Rear Camera
Switch to video
Click Element xpath=//*[contains(@resource-id, 'id/shutter_button')]
Sleep ${VIDEO_RECORDING_DURATION}
Click Element xpath=//*[contains(@resource-id, 'id/shutter_button')]
*** Keywords ***
Open Camera App
Open Application http://localhost:4723/wd/hub platformName=Android platformVersion=6.0.1 deviceName=dev_name appPackage=org.codeaurora.snapcam appActivity=com.android.camera.CameraLauncher
Switch to photo
Sleep 1s
Click Element xpath=//*[contains(@resource-id, 'id/camera_switcher')]
Sleep 1s
Click Element xpath=//*[contains(@content-desc, 'Switch to photo')]
Sleep 1s
Switch to video
Sleep 1s
Click Element xpath=//*[contains(@resource-id, 'id/camera_switcher')]
Sleep 1s
Click Element xpath=//*[contains(@content-desc, 'Switch to video')]
Sleep 1s
前置Camera测试
测试步骤如下,
1. 打开Camera App;
2. 切换到前置Camera;
2.1 Test Case 1: 拍照20次;
2.2 Test Case 2: 打开录像功能, 录像20s.
示例代码如下,
*** Settings ***
Suite Setup Open Camera App
Suite Teardown Close Application
Test Setup Switch to front camera
Library AppiumLibrary
*** Variables ***
${IMAGE_CAPTURE_TIMES} 20
${VIDEO_RECORDING_DURATION} 20s
*** Test Cases ***
Test Case 1: Capture Image Test
[Tags] Front Camera
Switch to photo
: FOR ${i} IN RANGE ${IMAGE_CAPTURE_TIMES}
Log Capture image ${i} times
Click Element xpath=//*[contains(@resource-id, 'id/shutter_button')]
Sleep 2s
Test Case 2: Video Recording Test
[Tags] Front Camera
Switch to video
Click Element xpath=//*[contains(@resource-id, 'id/shutter_button')]
Sleep ${VIDEO_RECORDING_DURATION}
Click Element xpath=//*[contains(@resource-id, 'id/shutter_button')]
*** Keywords ***
Open Camera App
Open Application http://localhost:4723/wd/hub platformName=Android platformVersion=6.0.1 deviceName=dev_name appPackage=org.codeaurora.snapcam appActivity=com.android.camera.CameraLauncher
Switch to photo
Sleep 1s
Click Element xpath=//*[contains(@resource-id, 'id/camera_switcher')]
Sleep 1s
Click Element xpath=//*[contains(@content-desc, 'Switch to photo')]
Sleep 1s
Switch to video
Sleep 1s
Click Element xpath=//*[contains(@resource-id, 'id/camera_switcher')]
Sleep 1s
Click Element xpath=//*[contains(@content-desc, 'Switch to video')]
Sleep 1s
Switch to front camera
Sleep 1s
# The "filter mode switcher" won't exit in the front camera UI, so use it to check if current UI is front or rear camera
${count} Get Matching Xpath Count xpath=//*[contains(@resource-id, 'id/filter_mode_switcher')]
Run Keyword If ${count}>0 Click Element xpath=//*[contains(@resource-id, 'id/front_back_switcher')]
案例五: WiFi测试
WiFi Test, 打开并连接特点的WiFi,测试步骤如下,
1. 打开Setting App;
2. 点击进入Wi-Fi页面;
2.1 Test Case 1: 打开WiFi;
2.2 Test Case 2: 连接WiFi;
测试代码如下,
*** Settings ***
Suite Setup Open Settings App
Suite Teardown Close Application
Library AppiumLibrary
*** Variables ***
${SSID_NAME} Honor 6X
${PASSWORD} guangwei
*** Test Cases ***
Test Case 1: Turn On WiFi
[Tags] WiFi Test
Turn On WiFi
Test Case 2: Connect WiFi
[Tags] WiFi Test
Connect WiFi ${SSID_NAME} ${PASSWORD}
*** Keywords ***
Open Settings App
Open Application http://localhost:4723/wd/hub platformName=Android platformVersion=6.0.1 deviceName=dev_name appPackage=com.android.settings appActivity=.Settings
Sleep 2s
Open WiFi Setting Page
Open WiFi Setting Page
Log Click the "Wi-Fi" Label
Wait Until Page Contains Element xpath=//*[contains(@text, 'Wi‑Fi')] 10 Can NOT find "Wi-Fi" label
Click Element xpath=//*[contains(@text, 'Wi‑Fi')]
Turn On WiFi
Wait Until Page Contains Element xpath=//*[contains(@resource-id, 'id/switch_widget')]
${wifi_status} = Get Element Attribute xpath=//*[contains(@resource-id, 'id/switch_widget')] text
Run Keyword If '${wifi_status}' != 'ON' Click Element xpath=//*[contains(@resource-id, 'id/switch_widget')]
Connect WiFi
[Arguments] ${ssid_name} ${password}
Log Step 1: Click the SSID-Name ${ssid_name}
Wait Until Page Contains Element xpath=//*[contains(@text, '${ssid_name}')] 10 Can NOT find ${ssid_name}
Click Element xpath=//*[contains(@text, '${ssid_name}')]
Sleep 2s
Log Step 2: Check if the AP ${ssid_name} already connected, if connected then disconnect
${count} Get Matching Xpath Count xpath=//*[contains(@text, 'Forget')]
Run Keyword If ${count} > 0 Log WiFi already connected, forget it then re-connect
Run Keyword If ${count} > 0 Click Element xpath=//*[contains(@text, 'Forget')]
Run Keyword If ${count} > 0 Sleep 2s
Run Keyword If ${count} > 0 Click Element xpath=//*[contains(@text, '${ssid_name}')]
Run Keyword If ${count} > 0 Sleep 2s
Log Step 3: Input the password then connect.
Wait Until Page Contains Element xpath=//*[contains(@resource-id, 'id/password')] 10 Can NOT find "password" text
Input Value xpath=//*[contains(@resource-id, 'id/password')] ${password}
Sleep 1s
Click Element xpath=//*[contains(@text, 'Connect')]
Log Step 4: Check if the WiFi connected sucesfully or not.
Wait Until Page Contains Connected 10 The device does NOT connect to the Access Point ${ssid_name} yet
案例六: Bluetooth测试
Bluetooth测试, 包括蓝牙打开, 扫描, 连接,测试步骤如下,
1. 打开Setting App;
2. 点击进入Bluetooth页面;
2.1 Test Case 1: 打开蓝牙;
2.2 Test Case 2: 蓝牙扫描;
2.3 Test Case 3: 蓝牙连接;
示例代码如下,
*** Settings ***
Suite Setup Open Settings App
Suite Teardown Close Application
Library AppiumLibrary
*** Variables ***
${BT_HEADSET_NAME} BTD110
*** Test Cases ***
Test Case 1: Turn On Bluetooth
[Tags] Bluetooth Test
Turn On Bluetooth
Test Case 2: Refresh Bluetooth
[Tags] Bluetooth Test
Refresh Bluetooth Device List
Test Case 3: Connect Bluetooth
[Tags] Bluetooth Test
Connect Bluetooth Headset ${BT_HEADSET_NAME}
*** Keywords ***
Open Settings App
Open Application http://localhost:4723/wd/hub platformName=Android platformVersion=6.0.1 deviceName=dev_name appPackage=com.android.settings appActivity=.Settings
Sleep 2s
Open Bluetooth Setting Page
Open Bluetooth Setting Page
Log Click the "Bluetooth" Label
Wait Until Page Contains Element xpath=//*[contains(@text, 'Bluetooth')] 10 Can NOT find "Bluetooth" label
Click Element xpath=//*[contains(@text, 'Bluetooth')]
Turn On Bluetooth
Wait Until Page Contains Element xpath=//*[contains(@resource-id, 'id/switch_widget')]
Sleep 1s
${wifi_status} = Get Element Attribute xpath=//*[contains(@resource-id, 'id/switch_widget')] text
Run Keyword If '${wifi_status}' != 'ON' Click Element xpath=//*[contains(@resource-id, 'id/switch_widget')]
Refresh Bluetooth Device List
Click Element xpath=//*[contains(@content-desc, 'More options')]
Sleep 2s
Wait Until Page Contains Element xpath=//*[contains(@text, 'Refresh')] 20 Can NOT find "Refresh"
${count} Get Matching Xpath Count xpath=//*[contains(@text, 'Refresh')]
Run Keyword If ${count} > 0 Click Element xpath=//*[contains(@text, 'Refresh')]
Connect Bluetooth Headset
[Arguments] ${bluetooth_name}
Log Step 1: Click the headset ${bluetooth_name}
Wait Until Page Contains Element xpath=//*[contains(@text, '${bluetooth_name}')] 10 Can NOT find ${bluetooth_name}
Click Element xpath=//*[contains(@text, '${bluetooth_name}')]
Sleep 2s
${count} Get Matching Xpath Count xpath=//*[contains(@resource-id, 'alertTitle')]
Run Keyword If ${count} > 0 Click Element xpath=//*[contains(@text, 'OK')]
Sleep 2s
Run Keyword If ${count} > 0 Click Element xpath=//*[contains(@text, '${bluetooth_name}')]
Log Check if the Bluetooth connected sucesfully or not.
Wait Until Page Contains Connected 10 The device does NOT connect to the Access Point ${bluetooth_name} yet
Robot Framework + Selenium
一、安装seleniumlibrary库
如果已经安装了pip,则使用管理员模式打开windows命令行,输入pip install robotframework-seleniumlibrary,安装完成后在命令行输入pip list查看python的安装列表,列表中出现了robotframework-seleniumlibrary及对应的版本号,说明安装完成。
二、导入seleniumlibrary库
添加完成,黑色示添加的库正常,红色表示库不存。如果为红色,请检查C:Python37Libsite-packages 目录下是否有 SeleniumLibrary 目录
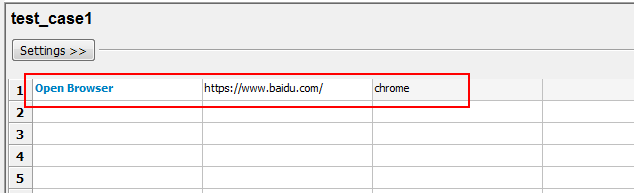
三、第一个例子
比如打开百度,输入一个Open Browser关键字,如果关键字为蓝色说明它是一个合法的关键字,后面有一个方框是红色的,表示这个参数不能缺省的。通过说明信息中,我发现它需要一个 url 地址是必填的,当然还需要指定 browser (默认不填为 friefox)
四、元素定位
Web 自动化测试其实就是找到元素(定位元素)并操作元素。SeleniumLibrary 提供了非常丰富的定位器:
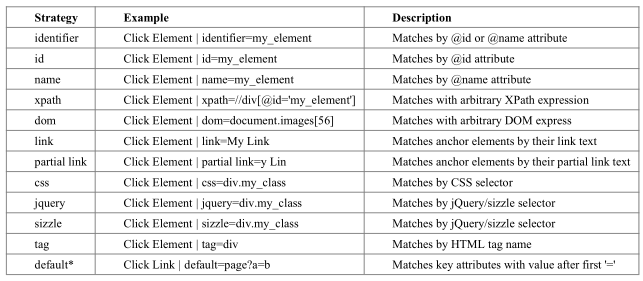
最常用的其实是id、name、xpath、css。 id 和 name两种定位方式非常简单且实用, xpath 和 css两种定位方式足够强大,可以满足几乎所有定位需求。
1、id和name定位
以百度为例。我们可看到输入框input元素有id和name属性,百度一下按钮有id属性。

输入框:id=kw name=wd,在 Robot framework 中就是这样写的:

Input text 用于输入框的关键字 ,后面两个参数,一个是元素的定位,一个是输入框输入的值。
百度一下按钮:id=su,在 Robot framework 中就是这样写的:

click button用户点击按钮的关键字,后面跟着一个必填参数。
2、xpath定位
XPath 是一种在 XML 文档中定位元素的语言。因为 HTML 可以看做 XML 的一种实现,所以 selenium用户可是使用这种强大语言在 web 应用中定位元素。如果一个元素没有id和name或没有唯一标识可以使用xpath 通过层级关系找到元素。
(1)xpath绝对路径
比如百度页面的搜索输入框xpath=/html/body/div[2]/div[1]/div/div[1]/div/form/span[1]/input。绝对路径的用法往往是在我们迫不得已的时候才用的。大多时候用相对路径更简便
(2)xpath的相对路径
使用元素本身定位:比如百度页面的搜索输入框xpath=//*[@id="kw"],可以利用元素自身的属性。//表示某个层级下,*表示某个标签名。@id=kw表示这个元素有个 id 等于 kw
当然,一般也可以制定标签名:xpath=//input[@id="kw"]元素本身,可以利用的属性就不只局限为于 id 和 name ,如:Xpath = //input[@autocomplete=’off’],但要保证这些元素可以唯一的识别一个元素。
找上级:如果一个元素找不到可以先找到他的上级。比如:xpath = //span[@class='bg s_btn_wr’]/input,如果父级没有唯一标识,还可以继续往上找:
xpath = //form[@id=’form1’]/span/input
布尔值写法:
Xpath = //input[@id=’kw1’ and @name=’wd’]
总结:使用过程中发现xpath定位有时候语法并没有任何问题也定位不到元素,比如xpath = //span[@class='bg s_btn_wr’]/input。
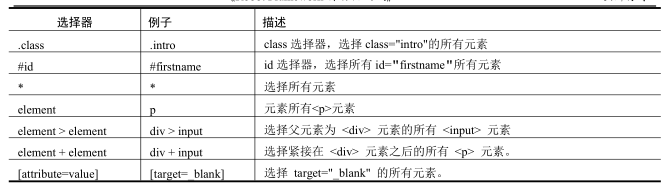
3、css 定位
CSS(Cascading Style Sheets)是一种语言,它被用来描述 HTML 和 XML 文档的表现。CSS 使用选择器来为页面元素绑定属性。这些选择器可以被 selenium 用作另外的定位策略。CSS 可以比较灵活选择控件的任意属性,一般情况下定位速度要比 XPath 快。
CSS 选择器的常见语法:

五、SeleniumLibrary 常用关键字
1、浏览器驱动

open browser也可以打开本地的文件,比如:

2、关闭浏览器
(1)关闭当前页面

(2)关闭所有页面(关闭所有打开的浏览器和浏览器缓存重置。)

3、浏览器最大化

4、设置浏览器窗口宽、高

5、获取浏览器窗口尺寸

6、文本输入

7、点击元素

Xpath=//* [@] :表示元素定位,定位点击的元素。
8、点击按钮


Xpath=//* [@] :表示元素定位,定位点击的按钮。
9、等待元素出现在当前页面
Arguments:[ locator | timeout=None | error=None ],
Xpath=//* [@] :表示元素定位,这里定位出现的元素。
40 : 表示最长等待时间。
Error : 表示错误提示,自定义错误提示,如:“元素不能正常显示”

10、固定时间休眠

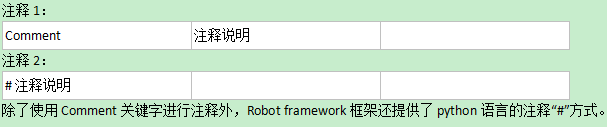
11、注释
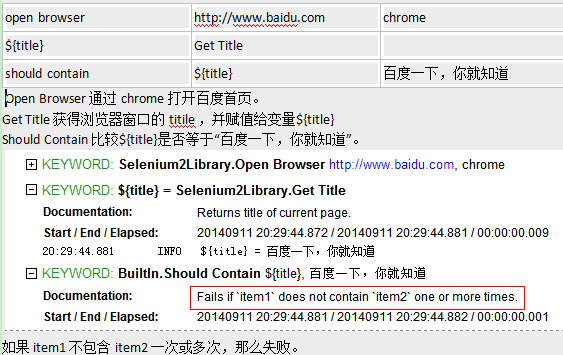
12、获取 title

我们通常会将获取的 title 传递给一个变量,然后与预期结果进行比较。从而判断当前脚本执行成功

13、获取元素的text
Arguments:[ locator ],Returns the text value of element identified by `locator`.


14、获取元素的属性值
id=kw@name:id=kw 表示定位的元素。@nam 获取这个元素的 name 属性值。

15、cookei 处理

get cookies 获得当前浏览器的所有 cookie 。
get cookie value 获得 cookie 值。key_name 表示一对 cookie 中 key 的 name 。
add cookie 添加 cookie。添加一对 cooke (key:value)
delete cookie 删除 cookie。删除 key 为 name 的 cookie 信息。
delete all cookies 删除当前浏览器的所有 cookies。
16、验证should contain
例子:先获取页面的title,赋值给${tt};然后去对比是否等于百度一下你就知道了。

17、表单嵌套

18、下拉框选择
Arguments:[ locator | *values ]。 locator 为定位下拉框;Vlaue 为选择下拉框里的属性值。

19、执行 JavaScript
Execute Javascript 关键字用于使用 JavaScript 代码,参数就是JavaScript 代码

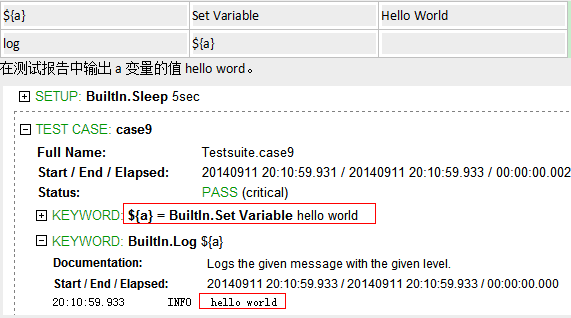
20、声明变量

21、日志输出
22、验证
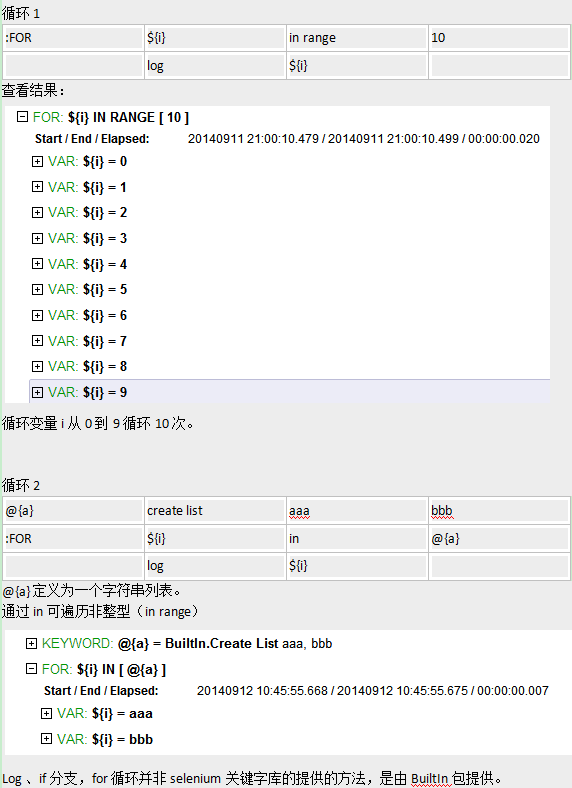
23、if分支语句
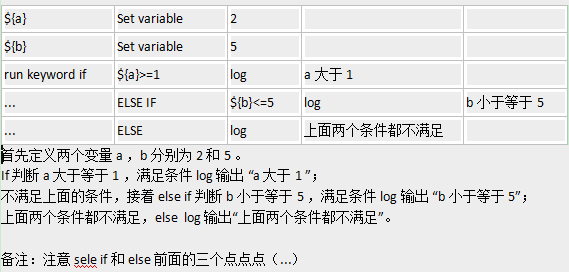
24、for循环语句