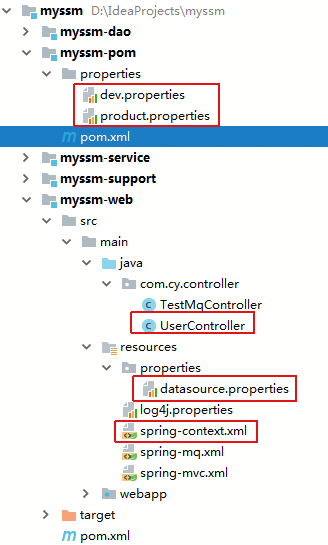
1.开发的时候经常需要加载不同的环境,比如本地开发环境dev,生产环境product。如果需要手动去修改的话就太麻烦了,自己实现了maven资源替换,然后多环境下的配置文件管理的demo,在此贴出来。
2.实现需求:
根据本地or开发配置文件,加载不同的配置,如果使用本地数据库demodb,zhangsan,123456才能登录成功;
如果使用生产环境数据库productdb,wangwu,123455才能登录成功;
代码如下:
1.父项目myssm-pom下两套配置,dev.properties为本地开发配置,product.properties为生产环境配置;

dev.properties:
driverClassName=com.mysql.jdbc.Driver
url=jdbc:mysql://localhost:3306/demodb
username=root
password=root
product.properties:
driverClassName=com.mysql.jdbc.Driver
url=jdbc:mysql://localhost:3306/productdb
username=root
password=root
2.myssm-pom.xml配置:

<?xml version="1.0" encoding="UTF-8"?>

<project xmlns="http://maven.apache.org/POM/4.0.0" xmlns:xsi="http://www.w3.org/2001/XMLSchema-instance"
  xsi:schemaLocation="http://maven.apache.org/POM/4.0.0 http://maven.apache.org/xsd/maven-4.0.0.xsd">
  <modelVersion>4.0.0</modelVersion>

  <groupId>com.cy.myssm</groupId>
  <artifactId>myssm-pom</artifactId>
  <version>1.0.0</version>
    <modules>
        <module>../myssm-web</module>
        <module>../myssm-service</module>
        <module>../myssm-dao</module>
        <module>../myssm-support</module>
    </modules>
    <packaging>pom</packaging>

    <!-- 环境配置 -->
    <profiles>
        <!-- 本地环境 -->
        <profile>
            <id>dev</id>
            <activation>
                <!-- 默认激活dev -->
                <activeByDefault>true</activeByDefault>
            </activation>
            <build>
                <!-- 指定当前profile环境下,属性文件路径 -->
                <filters>
                    <filter>../${project.parent.artifactId}/properties/dev.properties</filter>
                </filters>
            </build>
        </profile>
        <!-- 生产环境 -->
        <profile>
            <id>product</id>
            <build>
                <filters>
                    <filter>../${project.parent.artifactId}/properties/product.properties</filter>
                </filters>
            </build>
        </profile>
    </profiles>

    <build>
        <plugins>
            <plugin>
                <groupId>org.apache.maven.plugins</groupId>
                <artifactId>maven-resources-plugin</artifactId>
                <configuration>
                    <useDefaultDelimiters>false</useDefaultDelimiters>
                    <delimiters>
                        <delimiter>$[*]</delimiter>
                    </delimiters>
                    <encoding>UTF-8</encoding>
                </configuration>
            </plugin>
        </plugins>
        <resources>
            <resource>
                <!-- 要替换属性的文件目录 -->
                <directory>${basedir}/src/main/resources</directory>
                <filtering>true</filtering>
            </resource>
        </resources>
    </build>

</project>
说明:
1) profile下面标签相关概念:
id:profile的标示
activeByDefault: 我们可以在profile中的activation元素中指定激活条件,当没有指定条件,然后指定activeByDefault为true的时候就表示当没有指定其他profile为激活状态时,该 profile就默认会被激活。所以当我们调用mvn package的时候上面的dev将会被激活,但是当我们使用mvn package –P product的时候将激活product,而这个时候 dev将不会被激活。
filters:比较重要,指定当前profile环境下,属性文件路径;
2)resouces标签下面属性:
directory: 配置那个目录下的文件通过${key} (el表达式,默认的,但是我这里改成$[]了)会被替换成属性值,resource目录下,我们一般放jdbc连接,或配置文件;
includes: 指定那个目录下那个文件
filtering: 这个配置的意思是过滤上面指定属性文件中的占位符,占位符是${变量名称}这样的形式,maven会自动读取配置文件,然后解析其中的占位符,使用上面pom文件中定义 的属性进行替换
exclueds: 在resource目录下,有很多文件,但用些文件不希望替换,则可以通过<excluede>指定
filters: 这里的filters与<profile>的filter意思一样,都是指属性文件地址,这个如果上面定义<profile>的时候指定了,这里就不需要了,但有些开发习惯是在<profile>不定义,然后在 <build>里指定。
3) maven-resources-plugin
useDefaultDelimiters不使用默认的分割,默认的是将${}即el表达式替换掉;我这里将所有basedir下面的src/main/resources下面的文件中,只要含有$[key]的表达式替换成myssm-pom下面已经配置好的开发/生产配置;
4) datasource.properties:
driverClassName=$[driverClassName]
url=$[url]
username=$[username]
password=$[password]
3.sprint-context.xm配置:

<?xml version="1.0" encoding="UTF-8"?>
<beans xmlns="http://www.springframework.org/schema/beans"
       xmlns:xsi="http://www.w3.org/2001/XMLSchema-instance"
       xmlns:p="http://www.springframework.org/schema/p"
       xmlns:aop="http://www.springframework.org/schema/aop"
       xmlns:context="http://www.springframework.org/schema/context"
       xmlns:jee="http://www.springframework.org/schema/jee"
       xmlns:tx="http://www.springframework.org/schema/tx"
       xmlns:mvc="http://www.springframework.org/schema/mvc"
       xsi:schemaLocation="
        http://www.springframework.org/schema/aop http://www.springframework.org/schema/aop/spring-aop-4.0.xsd
        http://www.springframework.org/schema/beans http://www.springframework.org/schema/beans/spring-beans-4.0.xsd
        http://www.springframework.org/schema/mvc
        http://www.springframework.org/schema/mvc/spring-mvc-4.0.xsd
        http://www.springframework.org/schema/context http://www.springframework.org/schema/context/spring-context-4.0.xsd
        http://www.springframework.org/schema/jee http://www.springframework.org/schema/jee/spring-jee-4.0.xsd
        http://www.springframework.org/schema/tx http://www.springframework.org/schema/tx/spring-tx-4.0.xsd">

    <!-- 自动扫描 -->
    <context:component-scan base-package="com.cy" />
    <import resource="spring-mq.xml"/>
    <mvc:annotation-driven/>

    <!-- 属性文件加载 -->
    <bean class="org.springframework.beans.factory.config.PropertyPlaceholderConfigurer">
        <property name="locations">
            <list>
                <value>classpath:properties/datasource.properties</value>
            </list>
        </property>
        <property name="placeholderPrefix" value="@{" />
        <property name="systemPropertiesModeName" value="SYSTEM_PROPERTIES_MODE_NEVER" />
    </bean>

    <!-- 配置数据源 -->
    <bean id="dataSource" class="org.springframework.jdbc.datasource.DriverManagerDataSource">
        <property name="driverClassName" value="@{driverClassName}"/>
        <property name="url" value="@{url}"/>
        <property name="username" value="@{username}"/>
        <property name="password" value="@{password}"/>
    </bean>

    <!-- 配置mybatis的sqlSessionFactory -->
    <bean id="sqlSessionFactory" class="org.mybatis.spring.SqlSessionFactoryBean">
        <property name="dataSource" ref="dataSource" />
        <!-- 自动扫描mappers.xml文件 -->
        <property name="mapperLocations" value="classpath:mappers/*.xml"></property>
        <!-- mybatis配置文件 -->
        <property name="configLocation" value="classpath:mybatis-config.xml"></property>
    </bean>

    <!-- DAO接口所在包名,Spring会自动查找其下的类 -->
    <bean class="org.mybatis.spring.mapper.MapperScannerConfigurer">
        <property name="basePackage" value="com.cy.dao" />
        <property name="sqlSessionFactoryBeanName" value="sqlSessionFactory"></property>
    </bean>

    <!-- (事务管理)transaction manager, use JtaTransactionManager for global tx -->
    <bean id="transactionManager" class="org.springframework.jdbc.datasource.DataSourceTransactionManager">
        <property name="dataSource" ref="dataSource" />
    </bean>

</beans>
为了方便,将整段配置贴下来了;
说明:
1).使用PropertyPlaceholderConfigurer加载属性配置文件datasource.properties,但是这里使用前缀@{来引用属性配置,而默认是${}即el表达式;
2).systemPropertiesModeName的选择有三种:
SYSTEM_PROPERTIES_MODE_FALLBACK: 如果给定的配置文件没有该属性,检查系统配置文件;
SYSTEM_PROPERTIES_MODE_NEVER: 从不检查系统属性
SYSTEM_PROPERTIES_MODE_OVERRIDE: 先检查系统配置文件,如果没有该属性,再检查给定的配置文件;
3).现在就可以使用@{key}来引用datasource.properties中的属性配置啦;比如上面dataSource中的driverClassName,url等;
4.测试代码:

package com.cy.controller;

import javax.servlet.http.HttpServletRequest;
import javax.servlet.http.HttpSession;
import com.cy.entity.User;
import com.cy.service.UserService;
import org.apache.log4j.Logger;
import org.springframework.beans.factory.annotation.Autowired;
import org.springframework.beans.factory.annotation.Value;
import org.springframework.stereotype.Controller;
import org.springframework.web.bind.annotation.RequestMapping;

@Controller
@RequestMapping("/user")
public class UserController {

    private static Logger logger = Logger.getLogger(UserController.class);

    @Autowired
    private UserService userService;

    @Value("@{driverClassName}")
    private String driverClassName;

    @Value("@{url}")
    private String url;

    @Value("@{username}")
    private String username;

    @Value("@{password}")
    private String password;

    /**
     * 用户登录
     * @param user
     * @param request
     * @return
     */
    @RequestMapping("/login")
    public String login(User user, HttpServletRequest request){
        logger.info("login入参:username:"+user.getUsername()+",passowrd:"+user.getPassword());

        User resultUser=userService.login(user);
        if(resultUser==null){
            request.setAttribute("user", user);
            request.setAttribute("errorMsg", "用户名或密码错误!");
            return "index";
        }else{
            System.err.println("username:" +user.getUsername() +"登录成功!");
            HttpSession session=request.getSession();
            session.setAttribute("currentUser", resultUser);
            return "redirect:/success.jsp";
        }
    }

    /**
     * 测试@Value注解 注入的值是否生效
     */
    @RequestMapping("/testAnnotationValue")
    public void testAnnotationValue(){
        logger.info("driverClassName:" +driverClassName);
        logger.info("url:" +url);
        logger.info("username:" +username);
        logger.info("password:" +password);
    }
}
1)idea中maven projects工具栏中,如果使用默认dev profile,启动项目
zhangsan能登录,console打印;
2018-08-23 20:50:19,237 [http-bio-8888-exec-3] INFO  [com.cy.controller.UserController] - driverClassName:com.mysql.jdbc.Driver
  2018-08-23 20:50:19,237 [http-bio-8888-exec-3] INFO  [com.cy.controller.UserController] - url:jdbc:mysql://localhost:3306/demodb
  2018-08-23 20:50:19,237 [http-bio-8888-exec-3] INFO  [com.cy.controller.UserController] - username:root
  2018-08-23 20:50:19,237 [http-bio-8888-exec-3] INFO  [com.cy.controller.UserController] - password:root
2) 如果勾选product,maven就使用product的配置, 这时候使用的是productdb,只有wangwu才能登录了。
