源码安装,升级,新增nginx模块
# 源码安装nginx(1.14.2)
# 将原本1.14.2版本升级到1.16.1
# 增加健康检查模块(nginx upstream)
源码安装nginx
# 1.官网下载1.14.2安装包(安装于lb中,方便后续演示健康检查模块)
[root@lb01 ~]# wget http://nginx.org/download/nginx-1.14.2.tar.gz

# 2.解压
[root@lb01 ~]# tar xf nginx-1.14.2.tar.gz

# 3.根据环境安装依赖包
[root@lb01 ~]# yum install -y openssl-devel pcre-devel zlib-devel

# 4.进入解压后目录,生成(nginx -V方式可查看安装模块)
[root@lb01 nginx-1.14.2]# ./configure --prefix=/tcy/nginx-1.14.1 --user=nginx --group=nginx --with-compat --with-file-aio --with-threads --with-http_addition_module --with-http_auth_request_module --with-http_dav_module --with-http_flv_module --with-http_gunzip_module --with-http_gzip_static_module --with-http_mp4_module --with-http_random_index_module --with-http_realip_module --with-http_secure_link_module --with-http_slice_module --with-http_ssl_module --with-http_sub_module --with-http_v2_module --with-mail --with-mail_ssl_module --with-stream --with-stream_realip_module --with-stream_ssl_module --with-stream_ssl_preread_module --with-cc-opt='-O2 -g -pipe -Wall -Wp,-D_FORTIFY_SOURCE=2 -fexceptions -fstack-protector-strong --param=ssp-buffer-size=4 -grecord-gcc-switches -m64 -mtune=generic -fPIC' --with-ld-opt='-Wl,-z,relro -Wl,-z,now -pie' --with-http_stub_status_module

# 5.编译安装
[root@lb01 nginx-1.14.2]# make && make install

# 6.进入指定安装目录,查看是否产生文件
[root@lb01 tcy]# cd nginx-1.14.1/
[root@lb01 nginx-1.14.1]# ll
total 0
drwxr-xr-x 2 root root 333 May 28 23:34 conf
drwxr-xr-x 2 root root  40 May 28 23:34 html
drwxr-xr-x 2 root root   6 May 28 23:34 logs
drwxr-xr-x 2 root root  19 May 28 23:34 sbin

# 7.创建软连接,并且创建相关用户,修改环境变量
[root@lb01 tcy]# ln -s nginx-1.14.1/ nginx
[root@lb01 tcy]# ll
total 0
lrwxrwxrwx 1 root root 13 May 28 23:39 nginx -> nginx-1.14.1/
drwxr-xr-x 6 root root 54 May 28 23:34 nginx-1.14.1
[root@lb01 sbin]# useradd nginx -s /sbin/nologin -M
[root@db01 profile.d]# vim /etc/profile.d/nginx.sh
export PATH="/tcy/nginx/sbin:$PATH"
[root@db01 profile.d]# source /etc/profile

# 8.作为负载均衡服务器,书写配置文件,让其在conf.d下的文件也生效
[root@lb01 nginx]# vim conf/nginx.conf
include /tcy/nginx/conf.d/*.conf;						# 在http层添加此行信息(因是1.14.1版本)

[root@lb01 conf.d]# vim www.myadmin.com					 # 先写负载配置文件
upstream myadmin_lb {
        server 172.16.1.7;
        server 172.16.1.8;
}

server {
        listen 80;
        server_name www.myadmin.com;

        location / {
                proxy_pass http://myadmin_lb;
                include proxy_params;
        }

}

[root@lb01 conf]# vim proxy_params						 # 编写代理优化文件

proxy_set_header Host $http_host;
proxy_set_header X-Forwarded-For $proxy_add_x_forwarded_for;

proxy_connect_timeout 30;
proxy_send_timeout 60;
proxy_read_timeout 60;

proxy_buffering on;
proxy_buffer_size 32k;
proxy_buffers 4 128k;
proxy_next_upstream error timeout http_500 http_502 http_503 http_504;

# 8.启动nginx
[root@lb01 sbin]# ./nginx
[root@lb01 sbin]# netstat -lntup|grep nginx
tcp        0      0 0.0.0.0:80              0.0.0.0:*               LISTEN      10846/nginx: master

# 9.方便后续操作,修改环境变量(后面可直接使用nginx启动服务,无需进入目录绝对路径启动)
[root@lb01 tcy]# ln -s nginx-1.14.1/ nginx
[root@db01 profile.d]# vim /etc/profile.d/nginx.sh
export PATH="/tcy/nginx/sbin:$PATH"
[root@db01 profile.d]# source /etc/profile
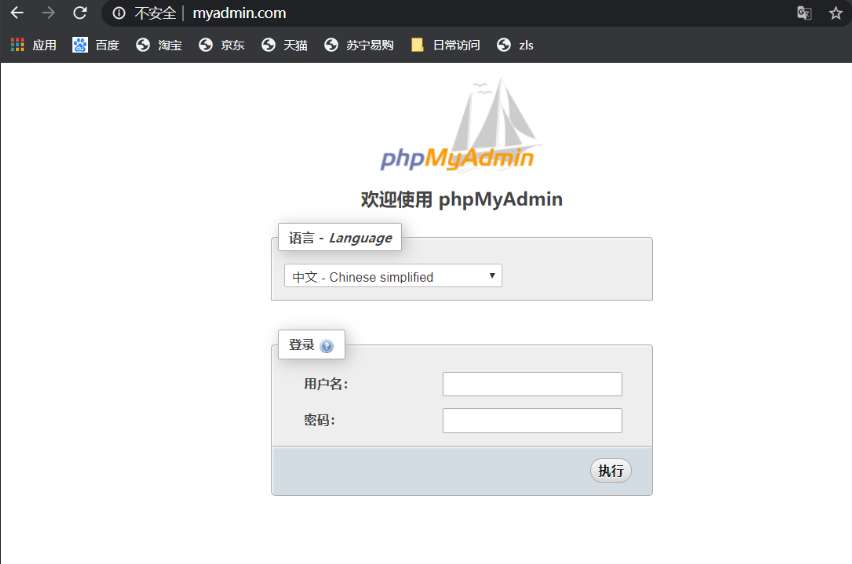
- 页面成功访问
版本升级
· 说明:
为什么在做版本升级时需要将原来版本中的pid迁移到新版本中:
在生产环境中需要保持网站高可用行,所以在老版本中服务原本就是启动的,不能停止,但又要做版本升级,所以老的版本中启动服务产生了pid,如果将软连接到新版本,那在启动nginx的时候就问题,有个老版本nginx在启动,新版本的启动会产生冲突,除非直接kill掉老版本中的服务,但这样服务就会停止,从而影响用户的访问。

# 下载1.16.1的nginx版本
[root@lb01 ~]# wget http://nginx.org/download/nginx-1.16.1.tar.gz

# 进入新版本目录重新生成(指定安装路径需要重新指定)
[root@lb01 nginx-1.16.1]# ./configure --prefix=/tcy/nginx-1.16.1 --user=nginx --group=nginx --with-compat --with-file-aio --with-threads --with-http_addition_module --with-http_auth_request_module --with-http_dav_module --with-http_flv_module --with-http_gunzip_module --with-http_gzip_static_module --with-http_mp4_module --with-http_random_index_module --with-http_realip_module --with-http_secure_link_module --with-http_slice_module --with-http_ssl_module --with-http_sub_module --with-http_v2_module --with-mail --with-mail_ssl_module --with-stream --with-stream_realip_module --with-stream_ssl_module --with-stream_ssl_preread_module --with-cc-opt='-O2 -g -pipe -Wall -Wp,-D_FORTIFY_SOURCE=2 -fexceptions -fstack-protector-strong --param=ssp-buffer-size=4 -grecord-gcc-switches -m64 -mtune=generic -fPIC' --with-ld-opt='-Wl,-z,relro -Wl,-z,now -pie' --with-http_stub_status_module

# 编译安装
[root@db01 nginx-1.16.1]# make && make install

# 将1.14.1版本中的配置文件,代理优化文件,pid文件及站点目录文件cp到1.16.1中(实际cp需要根据生产中变动文件copy)
[root@lb01 nginx-1.16.1]# mkdir conf.d
[root@lb01 nginx-1.16.1]# cp /tcy/nginx-1.14.1/conf.d/www.myadmin.com.conf /tcy/nginx-1.16.1/conf.d
[root@lb01 nginx-1.16.1]# cp /tcy/nginx-1.14.1/conf/nginx.conf /tcy/nginx-1.16.1/conf/nginx.conf
[root@lb01 nginx-1.16.1]# cp /tcy/nginx-1.14.1/logs/nginx.pid /tcy/nginx-1.16.1/logs/nginx.pid
[root@lb01 ~]# cp /tcy/nginx-1.14.1/conf/proxy_params /tcy/nginx-1.16.1/conf/

# 重新软连接到新的版本
[root@lb01 tcy]# rm -rf nginx && ln -s nginx-1.16.1/ nginx
[root@lb01 tcy]# ll
total 0
lrwxrwxrwx  1 root root  13 May 29 00:57 nginx -> nginx-1.16.1/
drwxr-xr-x 12 root root 165 May 29 00:00 nginx-1.14.1
drwxr-xr-x  7 root root  68 May 29 00:52 nginx-1.16.1

# 重启服务
[root@lb01 tcy]# nginx -s stop && nginx

# 查看版本
[root@lb01 tcy]# nginx -v
nginx version: nginx/1.16.1
新增模块
-------在1.16.1基础上新增模块,使编译安装版本支持负载均衡健康检查-------------
· [第三方模块项目地址](https://github.com/yaoweibin/nginx_upstream_check_module)
# nginx负载均衡健康检查简介:
在nginx官方模块中未提供对负载均衡后端节点的健康检查模块,但可以使用第三方模块`nignx_upstream_check_module`来检测后端服务的健康状态。
# 查看现有模块
--prefix=/tcy/nginx-1.14.1 --user=nginx --group=nginx --with-compat --with-file-aio --with-threads --with-http_addition_module --with-http_auth_request_module --with-http_dav_module --with-http_flv_module --with-http_gunzip_module --with-http_gzip_static_module --with-http_mp4_module --with-http_random_index_module --with-http_realip_module --with-http_secure_link_module --with-http_slice_module --with-http_ssl_module --with-http_sub_module --with-http_v2_module --with-mail --with-mail_ssl_module --with-stream --with-stream_realip_module --with-stream_ssl_module --with-stream_ssl_preread_module --with-cc-opt='-O2 -g -pipe -Wall -Wp,-D_FORTIFY_SOURCE=2 -fexceptions -fstack-protector-strong --param=ssp-buffer-size=4 -grecord-gcc-switches -m64 -mtune=generic -fPIC' --with-ld-opt='-Wl,-z,relro -Wl,-z,now -pie' --with-http_stub_status_module
# 将新增模块追加写入
-prefix=/tcy/nginx-1.16.1-new --user=nginx --group=nginx --with-compat --with-file-aio --with-threads --with-http_addition_module --with-http_auth_request_module --with-http_dav_module --with-http_flv_module --with-http_gunzip_module --with-http_gzip_static_module --with-http_mp4_module --with-http_random_index_module --with-http_realip_module --with-http_secure_link_module --with-http_slice_module --with-http_ssl_module --with-http_sub_module --with-http_v2_module --with-mail --with-mail_ssl_module --with-stream --with-stream_realip_module --with-stream_ssl_module --with-stream_ssl_preread_module --with-cc-opt='-O2 -g -pipe -Wall -Wp,-D_FORTIFY_SOURCE=2 -fexceptions -fstack-protector-strong --param=ssp-buffer-size=4 -grecord-gcc-switches -m64 -mtune=generic -fPIC' --with-ld-opt='-Wl,-z,relro -Wl,-z,now -pie' --with-http_stub_status_module --add-module=/tcy/nginx_upstream_check_module-master
---------------------------------安装流程---------------------------------------------------
# 安装打补丁模块
[root@lb01 tcy]# yum install -y patch
# 如服务器环境未安装依赖包,需要安装如下依赖包(如本地已经存在则可以忽略此操作)
[root@lb02 ~]# yum install -y gcc glibc gcc-c++ pcre-devel openssl-devel patch
# 下载补丁包,解压
[root@lb01 tcy]# wget https://github.com/yaoweibin/nginx_upstream_check_module/archive/master.zip
[root@lb01 tcy]# unzip master.zip
# 打补丁(nginx的版本是1.16补丁就选择1.16的,p1代表在nginx目录,p0是不在nginx目录)
[root@lb01 nginx-1.16.1]# patch -p1 < /tcy/nginx_upstream_check_module-master/check_1.16.1+.patch
# 进入之前解压后的1.16.1目录中,重新编译安装,但是指定安装路径为新路径,并且生成是添加新的健康检查模块
[root@lb01 nginx-1.16.1]# ./configure --prefix=/tcy/nginx-1.16.1-new --user=nginx --group=nginx --with-compat --with-file-aio --with-threads --with-http_addition_module --with-http_auth_request_module --with-http_dav_module --with-http_flv_module --with-http_gunzip_module --with-http_gzip_static_module --with-http_mp4_module --with-http_random_index_module --with-http_realip_module --with-http_secure_link_module --with-http_slice_module --with-http_ssl_module --with-http_sub_module --with-http_v2_module --with-mail --with-mail_ssl_module --with-stream --with-stream_realip_module --with-stream_ssl_module --with-stream_ssl_preread_module --with-cc-opt='-O2 -g -pipe -Wall -Wp,-D_FORTIFY_SOURCE=2 -fexceptions -fstack-protector-strong --param=ssp-buffer-size=4 -grecord-gcc-switches -m64 -mtune=generic -fPIC' --with-ld-opt='-Wl,-z,relro -Wl,-z,now -pie' --with-http_stub_status_module --add-module=/tcy/nginx_upstream_check_module-master
# 编译安装
[root@lb01 nginx-1.16.1]# make && make install
# 查看编译安装后内容
[root@lb01 tcy]# ll nginx-1.16.1-new/
total 0
drwxr-xr-x 2 root root 333 May 29 01:37 conf
drwxr-xr-x 2 root root 40 May 29 01:37 html
drwxr-xr-x 2 root root 6 May 29 01:37 logs
drwxr-xr-x 2 root root 19 May 29 01:37 sbin
# 和之前升级操作一样,将配置文件pid和conf.d文件和proxy代理优化文件cp到新的安装路径中
[root@lb01 tcy]# cp nginx-1.16.1/conf/nginx.conf nginx-1.16.1-new/conf/nginx.conf
[root@lb01 tcy]# cd nginx-1.16.1-new/
[root@lb01 nginx-1.16.1-new]# mkdir conf.d
[root@lb01 tcy]# cp nginx-1.16.1/conf.d/* nginx-1.16.1-new/conf.d/
[root@lb01 tcy]# cp nginx-1.16.1/logs/nginx.pid nginx-1.16.1-new/logs/
[root@lb01 ~]# cp /tcy/nginx-1.16.1/conf/proxy_params /tcy/nginx-1.16.1-new/conf/
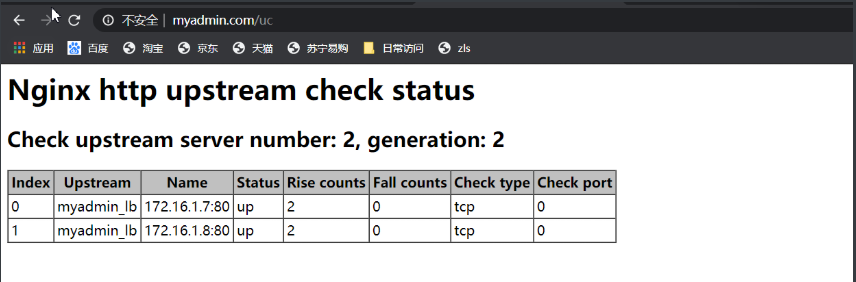
# 新增功能在配置文件中写入监控负载均衡健康检查
[root@lb01 conf.d]# cat www.myadmin.com.conf
upstream myadmin_lb {
server 172.16.1.7;
server 172.16.1.8;
#interval 检测间隔时间,单位为毫秒
#rise 表示请求2次正常,标记此后端的状态为up
#fall 表示请求3次失败,标记此后端的状态为down
#type 类型为tcp
#timeout 超时时间,单位为毫秒
check interval=3000 rise=2 fall=3 timeout=1000 type=tcp;
}
server {
listen 80;
server_name www.myadmin.com;
location / {
proxy_pass http://myadmin_lb;
include proxy_params;
}
location /uc { # 引用
check_status;
}
}
# 重新指定软链接文件
[root@lb01 tcy]# rm -rf nginx && ln -s nginx-1.16.1-new/ nginx
# 查看
[root@lb01 tcy]# ll
total 176
-rw-r--r-- 1 root root 175413 May 29 01:20 master.zip
lrwxrwxrwx 1 root root 17 May 29 01:44 nginx -> nginx-1.16.1-new/
drwxr-xr-x 12 root root 165 May 29 00:00 nginx-1.14.1
drwxr-xr-x 12 root root 165 May 29 00:59 nginx-1.16.1
drwxr-xr-x 7 root root 68 May 29 01:41 nginx-1.16.1-new
drwxr-xr-x 6 root root 4096 Nov 3 2019 nginx_upstream_check_module-master
# 重启
[root@lb01 conf.d]# nginx -s stop && nginx
# 浏览器查看页面(图一)
# 尝试断掉web02的服务(只能监控nginx,无法对nginx后端连接php监控)
[root@web02 ~]# systemctl stop nginx