本文用于指导在Centos虚拟机下部署kubernetes 1.15.0
1.1 安装VMware虚拟机
本人基于windows操作系统上的Centos虚拟机来搭建K8S环境,软件版本信息信息如下:
l 宿主机系统:windows 10 家庭版版
l VMware Workstation 版本:15 PRO
l 客户机系统版本:CentOS 7.6
下载软件和镜像:
VMware-workstation-full-15.0.0-10134415.exe
CentOS-7-x86_64-DVD-1611.iso
安装注意点:
1、 选择CentOS 7 64位;
2、 处理器配置,如果机器性能本来就不强的话,不要配过多的cpu给虚拟机;
3、 内存配置,建议1G内存。最低512M;
4、 没有特殊要求的话,选择桥接网络或者使用网络地址转换;
5、 磁盘类型,推荐使用iscsi磁盘
建议:第一台使用镜像安装,另外两台可克隆安装,注意克隆安装后修改IP地址信息。
登录虚拟机,查看centos版本信息:
[root@master]# uname -a
Linux master 3.10.0-957.1.3.el7.x86_64 #1 SMP Thu Nov 29 14:49:43 UTC 2018 x86_64 x86_64 x86_64 GNU/Linux
[root@master]# cat /etc/redhat-release
CentOS Linux release 7.6.1810 (Core)
安装完成后三台虚拟机IP分别为:
192.168.135.144
192.168.135.147
192.168.135.148
安装后要保证虚拟机之间网络互通,虚拟机虚宿主机之间网络互通。
1.2 K8S1.15.0安装
1.2.1 软件版本
Docker-ce-18.06.0.ce-3.el7
kubeadm-1.15.0-0.x86_64
kubectl-1.15.0-0.x86_64
kubelet-1.15.0-0.x86_64
kubernetes-cni-0.7.5-0.x86_64
flannel-v0.11.0-amd64
1.2.2 准备阶段
修改主机名:
hostnamectl master //192.168.135.144
hostnamectl slave1 //192.168.135.147
hostnamectl slave2 //192.168.135.148
关闭防火墙服务和selinx,避免与docker容器的防火墙规则冲突
systemctl stop firewalld
systemctl disable firewalld
setenforce 0
1.2.3 Master节点安装
第一步:查看所有仓库中所有docker版本,并选择特定版本安装
查看所有仓库中所有docker版本
$ yum list docker-ce --showduplicates | sort -r
…
docker-ce.x86_64 18.06.3.ce-3.el7 docker-ce-stable
docker-ce.x86_64 18.06.2.ce-3.el7 docker-ce-stable
docker-ce.x86_64 18.06.1.ce-3.el7 docker-ce-stable
…
安装18.06.1.ce-3.el7版本
[root@master ~]# yum -y install Docker-ce-18.06.0.ce-3.el7
第二步:启动并加入开机启动docker:
[root@master ~]# systemctl daemon-reload
[root@master ~]# systemctl start docker
[root@master ~]# systemctl enable docker
第三步:swap关闭
vim /etc/sysconfig/kubelet
KUBELET_EXTRA_ARGS="--fail-swap-on=false"
第四步:安装Kubeadm
yum -y install kubeadm-1.15.0-0.x86_64 kubectl-1.15.0-0.x86_64 kubelet-1.15.0-0.x86_64 kubernetes-cni-0.7.5-0.x86_64
第五步:设置开机启动kubelet
systemctl enable kubelet
第六步:加载镜像
先提前下载镜像k8s-1.15.0.tar.gz
链接: https://pan.baidu.com/s/1AhDsQHUIMd0CQufGteFSXw 提取码: vshs
上传到各节点【非自己提供,来自网络】
docker load -i k8s-1.15.0.tar.gz
先提前下载镜像flannel-v0.11.0.tar.gz
链接: https://pan.baidu.com/s/1QEssOf2yX1taupQT4lTxQg 提取码: x42r【本自己提供,来自网络】
docker load -i flannel-v0.11.0.tar.gz
第七部:Master节点初始化
kubeadm init --kubernetes-version=v1.15.0 --pod-network-cidr=10.244.0.0/16 --service-cidr=10.96.0.0/12 --ignore-preflight-errors=all
部署成功后会提示:
Your Kubernetes control-plane has initialized successfully!
To start using your cluster, you need to run the following as a regular user:
mkdir -p $HOME/.kube
sudo cp -i /etc/kubernetes/admin.conf $HOME/.kube/config
sudo chown $(id -u):$(id -g) $HOME/.kube/config
You should now deploy a pod network to the cluster.
Run "kubectl apply -f [podnetwork].yaml" with one of the options listed at:
https://kubernetes.io/docs/concepts/cluster-administration/addons/
Then you can join any number of worker nodes by running the following on each as root:
kubeadm join 192.168.135.144:6443 --token qptprd.q6kpq5gr2vmcul4c
--discovery-token-ca-cert-hash sha256:e57ea4378ecb188a4187a44936ec1e5fa881a8d95ba6f9fcc8b67771b7cbd085
这里将kubeadm join及后面内容复制下来,后面从节点加入集群的时候会用。
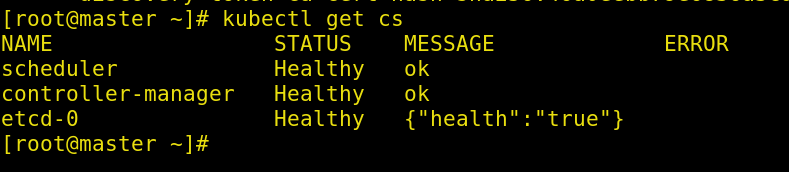
检查集群状态:kubectl get cs
检查节点状态:kubectl get nodes

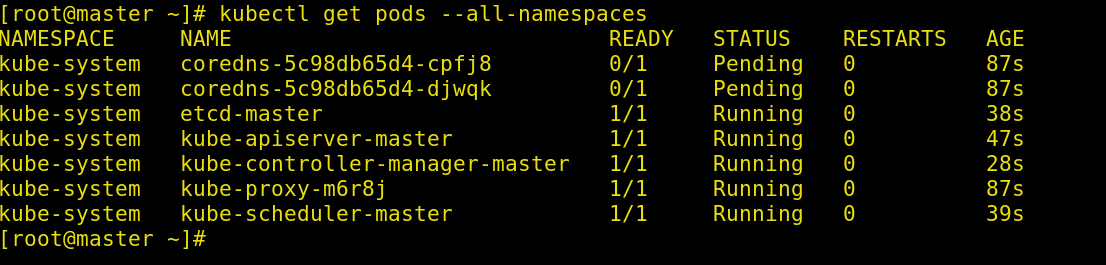
节点没有ready的原因是还没有安装flannel网络
状态所有的pods状态:kubectl get pods --all-namespaces
master部署网络插件flannel
[root@master01 ~]# kubectl apply -f kube-flannel.yml
clusterrole.rbac.authorization.k8s.io/flannel created
clusterrolebinding.rbac.authorization.k8s.io/flannel created
serviceaccount/flannel created
configmap/kube-flannel-cfg created
daemonset.extensions/kube-flannel-ds created
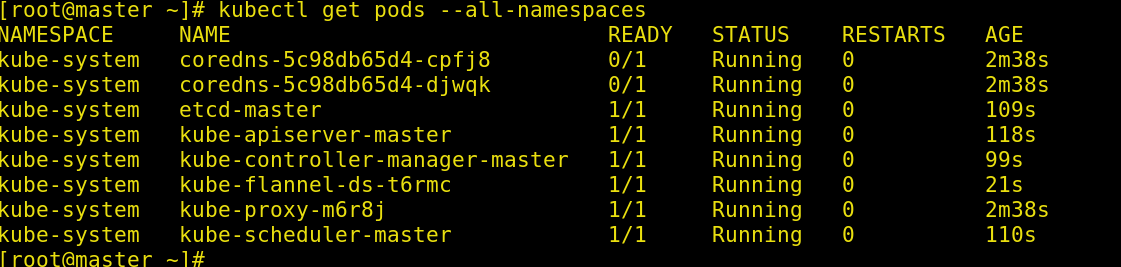
检查节点状态:kubectl get nodes

状态所有的pods状态:kubectl get pods --all-namespaces
1.2.4 安装kube slave
如下操作在分别在两个slave上执行
将147和148作为node加入集群
kubeadm join 192.168.135.144:6443 --token qptprd.q6kpq5gr2vmcul4c
--discovery-token-ca-cert-hash sha256:e57ea4378ecb188a4187a44936ec1e5fa881a8d95ba6f9fcc8b67771b7cbd085
提示如下结果则成功:
This node has joined the cluster:
* Certificate signing request was sent to apiserver and a response was received.
* The Kubelet was informed of the new secure connection details.
Run 'kubectl get nodes' on the control-plane to see this node join the cluster.
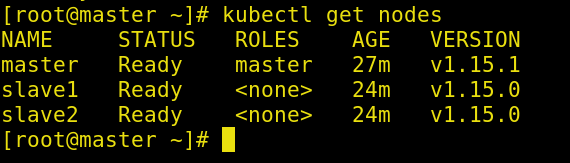
在Master上执行kubectl get nodes,查看结果如下:
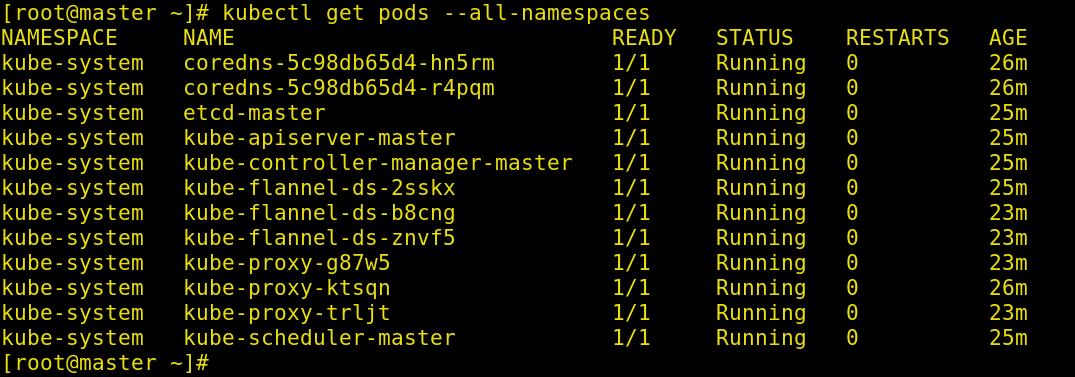
在Master上执行kubectl get pods --all-namespaces,查看结果如下:
1.3 在slave节点支持kubectl 命令
[root@slave1 taoweizhong]# kubectl get cs
The connection to the server localhost:8080 was refused - did you specify the right host or port?
[root@slave1 taoweizhong]#
在master节点使用远程复制命令:
scp /etc/kubernetes/admin.conf root@slave1:/etc/kubernetes/
在从节点:
echo "export KUBECONFIG=/etc/kubernetes/admin.conf" >> ~/.bash_profile
source ~/.bash_profile

1.4 重新初始化
kubeadm reset
1.4.1 master重新生成新的token
[root@master ~]# kubeadm token create
islfov.xfdgpohve01v6073
[root@master ~]# kubeadm token list
TOKEN TTL EXPIRES USAGES DESCRIPTION EXTRA GROUPS
4vreir.37c5jx9xklz7utdf 23h 2019-08-04T23:44:38-07:00 authentication,signing The default bootstrap token generated by 'kubeadm init'. system:bootstrappers:kubeadm:default-node-token
islfov.xfdgpohve01v6073 23h 2019-08-05T00:00:30-07:00 authentication,signing <none> system:bootstrappers:kubeadm:default-node-token
[root@master ~]#
-------Over------