自己工作中,经常会遇到安装linux操作系统的时候,有的时候机器也较多,虽然已经安装过无数次,每次都要挂载光盘,各种选包,是该让计算机自己工作的时候了。
这几天总结了一下,正好朋友青岚,要用一台机器,机房里味道比较大,就在虚拟机里跑了一下,自动化安装redhat 企业版6.0
无人值守安装
需要用到网卡的pxe功能,即待安装的linux机器通过网卡的的pxe功能 从一台已经安装好的服务器上,取得ip,内核文件,和安装介质。
首先说下大概流程,
我们需要有两台机器,一台是安装了dhcp,tftp,nfs服务的机器,一台是将要安装linux系统的机器。我这里用两台vmware虚拟机来做。
基本流程如下图:
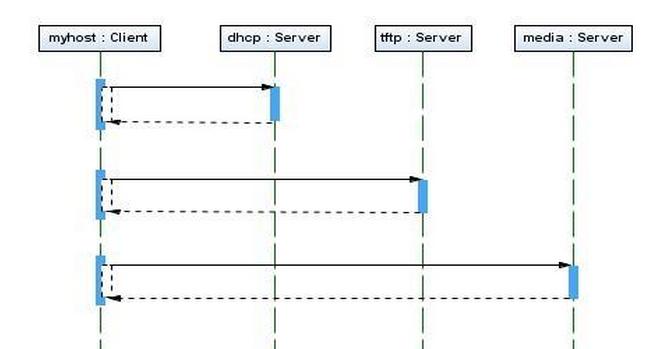
Server:(dhcp,tftp,nfs)
client(要安装系统的服务器):PXE网卡启动-》DHCP服务器-》获得IP-》从TFTP上下载pxelinux.0,pxelinux.0的配置文件为default,此default文件会去调用
vmlinz、initrd-》启动系统(在default文件里同时包括了无人值守的自动化安装脚本:ks3.cfg,此文件中包括了,安装介质的位置,还有系统安装过程中一系列的自动化应答选项。)
安装dhcp服务:
1、安装dhcp
yum install dhcp dhcp-devel
2、修改dhcp配置
[root@node01 linux-install]# cat /etc/dhcpd.conf
#
# DHCP Server Configuration file.
#   see /usr/share/doc/dhcp*/dhcpd.conf.sample
#
ddns-update-style interim;
ignore client-updates;

# allow boot from network use PXE
allow booting; #定义可以PXE启动
allow bootp; #定义支持boottp

subnet 192.168.209.0 netmask 255.255.255.0 {
# --- default gateway
option routers 192.168.209.1; #定义默认网关
option subnet-mask 255.255.255.0;

#option nis-domain "alrise.org";
#option domain-name "alrise.org";
#option domain-name-servers 192.168.95.1;

option time-offset -18000; # Eastern Standard Time

default-lease-time 21600;
max-lease-time 43200;

range dynamic-bootp 192.168.209.128 192.168.209.254;


# next-server is the tftp server.
# filename is boot image file under tftp root

next-server 192.168.209.2; #tftp机器所在ip
filename "pxelinux.0"; #初始化文件,参数为default文件,default来调用initr文件和vmlinux内核文件

}
[root@node01 linux-install]#
3、重启dhcp服务
[root@node01 ~]# chkconfig --list | grep dhcp
dhcpd 0:关闭 1:关闭 2:关闭 3:启用 4:关闭 5:启用 6:关闭
[root@node01 ~]# service dhcpd restart
关闭 dhcpd:[确定]
启动 dhcpd:[确定]

如果没有配置自动启动:
chkconfig --level 35 dhcpd on
查看dhcp服务:tail -f /var/log/messages。
安装tftp
1、安装tftp
yum install xinetd tftp tftp-server
安装完成后,一般会自动生成/tftpboot/目录,我们要在这个目录中放此次安装的重要文件。
2、配置tftp
[root@node01 ~]# cat /etc/xinetd.d/tftp
# default: off
# description: The tftp server serves files using the trivial file transfer
#       protocol.  The tftp protocol is often used to boot diskless
#       workstations, download configuration files to network-aware printers,
#       and to start the installation process for some operating systems.
service tftp
{
        socket_type             = dgram
        protocol                = udp
        wait                    = yes
        user                    = root
        server                  = /usr/sbin/in.tftpd
        server_args             = -u nobody -s /tftpboot
        disable                 = no
        per_source              = 11
        cps                     = 100 2
        flags                   = IPv4
}
[root@node01 ~]#

主要是修改disable为no
3、重启tftp服务
[root@node01 ~]# service xinetd restart
停止 xinetd:[确定]
启动 xinetd:[确定]
[root@node01 ~]# netstat --listen | grep tftp
udp        0      0 *:tftp                      *:*
安装nfs服务
[root@node01 ~]# rpm -qa | grep nfs
nfs-utils-lib-1.0.8-7.2.z2
system-config-nfs-1.3.23-1.el5
nfs-utils-1.0.9-40.el5
[root@node01 ~]#
把介质rhel-server-6.0-x86_64-dvd.iso拷贝到/data3目录
root#mkdir -p /data3/iso
root# cd /data3
root#mount -o loop rhel-server-6.0-x86_64-dvd.iso ./iso #挂载介质
修改nfs配置文件,发布该介质
[root@node01 data3]# cat /etc/exports
/data3/iso *(ro,no_root_squash,sync)
/tftpboot/linux-install *(ro,no_root_squash,sync)
/tftpboot/linux-install,是我们一会放置应答文件的目录,这里也一起共享下(一会下面就知道了)
发布共享:root# exportfs -ra
查看共享:
[root@node01 data3]# exportfs
/tftpboot/linux-install
<world>
/data3/iso <world>
[root@node01 data3]# showmount -e localhost
Export list for localhost:
/data3/iso *
/tftpboot/linux-install *
[root@node01 data3]#
启动nfs服务:service nfs restart
配置自启动:chkconfig --level 35 nfs on
拷贝相关文件,修改相关配置
1、复制文件,这些文件除pxelinux.0都是从上面的挂载介质的/data3/iso中得来的,即一定要是将要安装系统的东东。
#cp /data3/iso/images/pxeboot/initrd.img /tftpboot/
#cp /data3/iso/images/pxeboot/vmlinuz /tftpboot/
#cp /usr/lib/syslinux/pxelinux.0 /tftpboot (要求服务器上带这个文件)
#mkdir /tftpboot/pxelinux.cfg
#cp /data3/iso/isolinux/isolinux.cfg /tftpboot/pxelinux.cfg/default
拷贝可能会用到的msg
#cp /mnt/iso/isolinux/*.msg /tftpboot
这里要注意这个pxelinux.0,这个文件必须要和将要安装的系统一致,同时,这个文件的位置在centos5(redhat5)中在:/usr/lib/syslinux/pxelinux.0在centos 6(redhat 6) 中在/usr/share/syslinux/pxelinux.0
这个一定要注意。
修改default文件如下:
[root@node01 pxelinux.cfg]# cat default
default auto
#prompt 1
timeout 600

display boot.msg

menu background splash.jpg
menu title Welcome to Red Hat Enterprise Linux 6.0!
menu color border 0 #ffffffff #00000000
menu color sel 7 #ffffffff #ff000000
menu color title 0 #ffffffff #00000000
menu color tabmsg 0 #ffffffff #00000000
menu color unsel 0 #ffffffff #00000000
menu color hotsel 0 #ff000000 #ffffffff
menu color hotkey 7 #ffffffff #ff000000
menu color scrollbar 0 #ffffffff #00000000

label auto
  menu label ^auto install linux
  kernel vmlinuz
  append initrd=initrd.img ks=nfs:192.168.209.2:/tftpboot/linux-install/ks2.cfg devfs=nomount ramdisk_size=8192 ksdevice=eth0
label linux
  menu label ^Install or upgrade an existing system
  menu default
  kernel vmlinuz
  append initrd=initrd.img
label vesa
  menu label Install system with ^basic video driver
  kernel vmlinuz
  append initrd=initrd.img xdriver=vesa nomodeset
label rescue
  menu label ^Rescue installed system
  kernel vmlinuz
  append initrd=initrd.img rescue
label local
  menu label Boot from ^local drive
  localboot 0xffff
label memtest86
  menu label ^Memory test
  kernel memtest
  append -

[root@node01 pxelinux.cfg]#
蓝色部分是我修改和新增的,如果有多块网卡,需加额外加上 ksdevice=eth0,说明通过哪个网卡加载ks文件。
看到:ks=nfs:192.168.209.2:/tftpboot/linux-install/ks2.cfg了吧,这个是我们安装过程中的要应到的应答文件,这个也要通过nfs配置共享出来(这里是/tftpboot/linux-install目录),上面已经配置过了,这里不再配置。
我们再来看下,/tftpboot/linux-install/ks2.cfg这个应答文件的内容:
[root@node01 pxelinux.cfg]# cat /tftpboot/linux-install/ks2.cfg
# Kickstart file automatically generated by anaconda.

#version=RHEL6
install
nfs --server=192.168.209.2 --dir=/data3/iso
lang zh_CN.UTF-8
keyboard us
network --device eth0 --bootproto dhcp
rootpw  --iscrypted $1$dAKfG1$.gaEHuT7MxVbl0LS6rW5J1
firewall --service=ssh
authconfig --enableshadow --passalgo=sha512 --enablefingerprint
selinux --disabled
timezone --utc Asia/Shanghai
bootloader --location=mbr --driveorder=sda --append="nomodeset crashkernel=auto rhgb quiet"
# The following is the partition information you requested
# Note that any partitions you deleted are not expressed
# here so unless you clear all partitions first, this is
# not guaranteed to work
#clearpart --none --drives=sda
#clearpart --linux
#clearpart --all
clearpart --all --initlabel --drives=sda

part /boot --fstype=ext3 --size=300
part / --fstype=ext3 --size=7000
part swap --size=1500

repo --name="Red Hat Enterprise Linux"  --baseurl=file:///mnt/source/ --cost=100

%packages
@additional-devel
@base
@chinese-support
@compat-libraries
@console-internet
@core
@debugging
@basic-desktop
@desktop-platform
@desktop-platform-devel
@development
@directory-client
@ftp-server
@fonts
@general-desktop
@graphical-admin-tools
@hardware-monitoring
@input-methods
@java-platform
@kde-desktop
@large-systems
@legacy-x
@nfs-file-server
@storage-server
@network-file-system-client
@network-tools
@php
@performance
@perl-runtime
@system-management-snmp
@server-platform
@server-platform-devel
@server-policy
@system-management
@system-admin-tools
@virtualization
@web-server
@web-servlet
@system-management-wbem
@x11
libXinerama-devel
xorg-x11-proto-devel
startup-notification-devel
libgnomeui-devel
libbonobo-devel
libXau-devel
libgcrypt-devel
popt-devel
libdrm-devel
libXrandr-devel
libxslt-devel
libglade2-devel
gnutls-devel
mtools
pax
python-dmidecode
oddjob
sgpio
genisoimage
wodim
qt-mysql
desktop-file-utils
jpackage-utils
certmonger
pam_krb5
krb5-workstation
nscd
pam_ldap
nss-pam-ldapd
xterm
xorg-x11-xdm
libXmu
perl-DBD-SQLite
crypto-utils
certmonger
tog-pegasus
%end
reboot
主要看下,那些蓝色标注的地方:
nfs --server=192.168.209.2 --dir=/data3/iso #介质位置
lang zh_CN.UTF-8 #语言
keyboard us #键盘
network --device eth0 --bootproto dhcp #网卡
rootpw --iscrypted $1$dAKfG1$.gaEHuT7MxVbl0LS6rW5J1 #root密码,111111
firewall --service=ssh #防火墙
authconfig --enableshadow --passalgo=sha512 --enablefingerprint
selinux --disabled
timezone --utc Asia/Shanghai #时区
clearpart --all --initlabel --drives=sda #清除/dev/sda上的所有分区信息,并初始化
好了,所有的配置已经完了,下面启动client,按f2,用pxe来安装系统吧,如果想熟悉过程,可以把上面的default文件中的ks信息去掉,自己手动实现一次dhcp,nfs,tftp过程,这样比较容易排错。
呵呵,by taowang2016 on 2013-07-18
需要多少台DHCP 、TFTP 及文件服务器
根据上面的原理和服务器的规模,就可以大概计算出来了。DHCP 服务器一两台足够了。TFTP 的性能不太好,大约每80 台客户机就需要一台TFTP 服务器。文件服务器的数量根据安装镜像的大小及客户机数量计算吧,要保证每台客户机有足够的带宽。
修改pxe安装系统密码
使用pxe 安装Linux系统非常方便快捷,现在批量安装服务器系统多用pxe安装,但是怎样修改pxe配置文件,从而到达修改安装的客户端服务器root密码呢。现在我来介绍一种方法。
首先,虚拟机运行grub-md5-crypt命令,输入需要设置的明文密码,输入2次,产生了MD5密码。
其次,用鼠标选中MD5密码,再右键复制到命令行,修改,执行命令echo ‘MD5密码’ >> *.cfg 。
最后,修改*.cfg 配置文件,把文件最后一行刚刚导入的MD5 密码替换掉rootpw –iscrypted 中的–iscrypted后面的原来的MD5 密码,保存,重新安装系统,客户端服务器可以使用刚刚自己设置的root密码了。
http://www.linuxsun.com/archives/13
http://itlaok.blog.sohu.com/115784852.html
http://www.linuxidc.com/Linux/2011-04/34328.htm
http://blog.sina.com.cn/s/blog_755da69701012r63.html