hashlib模块
hash是一种接受不了内容的算法,(3.x里代替了md5模块和sha模块,主要提供 SHA1, SHA224, SHA256, SHA384, SHA512 ,MD5 算法),该算法接受传入的内容,经过运算得到一串hash值
特点:1.只要传入的内容一样,得到的hash值必然一样--->文件完整性校验)
2.不能用哈希值反解成内容--->把密码做成hash值,不要用明文传输
3.只要使用的hash算法不变,无论校验内容有多大,得到的hash值长度是固定的
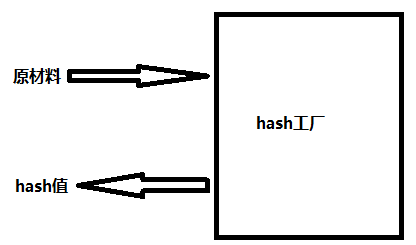
hash算法就像一座工厂,工厂接收你送来的原材料(可以用m.update()为工厂运送原材料),经过加工返回的产品就是hash值
hash的具体使用:
import hashlib

m=hashlib.md5()# m=hashlib.sha256()

m.update('hello'.encode('utf8'))
print(m.hexdigest())  #5d41402abc4b2a76b9719d911017c592

m.update('alvin'.encode('utf8'))

print(m.hexdigest())  #92a7e713c30abbb0319fa07da2a5c4af

m2=hashlib.md5()
m2.update('helloalvin'.encode('utf8'))
print(m2.hexdigest()) #92a7e713c30abbb0319fa07da2a5c4af

'''
注意:把一段很长的数据update多次,与一次update这段长数据,得到的结果一样
但是update多次为校验大文件提供了可能。
'''
以上加密算法虽然依然非常厉害,但时候存在缺陷,即:通过撞库可以反解。所以,有必要对加密算法中添加自定义key再来做加密。
import hashlib

# ######## 256 ########

hash = hashlib.sha256('898oaFs09f'.encode('utf8'))
hash.update('alvin'.encode('utf8'))
print (hash.hexdigest())#e79e68f070cdedcfe63eaf1a2e92c83b4cfb1b5c6bc452d214c1b7e77cdfd1c7
但我们可以通过密码加盐,来提升数据的安全性。
# import hashlib
# pwd='alex3714'
#
# m=hashlib.md5()
# m.update('一行白鹭上青天')
# m.update(pwd.encode('utf-8'))
# m.update('天'.encode('utf-8'))
#
# m.update('小雨一米五'.encode('utf-8'))
# print(m.hexdigest())


# import hashlib
#
# # m=hashlib.md5()
# # m.update('helloworld'.encode('utf-8'))
# # print(m.hexdigest()) #fc5e038d38a57032085441e7fe7010b0
#
# m=hashlib.sha256()
# m.update('helloworld'.encode('utf-8'))
# print(m.hexdigest()) #936a185caaa266bb9cbe981e9e05cb78cd732b0b3280eb944412bb6f8f8f07af
#
#
# m=hashlib.sha512()
# m.update('helloworld'.encode('utf-8'))
# print(m.hexdigest()) #1594244d52f2d8c12b142bb61f47bc2eaf503d6d9ca8480cae9fcf112f66e4967dc5e8fa98285e36db8af1b8ffa8b84cb15e0fbcf836c3deb803c13f37659a60
python 还有一个 hmac 模块,它内部对我们创建 key 和 内容 进行进一步的处理然后再加密:
1 import hmac
2 h = hmac.new('alvin'.encode('utf8'))
3 h.update('hello'.encode('utf8'))
4 print (h.hexdigest())#320df9832eab4c038b6c1d7ed73a5940
import hmac
m=hmac.new('天王盖地虎,小鸡炖模块'.encode('utf-8'))
m.update('alex3814'.encode('utf-8'))
print(m.hexdigest())
suprocess模块
import subprocess
# import time
#
# time.sleep(500)


# dos命令
# tasklist | findstr python
# taskkill /?
#D:code>tasklist | findstr python
# python.exe                   12360 Console                    1     11,024 K
#
# D:code>taskkill /F /PID 12360


# linux系统(了解)
# ps aux | grep python
# kill -9 PID


# import os
# while True:
#     cmd=input('>>>: ').strip()
#     if not cmd:continue
#     # print('%s run' %cmd)
#     res=os.system(cmd)

    # network.send(res)


# import os
#
# res=os.system('dixCVr')
# print('运行结果:',res)

import subprocess

obj=subprocess.Popen('dir',
                     shell=True,
                     stdout=subprocess.PIPE,
                     stderr=subprocess.PIPE
                     )

# print(obj)

res1=obj.stdout.read()
print('正确结果1111: ',res1)

res2=obj.stdout.read()
print('正确结果2222: ',res2) #只能取一次,取走了就没有了

# res2=obj.stderr.read()
# print('错误结果:',res2.decode('gbk'))
configparser模块
# 注释1
; 注释2

[section1]
k1 = v1
k2:v2
user=egon
age=18
is_admin=true
salary=31

[section2]
k1 = v1
读取
import configparser

config=configparser.ConfigParser()
config.read('a.cfg')

#查看所有的标题
res=config.sections() #['section1', 'section2']
print(res)

#查看标题section1下所有key=value的key
options=config.options('section1')
print(options) #['k1', 'k2', 'user', 'age', 'is_admin', 'salary']

#查看标题section1下所有key=value的(key,value)格式
item_list=config.items('section1')
print(item_list) #[('k1', 'v1'), ('k2', 'v2'), ('user', 'egon'), ('age', '18'), ('is_admin', 'true'), ('salary', '31')]

#查看标题section1下user的值=>字符串格式
val=config.get('section1','user')
print(val) #egon

#查看标题section1下age的值=>整数格式
val1=config.getint('section1','age')
print(val1) #18

#查看标题section1下is_admin的值=>布尔值格式
val2=config.getboolean('section1','is_admin')
print(val2) #True

#查看标题section1下salary的值=>浮点型格式
val3=config.getfloat('section1','salary')
print(val3) #31.0
改写
import configparser

config=configparser.ConfigParser()
config.read('a.cfg',encoding='utf-8')


#删除整个标题section2
config.remove_section('section2')

#删除标题section1下的某个k1和k2
config.remove_option('section1','k1')
config.remove_option('section1','k2')

#判断是否存在某个标题
print(config.has_section('section1'))

#判断标题section1下是否有user
print(config.has_option('section1',''))


#添加一个标题
config.add_section('egon')

#在标题egon下添加name=egon,age=18的配置
config.set('egon','name','egon')
config.set('egon','age',18) #报错,必须是字符串


#最后将修改的内容写入文件,完成最终的修改
config.write(open('a.cfg','w'))


import configparser

config = configparser.ConfigParser()
config["DEFAULT"] = {'ServerAliveInterval': '45',
                      'Compression': 'yes',
                     'CompressionLevel': '9'}

config['bitbucket.org'] = {}
config['bitbucket.org']['User'] = 'hg'
config['topsecret.server.com'] = {}
topsecret = config['topsecret.server.com']
topsecret['Host Port'] = '50022'     # mutates the parser
topsecret['ForwardX11'] = 'no'  # same here
config['DEFAULT']['ForwardX11'] = 'yes'
with open('example.ini', 'w') as configfile:
   config.write(configfile)

基于上述方法添加一个ini文档