服务端:
[1]用户组
# groupadd nagios && groupadd cacti && useradd -g cacti -G nagios cacti && useradd -g nagios -G cacti nagios
# passwd cacti
# passwd nagios
# id cacti && id nagios
[2]依赖包
# yum -y install \
wget make automake autoconf gd cpp gcc gcc-c++ glibc glibc-devel glib2 glib2-devel libtool libtool-ltdl-devel \
httpd httpd-devel libart_lgpl mod_ssl \
php php-devel php-common php-mysql php-gd php-snmp php-xml php-pear php-ldap php-mbstring php-mcrypt \
ntp net-snmp net-snmp-devel net-snmp-utils net-snmp-libs net-snmp-utils net-snmp-perl \
mysql mysql-server mysql-devel
# yum -y install \
openldap openldap-devel openldap-clients openldap-servers nss_ldap \
bison patch unzip mlocate flex gettext readline-devel libjpeg libjpeg-devel \
libpng libpng-devel freetype freetype-devel libxml2 libxml2-devel zlib zlib-devel expat-devel \
bzip2 bzip2-devel ncurses ncurses-devel curl curl-devel e2fsprogs e2fsprogs-devel libidn libidn-devel
[3]mysql配置
# chkconfig mysqld on
# service mysqld start
Initializing MySQL database: Installing MySQL system tables...
OK
Filling help tables...
OKTo start mysqld at boot time you have to copy
support-files/mysql.server to the right place for your systemPLEASE REMEMBER TO SET A PASSWORD FOR THE MySQL root USER !
To do so, start the server, then issue the following commands:
/usr/bin/mysqladmin -u root password 'new-password'
/usr/bin/mysqladmin -u root -h tianwu password 'new-password'Alternatively you can run:
/usr/bin/mysql_secure_installationwhich will also give you the option of removing the test
databases and anonymous user created by default. This is
strongly recommended for production servers.See the manual for more instructions.
You can start the MySQL daemon with:
cd /usr ; /usr/bin/mysqld_safe &You can test the MySQL daemon with mysql-test-run.pl
cd mysql-test ; perl mysql-test-run.plPlease report any problems with the /usr/bin/mysqlbug script!
The latest information about MySQL is available on the web at
http://www.mysql.com
Support MySQL by buying support/licenses at http://shop.mysql.com
[ OK ]
Starting MySQL: [ OK ]
# mysql
Welcome to the MySQL monitor. Commands end with ; or \g.
Your MySQL connection id is 2 to server version: 4.1.22Type 'help;' or '\h' for help. Type '\c' to clear the buffer.
mysql>
# mysqladmin password 123456
# mysql -u root -p
Enter password:
Welcome to the MySQL monitor. Commands end with ; or \g.
Your MySQL connection id is 10 to server version: 4.1.22Type 'help;' or '\h' for help. Type '\c' to clear the buffer.
mysql>
# mysqladmin -u root -p create cacti
Enter password:
============================================================
[4]httpd配置:
首先要看看,当前有没有Httpd在运行,默认的80端口是否有被占用:
# ps aux|grep httpd
# netstat -nlp
查看httpd的安装位置,是yum安装的还是编译安装的:
# which httpd
/usr/sbin/httpd
# whereis httpd
httpd: /usr/sbin/httpd.event /usr/sbin/httpd.worker /usr/sbin/httpd /etc/httpd /usr/lib/httpd /usr/include/httpd /usr/share/man/man8/httpd.8.gz
# cd /etc/httpd/
# ll
total 16
drwxr-xr-x 2 root root 4096 Aug 29 10:06 conf
drwxr-xr-x 2 root root 4096 Aug 29 10:07 conf.d
lrwxrwxrwx 1 root root 19 Aug 29 10:06 logs -> http://www.cnblogs.com/var/log/httpd
lrwxrwxrwx 1 root root 27 Aug 29 10:06 modules -> http://www.cnblogs.com/usr/lib/httpd/modules
lrwxrwxrwx 1 root root 13 Aug 29 10:06 run -> http://www.cnblogs.com/var/run
# vi /etc/httpd/conf/httpd.conf
/80
#Listen 80
Listen 99
# service httpd start
Starting httpd: httpd: apr_sockaddr_info_get() failed for hostname
httpd: Could not reliably determine the server's fully qualified domain name, using 127.0.0.1 for ServerName
[ OK ]
在这里出现了2个错误:
1.httpd: apr_sockaddr_info_get() failed for hostname
解决:
这个问题应该是没有在 /etc/httpd/conf/httpd.conf 中设定 ServerName 所以它会用主机上的名称来取代,首先会去找 /etc/hosts 中有没有主机的定义。
所以要解决这个问题可以设定 ServerName 或者在 /etc/hosts 中填入自己的主机名称 MYHOST,像这样:
>vi /etc/hosts
127.0.0.1 localhost.localdomain localhost MYHOST或者是
将httpd.conf中的ServerName 前面的 # 去掉。
2.Could not reliably determine the server's fully qualified domain name
解决:
修改httpd.conf中的ServerName IP:port与Listen IP:端口一致
# ps aux|grep httpd
root 1725 2.7 0.2 26224 8956 ? Ss 14:05 0:00 /usr/sbin/httpd
apache 1727 0.0 0.1 26356 4388 ? S 14:05 0:00 /usr/sbin/httpd
apache 1728 0.0 0.1 26356 4388 ? S 14:05 0:00 /usr/sbin/httpd
apache 1729 0.0 0.1 26356 4388 ? S 14:05 0:00 /usr/sbin/httpd
apache 1730 0.0 0.1 26356 4388 ? S 14:05 0:00 /usr/sbin/httpd
apache 1731 0.0 0.1 26356 4388 ? S 14:05 0:00 /usr/sbin/httpd
apache 1732 0.0 0.1 26356 4388 ? S 14:05 0:00 /usr/sbin/httpd
apache 1733 0.0 0.1 26356 4388 ? S 14:05 0:00 /usr/sbin/httpd
apache 1734 0.0 0.1 26356 4388 ? S 14:05 0:00 /usr/sbin/httpd
root 1738 0.0 0.0 4008 700 pts/2 S+ 14:05 0:00 grep httpd
# netstat -nlp|grep httpd
tcp 0 0 :::99 :::* LISTEN 1725/httpd
tcp 0 0 :::443 :::* LISTEN 1725/httpd
如果已经有80的配置,添加一个新的;否则启动报错:
#[error] VirtualHost *:88 -- mixing * ports and non-* ports with a NameVirtualHost address is not supported, proceeding with undefined results
httpd.conf添加
LoadModule status_module /usr/lib/httpd/modules/mod_status.so #注意拼写检查,写错会报:undefined symbol: mod_status.so
如果 mod_status.so已经内建了,就注释掉这一行
# ../bin/httpd -l
Compiled in modules:
core.c
mod_access.c
mod_auth.c
mod_include.c
mod_log_config.c
mod_env.c
mod_setenvif.c
worker.c
http_core.c
mod_mime.c
mod_status.c
mod_autoindex.c
mod_asis.c
mod_cgid.c
mod_negotiation.c
mod_dir.c
mod_imap.c
mod_actions.c
mod_userdir.c
mod_alias.c
mod_so.c
# vi httpd.conf
Listen 88
NameVirtualHost *:88
<VirtualHost *:88>
ServerName ****
DocumentRoot /var/www/html
<Directory "//var/www/html">
Options FollowSymLinks +Includes
AllowOverride None
Order allow,deny
Allow from all
</Directory>
</VirtualHost>
让apache支持php,在httpd.conf中添加:
#LoadModule php4_module modules/libphp4.so
LoadModule php4_module /usr/lib/httpd/modules/libphp4.so
DirectoryIndex index.html index.htm index.html.var index.php
AddType application/x-httpd-php .php
AddType application/x-httpd-php-source .phps
AddType application/x-httpd-php4 .php4
AddType application/x-httpd-php4-source .phps
启动使用Yum安装的httpd时,报错:
[root@w conf]# service httpd start
Starting httpd: Syntax error on line 398 of /etc/httpd/conf/httpd.conf:
Invalid command 'DirectoryIndex', perhaps mis-spelled or defined by a module not included in the server configuration
[FAILED]
[root@w conf]# httpd -k start
Syntax error on line 398 of /etc/httpd/conf/httpd.conf:
Invalid command 'DirectoryIndex', perhaps mis-spelled or defined by a module not included in the server configuration
测试配置文件:
[root@w conf]# /etc/init.d/httpd configtest
Syntax error on line 398 of /etc/httpd/conf/httpd.conf:
Invalid command 'DirectoryIndex', perhaps mis-spelled or defined by a module not included in the server configuration
到apache官网搜索下,对应的模块是啥:
http://httpd.apache.org/docs/2.2/mod/#D
Provides for "trailing slash" redirects and serving directory index files
添加:
LoadModule dir_module /usr/lib/httpd/modules/mod_dir.so
其他模块照此办理,或者查看这里http://www.cnblogs.com/taosim/articles/2550927.html。
#LoadModule status_module /usr/lib/httpd/modules/mod_status.so
LoadModule negotiation_module /usr/lib/httpd/modules/mod_negotiation.so
LoadModule alias_module /usr/lib/httpd/modules/mod_alias.so
LoadModule env_module /usr/lib/httpd/modules/mod_env.so
LoadModule setenvif_module /usr/lib/httpd/modules/mod_setenvif.so
LoadModule log_config_module /usr/lib/httpd/modules/mod_log_config.so
LoadModule mime_module /usr/lib/httpd/modules/mod_mime.so
LoadModule dir_module /usr/lib/httpd/modules/mod_dir.so
LoadModule autoindex_module /usr/lib/httpd/modules/mod_autoindex.so
LoadModule userdir_module /usr/lib/httpd/modules/mod_userdir.so
LoadModule access_module /usr/lib/httpd/modules/mod_access.so
LoadModule auth_module /usr/lib/httpd/modules/mod_auth.so
LoadModule php4_module /usr/lib/httpd/modules/libphp4.so
LoadModule weblogic_module modules/mod_wl_20.so
LoadModule evasive20_module /usr/lib/httpd/modules/mod_evasive20.so
LoadModule rewrite_module /usr/lib/httpd/modules/mod_rewrite.so
终于启动成功:
[root@w conf]# service httpd start
Starting httpd: [ OK ]
root 4196 0.6 0.3 18940 6800 ? Ss 17:20 0:00 /usr/sbin/httpd
nobody 4235 0.0 0.3 18940 6844 ? S 17:20 0:00 /usr/sbin/httpd
nobody 4236 0.0 0.3 18940 6844 ? S 17:20 0:00 /usr/sbin/httpd
nobody 4237 0.0 0.3 18940 6844 ? S 17:20 0:00 /usr/sbin/httpd
nobody 4238 0.0 0.3 18940 6844 ? S 17:20 0:00 /usr/sbin/httpd
nobody 4239 0.0 0.3 18940 6844 ? S 17:20 0:00 /usr/sbin/httpd
root 4288 0.0 0.0 5472 692 pts/1 S+ 17:20 0:00 grep httpd
编译安装的apache链接yum安装的php时,报错:
[root@w conf]# ../bin/apachectl start
[Fri Jun 1 1:5:3 2012] [crit] Apache is running a threaded MPM, but your PHP Module is not compiled to be threadsafe. You need to recompile PHP.
Pre-configuration failed
#“Non Thread Safe”和“Thread Safe”的区别
#“Non Thread Safe”和“Thread Safe”从字面意思上理解,Thread Safe 是线程安全,执行时会进行线程(Thread)安全检查,以防止有新要求就启动新线#程的 CGI 执行方式而耗尽系统资源。Non Thread Safe 是非线程安全,在执行时不进行线程(Thread)安全检查。
版本啊版本,自己接触linux以来,最让人头大的一个词汇啊,一讲版本必然有依赖,依赖啊依赖,你是版本的别名;
[root@w conf]# php version
Status: 404
Content-type: text/html
X-Powered-By: PHP/4.3.9
No input file specified.
到php官网找到sitemap,找到oldreleases,就可以找到4.3.9这个版本了;
4.3.9
- Released: 22 Sep 2004
- Announcement: English French
- ChangeLog
- Download: Source (tar.gz) Source (tar.bz2) Windows binary Windows installer
检查:
[root@w conf]# netstat -nlp|grep httpd
tcp 0 0 :::80 :::* LISTEN 6320/httpd
tcp 0 0 :::78 :::* LISTEN 6320/httpd
[5]测试php,测试php和mysql链接
phpinfo();
?>
<?php
$link=mysql_connect("localhost","root","123456");
if(!$link) echo "FAILD!";
else echo "OK!";
?>
[6]安装rrdtool
rrdtool有rpm,编译,yum源3种方式;首先使用yum源方式尝试。
先记录3个地址:
http://dag.wieers.com/sitemap.php
http://oss.oetiker.ch/rrdtool/download.en.html
----------------------------------------------------------------
添加dag更新仓库
输入以下内容
name=Dag RPM Repository for Red Hat Enterprise Linux
baseurl=http://apt.sw.be/redhat/el$releasever/en/$basearch/dag
gpgcheck=1
enabled=1
gpgkey=http://dag.wieers.com/rpm/packages/RPM-GPG-KEY.dag.txt
保存退出。
然后导入Key
# rpm --import RPM-GPG-KEY.dag.txt
# rm -f RPM-GPG-KEY.dag.txt //这个可以先移除也可以不移除
[root@w yum.repos.d]# cat dag.repo
[dag]
name=Dag RPM Repository for Red Hat Enterprise Linux
baseurl=http://apt.sw.be/redhat/el4/en/i386/dag/
gpgcheck=1
gpgkey=http://dag.wieers.com/rpm/packages/RPM-GPG-KEY.dag.txt
enabled=1
我的悲催之处在于,当centos6的时代,我却在el4的系统里折腾这个东东;不流行的东西,查找很麻烦;好多源都失效了,或者地址变更了;
# yum install rrdtool
Loaded plugins: rhnplugin, security
This system is not registered with RHN.
RHN support will be disabled.
Setting up Install Process
Resolving Dependencies
--> Running transaction check
---> Package rrdtool.i386 0:1.4.7-1.el5.rf set to be updated
--> Processing Dependency: perl(RRDp) for package: rrdtool
--> Processing Dependency: lua for package: rrdtool
--> Processing Dependency: libdbi.so.0 for package: rrdtool
--> Processing Dependency: perl(RRDs) for package: rrdtool
--> Running transaction check
---> Package libdbi.i386 0:0.8.1-2.1 set to be updated
---> Package lua.i386 0:5.1.4-2.el5.rf set to be updated
---> Package perl-rrdtool.i386 0:1.4.7-1.el5.rf set to be updated
--> Finished Dependency ResolutionDependencies Resolved
======================================================================================================================================
Package Arch Version Repository Size
======================================================================================================================================
Installing:
rrdtool i386 1.4.7-1.el5.rf dag 906 k
Installing for dependencies:
libdbi i386 0.8.1-2.1 base 35 k
lua i386 5.1.4-2.el5.rf dag 242 k
perl-rrdtool i386 1.4.7-1.el5.rf dag 52 kTransaction Summary
======================================================================================================================================
Install 4 Package(s)
Update 0 Package(s)
Remove 0 Package(s)Total download size: 1.2 M
Is this ok [y/N]:
验证下,看看安装正常没:
# rrdtool
RRDtool 1.2.30 Copyright 1997-2008 by Tobias Oetiker <tobi@oetiker.ch>
Compiled Feb 20 2009 18:20:20Usage: rrdtool [options] command command_options
Valid commands: create, update, updatev, graph, dump, restore,
last, lastupdate, first, info, fetch, tune,
resize, xportRRDtool is distributed under the Terms of the GNU General
Public License Version 2. (www.gnu.org/copyleft/gpl.html)For more information read the RRD manpages
[7]在mysql中创建cactidb库,用户等
[root@w yum.repos.d]# mysql -uroot -p
Enter password:
Welcome to the MySQL monitor. Commands end with ; or \g.
Your MySQL connection id is 15 to server version: 4.1.22
Type 'help;' or '\h' for help. Type '\c' to clear the buffer.
mysql> create database cactidb;
Query OK, 1 row affected (0.10 sec)
mysql> GRANT all privileges ON cactidb.* TO cactier@localhost IDENTIFIED BY '123456';
Query OK, 0 rows affected (0.34 sec)
mysql> GRANT all privileges ON cactidb.* TO cactier@127.0.0.1 IDENTIFIED BY '123456';
Query OK, 0 rows affected (0.03 sec)
mysql> GRANT all privileges ON cactidb.* TO cactier@192.168.1.0 IDENTIFIED BY '123456';
Query OK, 0 rows affected (0.12 sec)
mysql> flush privileges;
Query OK, 0 rows affected (0.24 sec)
mysql> quit
Bye
[8]配置SNMP,开放iptables对应端口
理解snmpd.conf中Access Control段4行基本配置逻辑:
典型而简易的snmpd.conf配置参考后文写出的范例。这里先讲逻辑;
现在假设服务端和客户端已经配置完成并且要测试是否连通,使用下面的命令:
# snmpwalk -v1 192.168.1.111 -c public system
其中 192.168.1.111是被监控的对象机IP
其中 public是一个暗语具现
当服务端透过snmpd去访问客户端时,需要一个明文暗语
定义这个暗语及其具现的语法如下:
# sec.name source community
com2sec notConfigUser default public
其中com2sec是命令
后面3个是参数:sec.name source community
source,如果是服务端就写服务端的地址,如果是客户端就写服务端的地址
sec.name是community一个用户,community就是暗语的名称,你可以自定义成自己熟悉的字符
比如这样:
com2sec neibushiyong serverip outuse,并假设这个是客户端的配置,且客户端IP是192.168.1.111
那么在服务端就可以这样验证测试:
# snmpwalk -v1 192.168.1.111 -c outuse system
下面看看group做些啥
# sec.model sec.name
group notConfigGroup v1 notConfigUser
group notConfigGroup v2c notConfigUser
其中group是命令本身
notConfigGroup是定义一个组,并且把第一句中属于暗语的一个用户比如notConfigUser和这个组关联起来
比较重要的是v1,v2c是安全级别,是信道协议。
也就是说,前面两句话是一次身份确认;后面2句话是放客人进来后,客人的受限范围,能干些什么;
---------------------
[root@w yum.repos.d]# vi /etc/snmp/snmpd.conf
服务端snmpd.conf范例
(1)com2sec notConfigUser 监控机本身IP,或者127.0.0.1 public
(2)group notConfigGroup v1 notConfigUser
group notConfigGroup v2c notConfigUser
(3)view all included .1
(4)access notConfigGroup "" any noauth exact roview rwview none
客户端snmpd.conf范例
(1)com2sec notConfigUser 监控服务端IP,或者127.0.0.1 public
(2)group notConfigGroup v1 notConfigUser
group notConfigGroup v2c notConfigUser
(3)view systemview included .1.3.6.1.2.1.1
view systemview included .1.3.6.1.2.1.25.1.1
(4)access notConfigGroup "" any noauth exact roview rwview none
重启服务并验证:
[root@s snmp]# service snmpd restart
停止 snmpd:[失败]
启动 snmpd:[ 确定 ]
[root@s snmp]# ps aux|grep snmpd
root 12954 0.7 0.1 12772 4472 ? S 16:39 0:00 /usr/sbin/snmpd -Lsd -Lf /dev/null -p /var/run/snmpd -a
root 12959 0.0 0.0 6376 728 pts/0 S+ 16:39 0:00 grep snmpd
[root@s snmp]# netstat -nlp|grep snmpd
tcp 0 0 0.0.0.0:199 0.0.0.0:* LISTEN 12954/snmpd
udp 0 0 0.0.0.0:161 0.0.0.0:* 12954/snmpd
[root@server216 snmp]#
验证从服务器到客户端是否可达通畅:
[root@w snmp]# snmpwalk -v1 192.168.1.** -c public system
SNMPv2-MIB::sysDescr.0 = STRING: Linux serverhostname 2.6.9-22.ELsmp #1 SMP Mon Sep 19 18:32:14 EDT 2005 i686
SNMPv2-MIB::sysObjectID.0 = OID: NET-SNMP-MIB::netSnmpAgentOIDs.10
DISMAN-EVENT-MIB::sysUpTimeInstance = Timeticks: (88161) 0:14:41.61
SNMPv2-MIB::sysContact.0 = STRING: Root <root@localhost> (configure /etc/snmp/snmp.local.conf)
SNMPv2-MIB::sysName.0 = STRING: serverhostname
SNMPv2-MIB::sysLocation.0 = STRING: Unknown (edit /etc/snmp/snmpd.conf)
SNMPv2-MIB::sysORLastChange.0 = Timeticks: (9) 0:00:00.09
SNMPv2-MIB::sysORID.1 = OID: IF-MIB::ifMIB
SNMPv2-MIB::sysORID.2 = OID: SNMPv2-MIB::snmpMIB
SNMPv2-MIB::sysORID.3 = OID: TCP-MIB::tcpMIB
SNMPv2-MIB::sysORID.4 = OID: IP-MIB::ip
SNMPv2-MIB::sysORID.5 = OID: UDP-MIB::udpMIB
SNMPv2-MIB::sysORID.6 = OID: SNMP-VIEW-BASED-ACM-MIB::vacmBasicGroup
SNMPv2-MIB::sysORID.7 = OID: SNMP-FRAMEWORK-MIB::snmpFrameworkMIBCompliance
SNMPv2-MIB::sysORID.8 = OID: SNMP-MPD-MIB::snmpMPDCompliance
SNMPv2-MIB::sysORID.9 = OID: SNMP-USER-BASED-SM-MIB::usmMIBCompliance
SNMPv2-MIB::sysORDescr.1 = STRING: The MIB module to describe generic objects for network interface sub-layers
SNMPv2-MIB::sysORDescr.2 = STRING: The MIB module for SNMPv2 entities
SNMPv2-MIB::sysORDescr.3 = STRING: The MIB module for managing TCP implementations
SNMPv2-MIB::sysORDescr.4 = STRING: The MIB module for managing IP and ICMP implementations
SNMPv2-MIB::sysORDescr.5 = STRING: The MIB module for managing UDP implementations
SNMPv2-MIB::sysORDescr.6 = STRING: View-based Access Control Model for SNMP.
SNMPv2-MIB::sysORDescr.7 = STRING: The SNMP Management Architecture MIB.
SNMPv2-MIB::sysORDescr.8 = STRING: The MIB for Message Processing and Dispatching.
SNMPv2-MIB::sysORDescr.9 = STRING: The management information definitions for the SNMP User-based Security Model.
SNMPv2-MIB::sysORUpTime.1 = Timeticks: (8) 0:00:00.08
SNMPv2-MIB::sysORUpTime.2 = Timeticks: (8) 0:00:00.08
SNMPv2-MIB::sysORUpTime.3 = Timeticks: (8) 0:00:00.08
SNMPv2-MIB::sysORUpTime.4 = Timeticks: (8) 0:00:00.08
SNMPv2-MIB::sysORUpTime.5 = Timeticks: (8) 0:00:00.08
SNMPv2-MIB::sysORUpTime.6 = Timeticks: (8) 0:00:00.08
SNMPv2-MIB::sysORUpTime.7 = Timeticks: (9) 0:00:00.09
SNMPv2-MIB::sysORUpTime.8 = Timeticks: (9) 0:00:00.09
SNMPv2-MIB::sysORUpTime.9 = Timeticks: (9) 0:00:00.09
You have new mail in /var/spool/mail/root
[root@w snmp]#
[9]安装cacti
本来是打算用编译的方式安装的;不过考虑到实操的系统是el4,着实太老旧了点儿;就试试yum方式成不成,没成想,有了dag源后,cacti也可以yum安装了;而且发现cacti官网截至06.20.2012下载页面http://www.cacti.net/download_cacti.php显示的latest version: 0.8.8a和yum方式安装的版本一样;
[root@w ~]# yum install cacti
Setting up Install Process
Setting up repositories
dag 100% |=========================| 1.9 kB 00:00
base 100% |=========================| 1.1 kB 00:00
update 100% |=========================| 951 B 00:00
Reading repository metadata in from local files
Parsing package install arguments
Resolving Dependencies
--> Populating transaction set with selected packages. Please wait.
---> Downloading header for cacti to pack into transaction set.
cacti-0.8.8a-1.el4.rf.noa 100% |=========================| 61 kB 00:02
---> Package cacti.noarch 0:0.8.8a-1.el4.rf set to be updated
--> Running transaction check
Dependencies Resolved
=============================================================================
Package Arch Version Repository Size
=============================================================================
Installing:
cacti noarch 0.8.8a-1.el4.rf dag 2.2 M
Transaction Summary
=============================================================================
Install 1 Package(s)
Update 0 Package(s)
Remove 0 Package(s)
Total download size: 2.2 M
Is this ok [y/N]:
Downloading Packages:
(1/1): cacti-0.8.8a-1.el4 100% |=========================| 2.2 MB 00:34
Running Transaction Test
Finished Transaction Test
Transaction Test Succeeded
Running Transaction
Installing: cacti ######################### [1/1]
Installed: cacti.noarch 0:0.8.8a-1.el4.rf
Complete!
Yum安装的cacti默认位置在:/var/www/cacti;apache虚拟机默认root配置在 /var/www/html;做个软链:
[root@w html]# ln -s ../cacti/ cacti
然后迫不及待的在浏览器里:http://**.**.**.**:**/cacti/index.php结果返回报错信息:
FATAL: Cannot connect to MySQL server on 'localhost'. Please make sure you have specified a valid MySQL database name in 'include/config.php'
========================================
http://www.aminglinux.com/bbs/thread-3592-1-1.html
1)、查看config.php下,是否配置正确
查看cactiusr的host是否有localhost 权限
- mysql -ucactiuser -h localhost -p
查看登录是否成功 ,如果登录正常则排除
2)、MYSQL权限问题
- SQL>GRANT ALL ON cacti.* TO cactiuser@localhost IDENTIFIED BY 'somepassword';
3)、当mysql中的所有配置和cacti的config.php都正确,却还是出现该错误时,那就是mysql套接字的原因了~
cacti会自动的去查找/var/lib/mysql/mysql.sock
该套接字,但是如果是源码安装的mysql,未指定套接字位置时,套接字的位置为/tmp/mysql.sock,由于cacti未找到/var/lib
/mysql/mysql.sock,所以显示的是“Cannot connect to MySQL server on 'localhost'”
解决:做一个/tmp/mysql.sock到/var/lib/mysql/mysql.sock的软连接
- ln -s /tmp/mysql.sock /var/lib/mysql/mysql.sock
=========================================
然后这样操作:
[root@w html]# cd cacti/
[root@w cacti]# pwd
/var/www/html/cacti
[root@w cacti]# mysql -uroot -p cactidb <cacti.sql
Enter password:
[root@w cacti]# mysql -uroot -p cactidb <cacti.sql
Enter password:
ERROR 1050 (42S01) at line 5: Table 'cdef' already exists
You have new mail in /var/spool/mail/root
--------------------------------------------
[root@w cacti]# cd include/
[root@w include]# vi config.php
/* make sure these values refect your actual database/host/user/password */
$database_type = "mysql";
$database_default = "cactidb";
$database_hostname = "localhost";
$database_username = "cactier";
$database_password = "123456";
$database_port = "3306";
$database_ssl = false;
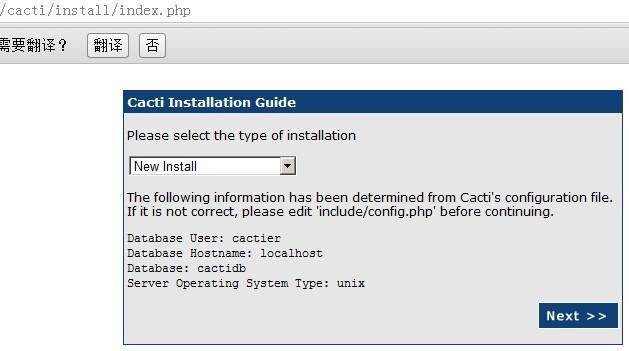
于是:
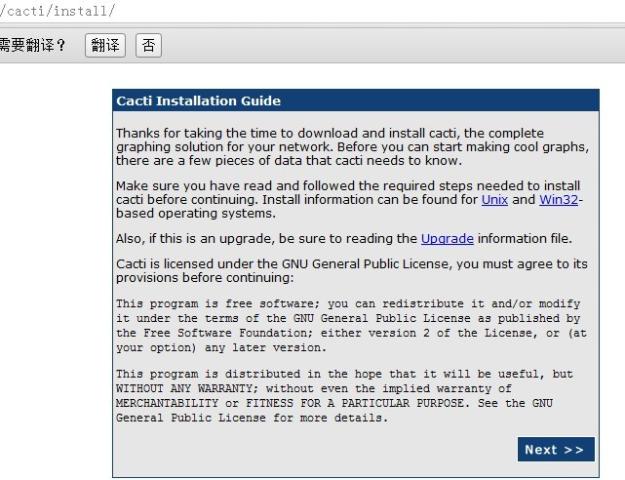
---
---
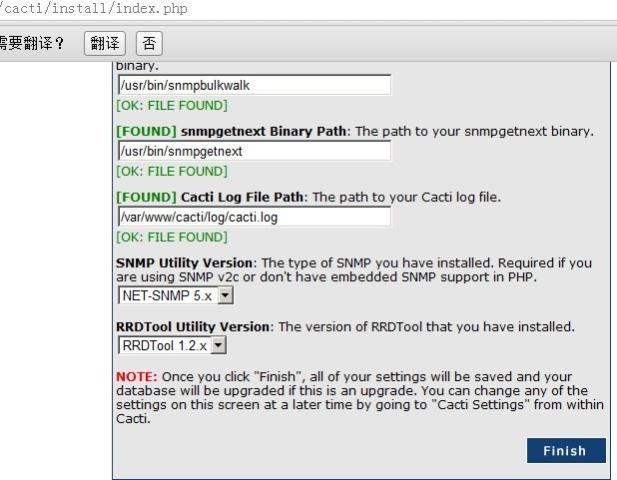
继续,http://**.**.**.**:**/cacti/index.php登录;默认的用户名密码是admin:admin
不过填写后点击login却无法登录进去;于是google,于是继续操作:
#session.save_path = /var/lib/php/session
session.save_path = "/tmp"
[root@w home]# mysql -u root -p cacti
Enter password:
Welcome to the MySQL monitor. Commands end with ; or \g.
Your MySQL connection id is 186 to server version: 4.1.22
Type 'help;' or '\h' for help. Type '\c' to clear the buffer.
mysql> update user_auth set password=md5('admin') where username='admin';
ERROR 1146 (42S02): Table 'cacti.user_auth' doesn't exist
update user_auth set password=Password('yournewpassord') where username='admin';
update user_auth set password='' where username='admin';
[root@w home]# mysqlshow cacti -u root -p
Enter password:
Database: cacti
+--------+
| Tables |
+--------+
====================
[root@w cacti]# mysql -u root -p
Enter password:
Welcome to the MySQL monitor. Commands end with ; or \g.
Your MySQL connection id is 653 to server version: 4.1.22
Type 'help;' or '\h' for help. Type '\c' to clear the buffer.
mysql> use cactidb;
Reading table information for completion of table and column names
You can turn off this feature to get a quicker startup with -A
Database changed
mysql> show tables;
+---------------------------+
| Tables_in_cactidb |
+---------------------------+
| cdef |
| cdef_items |
| colors |
| data_input |
| data_input_data |
| data_input_fields |
| data_local |
| data_template |
| data_template_data |
| data_template_data_rra |
| data_template_rrd |
| graph_local |
| graph_template_input |
| graph_template_input_defs |
| graph_templates |
| graph_templates_gprint |
| graph_templates_graph |
| graph_templates_item |
| graph_tree |
| graph_tree_items |
| host |
| host_graph |
| host_snmp_cache |
| host_snmp_query |
| host_template |
| host_template_graph |
| host_template_snmp_query |
| plugin_config |
| plugin_db_changes |
| plugin_hooks |
| plugin_realms |
| poller |
| poller_command |
| poller_item |
| poller_output |
| poller_reindex |
| poller_time |
| rra |
| rra_cf |
| settings |
| settings_graphs |
| settings_tree |
| snmp_query |
| snmp_query_graph |
| snmp_query_graph_rrd |
| snmp_query_graph_rrd_sv |
| snmp_query_graph_sv |
| user_auth |
| user_auth_perms |
| user_auth_realm |
| user_log |
| version |
+---------------------------+
52 rows in set (0.00 sec)
====================
没效果,继续:
[root@w html]# chmod 777 /var/lib/php/session
[root@w html]# ll /var/lib/php/session
total 0
[root@w html]# pwd
/var/www/html
[root@w html]# cd /var/lib/php
[root@w php]# ll
total 8
drwxrwxrwx 2 root apache 4096 Feb 3 07:56 session
[root@w php]#
这样,终于可以登录进去了;进去后首先强制要求修改密码:

修改密码后,验证旧密码: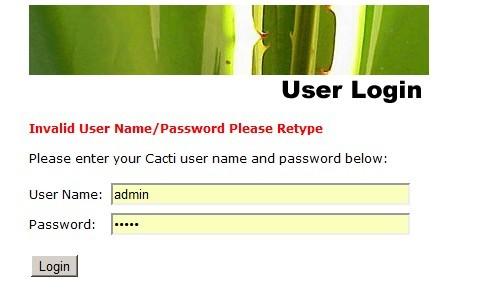
创建一个新的普通用户并尝试登录:

权限不足够,赋予权限:
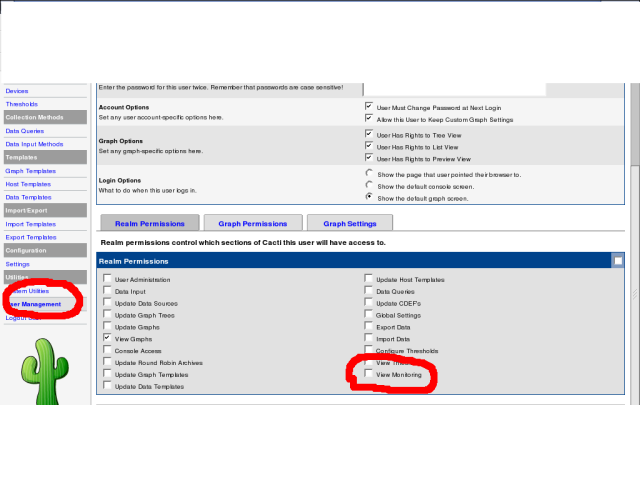
继续,咦,竟然没有图像,咋回事呢;继续操作:
[root@w rra]# php /var/www/html/cacti/poller.php > /dev/null 2>&1
[root@w rra]# chown -Rv cacti:cacti cacti/
[root@w rra]# pwd
/var/www/html/cacti/rra
[root@w rra]# ll
total 336
-rw-r--r-- 1 cacti cacti 141488 Jun 21 15:10 localhost_load_1min_5.rrd
-rw-r--r-- 1 cacti cacti 47840 Jun 21 15:10 localhost_mem_buffers_3.rrd
-rw-r--r-- 1 cacti cacti 47840 Jun 21 15:10 localhost_mem_swap_4.rrd
-rw-r--r-- 1 cacti cacti 47840 Jun 21 15:10 localhost_proc_7.rrd
-rw-r--r-- 1 cacti cacti 47840 Jun 21 15:10 localhost_users_6.rrd
[root@w rra]#
如果还不行,参考地址:http://www.cnblogs.com/taosim/articles/2557762.html
接下来是CaCti的使用,请参考地址:http://www.cnblogs.com/taosim/articles/2558020.html
如果添加了设备,但状态显示未知怎么办?先试试这个:
[root@w ~]# /usr/bin/php /var/www/html/cacti/poller.php
Content-type: text/html
X-Powered-By: PHP/4.3.9
You have new mail in /var/spool/mail/root
[root@w ~]#
而且需要给 device加图形,只建有device的话就是unkuow,给device加个流量图,它就up了。
添加磁盘使用百分比自定义设置:
[root@w include]# pwd
/var/www/html/cacti/include
[root@w include]# find . -name "*arrays.php"
./global_arrays.php
vi global_arrays.php 参考地址:http://www.cnblogs.com/taosim/articles/2562710.html
使用cacti默认模版监控磁盘使用情况,首先当你新建了一个设备后,在配置页面最下方有关联数据源的配置,要首先选择这里
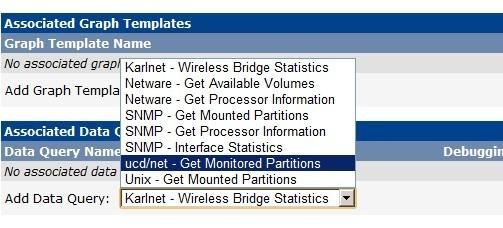 ---
--- .....
.....
然后在snmpd.conf中找到disk checks段,添加待监控分区,比如: disk /
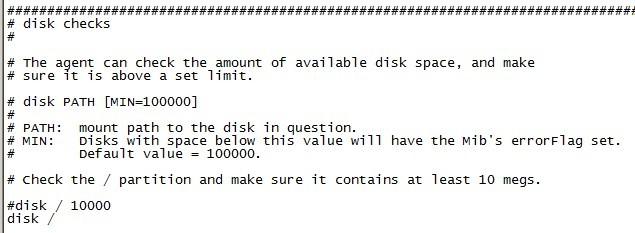
修改完配置文件后,重启snmpd服务;
[root@s snmp]# service snmpd restart
停止 snmpd:[ 确定 ]
启动 snmpd:[ 确定 ]
如果不做上述设置,有情况下可能会报错:No SNMP data returned
其他情况,比如监控网卡流量也类似;如果你把关联数据源的默认列都删除的话,选择图形模版时就会缺少对应的模版;
#############################################################################
&&&&&&&&&&&&&&&&&&&&&&&&&&&&&&&&&&&&&&&&&&&&&&&&&&&&&&&&&&&&&&&&&&&&&&&&&&&&&&&&&&&&&
#############################################################################
nagios部分
# usermod -a -G nagios daemon
# less /etc/passwd|grep nagios
nagios:x:503:504::/home/nagios:/bin/bash
# less /etc/group|grep nagios
cacti:x:503:nagios
nagios:x:504:cacti,daemon
# whereis httpd
httpd: /usr/sbin/httpd /usr/sbin/httpd.worker /etc/httpd /usr/lib/httpd /usr/include/httpd /usr/share/man/man8/httpd.8.gz
# cd /etc/httpd/conf
# cd /data/src/nagios
# pwd
/data/src/nagios
./configure --with-command-group=nagios --with-httpd-conf=/etc/httpd/conf/extra/
Creating sample config files in sample-config/ ...
*** Configuration summary for nagios 3.3.1 07-25-2011 ***:
General Options:
-------------------------
Nagios executable: nagios
Nagios user/group: nagios,nagios
Command user/group: nagios,nagios
Embedded Perl: no
Event Broker: yes
Install ${prefix}: /usr/local/nagios
Lock file: ${prefix}/var/nagios.lock
Check result directory: ${prefix}/var/spool/checkresults
Init directory: /etc/rc.d/init.d
Apache conf.d directory: /etc/httpd/conf/extra/
Mail program: /bin/mail
Host OS: linux-gnu
Web Interface Options:
------------------------
HTML URL: http://localhost/nagios/
CGI URL: http://localhost/nagios/cgi-bin/
Traceroute (used by WAP): /bin/traceroute
Review the options above for accuracy. If they look okay,
type 'make all' to compile the main program and CGIs.
# make all && make install && make install-init && make install-config && make install-commandmode
*** Support Notes *******************************************
If you have questions about configuring or running Nagios,
please make sure that you:
- Look at the sample config files
- Read the documentation on the Nagios Library at:
http://library.nagios.com
before you post a question to one of the mailing lists.
Also make sure to include pertinent information that could
help others help you. This might include:
- What version of Nagios you are using
- What version of the plugins you are using
- Relevant snippets from your config files
- Relevant error messages from the Nagios log file
For more information on obtaining support for Nagios, visit:
http://support.nagios.com
*************************************************************
Enjoy.
*** Main program, CGIs and HTML files installed ***
You can continue with installing Nagios as follows (type 'make'
without any arguments for a list of all possible options):
make install-init
- This installs the init script in /etc/rc.d/init.d
make install-commandmode
- This installs and configures permissions on the
directory for holding the external command file
make install-config
- This installs sample config files in /usr/local/nagios/etc
make[1]: Leaving directory `/data/src/nagios'
# make install-init
/usr/bin/install -c -m 755 -d -o root -g root /etc/rc.d/init.d
/usr/bin/install -c -m 755 -o root -g root daemon-init /etc/rc.d/init.d/nagios
*** Init script installed ***
*** Config files installed ***
Remember, these are *SAMPLE* config files. You'll need to read
the documentation for more information on how to actually define
services, hosts, etc. to fit your particular needs.
# make install-commandmode
/usr/bin/install -c -m 775 -o nagios -g nagios -d /usr/local/nagios/var/rw
chmod g+s /usr/local/nagios/var/rw
*** External command directory configured ***
# find / -name "contacts.cfg"
/data/src/nagios/sample-config/template-object/contacts.cfg
/usr/local/nagios/etc/objects/contacts.cfg
# vi
define contact{
contact_name nagiosadmin ; Short name of user
use generic-contact ; Inherit default values from generic-contact template (defined above)
alias Nagios Admin ; Full name of user
email nagios@localhost ; <<***** CHANGE THIS TO YOUR EMAIL ADDRESS ******
}
if you did install apache by yum , then you might see error like bellow :
Solution : mkdir /etc/httpd/conf.d , now run
make install-webconf
So it will install nagios.conf file in /etc/httpd/conf.d directory. Now follow form (a) to (b)
# make install-webconf
/usr/bin/install -c -m 644 sample-config/httpd.conf /etc/httpd/conf/extra//nagios.conf
/usr/bin/install: cannot create regular file `/etc/httpd/conf/extra//nagios.conf': No such file or directory
make: *** [install-webconf] Error 1
出现这个错误,先查看有没有/etc/httpd/conf.d目录;如果有的话;
在/data/src/nagios目录执行:
# cp sample-config/httpd.conf /etc/httpd/conf.d/nagios.conf
经过检查,可以这样解决上述报错:
# pwd
/etc/httpd/conf
#mkdir extra
# ./configure --with-command-group=nagios --with-httpd-conf=/etc/httpd/conf/extra(注意此处,不要多加/)
# make all && make install && make install-init && make install-config && make install-commandmode
# make install-webconf
/usr/bin/install -c -m 644 sample-config/httpd.conf /etc/httpd/conf/extra/nagios.conf
*** Nagios/Apache conf file installed ***
# pwd
/etc/httpd/conf/extra
# ll
total 4
-rw-r--r-- 1 root root 1010 Aug 7 11:27 nagios.conf
# htpasswd -c /usr/local/nagios/etc/htpasswd.users nagiosadmin
New password:
Re-type new password:
Adding password for user nagiosadmin
#设置登陆web界面时HTTP验证的账号密码如果apache是用源码编译安装的话,该指令改为如下所示:
#/usr/local/apache/bin/htpasswd -c /usr/local/nagios/etc/htpasswd.users nagiosadmin
下面修改httpd.conf , 当apache是Yum安装情况下 ,配置文件的路径为如下所示:
vim /etc/httpd/conf/httpd.conf
在空白地方添加一下两行
# nagios default settings
Include conf/extra/nagios.conf
由于上面产生的错误,修改nagios.conf到了/etc/httpd/conf.d/目录
所以
在空白地方添加一下两行
# nagios default settings
Include conf.d/nagios.conf
# service httpd restart
Stopping httpd: [FAILED]
Starting httpd: Syntax error on line 11 of /usr/local/apache2/conf/extra/nagios.conf:
ScriptAlias not allowed here
[FAILED]
# service httpd restart
Stopping httpd: [FAILED]
Starting httpd: Syntax error on line 11 of /usr/local/apache2/conf/extra/nagios.conf:
ScriptAlias not allowed here
[FAILED]
# vi /usr/local/apache2/conf/extra/nagios.conf
# vi /etc/httpd/conf/httpd.conf
莫名其妙的错误,把nagios.conf中的配置内容统统复制粘贴到httpd.conf然后就正常了;
# service httpd restart
Stopping httpd: [ OK ]
Starting httpd: [ OK ]
可以用http://IP/nagios/的方式访问了
####################################################################################
# less /etc/passwd|grep nagios
nagios:x:503:504::/home/nagios:/bin/bash
# less /etc/group|grep nagios
cacti:x:503:nagios
nagios:x:504:cacti,daemon
# ./configure --with-nagios-user=nagios --with-nagios-group=nagios
config.status: creating po/Makefile
--with-apt-get-command:
--with-ping6-command: /bin/ping6 -n -U -w %d -c %d %s
--with-ping-command: /bin/ping -n -U -w %d -c %d %s
--with-ipv6: yes
--with-mysql: /usr/bin/mysql_config
--with-openssl: yes
--with-gnutls: no
--with-perl: /usr/bin/perl
--with-cgiurl: /nagios/cgi-bin
--with-trusted-path: /bin:/sbin:/usr/bin:/usr/sbin
# make && make install
# chkconfig --add nagios
# chkconfig nagios on
# /usr/local/nagios/bin/nagios -v /usr/local/nagios/etc/nagios.cfg
Nagios Core 3.3.1
Copyright (c) 2009-2011 Nagios Core Development Team and Community Contributors
Copyright (c) 1999-2009 Ethan Galstad
Last Modified: 07-25-2011
License: GPL
Website: http://www.nagios.org
Reading configuration data...
Read main config file okay...
Processing object config file '/usr/local/nagios/etc/objects/commands.cfg'...
Processing object config file '/usr/local/nagios/etc/objects/contacts.cfg'...
Processing object config file '/usr/local/nagios/etc/objects/timeperiods.cfg'...
Processing object config file '/usr/local/nagios/etc/objects/templates.cfg'...
Processing object config file '/usr/local/nagios/etc/objects/localhost.cfg'...
Read object config files okay...
Running pre-flight check on configuration data...
Checking services...
Checked 8 services.
Checking hosts...
Checked 1 hosts.
Checking host groups...
Checked 1 host groups.
Checking service groups...
Checked 0 service groups.
Checking contacts...
Checked 1 contacts.
Checking contact groups...
Checked 1 contact groups.
Checking service escalations...
Checked 0 service escalations.
Checking service dependencies...
Checked 0 service dependencies.
Checking host escalations...
Checked 0 host escalations.
Checking host dependencies...
Checked 0 host dependencies.
Checking commands...
Checked 24 commands.
Checking time periods...
Checked 5 time periods.
Checking for circular paths between hosts...
Checking for circular host and service dependencies...
Checking global event handlers...
Checking obsessive compulsive processor commands...
Checking misc settings...
Total Warnings: 0
Total Errors: 0
Things look okay - No serious problems were detected during the pre-flight check
# service nagios start
Starting nagios: done.
# ps aux|grep nagios
nagios 9545 0.0 0.0 14180 1412 ? Ssl 17:30 0:00 /usr/local/nagios/bin/nagios -d /usr/local/nagios/etc/nagios.cfg
root 9553 0.0 0.0 4524 664 pts/9 S+ 17:30 0:00 grep nagios
# getenforce
Disabled
让apache支持CGI动态页面的配置中文文档:
http://man.chinaunix.net/newsoft/ApacheMenual_CN_2.2new/howto/cgi.html
参考资料地址:
http://www.cnblogs.com/taosim/articles/2627920.html
经过上述配置,在浏览器登录nagios后,点击链接都是下载.cgi文件;而不是执行.cgi文件,继续折腾
AddHandler cgi-script .cgi
在配置文件中添加:
AddHandler cgi-script .pl
AddHandler cgi-script .cgi
之后重启apache
如果无法解决试试看重新编译.c文件:
/usr/local/apache/bin/apxs -i -a -c mod_cgi.c
参考地址:http://www.cnblogs.com/taosim/articles/2629886.html
[以下为引用:
在折腾了很长时间后,我初步总结了一下我的经验,如有不对的地方,欢迎大家批评指正:
1、要在linux中执行perl的cgi程序,首先要在cgi文件中正确设置perl的路径,其次cgi文件要正确,再次在http.conf文件中要保证cgi-bin目录的资源设置中有options execcgi这一项,最后cgi-bin目录和cgi文件对于nobody这个用户应当是可读可执行(因为apache就是在nobody下跑的)。
2、一定要保证cgi文件格式是linux文本格式。这一点很重要。我曾经找了一些cgi程序,但在linux中就是无法执行。最后才发现是因为文件格式的原因。感谢Terry Yu告诉我。因为linux下的文本文件比dos下的文本文件每一行要少一个"\r",如果你用vim打开一个文本文件,最下面一行有提示[dos],这个cgi文件肯定无法在linux中运行。解决办法是用这个命令删去"\r":tr -d "\r" < file1>file2。那么为什么会出现这种情况呢?原来我平常都是在windows中进行下载并解压缩,然后拷贝到linux下,那它当然是dos文本格式。如果下载了压缩文件并在linux下解开则没有这个问题。
3、一定要在cgi文件进行输出前先输出这样一行:
Content-type: text/html
也就是说cgi文件中要有这样一行:
print "Content-type: text/html\n";
总结一下,现在所有的linux发行版本都支持perl写的cgi程序,如果你的程序无法运行,一定是在文件权限、apache配置、cgi文件格式这几个方面有错误。要有耐心,仔细检查,最后一定会成功的。
:以上为引用]
请确保Httpd.conf中有:
LoadModule cgi_module /usr/lib/httpd/modules/mod_cgi.so这句话;
请清空浏览器缓存后,重新尝试。
# /usr/sbin/apachectl configtest
Syntax OK
# /usr/local/apache2/bin/apachectl configtest
Syntax OK
# /usr/sbin/apxs -i -a -c /data/src/httpd-2.0.52/modules/generators/mod_cgi.c
# /usr/sbin/httpd -l
Compiled in modules:
core.c
prefork.c
http_core.c
mod_so.c
# /usr/local/apache2/bin/httpd -l
Compiled in modules:
core.c
mod_access.c
mod_auth.c
mod_include.c
mod_log_config.c
mod_env.c
mod_setenvif.c
worker.c
http_core.c
mod_mime.c
mod_status.c
mod_autoindex.c
mod_asis.c
mod_cgid.c
mod_negotiation.c
mod_dir.c
mod_imap.c
mod_actions.c
mod_userdir.c
mod_alias.c
mod_so.c
===============================================================================
以下是监控对象主机和邮件报警配置办法:
# tar -xvzf nrpe-2.13.tar.gz
# cd /data/src/nrpe-2.13
# pwd
/data/src/nrpe-2.13
# ./configure --enable-ssl --enable-command-args
# make all
*** Configuration summary for nrpe 2.13 11-11-2011 ***:
General Options:
-------------------------
NRPE port: 5666
NRPE user: nagios
NRPE group: nagios
Nagios user: nagios
Nagios group: nagios
Review the options above for accuracy. If they look okay,
type 'make all' to compile the NRPE daemon and client.
*** Compile finished ***
If the NRPE daemon and client compiled without any errors, you
can continue with the installation or upgrade process.
Read the PDF documentation (NRPE.pdf) for information on the next
steps you should take to complete the installation or upgrade.
# make install-plugin
cd ./src/ && make install-plugin
make[1]: Entering directory `/data/src/nrpe-2.13/src'
/usr/bin/install -c -m 775 -o nagios -g nagios -d /usr/local/nagios/libexec
/usr/bin/install -c -m 775 -o nagios -g nagios check_nrpe /usr/local/nagios/libexec
make[1]: Leaving directory `/data/src/nrpe-2.13/src'
# make install-daemon
cd ./src/ && make install-daemon
make[1]: Entering directory `/data/src/nrpe-2.13/src'
/usr/bin/install -c -m 775 -o nagios -g nagios -d /usr/local/nagios/bin
/usr/bin/install -c -m 775 -o nagios -g nagios nrpe /usr/local/nagios/bin
make[1]: Leaving directory `/data/src/nrpe-2.13/src'
# make install-daemon-config
/usr/bin/install -c -m 775 -o nagios -g nagios -d /usr/local/nagios/etc
/usr/bin/install -c -m 644 -o nagios -g nagios sample-config/nrpe.cfg /usr/local/nagios/etc
接着在被监控主机上安装nrpe,nagios-plugin;编译步骤同上;configure时报错:
checking for SSL headers... configure: error: Cannot find ssl headers
# yum install openssl openssl-devel
Dependencies Resolved
=============================================================================
Package Arch Version Repository Size
=============================================================================
Installing:
openssl-devel i586 0.9.7a-43.18.el4 update 1.6 M
Updating:
openssl i686 0.9.7a-43.18.el4 update 1.1 M
Installing for dependencies:
e2fsprogs-devel i386 1.35-12.24.el4 base 490 k
krb5-devel i386 1.3.4-65.el4 update 827 k
Updating for dependencies:
krb5-libs i386 1.3.4-65.el4 update 488 k
krb5-workstation i386 1.3.4-65.el4 update 827 k
Transaction Summary
=============================================================================
Install 3 Package(s)
Update 3 Package(s)
Remove 0 Package(s)
Total download size: 5.2 M
Is this ok [y/N]:
记得要添加nagios用户,否则就这样:
# make install-plugin
cd ./src/ && make install-plugin
make[1]: Entering directory `/data/src/nrpe-2.13/src'
/usr/bin/install -c -m 775 -o nagios -g nagios -d /usr/local/nagios/libexec
/usr/bin/install: 无效的用户 ‘nagios’
make[1]: *** [install-plugin] 错误 1
make[1]: Leaving directory `/data/src/nrpe-2.13/src'
make: *** [install-plugin] 错误 2
# useradd nagios
# make install-plugin
cd ./src/ && make install-plugin
make[1]: Entering directory `/data/src/nrpe-2.13/src'
/usr/bin/install -c -m 775 -o nagios -g nagios -d /usr/local/nagios/libexec
/usr/bin/install -c -m 775 -o nagios -g nagios check_nrpe /usr/local/nagios/libexec
make[1]: Leaving directory `/data/src/nrpe-2.13/src'
还要在客户机上安装nagios-plugin:
# cd /data/src/nagios-plugins-1.4.9
# ./configure --prefix=/usr/local/nagios --with-nagios-user=nagios --with-nagios-group=nagios
# make && make install
# cd /usr/local/nagios/
# ll
总用量 32
drwxrwxr-x 2 nagios nagios 4096 8月 15 15:15 bin
drwxrwxr-x 2 nagios nagios 4096 8月 15 15:15 etc
drwxrwxr-x 2 nagios nagios 4096 8月 15 15:19 libexec
drwxr-xr-x 3 root root 4096 8月 15 15:19 share
# cd libexec/
# ll check_*
-rwxr-xr-x 1 nagios nagios 58470 8月 15 15:19 check_apt
-rwxr-xr-x 1 nagios nagios 2274 8月 15 15:19 check_breeze
-rwxr-xr-x 1 nagios nagios 69223 8月 15 15:19 check_by_ssh
lrwxrwxrwx 1 root root 9 8月 15 15:19 check_clamd -> check_tcp
-rwxr-xr-x 1 nagios nagios 42360 8月 15 15:19 check_cluster
-r-sr-xr-x 1 root nagios 69829 8月 15 15:19 check_dhcp
-rwxr-xr-x 1 nagios nagios 65148 8月 15 15:19 check_dig
如果make && make install后报错如下:
make[2]: *** [check_mysql-check_mysql.o] 错误 1
make[2]: Leaving directory `/data/src/nagios-plugins-1.4.9/plugins'
make[1]: *** [all-recursive] 错误 1
make[1]: Leaving directory `/data/src/nagios-plugins-1.4.9'
make: *** [all] 错误 2
请移除刚才的目录后,重新解压重新编译,编译时加参数:
# ./configure --prefix=/usr/local/nagios --with-nagios-user=nagios --with-nagios-group=nagios --with-mysql=/usr/lib/mysql #用whereis mysql 查看mysql的路径填写到此处
............................................................
修改配置文件:
# vi /usr/local/nagios/etc/nrpe.cfg
/allowed_hosts
allowed_hosts=127.0.0.1,192.168.1.XXX
dont_blame_nrpe=1
然后启动:
# /usr/local/nagios/bin/nrpe -c /usr/local/nagios/etc/nrpe.cfg -d
# ps aux|grep nrpe
nagios 5466 0.0 0.0 3716 996 ? Ss 15:05 0:00 /usr/local/nagios/bin/nrpe -c /usr/local/nagios/etc/nrpe.cfg -d
root 5470 0.0 0.0 5848 696 pts/2 S+ 15:06 0:00 grep nrpe
到服务端修改服务端主机上的nagios配置文件:
# vi /usr/local/nagios/etc/nagios.cfg
增加内容:
cfg_dir=/usr/local/nagios/etc/services ##定义一个目录,以后把新增加的主机信息文件全部放到这里
# mkdir /usr/local/nagios/etc/services
# cd /usr/local/nagios/etc/services
# vi 192.168.1.XXX.cfg
define host{
use linux-server
host_name aa.bb.cc.XXX
alias data_xxx
address 192.168.1.XXX
}
define service{
use local-service ; Name of service template to use
host_name aa.bb.cc.XXX
service_description HTTP
check_command check_http
notifications_enabled 1 #报警开关
}
修改完配置文件,要重启服务;修改了服务端的就是重启服务端的nagios服务,修改了客户端的文件后就重启客户端的服务;
配置hostgroup.cfg;servicegroup.cfg:
hostgroup.cfg
define hostgroup{
hostgroup_name data_yizhuang
alias info_info
members XXX.XX.XXX.XX8,XXX.XX.XXX.XX9
}
servicegroup.cfg
define servicegroup{
servicegroup_name http
alias apache
members XXX.XX.XXX.XX8,HTTP,XXX.XX.XXX.XX9,HTTP #注意这一行中HTTP是在上节中定义的service_description
}
然后来配置邮件报警,就发139邮箱吧,139有免费短信提醒功能,这算是移动的功德吧
# vi /usr/local/nagios/etc/objects/contacts.cfg #contacts联系人
define contact{
contact_name nagiosadmin ; Short name of user
use generic-contact ; Inherit default values from generic-contact template (defined above)
alias Nagios Admin ; Full name of user
email 1234567890@139.com ; <<***** CHANGE THIS TO YOUR EMAIL ADDRESS ******
}
# vi /usr/local/nagios/etc/nagios.cfg
807 enable_notifications=1 #全局报警开关
# less /usr/local/nagios/etc/objects/templates.cfg
service_notification_commands notify-service-by-email
host_notification_commands notify-host-by-email
# less /usr/local/nagios/etc/objects/commands.cfg
# 'notify-host-by-email' command definition
define command{
command_name notify-host-by-email
command_line /usr/bin/printf "%b" "***** Nagios *****\n\nNotification Type: $NOTIFICATIONTYPE$\nHost: $HOSTNAME$\nState: $H
OSTSTATE$\nAddress: $HOSTADDRESS$\nInfo: $HOSTOUTPUT$\n\nDate/Time: $LONGDATETIME$\n" | /bin/mail -s "** $NOTIFICATIONTYPE$ Host Alert
: $HOSTNAME$ is $HOSTSTATE$ **" $CONTACTEMAIL$
}
# 'notify-service-by-email' command definition
define command{
command_name notify-service-by-email
command_line /usr/bin/printf "%b" "***** Nagios *****\n\nNotification Type: $NOTIFICATIONTYPE$\n\nService: $SERVICEDESC$\nH
ost: $HOSTALIAS$\nAddress: $HOSTADDRESS$\nState: $SERVICESTATE$\n\nDate/Time: $LONGDATETIME$\n\nAdditional Info:\n\n$SERVICEOUTPUT$\n"
| /bin/mail -s "** $NOTIFICATIONTYPE$ Service Alert: $HOSTALIAS$/$SERVICEDESC$ is $SERVICESTATE$ **" $CONTACTEMAIL$
}
修改下扫描频率:
# vi /usr/local/nagios/etc/nagios.cfg
command_check_interval=-1 # 默认-1尽可能频繁
interval_length=60 # 默认为60秒
修改为:
command_check_interval=1
interval_length=1
# service nagios restart
Running configuration check...done.
Stopping nagios: done.
Starting nagios: done.
修改报警频率:
修改默认阀值:
先把本地的平均负载修改了,短信差点儿轰爆我:
# vi /usr/local/nagios/etc/objects/localhost.cfg
# Define a service to check the load on the local machine.
define service{
use local-service ; Name of service template to use
host_name localhost
service_description Current Load
check_command check_local_load!10.0,9.0,8.0!30.0,15.0,14.0
}
添加一个非管理员账号
====================
在oracle服务所在主机上安装nagios的客户端,也就是nrpe和nagios-plugin:
1.要添加nagios用户,并且把nagios添加到和Oracle用户相同的用户组中;
2.vi .bash_profile,把oracle用户的环境变量配置段复制过来,追加到该文件末尾;source .bash_profile使生效。
3./usr/local/nagios/libexec/check_oracle --tns servename测试是否返回ok
4.vi /usr/local/nagios/etc/nrpe.cfg 添加内容:
command[check_oracle_tns]=/usr/local/nagios/libexec/check_oracle --tns sid
command[check_oracle_db]=/usr/local/nagios/libexec/check_oracle --db sid
command[check_oracle_login]=/usr/local/nagios/libexec/check_oracle --login sid
5. vi /usr/local/nagios/etc/objects/commands.cfg 添加如下内容:
# 'check_nrpe'command definition
define command{
command_name check_nrpe
command_line $USER1$/check_nrpe -H $HOSTADDRESS$ -c $ARG1$
}
# 'check_oracle_tns' command definition
define command{
command_name check_oracle_tns
command_line $USER1$/check_oracle --tns $ARG1$
}
# 'check_oracle_db' command definition
define command{
command_name check_oracle_db
command_line $USER1$/check_oracle --db $ARG1$
}
# 'check_oracle_login' command definition
define command{
command_name check_oracle_login
command_line $USER1$/check_oracle --login $ARG1$
}
6.在# vi /usr/local/nagios/etc/services/192.168.1.XXX.cfg中,
define service{
use local-service ; Name of service template to use
host_name DB_XX.XXX
service_description check_oracle_tns
check_command check_nrpe!check_oracle_tns
notifications_enabled 1
}
define service{
use local-service ; Name of service template to use
host_name DB_XX.XXX
service_description check_oracle_db
check_command check_nrpe!check_oracle_db
notifications_enabled 1
}
define service{
use local-service ; Name of service template to use
host_name DB_XX.XXX
service_description check_oracle_login
check_command check_nrpe!check_oracle_login
notifications_enabled 1
}
7.如果在nagios的web管理页面中出现错误提示:Status Information:Cannot determine ORACLE_HOME for sid servername
请,在oracle所在主机上,用oracle用户启动nrpe:
$ ps aux|grep nrpe
oracle 24481 0.0 0.0 39960 1064 ? Ss 08:48 0:00 /usr/local/nagios/bin/nrpe -c /usr/local/nagios/etc/nrpe.cfg -d
===========================================================================
Yum方式安装nagios
# cd /data/src/
# ll
total 0
# wget http://packages.sw.be/rpmforge-release/rpmforge-release-0.5.2-2.el5.rf.i386.rpm
Connecting to apt.sw.be|193.1.193.67|:80... connected.
HTTP request sent, awaiting response... 200 OK
Length: 12680 (12K) [application/x-redhat-package-manager]
Saving to: `rpmforge-release-0.5.2-2.el5.rf.i386.rpm'
100%[============================================================================================>] 12,680 14.4K/s in 0.9s
2012-08-29 15:35:48 (14.4 KB/s) - `rpmforge-release-0.5.2-2.el5.rf.i386.rpm' saved [12680/12680]
[root@tianwu src]# ll
total 16
-rw-r--r-- 1 root root 12680 Nov 13 2010 rpmforge-release-0.5.2-2.el5.rf.i386.rpm
# rpm -ivh rpmforge-release-0.5.2-2.el5.rf.i386.rpm
Preparing... ########################################### [100%]
1:rpmforge-release ########################################### [100%]
# yum install nagios nagios-nrpe nagios-plugins nagios-plugins-nrpe check_logfiles
Loaded plugins: rhnplugin, security
This system is not registered with RHN.
RHN support will be disabled.
rpmforge | 1.9 kB 00:00
rpmforge/primary_db | 7.1 MB 01:01
Setting up Install Process
Resolving Dependencies
--> Running transaction check
---> Package check_logfiles.i386 0:3.4.2-1.el5.rf set to be updated
---> Package nagios.i386 0:3.2.3-3.el5.rf set to be updated
---> Package nagios-nrpe.i386 0:2.12-1.el5.rf set to be updated
---> Package nagios-plugins.i386 0:1.4.15-2.el5.rf set to be updated
--> Processing Dependency: fping for package: nagios-plugins
--> Processing Dependency: perl(Net::SNMP) for package: nagios-plugins
---> Package nagios-plugins-nrpe.i386 0:2.12-1.el5.rf set to be updated
--> Running transaction check
---> Package fping.i386 0:3.1-1.el5.rf set to be updated
---> Package perl-Net-SNMP.noarch 0:5.2.0-1.2.el5.rf set to be updated
--> Processing Dependency: perl(Socket6) >= 0.19 for package: perl-Net-SNMP
--> Processing Dependency: perl(Digest::HMAC) for package: perl-Net-SNMP
--> Processing Dependency: perl(Crypt::DES) for package: perl-Net-SNMP
--> Processing Dependency: perl(Digest::SHA1) for package: perl-Net-SNMP
--> Running transaction check
---> Package perl-Crypt-DES.i386 0:2.05-3.2.el5.rf set to be updated
---> Package perl-Digest-HMAC.noarch 0:1.01-15 set to be updated
---> Package perl-Digest-SHA1.i386 0:2.11-1.2.1 set to be updated
---> Package perl-Socket6.i386 0:0.19-3.fc6 set to be updated
--> Finished Dependency Resolution
Dependencies Resolved
======================================================================================================================================
Package Arch Version Repository Size
======================================================================================================================================
Installing:
check_logfiles i386 3.4.2-1.el5.rf dag 39 k
nagios i386 3.2.3-3.el5.rf dag 3.7 M
nagios-nrpe i386 2.12-1.el5.rf dag 35 k
nagios-plugins i386 1.4.15-2.el5.rf dag 1.6 M
nagios-plugins-nrpe i386 2.12-1.el5.rf dag 20 k
Installing for dependencies:
fping i386 3.1-1.el5.rf rpmforge 56 k
perl-Crypt-DES i386 2.05-3.2.el5.rf rpmforge 37 k
perl-Digest-HMAC noarch 1.01-15 base 12 k
perl-Digest-SHA1 i386 2.11-1.2.1 base 48 k
perl-Net-SNMP noarch 5.2.0-1.2.el5.rf rpmforge 96 k
perl-Socket6 i386 0.19-3.fc6 base 22 k
Transaction Summary
======================================================================================================================================
Install 11 Package(s)
Update 0 Package(s)
Remove 0 Package(s)
Total download size: 5.7 M
Is this ok [y/N]:
给nagios设置一个登录密码:
htpasswd -c /etc/nagios/htpasswd.users nagiosadmin
然后浏览器里访问:http://ip:port/nagios