目录:
代码实例:
Python GUI编程(Tkinter)
Python 提供了多个图形开发界面的库,几个常用 Python GUI 库如下:
-
Tkinter: Tkinter 模块(Tk 接口)是 Python 的标准 Tk GUI 工具包的接口 .Tk 和 Tkinter 可以在大多数的 Unix 平台下使用,同样可以应用在 Windows 和 Macintosh 系统里。Tk8.0 的后续版本可以实现本地窗口风格,并良好地运行在绝大多数平台中。
-
wxPython:wxPython 是一款开源软件,是 Python 语言的一套优秀的 GUI 图形库,允许 Python 程序员很方便的创建完整的、功能键全的 GUI 用户界面。
-
Jython:Jython 程序可以和 Java 无缝集成。除了一些标准模块,Jython 使用 Java 的模块。Jython 几乎拥有标准的Python 中不依赖于 C 语言的全部模块。比如,Jython 的用户界面将使用 Swing,AWT或者 SWT。Jython 可以被动态或静态地编译成 Java 字节码。
Tkinter 编程
Tkinter 是 Python 的标准 GUI 库。Python 使用 Tkinter 可以快速的创建 GUI 应用程序。
由于 Tkinter 是内置到 python 的安装包中、只要安装好 Python 之后就能 import Tkinter 库、而且 IDLE 也是用 Tkinter 编写而成、对于简单的图形界面 Tkinter 还是能应付自如。
注意:Python3.x 版本使用的库名为 tkinter,即首写字母 T 为小写。
import tkinter
#创建一个GUI程序

#1、导入 Tkinter 模块
#2、创建控件
#3、指定这个控件的 master, 即这个控件属于哪一个
#4、告诉 GM(geometry manager) 有一个控件产生了。
主窗口常用操作:
1 root.title('标题名')#修改框体的名字,也可在创建时使用className参数来命名;
2 root.resizable(0,0)  # 框体大小可调性,分别表示x,y方向的可变性;
3 root.geometry('250x150')#指定主框体大小;
4 root.quit() # 退出;
5 root.update_idletasks()
6 root.update()#刷新页面;
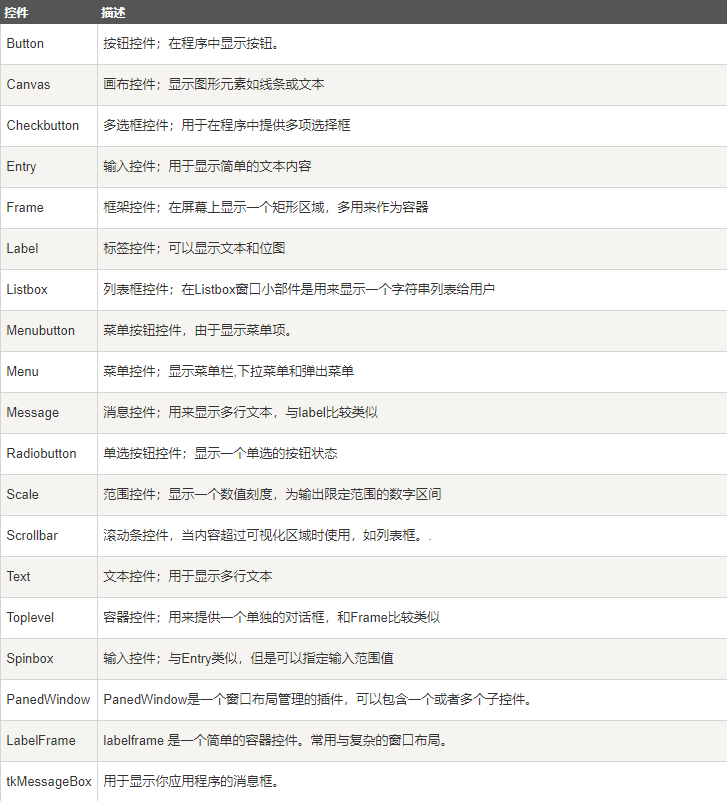
Tkinter 组件
Tkinter的提供各种控件,如按钮,标签和文本框,一个GUI应用程序中使用。这些控件通常被称为控件或者部件。
目前有15种Tkinter的部件。我们提出这些部件以及一个简短的介绍,在下面的表:
(在Tkinter中窗口部件类没有分级;所有的窗口部件类在树中都是兄弟。)
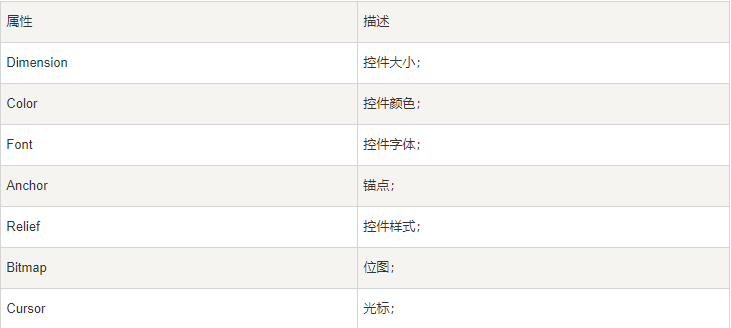
标准属性
标准属性也就是所有控件的共同属性,如大小,字体和颜色等等
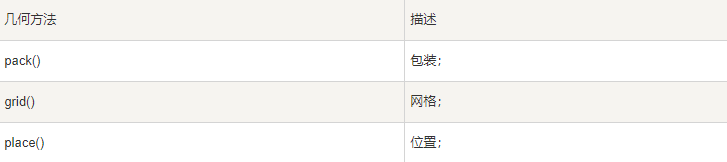
几何管理
Tkinter控件有特定的几何状态管理方法,管理整个控件区域组织,一下是Tkinter公开的几何管理类:包、网格、位置
组件的放置和排版(pack,grid,place) 属性参数


pack组件设置位置属性参数:
    after:        将组件置于其他组件之后;
    before:       将组件置于其他组件之前;
    anchor:        组件的对齐方式,顶对齐'n',底对齐's',左'w',右'e'
    side:        组件在主窗口的位置,可以为'top','bottom','left','right'(使用时tkinter.TOP,tkinter.E);
    fill            填充方式 (Y,垂直,X,水平)
    expand          1可扩展,0不可扩展
grid组件使用行列的方法放置组件的位置,参数有:
    column:         组件所在的列起始位置;
    columnspam:     组件的列宽;
    row:         组件所在的行起始位置;
    rowspam:      组件的行宽;
place组件可以直接使用坐标来放置组件,参数有:
    anchor:       组件对齐方式;    NW N NE E SE S SW W CENTER
    x:            组件左上角的x坐标;
    y:             组件右上角的y坐标;
    relx:          组件相对于窗口的x坐标,应为0-1之间的小数;
    rely:           组件相对于窗口的y坐标,应为0-1之间的小数;
              组件的宽度;
    heitht:        组件的高度;
    rel       组件相对于窗口的宽度,0-1;
    relheight:     组件相对于窗口的高度,0-1;
代码实例:
1、 Label & Button
# -*- coding: utf-8 -*-
# @Time    : 2018/3/31 0:15
# @Author  : TanRong
# @Software: PyCharm
# @File    : lable_button.py

from tkinter import *

root = Tk()  #根窗口
root.title('Lable & Button') #主窗口标题
root.geometry('800x600') #主窗口大小,中间的为英文字母x

var = StringVar() #tk里面特定的字符串形式
lable = Label(root, textvariable=var, bg='green', font=('Arial', 12),
              width=15, height=2)
lable.pack()
# lable.place() 安放到具体位置

on_hit = False
def hit_me():
    global on_hit #必须标出它是global的
    if on_hit == False:
        on_hit = True
        var.set('线性回归')
    else:
        on_hit = False
        var.set('')

button = Button(root, text='执行', width=15, height=2, command=hit_me)
button.pack()

root.mainloop()
    anchor:            指定按钮上文本的位置;
    background(bg)       指定按钮的背景色;
    bitmap:            指定按钮上显示的位图;
    borderwidth(bd)    指定按钮边框的宽度;
    command:          指定按钮消息的回调函数;
    cursor:            指定鼠标移动到按钮上的指针样式;
    font:               指定按钮上文本的字体;
    foreground(fg)     指定按钮的前景色;
    height:            指定按钮的高度;
    image:             指定按钮上显示的图片;
    state:              指定按钮的状态(disabled);
    text:               指定按钮上显示的文本;
                 指定按钮的宽度
    padx               设置文本与按钮边框x的距离,还有pady;
    activeforeground    按下时前景色
    textvariable        可变文本,与StringVar等配合着用
    Anchor            标签中文本的位置;
    background(bg)    背景色;
    foreground(fg)      前景色;
    borderwidth(bd)     边框宽度;
    width             标签宽度;
    height            标签高度;
    bitmap             标签中的位图;
    font               字体;
    image             标签中的图片;
    justify            多行文本的对齐方式;
    text             标签中的文本,可以使用'
'表示换行
    textvariable       显示文本自动更新,与StringVar等配合着用
2、 Entry & Text
# -*- coding: utf-8 -*-
# @Time    : 2018/4/1 0:30
# @Author  : TanRong
# @Software: PyCharm
# @File    : entry_text.py

from tkinter import *

root = Tk();
root.title('Entry & Text')
root.geometry('800x600')

entry = Entry(root, show='*')
entry.pack()
def insert_point():
    var = entry.get()
    text.insert('insert', var)
def insert_end():
    var = entry.get()
    # text.insert('end', var) 插入到末尾
    text.insert('2.2', var) #插入到第二行第三位
b1 = Button(root, text='insert point', width=15, height=2, command=insert_point)
b1.pack()
b2 = Button(root, text='insert end', command=insert_end)
b2.pack()
text = Text(root, height=2)
text.pack()

root.mainloop()
    background(bg)      文本框背景色;
    foreground(fg)        前景色;
    selectbackground    选定文本背景色;
    selectforeground    选定文本前景色;
    borderwidth(bd)      文本框边框宽度;
    font                 字体;
    show                文本框显示的字符,若为*,表示文本框为密码框;
    state               状态;
    width              文本框宽度
    textvariable        可变文本,与StringVar等配合着用
3、Listbox列表
 1 # -*- coding: utf-8 -*-
 2 # @Time    : 2018/4/1 0:45
 3 # @Author  : TanRong
 4 # @Software: PyCharm
 5 # @File    : listbox.py
 6
 7 from tkinter import *
 8
 9 root = Tk();
10 root.title('Listbox')
11 root.geometry('400x300')
12
13 var1 = StringVar()
14 lable = Label(root, bg='yellow', width=4, textvariable=var1)
15 lable.pack()
16
17 def print_selection():
18     value = lb.get(lb.curselection()) #得到光标选定的列表项
19     var1.set(value)
20
21 button = Button(root, text='print selection', width=15, height=2, command=print_selection)
22 button.pack()
23
24 var2 = StringVar()
25 var2.set((11,22,33,55))
26 lb = Listbox(root, listvariable=var2)
27 list_items = [1,2,3,4]
28 for item in list_items:
29     lb.insert('end', item)
30 lb.insert(1, 'first') #索引插入,第2位插入first
31 lb.insert(2, 'second')
32 lb.delete(2)#索引删除
33 lb.pack()
34
35 root.mainloop()
4、Radiobutton单选框
 1 # -*- coding: utf-8 -*-
 2 # @Time    : 2018/4/1 0:59
 3 # @Author  : TanRong
 4 # @Software: PyCharm
 5 # @File    : radiobutton.py
 6
 7 import tkinter as tk
 8
 9 root = tk.Tk()
10 root.title("Radiobutton")
11 root.geometry('400x300')
12
13 var = tk.StringVar()
14 lable = tk.Label(root, text='empty', bg='yellow', width=25 )
15 lable.pack()
16
17 def print_selection():
18     lable.config(text='you have selected ' + var.get()) #lable重新设置text
19 r1 = tk.Radiobutton(root, text='OptionA',
20                     variable=var, value='A',
21                     command=print_selection)
22 r1.pack()
23 r2 = tk.Radiobutton(root, text='OptionB',
24                     variable=var, value='B',
25                     command=print_selection)
26 r2.pack()
27 r3 = tk.Radiobutton(root, text='OptionC',
28                     variable=var, value='C',
29                     command=print_selection)
30 r3.pack()
31
32 root.mainloop()
    anchor           文本位置;
    background(bg)   背景色;
    foreground(fg)    前景色;
    borderwidth       边框宽度;
    width            组件的宽度;
    height           组件高度;
    bitmap           组件中的位图;
    image            组件中的图片;
    font             字体;
    justify          组件中多行文本的对齐方式;
    text             指定组件的文本;
    value            指定组件被选中中关联变量的值;
    variable          指定组件所关联的变量;
    indicatoron        特殊控制参数,当为0时,组件会被绘制成按钮形式;
    textvariable       可变文本显示,与StringVar等配合着用
5、Scale尺度
 1 # -*- coding: utf-8 -*-
 2 # @Time    : 2018/4/1 1:17
 3 # @Author  : TanRong
 4 # @Software: PyCharm
 5 # @File    : scale.py
 6 import tkinter as tk
 7
 8 root = tk.Tk()
 9 root.title("Scale")
10 root.geometry('400x300')
11
12 lable = tk.Label(root, text='empty', bg='yellow', width=25 )
13 lable.pack()
14
15 def print_selection(v):
16     lable.config(text='you have selected '+ v)
17 #5-11是取值范围;HORIZONTAL指水平;length是长度200像素;showvalue为1是将value显示在scale上面;
18 # tickinterval是标签的单位长度,比如隔3个数值显示一个单位;resolution=0.01保留2位小数
19 # Scale中的执行函数是有默认传入值的,就是标签的值
20 scale = tk.Scale(root, label='try me', from_=5, to=11,
21                  orient=tk.HORIZONTAL, length=200,
22                  showvalue=1, tickinterval=3, resolution=0.01,
23                  command=print_selection)
24 scale.pack()
25 root.mainloop()
6、Checkbutton复选框
 1 # -*- coding: utf-8 -*-
 2 # @Time    : 2018/4/1 15:19
 3 # @Author  : TanRong
 4 # @Software: PyCharm
 5 # @File    : checkbutton.py
 6
 7 import tkinter as tk
 8
 9 root = tk.Tk()
10 root.title('Checkbutton')
11 root.geometry('400x300')
12
13 label = tk.Label(root, bg='yellow', width=20, text='Empty')
14 label.pack()
15
16
17 def print_selectioin():
18     var = tk.StringVar()
19     if var1.get() + var2.get() == 2:
20         var = 'I love both'
21     elif var1.get() + var2.get() == 0:
22         var = 'I do not love either'
23     else:
24         if var1.get() == 1:
25             var = 'I love Python'
26         else:
27             var = 'I love C++'
28
29     label.config(text=var)
30
31 var1 = tk.IntVar()
32 var2 = tk.IntVar()
33 c1 = tk.Checkbutton(root, text='Python', variable=var1, onvalue=1, offvalue=0,
34                     command=print_selectioin)
35 c2 = tk.Checkbutton(root, text='C++', variable=var2, onvalue=1, offvalue=0,
36                     command=print_selectioin)
37 c1.pack()
38 c2.pack()
39 root.mainloop()
    anchor           文本位置;
    background(bg)   背景色;
    foreground(fg)    前景色;
    borderwidth       边框宽度;
    width            组件的宽度;
    height           组件高度;
    bitmap           组件中的位图;
    image            组件中的图片;
    font             字体;
    justify          组件中多行文本的对齐方式;
    text             指定组件的文本;
    value            指定组件被选中中关联变量的值;
    variable          指定组件所关联的变量;
    indicatoron        特殊控制参数,当为0时,组件会被绘制成按钮形式;
    textvariable       可变文本显示,与StringVar等配合着用
7、Canvas 画布
 1 # -*- coding: utf-8 -*-
 2 # @Time    : 2018/4/1 16:02
 3 # @Author  : TanRong
 4 # @Software: PyCharm
 5 # @File    : canvas.py
 6
 7 import tkinter as tk
 8
 9 root = tk.Tk()
10 root.title('Canvas')
11 root.geometry('400x300')
12
13
14 canvas = tk.Canvas(root, bg='blue', height=100, width=200)
15 image_file = tk.PhotoImage(file='../images/23.gif')
16 image = canvas.create_image(10, 10, anchor='nw', image=image_file) #是图片锚定的点
17
18 x0,y0,x1,y1 = 50,50,80,80
19 line = canvas.create_line(x0,y0,x1,y1)
20
21 oval = canvas.create_oval(x0,y0,x1,y1,fill='red') #x0,y0,x1,y1是圆的外接正方形
22 arc = canvas.create_arc(x0+30,y0+30,x1+30,y1+30, start=0, extent=160)#0-160角度范围
23 rect = canvas.create_rectangle(100,30,100+20,30+20)
24 canvas.pack()
25
26 def moveit():
27     canvas.move(rect, 1, 2)  #rect是正方形id,1是x方向移动,2是y方向移动
28 button = tk.Button(root, text='move', command=moveit).pack()
29
30 root.mainloop()
background(bg)      背景色;
    foreground(fg)       前景色;
    borderwidth       组件边框宽度;
    width             组件宽度;
    height             高度;
    bitmap             位图;
    image             图片;
绘图的方法主要以下几种:
    create_arc          圆弧;
    create_bitmap      绘制位图,支持XBM;
    create_image       绘制图片,支持GIF(x,y,image,anchor);
    create_line         绘制支线;
    create_oval;        绘制椭圆;
    create_polygon     绘制多边形(坐标依次罗列,不用加括号,还有参数,fill,outline);
    create_rectangle   绘制矩形((a,b,c,d),值为左上角和右下角的坐标);
    create_text         绘制文字(字体参数font,);
    create_window      绘制窗口;
    delete              删除绘制的图形;
    itemconfig          修改图形属性,第一个参数为图形的ID,后边为想修改的参数;
    move               移动图像(1,4,0),1为图像对象,4为横移4像素,0为纵移像素,然后用root.update()刷新即可看到图像的移动,为了使多次移动变得可视,最好加上time.sleep()函数;
    只要用create_方法画了一个图形,就会自动返回一个ID,创建一个图形时将它赋值给一个变量,需要ID时就可以使用这个变量名。
    coords(ID)          返回对象的位置的两个坐标(4个数字元组);

对于按钮组件、菜单组件等可以在创建组件时通过command参数指定其事件处理函数。方法为bind;或者用bind_class方法进行类绑定,bind_all方法将所有组件事件绑定到事件响应函数上。
8、Menubar菜单
 1 # -*- coding: utf-8 -*-
 2 # @Time    : 2018/4/1 16:02
 3 # @Author  : TanRong
 4 # @Software: PyCharm
 5 # @File    : menubar.py
 6 import tkinter as tk
 7
 8 root = tk.Tk()
 9 root.title("Menubar")
10 root.geometry('400x300')
11
12 label = tk.Label(root, text='', bg='yellow')
13 label.pack()
14
15 counter = 0
16 def do_job():
17     global counter
18     label.config(text='do '+ str(counter))   #如果直接将pack()写在label定义的后面,则在这里就会出现label没有config属性的错误
19     counter += 1
20 menubar = tk.Menu(root)
21 filemenu = tk.Menu(menubar, tearoff=0)#tearoff是指不可分割  它的值只有0和1,将tearoff设置为1以后,就是表明这个菜单是可以独立出来的,如果是0的话就不可以独立出来。代码演示一下即可。
22 menubar.add_cascade(label='File', menu=filemenu)
23 filemenu.add_command(label='New', command=do_job)
24 filemenu.add_command(label='Open', command=do_job)
25 filemenu.add_command(label='Save', command=do_job)
26 filemenu.add_separator()
27 filemenu.add_command(label='Exit',command=root.quit)
28
29 editmenu = tk.Menu(menubar, tearoff=0)
30 menubar.add_cascade(label='Edit', menu=editmenu)
31 editmenu.add_command(label='Cut', command=do_job)
32 editmenu.add_command(label='Copy', command=do_job)
33 editmenu.add_command(label='Paste', command=do_job)
34
35 submenu = tk.Menu(filemenu)
36 filemenu.add_cascade(label='Import', menu=submenu, underline=0)
37 submenu.add_command(label='Submenu1', command=do_job)
38
39 root.config(menu = menubar) #将整个menubar添加到窗口
40 root.mainloop()
参数:
    tearoff          分窗,0为在原窗,1为点击分为两个窗口
    bg,fg           背景,前景
    borderwidth      边框宽度
    font              字体
    activebackgound   点击时背景,同样有activeforeground,activeborderwidth,disabledforeground
    cursor
    postcommand
    selectcolor      选中时背景
    takefocus
    title
    type
    relief

方法:
    menu.add_cascade      添加子选项
    menu.add_command      添加命令(label参数为显示内容)
    menu.add_separator    添加分隔线
    menu.add_checkbutton  添加确认按钮
    delete                删除
9、Frame框架
 1 # -*- coding: utf-8 -*-
 2 # @Time    : 2018/4/1 20:11
 3 # @Author  : TanRong
 4 # @Software: PyCharm
 5 # @File    : frame.py
 6 import tkinter as tk
 7
 8 root = tk.Tk()
 9 root.title("Frame")
10 root.geometry('400x300')
11
12 tk.Label(root, text='on the window').pack()
13 frm = tk.Frame(root)
14 frm.pack()
15 frm_l = tk.Frame(frm)
16 frm_r = tk.Frame(frm)
17 frm_l.pack(side='left') #固定到左侧(是针对父级的,不是主窗口)
18 frm_r.pack(side='right')
19
20 tk.Label(frm_l, text='on the frm_11').pack()
21 tk.Label(frm_l, text='on the frm_12').pack()
22 tk.Label(frm_r, text='on the frm_r').pack()
23
24 root.mainloop()
10、messagebox弹窗
 1 # -*- coding: utf-8 -*-
 2 # @Time    : 2018/4/1 20:19
 3 # @Author  : TanRong
 4 # @Software: PyCharm
 5 # @File    : messagebox.py
 6 import tkinter as tk
 7 import tkinter.messagebox # messagebox必须加这行
 8
 9 root = tk.Tk()
10 root.title("messagebox")
11 root.geometry('400x300')
12
13 def hit_me():
14     # tk.messagebox.showinfo(title='Hi', message='hahahha')
15     # tk.messagebox.showwarning(title='Warning', message='nononon')
16     # tk.messagebox.showerror(title='Error', message='fatal! never!!')
17     # print(tk.messagebox.askquestion(title='Hi', message='nononon')) #return 'yes' / 'no'
18     # print(tk.messagebox.askyesno(title='Hi', message='nononon')) # return True / False
19     # print(tk.messagebox.askretrycancel(title='Hi', message='nononon'))  # return True / False
20     print(tk.messagebox.askokcancel(title='Hi', message='nononon'))  # return True / False
21
22 tk.Button(root, text='hit me', command=hit_me).pack()
23
24 root.mainloop()
messagebox._show函数的控制参数:
    default         指定消息框按钮;
    icon            指定消息框图标;
    message        指定消息框所显示的消息;
    parent          指定消息框的父组件;
    title           标题;
    type            类型;

simpledialog模块参数:
    title           指定对话框的标题;
    prompt         显示的文字;
    initialvalue    指定输入框的初始值;

  filedialog    模块参数:
    filetype       指定文件类型;
    initialdir     指定默认目录;
    initialfile    指定默认文件;
    title         指定对话框标题

colorchooser模块参数:
    initialcolor    指定初始化颜色;
    title           指定对话框标题;
11、pack & gird & place几何管理
 1 # -*- coding: utf-8 -*-
 2 # @Time    : 2018/4/2 0:50
 3 # @Author  : TanRong
 4 # @Software: PyCharm
 5 # @File    : pack_grid_place.py
 6 import tkinter as tk
 7
 8 root = tk.Tk()
 9 root.title("pack & grid & place")
10 root.geometry('400x300')
11
12 # tk.Label(root, text=1).pack(side='top')
13 # tk.Label(root, text=2).pack(side='bottom')
14 # tk.Label(root, text=3).pack(side='left')
15 # tk.Label(root, text=4).pack(side='right')
16
17 # for i in range(4):
18 #     for j in range(3):
19 #         tk.Label(root, text=1).grid(row=i, column=j, ipadx=10, ipady=10) #padx和pady是外部的x和y方向的扩展长度,ipadx和ipady是内部的
20
21 tk.Label(root, text=1).place(x=10, y=100, anchor='nw')
22
23 root.mainloop()
12、事件关联
bind(sequence,func,add)——
bind_class(className,sequence,func,add)
bind_all(sequence,func,add)
事件参数:
sequence              所绑定的事件;
func                   所绑定的事件处理函数;
add                    可选参数,为空字符或‘+’;
className             所绑定的类;

鼠标键盘事件
    <Button-1>            鼠标左键按下,2表示中键,3表示右键;
    <ButtonPress-1>        同上;
    <ButtonRelease-1>    鼠标左键释放;
    <B1-Motion>           按住鼠标左键移动;
    <Double-Button-1>     双击左键;
    <Enter>               鼠标指针进入某一组件区域;
    <Leave>               鼠标指针离开某一组件区域;
    <MouseWheel>         滚动滚轮;
    <KeyPress-A>         按下A键,A可用其他键替代;
    <Alt-KeyPress-A>      同时按下alt和A;alt可用ctrl和shift替代;
    <Double-KeyPress-A>    快速按两下A;
    <Lock-KeyPress-A>     大写状态下按A;

窗口事件
    Activate             当组件由不可用转为可用时触发;
    Configure            当组件大小改变时触发;
    Deactivate          当组件由可用转变为不可用时触发;
    Destroy              当组件被销毁时触发;
    Expose              当组件从被遮挡状态中暴露出来时触发;
    Unmap              当组件由显示状态变为隐藏状态时触发;
    Map                  当组件由隐藏状态变为显示状态时触发;
    FocusIn              当组件获得焦点时触发;
    FocusOut            当组件失去焦点时触发;
    Property             当窗体的属性被删除或改变时触发;
    Visibility           当组件变为可视状态时触发;

响应事件
event对象(def function(event)):
    char                按键字符,仅对键盘事件有效;
    keycode            按键名,仅对键盘事件有效;
    keysym             按键编码,仅对键盘事件有效;
    num                鼠标按键,仅对鼠标事件有效;
    type                 所触发的事件类型;
    widget               引起事件的组件;
    width,heigh        组件改变后的大小,仅Configure有效;
    x,y                鼠标当前位置,相对于窗口;
    x_root,y_root       鼠标当前位置,相对于整个屏幕
13、字体
一般格式:
('Times -10 bold')
('Times',10,'bold','italic')    依次表示字体、字号、加粗、倾斜


补充:
config            重新配置
label.config(font='Arial -%d bold' % scale.get())
依次为字体,大小(大小可为字号大小),加粗
tkinter.StringVar    能自动刷新的字符串变量,可用set和get方法进行传值和取值,类似的还有IntVar,DoubleVar...
14、下拉列表Comobobox
import tkinter as tk
from tkinter import ttk   #必须加这个


def select_algorithm(*args):
    global  algo_selected
    algo_selected = algorithm_combobox.get()
    print(algo_selected)


algo_name = tk.StringVar()
algorithm_combobox = ttk.Combobox(tools_frm, textvariable=algo_name, width=12)
algorithm_combobox['value'] = ('选择算法', 'Classification', 'Clustering', 'Regression', 'Projections', 'Dynamical', 'Optimization') #'Reinforcenment Learning'
algorithm_combobox['state'] = 'readonly'
algorithm_combobox.current(0)
algorithm_combobox.bind("<<ComboboxSelected>>", select_algorithm)  #添加选择事件
algorithm_combobox.grid(row=1, column=4)
15、文件选择框filedialog
import tkinter as tk
import tkinter.filedialog   #必须加

filename = tk.filedialog.askopenfilename(title='选择训练数据', filetypes=[('csv','*.csv')])
    # print(filename)
    if len(filename) != 0:
        data = np.loadtxt(filename, delimiter=',')  # 训练数据
代码实战 - 登录窗口
  1 # -*- coding: utf-8 -*-
  2 # @Time    : 2018/4/2 1:00
  3 # @Author  : TanRong
  4 # @Software: PyCharm
  5 # @File    : login.py
  6 import tkinter as tk
  7 import pickle
  8 import tkinter.messagebox
  9
 10 root = tk.Tk()
 11 root.title('Welcome to Login')
 12 root.geometry('450x300')
 13
 14 # welcome image
 15 canvas = tk.Canvas(root, height=200, width=500)
 16 image_file = tk.PhotoImage(file='../images/welcome.gif')
 17 image = canvas.create_image(0,0, anchor='nw', image=image_file)
 18 canvas.pack(side='top')
 19
 20 #输入框
 21 tk.Label(root, text='User name:').place(x=50, y=150)
 22 tk.Label(root, text='Password:').place(x=50, y=190)
 23
 24 var_usr_name = tk.StringVar()
 25 var_usr_pwd = tk.StringVar()
 26 var_usr_name.set('loginPython@163.com')
 27
 28 entry_usr_name = tk.Entry(root, textvariable=var_usr_name)
 29 entry_usr_name.place(x=160, y=150)
 30 entry_usr_pwd = tk.Entry(root, textvariable=var_usr_pwd, show='*')
 31 entry_usr_pwd.place(x=160, y=190)
 32
 33 def usr_login():
 34     usr_name = var_usr_name.get()
 35     usr_pwd = var_usr_pwd.get()
 36     try:
 37         with open('usrs_info.pickle', 'rb') as usr_file:
 38             usrs_info = pickle.load(usr_file)
 39     except FileNotFoundError:
 40         with open('usrs_info.pickle', 'wb') as usr_file:
 41             usrs_info = {'admin':'admin'} #设置管理员信息
 42             pickle.dump(usrs_info, usr_file)
 43
 44     if usr_name in usrs_info:
 45         if usr_pwd == usrs_info[usr_name]:
 46             tk.messagebox.showinfo(title='Welcome', message='How are you? '+ usr_name)
 47         else:
 48             tk.messagebox.showerror(title='Error', message='Error your password is wrong, try agein.')
 49     else:
 50         is_sign_up = tk.messagebox.askyesno(title='Welcome',
 51                                             message='You have not sign up. Sign up today?')
 52         if is_sign_up:
 53             usr_sign_up()
 54 def usr_sign_up():
 55     def sign_to_python():
 56         nname = new_name.get()
 57         npwd = new_pwd.get()
 58         npwd_confirm = new_pwd_confirm.get()
 59         with open('usrs_info.pickle', 'rb') as usr_file:
 60             exist_usr_info = pickle.load(usr_file)
 61         if npwd != npwd_confirm:
 62             tk.messagebox.showerror(title='Error', message='Password and Confirm Password must be same!')
 63         elif nname in exist_usr_info:
 64             tk.messagebox.showerror(title='Error', message='The user has already signed up!')
 65         else:
 66             exist_usr_info[nname] = npwd
 67             with open('usrs_info.pickle', 'wb') as usr_file:
 68                 pickle.dump(exist_usr_info, usr_file)
 69             tk.messagebox.showinfo(title='Welcome', message='You have successfully signed up!')
 70             # global var_usr_name  无效
 71             # global var_usr_pwd
 72             # var_usr_name = nname
 73             # var_usr_pwd  = ''
 74             window_sign_up.destroy()
 75
 76     window_sign_up = tk.Toplevel(root)
 77     window_sign_up.geometry('350x200')
 78     window_sign_up.title('Sign up window')
 79
 80     new_name = tk.StringVar()
 81     new_name.set('loginPython@163.com')
 82     tk.Label(window_sign_up, text='User name:').place(x=10, y=10)
 83     entry_new_name = tk.Entry(window_sign_up, textvariable=new_name)
 84     entry_new_name.place(x=150, y=10)
 85
 86     new_pwd = tk.StringVar()
 87     tk.Label(window_sign_up, text='Password:').place(x=10, y=50)
 88     entry_new_pwd = tk.Entry(window_sign_up, textvariable=new_pwd)
 89     entry_new_pwd.place(x=150, y=50)
 90
 91     new_pwd_confirm = tk.StringVar()
 92     tk.Label(window_sign_up, text='Confirm Password:').place(x=10, y=90)
 93     entry_usr_pwd_confirm = tk.Entry(window_sign_up, textvariable=new_pwd_confirm)
 94     entry_usr_pwd_confirm.place(x=150, y=90)
 95
 96     btn_confirm_sign_up = tk.Button(window_sign_up, text='Sign up', command=sign_to_python)
 97     btn_confirm_sign_up.place(x=150, y=130)
 98 btn_login = tk.Button(root, text='Login', command=usr_login)
 99 btn_login.place(x=170, y=230)
100 btn_sign_up = tk.Button(root, text='Sign up', command=usr_sign_up)
101 btn_sign_up.place(x=270, y=230)
102
103 root.mainloop()
#filename:Caculater

import tkinter,time,decimal,math,string

root=tkinter.Tk()
root.title('计算器')
root.resizable(0,0)
global cuncu, vartext, result, fuhao
result = fuhao = None
vartext = tkinter.StringVar()
cuncu = []

class anjianzhi:
    global cuncu, vartext, result, fuhao
    def __init__(self,anjian):
        self.anjian = anjian
    def jia(self):
        cuncu.append(self.anjian)
        vartext.set( ''.join(cuncu))
    def tui(self):
        cuncu.pop()
        vartext.set(''.join(cuncu))
    def clear(self):
        cuncu.clear()
        vartext.set('')
        result = None
        fuhao = None
    def zhengfu(self):
        if cuncu[0]:
            if cuncu[0] == '-':
                cuncu[0] = '+'
            elif cuncu[0] == '+':
                cuncu[0] = '-'
            else:
                cuncu.insert(0, '-')
        vartext.set(''.join(cuncu))
    def xiaoshudian(self):
        if cuncu.count('.') >= 1:
            pass
        else:
            if cuncu == [] :
                cuncu.append('0')
            cuncu.append('.')
            vartext.set(''.join(cuncu))
    def yunshuan(self):
        global cuncu, vartext, result, fuhao
        if vartext.get() == '':
            pass
        else:
            get1 = decimal.Decimal(vartext.get())
            if self.anjian in ('1/x','sqrt'):
                if self.anjian == '1/x':
                    result = 1/get1
                elif self.anjian == 'sqrt':
                    result = math.sqrt(get1)
            elif  self.anjian in ('+','-','*','/','='):
                if fuhao is not None:
                    get1 = decimal.Decimal(result)
                    get2 = decimal.Decimal(vartext.get())
                    if fuhao == '+':
                        result = get1 + get2
                    elif fuhao == '-':
                        result = get1 - get2
                    elif fuhao == '*':
                        result = get1 * get2
                    elif fuhao == '/':
                        result = get1 / get2
                else:
                    result = get1
                if self.anjian == '=':
                    fuhao = None
                else:
                    fuhao = self.anjian
            print(fuhao)
            print(result)
            vartext.set(str(result))
            cuncu.clear()

def copy1():
    # tkinter.Misc().clipboard_clear()
    tkinter.Misc().clipboard_append(string(vartext.get()))

def buju(root):
    global cuncu, vartext, result, fuhao
    entry1 = tkinter.Label(root, width=30, height=2, bg='white', anchor='se', textvariable=vartext)
    entry1.grid(row=0, columnspan=5)
    buttonMC=tkinter.Button(root,text='MC',width=5)
    buttonMR=tkinter.Button(root,text='MR',width=5)
    buttonMS=tkinter.Button(root,text='MS',width=5)
    buttonM1=tkinter.Button(root,text='M+',width=5)
    buttonM2=tkinter.Button(root,text='M-',width=5)
    buttonMC.grid(row=1,column=0)
    buttonMR.grid(row=1,column=1)
    buttonMS.grid(row=1,column=2)
    buttonM1.grid(row=1,column=3)
    buttonM2.grid(row=1,column=4)


    buttonJ=tkinter.Button(root,text='←',width=5,command=anjianzhi('c').tui)
    buttonCE=tkinter.Button(root,text='CE',width=5)
    buttonC=tkinter.Button(root,text=' C ',width=5,command=anjianzhi('c').clear)
    button12=tkinter.Button(root,text='±',width=5,command=anjianzhi('c').zhengfu)
    buttonD=tkinter.Button(root,text='√',width=5,command=anjianzhi('sqrt').yunshuan)
    buttonJ.grid(row=2,column=0)
    buttonCE.grid(row=2,column=1)
    buttonC.grid(row=2,column=2)
    button12.grid(row=2,column=3)
    buttonD.grid(row=2,column=4)

    button7=tkinter.Button(root,text=' 7 ',width=5,command=anjianzhi('7').jia)
    button8=tkinter.Button(root,text=' 8 ',width=5,command=anjianzhi('8').jia)
    button9=tkinter.Button(root,text=' 9 ',width=5,command=anjianzhi('9').jia)
    buttonc=tkinter.Button(root, text=' / ',width=5,command=anjianzhi('/').yunshuan)
    buttonf= tkinter.Button(root, text=' % ',width=5)
    button7.grid(row=3,column=0)
    button8.grid(row=3,column=1)
    button9.grid(row=3,column=2)
    buttonc.grid(row=3,column=3)
    buttonf.grid(row=3,column=4)

    button4=tkinter.Button(root,text=' 4 ',width=5,command=anjianzhi('4').jia)
    button5=tkinter.Button(root,text=' 5 ',width=5,command=anjianzhi('5').jia)
    button6=tkinter.Button(root,text=' 6 ',width=5,command=anjianzhi('6').jia)
    buttonx=tkinter.Button(root,text=' * ',width=5,command=anjianzhi('*').yunshuan)
    buttonfs=tkinter.Button(root,text='1/x',width=5,command=anjianzhi('1/x').yunshuan)
    button4.grid(row=4,column=0)
    button5.grid(row=4,column=1)
    button6.grid(row=4,column=2)
    buttonx.grid(row=4,column=3)
    buttonfs.grid(row=4,column=4)

    button1 = tkinter.Button(root, text=' 1 ',width=5,command=anjianzhi('1').jia)
    button2 = tkinter.Button(root, text=' 2 ',width=5,command=anjianzhi('2').jia)
    button3 = tkinter.Button(root, text=' 3 ',width=5,command=anjianzhi('3').jia)
    button_= tkinter.Button(root, text=' - ',width=5,command=anjianzhi('-').yunshuan)
    buttondy= tkinter.Button(root, text='
 =
 ',width=5,command=anjianzhi('=').yunshuan)
    button1.grid(row=5, column=0)
    button2.grid(row=5, column=1)
    button3.grid(row=5, column=2)
    button_.grid(row=5, column=3)
    buttondy.grid(row=5, column=4,rowspan=2)

    button0=tkinter.Button(root,text='   0   ',width=11,command=anjianzhi('0').jia)
    buttonjh = tkinter.Button(root,text=' . ',width=5,command=anjianzhi('c').xiaoshudian)
    buttonjia=tkinter.Button(root,text=' + ',width=5,command=anjianzhi('+').yunshuan)
    button0.grid(row=6,column=0,columnspan=2)
    buttonjh.grid(row=6,column=2)
    buttonjia.grid(row=6,column=3)
def caidan(root):

    menu=tkinter.Menu(root)
    submenu1=tkinter.Menu(menu,tearoff=0)
    menu.add_cascade(label='查看',menu=submenu1)
    submenu2 = tkinter.Menu(menu, tearoff=0)
    submenu2.add_command(label='复制')
    submenu2.add_command(label='粘贴')
    menu.add_cascade(label='编辑',menu=submenu2)
    submenu = tkinter.Menu(menu, tearoff=0)
    submenu.add_command(label='查看帮助')
    submenu.add_separator()
    submenu.add_command(label='关于计算机')
    menu.add_cascade(label='帮助',menu=submenu)
    root.config(menu=menu)


buju(root)
caidan(root)
root.mainloop()

计算器
tkinter中的颜色:
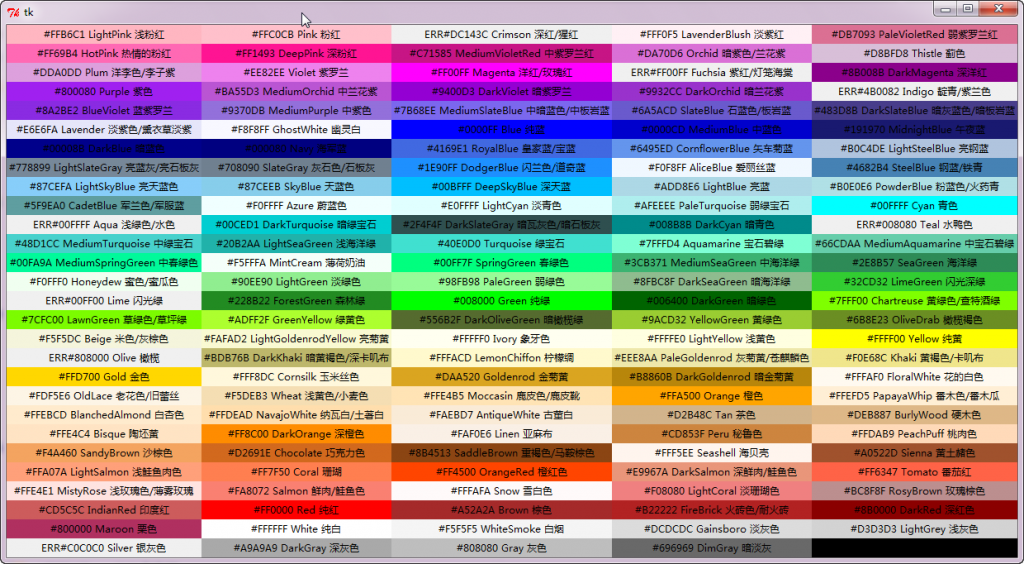
参考链接: tkinter模块常用参数(python3):http://www.cnblogs.com/aland-1415/p/6849193.html