微软示例
1.(对新数据库使用 Code First):http://msdn.microsoft.com/zh-cn/data/jj193542
2.(连接和模型):http://msdn.microsoft.com/zh-cn/data/jj592674.aspx
1.安装EF 5.0
打开“程序包管理器控制台”,(“视图”-》“其他窗口”-》“程序包管理器控制台”)
MVC4只能安装 EF 5.0
Install-Package EntityFramework -Version 5.0.0
Uninstall-Package
删除一个包,使用Uninstall-Package命令包的名称。例如,使用Uninstall-Package elmah命令下面的例子所示:
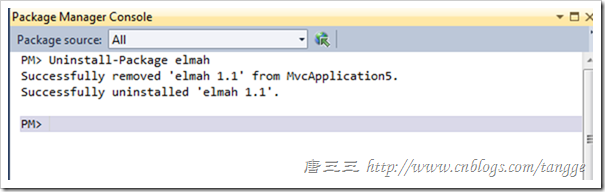
下列是安装了6.1.1,结果MVC4只支持5.0.0
PM> Uninstall-Package EntityFramework
正在从 05MVCAjax_CodeFirst 删除“EntityFramework 6.1.1”。
已成功将“EntityFramework 6.1.1”从 05MVCAjax_CodeFirst 中删除。
正在卸载“EntityFramework 6.1.1”。
已成功卸载“EntityFramework 6.1.1”。

PM> Install-Package EntityFramework -Version 5.0.0
正在安装“EntityFramework 5.0.0”。
您正在从 Microsoft 下载 EntityFramework,有关此程序包的许可协议在 http://go.microsoft.com/fwlink/?LinkId=253898&clcid=0x409 上提供。请检查此程序包是否有其他依赖项,这些依赖项可能带有各自的许可协议。您若使用程序包及依赖项,即构成您接受其许可协议。如果您不接受这些许可协议,请从您的设备中删除相关组件。
已成功安装“EntityFramework 5.0.0”。
正在将“EntityFramework 5.0.0”添加到 05MVCAjax_CodeFirst。
已成功将“EntityFramework 5.0.0”添加到 05MVCAjax_CodeFirst。
2.创建模型
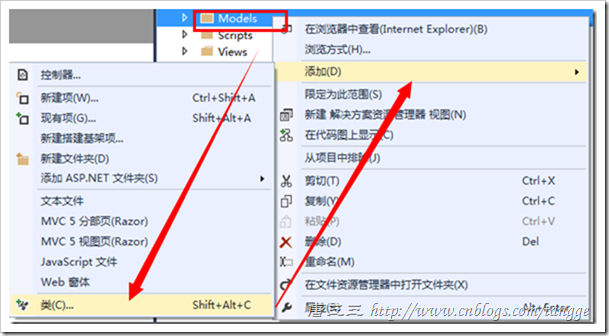
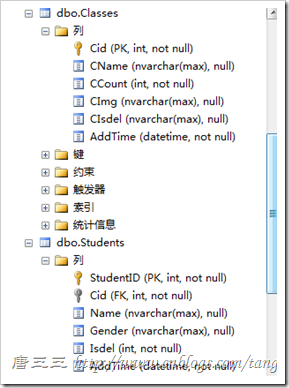
Classe.cs
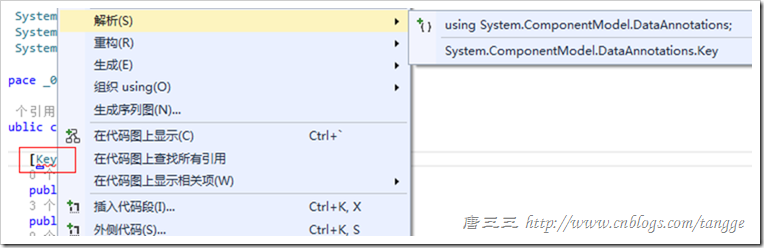
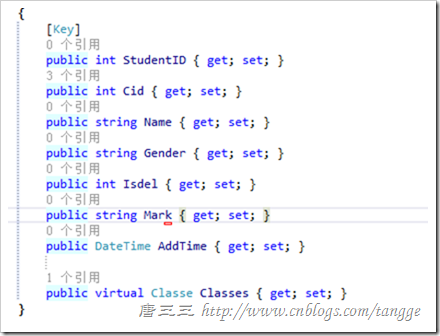
Classe.cs

using System;
using System.Collections.Generic;
using System.ComponentModel.DataAnnotations;
using System.Data.Entity;
using System.Linq;
using System.Web;

namespace _05MVCAjax_CodeFirst.Models
{
    public class Student
    {
        [Key]
        public int StudentID { get; set; }
        public int Cid { get; set; }
        public string Name { get; set; }
        public string Gender { get; set; }
        public int Isdel { get; set; }
        public DateTime AddTime { get; set; }

        public virtual Classe Classes { get; set; }
    }
}
2.1.StudentID 如果写成 StudentId 这样写能与外键列名保持一致,感觉这样好点。(这里我只能加[Key])
2.2.类名用的是Classe,而不是Classes。实体一般用单数,在生成数据表是,会自动添加成复数表名 Classes
Student.cs
Student.cs

using System;
using System.Collections.Generic;
using System.ComponentModel.DataAnnotations;
using System.Data.Entity;
using System.Linq;
using System.Web;

namespace _05MVCAjax_CodeFirst.Models
{
    public class Student
    {
        [Key]
        public int StudentID { get; set; }
        public int Cid { get; set; }
        public string Name { get; set; }
        public string Gender { get; set; }
        public int Isdel { get; set; }
        public DateTime AddTime { get; set; }

        public virtual Classe Classes { get; set; }
    }
}
2.3.virtual 用于延迟加载,也就是你在使用 Student 实体对象时,如果不使用相关联的 Classe 表中的数据,系统就不加载,你使用的时候,才到数据库查询相应的 Classe 数据。
3.创建上下文
现在,可以定义派生上下文,用于表示数据库的一个会话,以便我们查询和保存数据。我们定义一个派生自 System.Data.Entity.DbContext 的上下文,并为模型中的每个类公开一个类型化 DbSet<TEntity>。
AppContext.cs
AppContext.cs

using System;
using System.Collections.Generic;
using System.Data.Entity;   //DbContext
using System.Linq;
using System.Web;

namespace _05MVCAjax_CodeFirst.Models
{
    public class AppContext : DbContext
    {
        public AppContext()
            : base("name=AppContext") { }
        public DbSet<Classe> Classes { get; set; }
        public DbSet<Student> Students { get; set; }
    }
}

4.处理模型更改
现在更改模型,当我们进行更改时,还需要更新数据库架构。为此,我们使用一个称为“Code First 迁移”(或简称“迁移”)的功能。
“迁移”是一组有序的步骤,描述如何升级(和降级)数据库架构。这些步骤(称为“迁移”)中的每个步骤均包含一些代码,用于描述要应用的更改。
第一步是为 AppContext 启用 Code First 迁移。
- “工具”->“库程序包管理器”->“程序包管理器控制台”
- 在程序包管理器控制台中运行 Enable-Migrations 命令
一个新的 Migrations 文件夹已添加至项目中,它包含两个文件:
- Configuration.cs — 此文件包含“迁移”将用来迁移 BloggingContext 的设置。在本演练中不需要进行任何更改,但是,在此处可以指定种子数据、为其他数据库注册提供程序、更改生成迁移的命名空间等。
- <时间戳>_InitialCreate.cs — 这是第一个迁移,它表示已经应用于数据库的更改。应用更改的目的是将其从空数据库迁移至包含博客和文章表的数据库(这句话说的microsoft里面的示例)。尽管我们让 Code First 自动创建这些表,现在我们选择“迁移”(已转化为一次“迁移”)。Code First 还在本地数据库中记录:该“迁移”已经应用。文件名中的时间戳用于排序。

现在,更改模型,向 Student 类添加一个 Mark 属性:
在程序包管理器控制台中运行 Add-Migration AddUrl 命令。
Add-Migration 命令检查自上次迁移后是否有更改,并使用所有更改搭建新迁移。我们可以为迁移指定名称;在本例中,将此迁移称为“AddUrl”。
搭建的代码表明:我们需要向 dbo.Blogs 表添加可容纳字符串数据的 Url 列。如果需要,可以对搭建的代码进行编辑,但是,在本例中,没有这个必要。
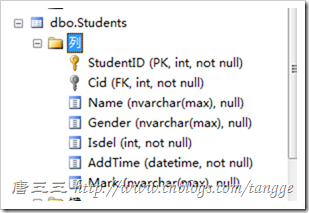
Migrations/201407100246388_AddUrl.cs
Migrations/201407100246388_AddUrl.cs

namespace _05MVCAjax_CodeFirst.Migrations
{
    using System;
    using System.Data.Entity.Migrations;

    public partial class AddUrl : DbMigration
    {
        public override void Up()
        {
            AddColumn("dbo.Students", "Mark", c => c.String());
        }

        public override void Down()
        {
            DropColumn("dbo.Students", "Mark");
        }
    }
}
在程序包管理器控制台中运行 Update-Database 命令。此命令将所有挂起的迁移应用于数据库。InitialCreate 迁移已经应用,因此,这些迁移将仅应用新的 AddUrl 迁移。
提示:在调用 Update-Database 命令查看对数据库执行的 SQL 时,可以使用 –Verbose 开关。
5.数据注释
到目前为止,EF 发现了使用其默认约定的模型。但是,有时类不遵从约定,我们需要能够执行进一步配置。对此有两种方法;本节将介绍数据注释,下一节将介绍 Fluent API。
向模型添加用户类
public class User
    {
        public string Username { get; set; }
        public string DisplayName { get; set; }
    }
我们还需要向派生上下文添加一个集
public class BloggingContext : DbContext
    {
        public DbSet<Blog> Blogs { get; set; }
        public DbSet<Post> Posts { get; set; }
        public DbSet<User> Users { get; set; }
    }
如果尝试添加迁移,会收到错误消息“EntityType‘User’未定义键。请为该 EntityType 定义键。”这是因为 EF 无法知道 Username 应为用户的主键。
我们将使用数据注释,因此需要在 Program.cs 的顶部添加一个 using 语句
using System.ComponentModel.DataAnnotations;
现在,注释 Username 属性,将它标识为主键
public class User
    {
        [Key]
        public string Username { get; set; }
        public string DisplayName { get; set; }
    }
使用 Add-Migration AddUser 命令搭建一个迁移,将这些更改应用于数据库
运行 Update-Database 命令,将新迁移应用于数据库
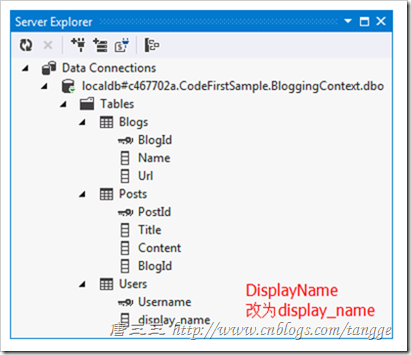
现在,新表已添加至数据库:
.png)
EF 支持的完整注释列表为:
- KeyAttribute
- StringLengthAttribute
- MaxLengthAttribute
- ConcurrencyCheckAttribute
- RequiredAttribute
- TimestampAttribute
- ComplexTypeAttribute
- ColumnAttribute
- TableAttribute
- InversePropertyAttribute
- ForeignKeyAttribute
- DatabaseGeneratedAttribute
- NotMappedAttribute
6.Fluent API(模型配置方法)
上一节介绍了如何使用数据注释来补充或重写按约定检测的内容。另一种模型配置方法是通过 Code First Fluent API。
大多数模型配置都可使用简单数据注释进行。Fluent API 是一种更高级的方法,除某些数据注释不可能支持的更高级配置外,可以指定包含数据注释所有功能的模型配置。数据注释和 Fluent API 可一起使用。
要访问 Fluent API,需要在 DbContext 中重写 OnModelCreating 方法。假设我们需要重命名 User.DisplayName 存储至 display_name 的列。
- 使用以下代码重写 BloggingContext 的 OnModelCreating 方法
public class BloggingContext : DbContext
        { public DbSet<Blog> Blogs { get; set; }
            public DbSet<Post> Posts { get; set; }
            public DbSet<User> Users { get; set; }
            protected override void OnModelCreating(DbModelBuilder modelBuilder)
            {
                modelBuilder.Entity<User>()
                    .Property(u => u.DisplayName)
                    .HasColumnName("display_name");
            }
        }
- 使用 Add-Migration ChangeDisplayName 命令搭建迁移,将这些更改应用于数据库。
- 运行 Update-Database 命令,将新迁移应用于数据库。
DisplayName 列现在重命名为 display_name:
7、修改表结构Update-Database(自动迁移容易导致数据丢失)
1、设置好数据库连接字串
在项目中,找到 app.config(没有则在项目根目录手动新增,这里的设置只对本项目有效,不会影响到 Web 项目中的设置)。配置 <connectionStrings> 节点,新增
<connectionStrings>
    <add name="AppContext" connectionString="Data Source=.;Initial Catalog=Test;User ID=sa;Password=sa123" providerName="System.Data.SqlClient" />
  </connectionStrings>
,Mvc4DAL 用的是名称 AppContext的连接字串
public class AppContext : DbContext
    {
        public AppContext()
            : base("name=AppContext") { }
若没有设置好连接字串,或是字串设置有误,将出现如下提示:
Anerror occurred while getting provider information from the database. This canbe caused by Entity Framework using an incorrect connection string. Check theinner exceptions for details and ensure that the connection string is correct.
2、运行命令Enable-Migrations
出现如下提示时,你需要执行 Enable-Migrations:
Nomigrations configuration type was found in the assembly 'Mvc4DAL'. (In VisualStudio you can use the Enable-Migrations command from Package Manager Consoleto add a migrations configuration).
打开“程序包管理器控制台”,运行命令 Enable-Migrations ,Mvc4DAL项目中将出现Migrations文件夹与相应的文件 Configuration.cs

执行 Enable-Migrations 时可能会因为错误而打断,此时需要再次运行加参数的命令Enable-Migrations -Force:
Migrationshave already been enabled in project 'Mvc4DAL'. To overwrite the existingmigrations configuration, use the -Force parameter.
注意“Enable-Migrations”中间没有空格,“-Force”前面必须要有空格。
3、设置 AutomaticMigrationsEnabled为 true (自动迁移容易导致数据丢失,最好还是用Add-Migration)
打开Migrations文件夹中的 Configuration.cs,AutomaticMigrationsEnabled默认为 false 改为 true就哦了,否则将出现提示:
Unable to update database to match the current model because there arepending changes and automatic migration is disabled. Either write the pendingmodel changes to a code-based migration or enable automatic migration. SetDbMigrationsConfiguration.AutomaticMigrationsEnabled to true to enableautomatic migration. You can use the Add-Migration command to write the pendingmodel changes to a code-based migration.
四、最后执行 Update-Database
上述步骤都设置好了,打开“程序包管理器控制台”,运行命令 Update-Database,没有出错就大功成。这里要注意的是,数据库中有个名称为dbo.__MigrationHistory 的Table很重要,记录的是从创建数据库开始的全部更新的记录,所以在你没有绝对把握的情况下千万别动它。
8.问题解决:
1.安装了6.1.1后,报错。
---------------------------
Microsoft Visual Studio
---------------------------
无法检索“_05MVCAjax_CodeFirst.Models.Student”的元数据。无法识别的元素“providers”。 (C:UsersTANGGEAppDataLocalTemp- mp5C01.tmp line 52)
---------------------------
确定
---------------------------
注释掉Web.Config里面的<providers>
  </system.webServer>
  <entityFramework>
    <defaultConnectionFactory type="System.Data.Entity.Infrastructure.LocalDbConnectionFactory, EntityFramework">
      <parameters>
        <parameter value="v11.0" />
      </parameters>
    </defaultConnectionFactory>
    <!--<providers>
      <provider invariantName="System.Data.SqlClient" type="System.Data.Entity.SqlServer.SqlProviderServices, EntityFramework.SqlServer" />
    </providers>-->
  </entityFramework>
</configuration>
2.缺少主键。
无法检索“_05MVCAjax_CodeFirst.Models.Student”的元数据。
One or more validation errors were detected during model generation:
- System.Data.Entity.Edm.EdmEntityType: : EntityType 'Classe' has no key defined. Define the key for this EntityType.
- System.Data.Entity.Edm.EdmEntitySet: EntityType: EntitySet 'Classes' is based on type 'Classe' that has no keys defined.
Type 'get-help EntityFramework' to see all available Entity Framework commands.
3.版本问题。

解决方案:
卸载6.1.1,重装5.0.0,(如果已经完成可不操作),重启vs。
Code First 从数据库自动生成工具EF Power Tools 4
EF Power Tools学习资料