1、Quartz 2D是一个二维绘图引擎,同时支持ios和Mac系统; Quart2D的API是纯C语言的,API来自于Core Graphics框架:
2、Quartz 2D可以绘制图形(线段/三角形/矩形/圆和弧)、绘制文字、绘制和生成图片、读取/生成pdf、截图/裁剪图片、自定义UI控件等
3、对于界面复杂且个性化的UI,普通的UI控件无法实现,而Quartz2D技术却可以通过自定义UI控件来实现。其实,ios中大部分控件的内容都是通过Quart2D画出来的
4、图形上下文(GraphicsContext): 是一个CGContextRef类型的数据
图形上下文的作用:1)保存绘制信息、绘图状态;
2)决定绘制的输出目标(绘制到什么地方去:可以是pdf文件、图片或显示器的窗口上)
相同的一套绘图序列,指定不同的GraphicsContext, 就可将相同的图像绘制到不同的目标上,
Quartz2D提供了以下几种类型的Graphics Context :
1)Bitmap Graphics Context
2)PDF Graphics Context
3)Window Graphics Context
4)Layer Graphics Context
5)Printer Graphics Context
5、自定义控件
如何利用Quartz2D自定义UI控件,然后绘制东西到View上?
-->需要图形上下文,保存绘图信息; 然后图形上下文必须跟view相关联,才能将内容绘制到View上面
自定义UI控件的步骤:
1)新建一个类,继承自UIView
2)实现 - (void) drawRect: (CGRect)rect; 方法,然后在这个方法中,可以去的跟当前view相关联的图形上下文; 绘制相应的图形内容(绘制时产生的线条称为路径,路径由一个或多个线段或曲线段组成);利用图形上下文将绘制的所有内容渲染显示到view上面
为什么要实现drawRect: 方法才能绘图到view上?
--》 因为在drawRect: 方法中才能取得跟view相关联的图形上下文
drawRect: 方法在什么时候被调用?
--》当view第一次显示到屏幕上时(被加到UIWindow上现实出来)
--》调用view的setNeedsDisplay或者setNeedsDisplayInRect: 时
6、view内部有个layer(图层)属性,drawRect: 方法中取得的是一个Layer Graphics Context, 因此,绘制的东西其实是绘制到view的layer上去了。 view之所以能现实东西,完全是因为它内部的layer
7、Quartz2D绘图的代码步骤(举例):
1)活的图形上下文: CGContextRef ctx = UIGraphicsGetCurrentContext();
2) 拼接路径(假如一条线段):
CGContextMoveToPoint(ctx, 10, 10); //线段起点坐标(10, 10)
CGContextAddLineToPoint(ctx, 100, 100); //线段绘制到坐标(100, 100)
3)绘制路径(渲染): CGContextStrokePath(ctx); //CGContextFillPath(ctx);
8、常用拼接路径函数
1)新建一个起点:void CGContextMoveToPoint(CGContextRef c, CGFloat x, CGFloat y)
2)添加新的线段到某个点:void CGContextAddLineToPoint(CGContextRef c, CGFloat x, CGFloat y)
3)添加一个矩形: void CGContextAddRect(CGContextRef c, CGRect rect)
4)添加一个椭圆:void CGContextAddEllipseInRect(CGContextRef context, CGRect rect)
5)添加一个圆弧:void CGContextAddArc(CGContextRef c, CGFloat x, CGFloat y, CGFloat radius, CGFloat startAngle, CGFloat endAngle, int clockwise)
6)Mode参数决定绘制的模式: void CGContextDrawPath(CGContextRef c, CGPathDrawingMode mode)
7)绘制空心路径: void CGContextStrokePath(CGContextRef c)
8)绘制实心路径: void CGContextFillPath(CGContextRef c)
一般以CGContextDraw、CGContextStroke、CGContextFill开头的函数,都是用来绘制路径的
9)将当前的上下文 Copy一份,保存到栈顶(那个栈叫做图形上下文栈): void CGContextSaveGState(CGContextRef c)
10)将栈顶的上下文出栈,替换掉当前的上下文: void CGContextRestoreGState(CGContextRef c)
9 、 示例代码
效果截图

自定义UIView代码, 自定义View名称为:Quarz2DView
Quarz2DView.h:
#import <UIKit/UIKit.h>

@interface Quarz2DView : UIView

@end
Quarz2DView.m文件代码:


  1 #import "Quarz2DView.h"
  2
  3 @interface Quarz2DView()
  4
  5 @property (nonatomic, retain) UILabel *lblProgress;
  6 @property (nonatomic, retain) UISlider *slider; //进度条
  7 @property (nonatomic, assign) CGFloat snowHeight;   //雪花的高度
  8
  9 @end
 10
 11 @implementation Quarz2DView
 12
 13 - (instancetype)init{
 14     if (self = [super init]){
 15         UISlider *slider = [[UISlider alloc] init];
 16         self.slider = slider;
 17         self.slider.frame = CGRectMake(10, 260, 100, 20);
 18         [self.slider addTarget:self action:@selector(changeProgress:) forControlEvents:UIControlEventValueChanged];
 19         [self addSubview: slider];
 20
 21         CADisplayLink *link = [CADisplayLink displayLinkWithTarget:self selector:@selector(setNeedsDisplay)];
 22         link.frameInterval = 10; //默认是1,表示一秒中刷新屏幕60次,60hz; 设为2,则每秒刷新30次
 23         [link addToRunLoop:[NSRunLoop mainRunLoop] forMode:NSDefaultRunLoopMode];
 24     }
 25     NSLog(@"init");
 26     return self;
 27 }
 28
 29 /*layoutSubviews在以下情况下会被调用:
 30 1、init初始化不会触发layoutSubviews
 31 2、addSubview会触发layoutSubviews
 32 3、设置view的Frame会触发layoutSubviews,当然前提是frame的值设置前后发生了变化
 33 4、滚动一个UIScrollView会触发layoutSubviews
 34 5、旋转Screen会触发父UIView上的layoutSubviews事件
 35 6、改变一个UIView大小的时候也会触发父UIView上的layoutSubviews事件
 36  */
 37 - (void)layoutSubviews{
 38     //NSLog(@"layoutSubviews...");
 39 }
 40
 41 //利用xlb创建的时候会调用这个方法
 42 - (void)awakeFromNib{
 43     NSLog(@"利用xlb创建控件");
 44 }
 45
 46 // Only override drawRect: if you perform custom drawing.
 47 // An empty implementation adversely affects performance during animation.
 48 - (void)drawRect:(CGRect)rect {
 49     [self drawOne]; //绘制多根线段
 50     [self drawTwo]; //绘制带宽度的线段
 51     [self drawThree]; //绘制实体三角形
 52     [self drawFour];    //绘制方形、圆形、圆弧形
 53     [self drawFive]; //画分布率圆,由几部分扇形组成
 54     [self drawSix];  //画进度条
 55     [self drawSeven]; //画文字和图片, 椭圆
 56     [self drawEight];   //画雪花
 57     [self drawNine]; //演示图形上下文栈
 58     //[self drawTen]; //演示画图旋转、缩放、偏移
 59 }
 60
 61 //绘制多个线段
 62 - (void)drawOne{
 63     //1、获得上下文对象
 64     CGContextRef ctr = UIGraphicsGetCurrentContext();
 65     //2、拼接路径
 66     UIBezierPath *path = [UIBezierPath bezierPath];
 67     //3、开始画起点
 68     [path moveToPoint:CGPointMake(10, 10)];
 69     //4、画线段
 70     [path addLineToPoint:CGPointMake(80, 40)];
 71     [path addLineToPoint:CGPointMake(300, 30)];
 72     [path closePath]; //关闭路径,相当于:[path addLineToPoint:CGPointMake(10, 10)];
 73     //5、将路径添加到图形上下文中
 74     CGContextAddPath(ctr, path.CGPath);
 75     //6、将图形上下文渲染到视图上
 76     CGContextStrokePath(ctr);
 77
 78     //绘制线段的三种方式
 79 //    //    //第一种方式
 80 //    //    //1.1、获取图形上下文
 81 //    //    CGContextRef crf = UIGraphicsGetCurrentContext();
 82 //    //    //1.2、画起点和终点
 83 //    //    CGContextMoveToPoint(crf, 0, 0);
 84 //    //    CGContextAddLineToPoint(crf, 100, 100);
 85 //    //    //1.3、渲染
 86 //    //    CGContextStrokePath(crf);
 87 //
 88 //    //第二种方式
 89 //    //2.1、获取图形上下文
 90 //    CGContextRef crf2 = UIGraphicsGetCurrentContext();
 91 //    //2.2、起点和终点
 92 //    CGMutablePathRef pathRef = CGPathCreateMutable();
 93 //    CGPathMoveToPoint(pathRef, nil, 0, 0);
 94 //    CGPathAddLineToPoint(pathRef, nil, 100, 100);
 95 //    CGContextAddPath(crf2, pathRef);
 96 //    //2.3、渲染
 97 //    CGContextStrokePath(crf2);
 98 //    //2.4、释放
 99 //    CGPathRelease(pathRef);
100 //
101 //    //    //第三种方式:使用OC对象,前面两种方式是用C语言函数
102 //    //    UIBezierPath *bezi = [UIBezierPath bezierPath];
103 //    //    [bezi moveToPoint:CGPointMake(0, 0)];   //起点
104 //    //    [bezi addLineToPoint:CGPointMake(100, 100)];    //终点
105 //    //    [bezi stroke];  //渲染
106 }
107
108 //绘制一根带宽度和颜色的线段
109 - (void)drawTwo{
110     //1、获得上下文对象
111     CGContextRef ctr = UIGraphicsGetCurrentContext();
112     /*enum CGLineCap { //线段帽子,单点
113      kCGLineCapButt,
114      kCGLineCapRound,  //圆形
115      kCGLineCapSquare  //方形
116      };*/
117     CGContextSetLineCap(ctr, kCGLineCapRound); //设置线段结束点:帽子
118     /*enum CGLineJoin { //线段转折点
119      kCGLineJoinMiter, //斜街,转折点很尖
120      kCGLineJoinRound, //转折圆角
121      kCGLineJoinBevel //转折点线段
122      };*/
123     CGContextSetLineJoin(ctr, kCGLineJoinRound);  //设置线段转折点
124     CGContextSetLineWidth(ctr, 5); //设置路径的宽度
125     CGContextSetRGBStrokeColor(ctr, 1.0f, 0.8f, 0.1f, 1); //设置颜色
126     //2、拼接路径
127     UIBezierPath *path = [UIBezierPath bezierPath];
128     //3、开始画起点
129     [path moveToPoint:CGPointMake(10, 50)];
130     //4、画线段
131     [path addLineToPoint:CGPointMake(280, 50)];
132     [path addLineToPoint:CGPointMake(200, 20)];
133     //5、将路径添加到图形上下文中
134     CGContextAddPath(ctr, path.CGPath);
135     //6、将图形上下文渲染到视图上
136     CGContextStrokePath(ctr);
137 }
138
139 //绘制一个实体三角形
140 - (void)drawThree{
141     //1、图形上下文
142     CGContextRef ctr = UIGraphicsGetCurrentContext();
143     [[UIColor purpleColor] setFill];   //设置实体颜色
144     [[UIColor redColor] setStroke]; //设置边框颜色
145     CGContextSetLineWidth(ctr, 6); //设置边框宽度
146
147     //2、拼接路径对象
148     UIBezierPath *path = [UIBezierPath bezierPath];
149     //3、绘制路径
150     [path moveToPoint:CGPointMake(10, 60)];
151     [path addLineToPoint:CGPointMake(280, 60)];
152     [path addLineToPoint:CGPointMake(160, 110)];
153     [path closePath];
154     //4、把路径添加到上下文对象中
155     CGContextAddPath(ctr, path.CGPath);
156
157     //5、将图形上下文渲染到视图上
158    // CGContextFillPath(ctr); //既填充又描边,不能用这个
159     CGContextDrawPath(ctr, kCGPathEOFillStroke);
160     /*
161      enum CGPathDrawingMode {
162      kCGPathFill, //非零绕数规则
163      kCGPathEOFill, //奇偶规则
164      kCGPathStroke,  //描边
165      kCGPathFillStroke,//填充又描边
166      kCGPathEOFillStroke //填充描边
167      };*/
168 }
169
170 //绘制正方形、圆形、圆角方形
171 - (void)drawFour{
172     CGContextRef ctr = UIGraphicsGetCurrentContext();
173     CGContextSetLineWidth(ctr, 1);
174     [[UIColor greenColor] set];
175
176     //方形  左上角(10, 90) ,宽高都是60
177     UIBezierPath *path = [UIBezierPath bezierPathWithRect:CGRectMake(10, 90, 60, 60)];
178     CGContextAddPath(ctr, path.CGPath);
179
180     //圆形,左上角(10, 90)  圆心(40, 120) 半径30 cornerRadius < 30则是圆角方形,>=30 则是圆形
181     UIBezierPath *path2 = [UIBezierPath bezierPathWithRoundedRect:CGRectMake(10, 90, 60, 60) cornerRadius:30];
182     CGContextAddPath(ctr, path2.CGPath);
183     //圆角方形
184     UIBezierPath *path3 = [UIBezierPath bezierPathWithRoundedRect:CGRectMake(20, 100, 40, 40) cornerRadius:10];
185     CGContextAddPath(ctr, path3.CGPath);
186     //圆角矩形
187     UIBezierPath *path4 = [UIBezierPath bezierPathWithRoundedRect:CGRectMake(30, 105, 20, 30) cornerRadius:10];
188     CGContextAddPath(ctr, path4.CGPath);
189     //设置某一个角圆形
190     UIBezierPath *path5 = [UIBezierPath bezierPathWithRoundedRect:CGRectMake(230, 90, 60, 60) byRoundingCorners:UIRectCornerTopLeft cornerRadii:CGSizeMake(20, 20)];
191     CGContextAddPath(ctr, path5.CGPath);
192     /*typedef NS_OPTIONS(NSUInteger, UIRectCorner) {
193      UIRectCornerTopLeft     = 1 << 0, //顶部左边
194      UIRectCornerTopRight    = 1 << 1,//顶部右边圆角,其他直角
195      UIRectCornerBottomLeft  = 1 << 2,//地步左边圆角
196      UIRectCornerBottomRight = 1 << 3,//底部右边圆角
197      UIRectCornerAllCorners  = ~0UL  //圆形
198      };*/
199
200     //画圆弧  clockwise: 顺时针还是逆时针
201     UIBezierPath *path6 = [UIBezierPath bezierPathWithArcCenter:CGPointMake(160, 120) radius:40 startAngle:0 endAngle:M_PI clockwise:YES];//顺时针从2π到π,圆心(160,100)
202     CGContextAddPath(ctr, path6.CGPath);
203
204     CGContextStrokePath(ctr);
205
206     //画一段圆弧实体
207     UIBezierPath *path7 = [UIBezierPath bezierPathWithArcCenter:CGPointMake(160, 120) radius:30 startAngle:2.8f endAngle:0 clockwise:NO]; //逆时针从0到2.8,圆心(160,100)
208     CGContextAddPath(ctr, path7.CGPath);
209     CGContextFillPath(ctr);
210 }
211
212 //y:150 画一个圆,有几个扇形组成,比如由四个百分比组成:55 + 30 + 12 + 3
213 - (void)drawFive{
214     CGContextRef ctr = UIGraphicsGetCurrentContext();
215     //半径50, 圆心(240, 210), 左上角(190, 160), 右上角(290, 210), 左下角(190, 260), 右下角(290, 260)
216
217     CGPoint center = CGPointMake(240, 210);  //圆心
218     CGFloat radius = 50;
219
220     //1、先画55%扇形
221     [[UIColor purpleColor] setFill];
222     CGFloat endAngle = M_PI * 2 * 55 / 100;
223     UIBezierPath *path1 = [UIBezierPath bezierPathWithArcCenter:center radius:radius startAngle:0 endAngle:endAngle clockwise:YES];
224     [path1 addLineToPoint:center]; //原来扇形是这样画的
225     CGContextAddPath(ctr, path1.CGPath);
226     //渲染
227     CGContextFillPath(ctr);
228     //加个文字说明
229     UILabel *lbl1 = [[UILabel alloc] initWithFrame:CGRectMake(220, 225, 40, 20)];
230     lbl1.textAlignment = NSTextAlignmentCenter;
231     lbl1.font = [UIFont systemFontOfSize:10];
232     lbl1.text = @"55.00%";
233     [self addSubview:lbl1];
234
235     //2、再画第二个扇形:30%
236     [[UIColor greenColor] setFill];
237     CGFloat endAngle2 = M_PI * 2 * 30 / 100 + endAngle;
238     UIBezierPath *path2 = [UIBezierPath bezierPathWithArcCenter:center radius:radius startAngle:endAngle endAngle:endAngle2 clockwise:YES];
239     [path2 addLineToPoint:center]; //原来扇形是这样画的
240     CGContextAddPath(ctr, path2.CGPath);
241     //渲染
242     CGContextFillPath(ctr);
243     //加个文字说明
244     UILabel *lbl2 = [[UILabel alloc] initWithFrame:CGRectMake(210, 170, 40, 20)];
245     lbl2.textAlignment = NSTextAlignmentCenter;
246     lbl2.font = [UIFont systemFontOfSize:10];
247     lbl2.text = @"30.00%";
248     [self addSubview:lbl2];
249
250     //3、再画第三个扇形:12%
251     [[UIColor yellowColor] setFill];
252     CGFloat endAngle3 = M_PI * 2 * 12 / 100 + endAngle2;
253     UIBezierPath *path3 = [UIBezierPath bezierPathWithArcCenter:center radius:radius startAngle:endAngle2 endAngle:endAngle3 clockwise:YES];
254     [path3 addLineToPoint:center];
255     CGContextAddPath(ctr, path3.CGPath);
256     //渲染
257     CGContextFillPath(ctr);
258     //加个文字说明
259     UILabel *lbl3 = [[UILabel alloc] initWithFrame:CGRectMake(251, 186, 40, 20)];
260     lbl3.textAlignment = NSTextAlignmentCenter;
261     lbl3.font = [UIFont systemFontOfSize:10];
262     lbl3.text = @"12.00%";
263     [self addSubview:lbl3];
264
265     //4、再画第四个扇形:3%
266     [[UIColor blueColor] setFill];
267     UIBezierPath *path4 = [UIBezierPath bezierPathWithArcCenter:center radius:radius startAngle:endAngle3 endAngle:0 clockwise:YES];
268     [path4 addLineToPoint:center];
269     CGContextAddPath(ctr, path4.CGPath);
270     //渲染
271     CGContextFillPath(ctr);
272
273     //第二种方式画一个扇形组合圆
274     NSArray *arr = @[@25, @42, @10, @18, @5];
275     CGFloat startA =0, endA = 0;
276     center = CGPointMake(150, 210);
277     radius = 35;
278
279     for (int i = 0; i < arr.count; i++) {
280         startA = endA;
281         endA = startA + M_PI * 2 * [[arr objectAtIndex:i] floatValue] / 100;
282         [[self randomColor] setFill];
283         UIBezierPath *p = [UIBezierPath bezierPathWithArcCenter:center radius:radius startAngle:startA endAngle:endA clockwise:YES];
284         [p addLineToPoint:center];
285         CGContextAddPath(ctr, p.CGPath);
286         CGContextFillPath(ctr); //渲染
287     }
288 }
289
290 //进度条演示
291 - (UILabel *)lblProgress{
292     if (_lblProgress == nil){
293         _lblProgress = [[UILabel alloc] init];
294         _lblProgress.frame = CGRectMake(20, 200, 80, 20);
295         _lblProgress.textAlignment = NSTextAlignmentCenter;
296         _lblProgress.font = [UIFont systemFontOfSize:12];
297         _lblProgress.text = @"00.00%";
298         [self addSubview:_lblProgress];
299     }
300     return _lblProgress;
301 }
302 //可拖拽进度条
303 - (void)drawSix{
304     CGContextRef ctr = UIGraphicsGetCurrentContext();
305     [self lblProgress];
306
307     //3π/2顺时针走  2π走一个圈360度  2π : 100进度
308     CGFloat startAngle = M_PI * 1.5; //开始角度
309     CGFloat endAngle = M_PI * 1.5 + M_PI * 2 * self.slider.value;
310     UIBezierPath *path = [UIBezierPath bezierPathWithArcCenter:CGPointMake(60, 210) radius:50 startAngle:startAngle endAngle:endAngle clockwise:YES];
311     CGContextAddPath(ctr, path.CGPath);
312     CGContextStrokePath(ctr);
313 }
314
315 //进度条事件
316 - (void)changeProgress:(UISlider *)sender{
317     self.lblProgress.text = [NSString stringWithFormat:@"%.2f%%", sender.value * 100];
318     //调用方法重绘
319     [self setNeedsDisplay];
320 }
321
322 //生成一个随机颜色
323 - (UIColor *)randomColor{
324     /*
325      颜色有两种表示方法:RGB  RGBA
326      RGB 24
327      R、G、B每个颜色通道8位
328      8的二进制255
329      R、G、B每个颜色的取值范围0-255
330      120/255.0
331      */
332     CGFloat r = arc4random_uniform(256) / 255.0;
333     CGFloat g = arc4random_uniform(256) / 255.0;
334     CGFloat b = arc4random_uniform(256) / 255.0;
335     return [UIColor colorWithRed:r green:g blue:b alpha:1];
336 }
337
338 //画文字和图片Y: 280  画一个椭圆
339 - (void)drawSeven{
340     CGContextRef ctr = UIGraphicsGetCurrentContext();
341     [[UIColor greenColor] set];
342     //先画一根分割线
343     UIBezierPath *path = [UIBezierPath bezierPathWithRect:CGRectMake(0, 290, 300, 2)];
344     CGContextAddPath(ctr, path.CGPath);
345     CGContextFillPath(ctr);
346
347     //画文字
348     NSString *str = @"君不见黄河之水天上来, 奔流到海不复回;君不见高堂明镜悲白发,朝如青丝暮成雪";
349     NSDictionary *dicts = @{UITextAttributeFont: [UIFont systemFontOfSize:10],
350                             UITextAttributeTextColor: [UIColor purpleColor]};
351     [str drawInRect:CGRectMake(0, 300, 200, 40) withAttributes:dicts];
352
353     //画图片 : 可以想象UIImageView是如何展示图片的
354     UIImage *img = [UIImage imageNamed:@"paddle"];
355     [img drawAtPoint:CGPointMake(220, 300)];
356
357     //画椭圆
358     UIBezierPath *path2 = [UIBezierPath bezierPathWithOvalInRect:CGRectMake(10, 330, 280, 30)];
359     CGContextAddPath(ctr, path2.CGPath);
360     UIBezierPath *path3 = [UIBezierPath bezierPathWithOvalInRect:CGRectMake(80, 333, 10, 25)];
361     CGContextAddPath(ctr, path3.CGPath);
362     UIBezierPath *path4 = [UIBezierPath bezierPathWithOvalInRect:CGRectMake(140, 330, 10, 30)];
363     CGContextAddPath(ctr, path4.CGPath);
364     UIBezierPath *path5 = [UIBezierPath bezierPathWithOvalInRect:CGRectMake(200, 333, 10, 25)];
365     CGContextAddPath(ctr, path5.CGPath);
366     CGContextStrokePath(ctr);
367 }
368
369 //画一个雪花飘落
370 - (void)drawEight{
371     self.snowHeight += 5;
372     UIImage *img = [UIImage imageNamed:@"雪花"];
373     [img drawAtPoint:CGPointMake(30, self.snowHeight)];
374
375     UIImage *img2 = [UIImage imageNamed:@"雪花"];
376     [img2 drawAtPoint:CGPointMake(120, self.snowHeight + 90)];
377
378     UIImage *img3 = [UIImage imageNamed:@"雪花"];
379     [img3 drawAtPoint:CGPointMake(240, self.snowHeight + 150)];
380
381     if (self.snowHeight > 420){
382         self.snowHeight = 0;
383     }
384 }
385
386 //图形上下文栈:可以把图形上下文保存到栈里,到了需要的时候再取出来
387 - (void)drawNine{
388     CGContextRef ctr = UIGraphicsGetCurrentContext();
389     CGContextSaveGState(ctr); //将此时的图形上下文存入栈里
390
391     //原图形上下文画图是这样的
392     UIBezierPath *oldPath = [UIBezierPath bezierPathWithOvalInRect:CGRectMake(5, 370, 90, 20)];
393     CGContextAddPath(ctr, oldPath.CGPath);
394     CGContextStrokePath(ctr); //渲染
395
396     //变化图形上下文
397     CGContextSetLineWidth(ctr, 5);
398     [[UIColor redColor] set];
399     UIBezierPath *newPath = [UIBezierPath bezierPathWithOvalInRect:CGRectMake(105, 370, 90, 20)];
400     CGContextAddPath(ctr, newPath.CGPath);
401     CGContextStrokePath(ctr);   //渲染
402
403     //取出原图形上下文覆盖当前图形上下文
404     CGContextRestoreGState(ctr);
405
406     //原图形上下文画图
407     UIBezierPath *oldPath2 = [UIBezierPath bezierPathWithOvalInRect:CGRectMake(205, 370, 90, 20)];
408     CGContextAddPath(ctr, oldPath2.CGPath);
409     CGContextStrokePath(ctr);   //渲染
410 }
411
412 //画图形偏移、放大、旋转
413 - (void)drawTen{
414     // 1.获取上下文
415     CGContextRef ctx = UIGraphicsGetCurrentContext();
416
417     // 注意:你的路径一定放在上下文矩阵操作之后
418     // 平移上下文
419     CGContextTranslateCTM(ctx, 50, 100);
420
421     // 旋转上下文
422     CGContextRotateCTM(ctx, M_PI_4);
423
424     // 缩放上下文
425     CGContextScaleCTM(ctx, 0.5, 1.2);
426
427     // 2.拼接路径
428     UIBezierPath *path = [UIBezierPath bezierPathWithOvalInRect:CGRectMake(-50, -100, 150, 200)];
429
430     // 3.把路径添加到上下文
431     CGContextAddPath(ctx, path.CGPath);
432
433     [[UIColor yellowColor] set];
434
435     // 4.渲染
436     CGContextFillPath(ctx);
437 }
438
439 /*
440  字符属性
441
442  字符属性可以应用于 attributed string 的文本中。
443
444  NSString *const NSFontAttributeName;(字体)
445
446  NSString *const NSParagraphStyleAttributeName;(段落)
447
448  NSString *const NSForegroundColorAttributeName;(字体颜色)
449
450  NSString *const NSBackgroundColorAttributeName;(字体背景色)
451
452  NSString *const NSLigatureAttributeName;(连字符)
453
454  NSString *const NSKernAttributeName;(字间距)
455
456  NSString *const NSStrikethroughStyleAttributeName;(删除线)
457
458  NSString *const NSUnderlineStyleAttributeName;(下划线)
459
460  NSString *const NSStrokeColorAttributeName;(边线颜色)
461
462  NSString *const NSStrokeWidthAttributeName;(边线宽度)
463
464  NSString *const NSShadowAttributeName;(阴影)(横竖排版)
465
466  NSString *const NSVerticalGlyphFormAttributeName;
467
468  常量
469
470  1> NSFontAttributeName(字体)
471
472  该属性所对应的值是一个 UIFont 对象。该属性用于改变一段文本的字体。如果不指定该属性,则默认为12-point Helvetica(Neue)。
473
474  2> NSParagraphStyleAttributeName(段落)
475
476  该属性所对应的值是一个 NSParagraphStyle 对象。该属性在一段文本上应用多个属性。如果不指定该属性,则默认为 NSParagraphStyle 的defaultParagraphStyle 方法返回的默认段落属性。
477
478  3> NSForegroundColorAttributeName(字体颜色)
479
480  该属性所对应的值是一个 UIColor 对象。该属性用于指定一段文本的字体颜色。如果不指定该属性,则默认为黑色。
481
482  4> NSBackgroundColorAttributeName(字体背景色)
483
484  该属性所对应的值是一个 UIColor 对象。该属性用于指定一段文本的背景颜色。如果不指定该属性,则默认无背景色。
485
486  5> NSLigatureAttributeName(连字符)
487
488  该属性所对应的值是一个 NSNumber 对象(整数)。连体字符是指某些连在一起的字符,它们采用单个的图元符号。0 表示没有连体字符。1 表示使用默认的连体字符。2表示使用所有连体符号。默认值为 1(注意,iOS 不支持值为 2)。
489
490  6> NSKernAttributeName(字间距)
491
492  该属性所对应的值是一个 NSNumber 对象(整数)。字母紧排指定了用于调整字距的像素点数。字母紧排的效果依赖于字体。值为 0 表示不使用字母紧排。默认值为0。
493
494  7> NSStrikethroughStyleAttributeName(删除线)
495
496  该属性所对应的值是一个 NSNumber 对象(整数)。该值指定是否在文字上加上删除线,该值参考“Underline Style Attributes”。默认值是NSUnderlineStyleNone。
497
498  8> NSUnderlineStyleAttributeName(下划线)
499
500  该属性所对应的值是一个 NSNumber 对象(整数)。该值指定是否在文字上加上下划线,该值参考“Underline Style Attributes”。默认值是NSUnderlineStyleNone。
501
502  9> NSStrokeColorAttributeName(边线颜色)
503
504  该属性所对应的值是一个 UIColor 对象。如果该属性不指定(默认),则等同于 NSForegroundColorAttributeName。否则,指定为删除线或下划线颜色。更多细节见“Drawing attributedstrings that are both filled and stroked”。
505
506  10> NSStrokeWidthAttributeName(边线宽度)
507
508  该属性所对应的值是一个 NSNumber 对象(小数)。该值改变描边宽度(相对于字体size 的百分比)。默认为 0,即不改变。正数只改变描边宽度。负数同时改变文字的描边和填充宽度。例如,对于常见的空心字,这个值通常为3.0。
509
510  11> NSShadowAttributeName(阴影)
511
512  该属性所对应的值是一个 NSShadow 对象。默认为 nil。
513
514  12> NSVerticalGlyphFormAttributeName(横竖排版)
515
516  该属性所对应的值是一个 NSNumber 对象(整数)。0 表示横排文本。1 表示竖排文本。在 iOS 中,总是使用横排文本,0 以外的值都未定义。
517
518  */
519
520 @end
自定义控制器展示自定义Quarz2DView
Quartz2DViewController.h 文件:
#import <UIKit/UIKit.h>

@interface Quartz2DViewController : UIViewController

@end
Quartz2DViewController.m文件代码:
 1 #import "Quartz2DViewController.h"
 2 #import "Quarz2DView.h"
 3 #import "Quartz2DControllerTwo.h"
 4
 5 @interface Quartz2DViewController ()
 6
 7 @end
 8
 9 @implementation Quartz2DViewController
10
11 - (void)viewDidLoad {
12     [super viewDidLoad];
13     // Do any additional setup after loading the view.
14     [self.view setBackgroundColor:[UIColor whiteColor]]; //设置白色背景
15
16     Quarz2DView *view = [Quarz2DView new];
17     view.frame = CGRectMake(10, 10, 300, 420);
18     [view setBackgroundColor:[UIColor grayColor]];
19     view.alpha = 0.9; //默认时1,不透明
20     [self.view addSubview:view];
21
22     //增加两个按钮: 上一页按钮
23     UIButton *returnBtn = [UIButton buttonWithType:UIButtonTypeCustom];
24     [returnBtn setTitle:@"上一页" forState:UIControlStateNormal];
25     returnBtn.frame = CGRectMake(40, 440, 80, 30);
26     [returnBtn addTarget:self action:@selector(returnLastPage) forControlEvents:UIControlEventTouchUpInside];
27     [returnBtn setBackgroundColor:[UIColor purpleColor]];
28     [self.view addSubview:returnBtn];
29
30     //下一页按钮
31     UIButton *nextBtn = [UIButton buttonWithType:UIButtonTypeCustom];
32     [nextBtn setTitle:@"下一页" forState:UIControlStateNormal];
33     nextBtn.frame = CGRectMake(200, 440, 80, 30);
34     [nextBtn addTarget:self action:@selector(nextController) forControlEvents:UIControlEventTouchUpInside];
35     [nextBtn setBackgroundColor:[UIColor purpleColor]];
36     [self.view addSubview:nextBtn];
37 }
38
39 //返回上一页
40 - (void)returnLastPage{
41     [self dismissViewControllerAnimated:YES completion:nil];
42 }
43
44 //进入下一个控制器
45 - (void)nextController{
46     Quartz2DControllerTwo *control = [[Quartz2DControllerTwo alloc] init];
47     [self presentViewController:control animated:YES completion:nil];
48 }
49
50 - (void)didReceiveMemoryWarning {
51     [super didReceiveMemoryWarning];
52     // Dispose of any resources that can be recreated.
53 }
54
55 /*
56 #pragma mark - Navigation
57
58 // In a storyboard-based application, you will often want to do a little preparation before navigation
59 - (void)prepareForSegue:(UIStoryboardSegue *)segue sender:(id)sender {
60     // Get the new view controller using [segue destinationViewController].
61     // Pass the selected object to the new view controller.
62 }
63 */
64
65 @end
---------------------------------------------------------------------------------------
---------------------------------------------------------------------------------------
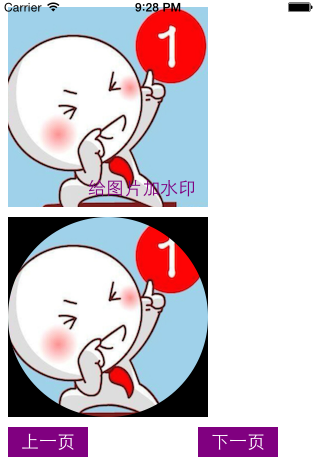
给图片添加水印,裁剪图片,效果截图:
自定义控制器Quartz2DControllerTwo.h 文件:
#import <UIKit/UIKit.h>

@interface Quartz2DControllerTwo : UIViewController

@end
Quartz2DControllerTwo.m文件代码:
  1 #import "Quartz2DControllerTwo.h"
  2 #import "Quartz2DControllerThree.h"
  3
  4 @interface Quartz2DControllerTwo ()
  5
  6 @end
  7
  8 @implementation Quartz2DControllerTwo
  9
 10 - (void)viewDidLoad {
 11     [super viewDidLoad];
 12     // Do any additional setup after loading the view.
 13     [self.view setBackgroundColor:[UIColor whiteColor]];
 14
 15     [self testImageContext];    //测试图形上下文的用法
 16     [self clipImage];   //裁剪图片
 17
 18     //添加上一页和下一页按钮
 19     UIButton *preBtn = [UIButton buttonWithType:UIButtonTypeCustom];
 20     [preBtn setTitle:@"上一页" forState:UIControlStateNormal];
 21     preBtn.frame = CGRectMake(10, 430, 80, 30);
 22     [preBtn setBackgroundColor:[UIColor purpleColor]];
 23     [preBtn addTarget:self action:@selector(prePage) forControlEvents:UIControlEventTouchUpInside];
 24     [self.view addSubview:preBtn];
 25
 26     UIButton *nextBtn = [UIButton buttonWithType:UIButtonTypeCustom];
 27     [nextBtn setTitle:@"下一页" forState:UIControlStateNormal];
 28     nextBtn.frame = CGRectMake(200, 430, 80, 30);
 29     [nextBtn setBackgroundColor:[UIColor purpleColor]];
 30     [nextBtn addTarget:self action:@selector(nextPage) forControlEvents:UIControlEventTouchUpInside];
 31     [self.view addSubview:nextBtn];
 32 }
 33
 34 //图片上下文应用:将图片缓存到图片上下文,然后合成新的图片,并保存下来,关闭图片上下文,也可以把图片保存在本地
 35 - (void)testImageContext{
 36     //1、创建图片
 37     UIImage *img = [UIImage imageNamed:@"first"];
 38     //2、打开图片上下文  opaque:YES表示透明, NO表示不透明  设置图形上下文的尺寸
 39     UIGraphicsBeginImageContextWithOptions(img.size, NO, 0.0);
 40     //3、将图片写入到图片上下文中
 41     [img drawAtPoint:CGPointZero];
 42     //4、将文字写入到图片上下文中
 43     NSString *str = @"给图片加水印";
 44     NSDictionary *dicts = @{NSFontAttributeName: [UIFont systemFontOfSize:18],
 45                             NSForegroundColorAttributeName: [UIColor purpleColor]}; //设置字体属性
 46     [str drawAtPoint:CGPointMake(img.size.width - 120, img.size.height - 30) withAttributes:dicts];
 47     //5、从图形上下文中获取新的图片
 48     UIImage *newImg = UIGraphicsGetImageFromCurrentImageContext();
 49     //6、关闭图形上下文
 50     UIGraphicsEndImageContext();
 51
 52     //将新图片显示出来
 53     UIImageView *imgView = [[UIImageView alloc] initWithFrame:CGRectMake(10, 10, img.size.width, img.size.height)];
 54     imgView.image = newImg;
 55     [self.view addSubview:imgView];
 56     //将新图片保存到指定路径
 57 //    NSData *data = UIImagePNGRepresentation(newImg);
 58 //    [data writeToFile:@"/Users/tanxiaoming/Desktop/tan.png" atomically:YES];
 59 }
 60
 61 //裁剪图片
 62 - (void)clipImage{
 63     UIImage *img = [UIImage imageNamed:@"first"];
 64     UIGraphicsBeginImageContextWithOptions(img.size, YES, 0.0);
 65
 66     //画圆弧
 67     UIBezierPath *path = [UIBezierPath bezierPathWithOvalInRect:CGRectMake(0, 0, img.size.width, img.size.height)];
 68     [path addClip]; //裁剪
 69     //将图片画在上下文中
 70     [img drawAtPoint:CGPointZero];
 71
 72     //从当前图片上下文中获取新图片
 73     UIImage *newImg = UIGraphicsGetImageFromCurrentImageContext();
 74     //关闭图形上下文
 75     UIGraphicsEndImageContext();
 76
 77     //现实图片
 78     UIImageView *imgView = [[UIImageView alloc] initWithFrame:CGRectMake(10, 20 + img.size.height, newImg.size.width, newImg.size.height)];
 79     imgView.image = newImg;
 80     [self.view addSubview:imgView];
 81 }
 82
 83 //返回上一页
 84 - (void)prePage{
 85     [self dismissViewControllerAnimated:YES completion:nil];
 86 }
 87
 88 //下一页
 89 - (void)nextPage{
 90     Quartz2DControllerThree *controller = [[Quartz2DControllerThree alloc] init];
 91     [self presentViewController:controller animated:YES completion:nil];
 92 }
 93
 94 - (void)didReceiveMemoryWarning {
 95     [super didReceiveMemoryWarning];
 96     // Dispose of any resources that can be recreated.
 97 }
 98
 99 /*
100 #pragma mark - Navigation
101
102 // In a storyboard-based application, you will often want to do a little preparation before navigation
103 - (void)prepareForSegue:(UIStoryboardSegue *)segue sender:(id)sender {
104     // Get the new view controller using [segue destinationViewController].
105     // Pass the selected object to the new view controller.
106 }
107 */
108
109 @end
---------------------------------------------------------------------------------------
---------------------------------------------------------------------------------------
屏幕截图,效果截图:

Quartz2DControllerThree.h文件:
#import <UIKit/UIKit.h>

@interface Quartz2DControllerThree : UIViewController

@end
Quartz2DControllerThree.m文件代码:
  1 #import "Quartz2DControllerThree.h"
  2
  3 @interface Quartz2DControllerThree ()
  4
  5 @property (nonatomic, retain) UIImageView *imgView;
  6
  7 @end
  8
  9 @implementation Quartz2DControllerThree
 10
 11 - (void)viewDidLoad {
 12     [super viewDidLoad];
 13     // Do any additional setup after loading the view.
 14     [self.view setBackgroundColor:[UIColor whiteColor]]; //设置背景颜色
 15
 16     [self clipImage];   //裁剪图片
 17
 18     UIButton *preBtn = [UIButton buttonWithType:UIButtonTypeCustom];
 19     [preBtn setTitle:@"上一页" forState:UIControlStateNormal];
 20     [preBtn setBackgroundColor:[UIColor purpleColor]];
 21     [preBtn setFrame:CGRectMake(10, 420, 80, 30)];
 22     [preBtn addTarget:self action:@selector(prePage) forControlEvents:UIControlEventTouchUpInside];
 23     [self.view addSubview:preBtn];
 24
 25     //屏幕截图按钮
 26     UIButton *screenBtn = [UIButton buttonWithType:UIButtonTypeCustom];
 27     [screenBtn setFrame:CGRectMake(240, 100, 80, 30)];
 28     [screenBtn setTitle:@"屏幕截图" forState:UIControlStateNormal];
 29     [screenBtn setBackgroundColor:[UIColor grayColor]];
 30     [screenBtn addTarget:self action:@selector(screenImg) forControlEvents:UIControlEventTouchUpInside];
 31     [self.view addSubview:screenBtn];
 32
 33 }
 34
 35 - (UIImageView *)imgView{
 36     if (_imgView == nil){
 37         _imgView = [[UIImageView alloc] initWithFrame:CGRectMake(10, 250, 300, 300)];
 38         _imgView.contentMode = UIViewContentModeScaleAspectFit; //自适应图片大小
 39         [self.view addSubview:_imgView];
 40     }
 41     return _imgView;
 42 }
 43
 44 //裁剪图片
 45 - (void)clipImage{
 46     UIImage *img = [UIImage imageNamed:@"first"];
 47     CGFloat border = 10;
 48     CGFloat radius = 2 * border + (img.size.width > img.size.height ? img.size.height : img.size.width);
 49
 50     //先画大圆
 51     //开启图形上下文
 52     UIGraphicsBeginImageContextWithOptions(CGSizeMake(radius, radius), NO, 0.0);
 53     CGContextRef ctr = UIGraphicsGetCurrentContext();//获取上下文
 54     UIBezierPath *path = [UIBezierPath bezierPathWithOvalInRect:CGRectMake(0, 0, radius, radius)];
 55     CGContextAddPath(ctr, path.CGPath); //添加到上下文
 56     [[UIColor purpleColor] set]; //设置颜色
 57     CGContextFillPath(ctr); //渲染
 58
 59     //设置小圆
 60     UIBezierPath *smallPath = [UIBezierPath bezierPathWithOvalInRect:CGRectMake(border, border, radius - 2 * border, radius - 2 * border)];
 61
 62     [smallPath addClip];    //裁剪
 63
 64     [img drawAtPoint:CGPointMake(border, border)]; //把图画到图形上下文中
 65     UIImage *newImg = UIGraphicsGetImageFromCurrentImageContext();   //获取新图片
 66
 67
 68     UIGraphicsEndImageContext();    //关闭图形上下文
 69
 70     UIImageView *imgView = [[UIImageView alloc] initWithFrame:CGRectMake(10, 10, radius, radius)];
 71     imgView.image = newImg;
 72     [self.view addSubview:imgView];
 73 }
 74
 75 //屏幕截图
 76 - (void)screenImg{
 77     //1、开启图形上下文
 78     UIGraphicsBeginImageContextWithOptions(self.view.bounds.size, NO, 0.0);
 79     //2、获取上下文
 80     CGContextRef ctr = UIGraphicsGetCurrentContext();
 81     //3、将self.view的图层渲染到上下文,图层只能渲染不能draw
 82     [self.view.layer renderInContext:ctr];
 83     //4、从图形上下文获取新图片
 84     UIImage *img = UIGraphicsGetImageFromCurrentImageContext();
 85     //5、关闭图形上下文
 86     UIGraphicsEndImageContext();
 87     //6、显示或保存
 88
 89 //    NSData *data = UIImagePNGRepresentation(img);
 90 //    [data writeToFile:@"/Users/tanxiaoming/Desktop/xiao.png" atomically:YES];
 91
 92     self.imgView.image = img;
 93 }
 94
 95 - (void)prePage{
 96     [self dismissViewControllerAnimated:YES completion:nil];
 97 }
 98
 99 - (void)didReceiveMemoryWarning {
100     [super didReceiveMemoryWarning];
101     // Dispose of any resources that can be recreated.
102 }
103
104 /*
105 #pragma mark - Navigation
106
107 // In a storyboard-based application, you will often want to do a little preparation before navigation
108 - (void)prepareForSegue:(UIStoryboardSegue *)segue sender:(id)sender {
109     // Get the new view controller using [segue destinationViewController].
110     // Pass the selected object to the new view controller.
111 }
112 */
113
114 @end