环境
| 角色 |
主机 |
| elasticsearch |
10.0.0.51 |
| elasticsearch |
10.0.0.52 |
| elasticsearch |
10.0.0.53 |
条件
1.恢复快照,基础优化
2.每台elasticsearch服务器需要配置2G内存
以下以db01为例进行配置
服务器时间同步
[root@db01 ~]# yum install -y ntpdate
[root@db01 ~]# ntpdate time1.aliyun.com
服务器统一字符集
服务器编码解码的字符集统一使用utf-8
安装Java环境
#上传
[root@db01 ~]# rz jdk-8u181-linux-x64.rpm

#安装
[root@db01 ~]# rpm -ivh jdk-8u181-linux-x64.rpm
安装ES
1.上传或下载包
[root@db01 ~]# rz elasticsearch-6.6.0.rpm

2.安装
[root@db01 ~]# rpm -ivh elasticsearch-6.6.0.rpm

3.根据提示继续操作
[root@db01 ~]# systemctl daemon-reload
[root@db01 ~]# systemctl enable elasticsearch.service
[root@db01 ~]# systemctl start elasticsearch.service

4.验证,es启动过程有点慢,看情况判断
[root@db01 ~]# netstat -lntp
tcp6       0      0 127.0.0.1:9200          :::*                    LISTEN      20040/java
tcp6       0      0 127.0.0.1:9300          :::*                    LISTEN      20040/java

[root@db01 ~]# curl 127.0.0.1:9200
{
  "name" : "FIddisT",
  "cluster_name" : "elasticsearch",		#集群的名字
  "cluster_uuid" : "m8Y9neWHRxat7V1tVijMxA",
  "version" : {
    "number" : "6.6.0",
    "build_flavor" : "default",
    "build_type" : "rpm",
    "build_hash" : "a9861f4",
    "build_date" : "2019-01-24T11:27:09.439740Z",
    "build_snapshot" : false,
    "lucene_version" : "7.6.0",
    "minimum_wire_compatibility_version" : "5.6.0",
    "minimum_index_compatibility_version" : "5.0.0"
  },
  "tagline" : "You Know, for Search"
}

#es服务启动较慢,可以使用ps或者free -m 判断服务是否运行
配置ES
#db01配置
[root@db01 ~]# vim /etc/elasticsearch/elasticsearch.yml
cluster.name: my-application
node.name: node-51
path.data: /service/es/data
path.logs: /service/es/logs
bootstrap.memory_lock: true
network.host: 10.0.0.51,127.0.0.1
http.port: 9200
discovery.zen.ping.unicast.hosts: ["10.0.0.51", "10.0.0.52","10.0.0.53"]
discovery.zen.minimum_master_nodes: 2

#db02配置
[root@db02 ~]# vim /etc/elasticsearch/elasticsearch.yml
cluster.name: my-application
node.name: node-52
path.data: /service/es/data
path.logs: /service/es/logs
bootstrap.memory_lock: true
network.host: 10.0.0.52,127.0.0.1
http.port: 9200
discovery.zen.ping.unicast.hosts: ["10.0.0.51", "10.0.0.52","10.0.0.53"]
discovery.zen.minimum_master_nodes: 2

#db03配置
[root@db03 ~]# vim /etc/elasticsearch/elasticsearch.yml
cluster.name: my-application
node.name: node-53
path.data: /service/es/data
path.logs: /service/es/logs
bootstrap.memory_lock: true
network.host: 10.0.0.53,127.0.0.1
http.port: 9200
discovery.zen.ping.unicast.hosts: ["10.0.0.51", "10.0.0.52","10.0.0.53"]
discovery.zen.minimum_master_nodes: 2
根据配置文件创建目录
#创建数据目录和日志目录
[root@db01 ~]# mkdir /service/es/{data,logs} -p
#授权
[root@db01 ~]# chown -R elasticsearch.elasticsearch /service/es/
配置启动文件中的内存锁
[root@db01 ~]# vim /usr/lib/systemd/system/elasticsearch.service
[Service]
... ...
LimitMEMLOCK=infinity
重启ES
[root@db01 ~]# systemctl daemon-reload
[root@db01 ~]# systemctl start elasticsearch.service
ES交互
方法一:使用curl命令
#创建索引(库),?pretty以列格式显示
[root@db01 ~]# curl -XPUT '10.0.0.51:9200/student?pretty'
{
  "acknowledged" : true,
  "shards_acknowledged" : true,
  "index" : "student"
}

#添加数据(key value)
[root@db01 ~]# curl -XPUT '10.0.0.51:9200/student/user/1?pretty' -H 'Content-Type: application/json' -d '{"name": "lhd","sex":"man","age":"18","about":"good good study","interests":["chinese","english"]}'
{
  "_index" : "student",
  "_type" : "user",
  "_id" : "1",
  "_version" : 1,
  "result" : "created",
  "_shards" : {
    "total" : 2,
    "successful" : 1,
    "failed" : 0
  },
  "_seq_no" : 0,
  "_primary_term" : 1
}

#查看数据,索引 类型 以列显示
[root@db01 ~]# curl -GET '10.0.0.51:9200/student/user/1?pretty'
{
  "_index" : "student",
  "_type" : "user",
  "_id" : "1",
  "_version" : 1,
  "_seq_no" : 0,
  "_primary_term" : 1,
  "found" : true,
  "_source" : {
    "name" : "lhd",
    "sex" : "man",
    "age" : "18",
    "about" : "good good study",
    "interests" : [
      "chinese",
      "english"
    ]
  }
}
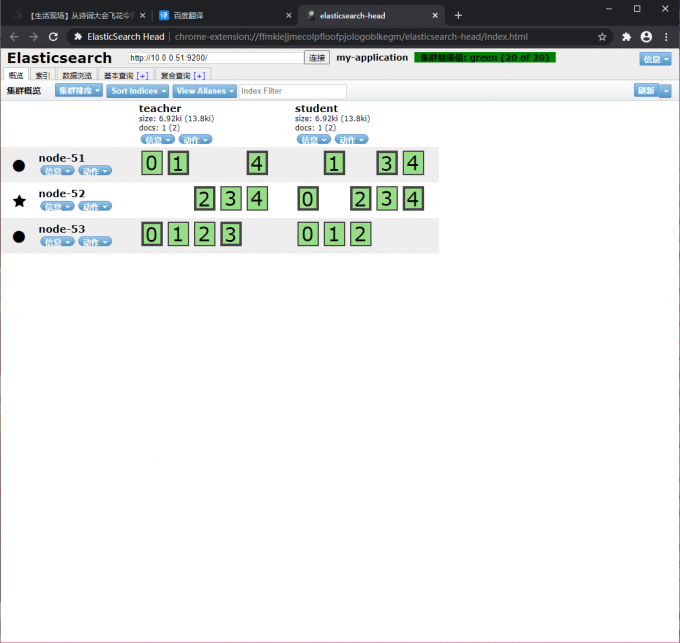
方法二:使用插件1
1.在'电脑上'解压es-head-0.1.4_0.crx.zip,解压到'一个目录'(以后使用浏览器中的插件必须依靠该目录)
2.谷歌浏览器,右上角,三个点或者三个杠
3.更多工具--扩展程序
4.右上角打开开发者模式
5.加载已解压的扩展程序,选择解压问价你的目录
6.右上角有个放大镜或者拼图,点击进去

方法三:使用插件2
#安装npm(只需要在一个节点安装即可,如果前端还有nginx做反向代理可以每个节点都装)
[root@elkstack01 ~]# yum install -y npm
#进入下载head插件代码目录
[root@elkstack01 src]# cd /usr/local/
#从GitHub上克隆代码到本地
[root@elkstack01 local]# git clone git://github.com/mobz/elasticsearch-head.git
#克隆完成后,进入elasticsearch插件目录
[root@elkstack01 local]# cd elasticsearch-head/
#清除缓存
[root@elkstack01 elasticsearch-head]# npm cache clean -f
#使用npm安装n模块(不同的项目js脚本所需的node版本可能不同,所以就需要node版本管理工具)
[root@elkstack01 elasticsearch-head]# npm install -g n
#安装最新版本n模块
[root@elkstack01 elasticsearch-head]# n stable
#生成grunt
[root@elkstack01 elasticsearch-head]# npm install grunt -save
#确认生成grunt文件
[root@elkstack01 elasticsearch-head]# ll node_modules/grunt
#执行安装grunt
[root@elkstack01 elasticsearch-head]# npm install
#后台启动head插件(切记,必须在插件目录下执行启动命令)
[root@elkstack01 elasticsearch-head]# npm run start &
#验证端口是否启动成功
[root@elkstack01 elasticsearch-head]# netstat -lntup
tcp        0      0 0.0.0.0:9100                0.0.0.0:*                   LISTEN      11293/grunt
#启动成功后,修改elasticsearch配置文件
[root@elkstack01 elasticsearch-head]# vim /etc/elasticsearch/elasticsearch.yml
#添加如下两行,开启跨域访问支持(添加在配置文件最后即可)
http.cors.enabled: true
http.cors.allow-origin: "*"
#重启elasticsearch
[root@elkstack01 elasticsearch-head]# /etc/init.d/elasticsearch restart
