Spring Security的使用

spring security使用目的:验证,授权,攻击防护。

原理:创建大量的filter和interceptor来进行请求的验证和拦截,以此来达到安全的效果。

Spring Security主要包括两大功能:验证和鉴权。验证就是确认用户的身份,一般采用用户名和密码的形式;鉴权就是确认用户拥有的身份(角色、权限)能否访问受保护的资源。

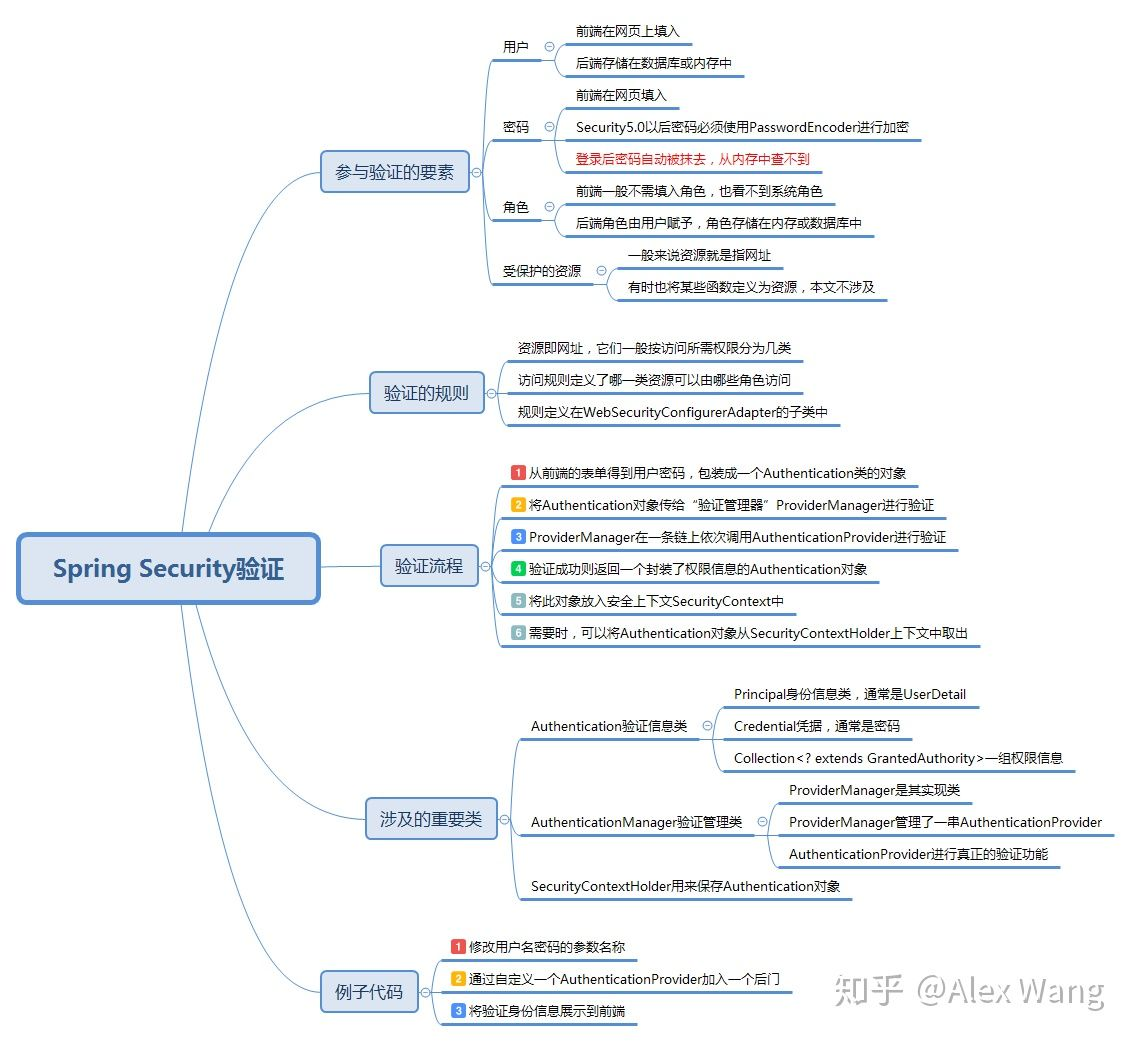
 鉴权则是一系列判断用户是否有权限访问资源的过程。

1.当用户未登录时,访问任何需要权限的资源都会转向登录页面,尝试进行登录;

2.当用户登录成功时,他会获得一系列角色。

3.用户访问某资源/xxx时,FilterInvocationSecurityMetadataSource这个类的实现类(本文是MySecurityMetadataSource)会调用getAttributes方法来进行资源匹配。它会读取数据库resource表中的所有记录,对/xxx进行匹配。若匹配成功,则将/xxx对应所需的角色组成一个 Collection<ConfigAttribute>返回;匹配不成功则说明/xxx不需要什么额外的访问权限;

4.流程来到鉴权的决策类AccessDecisionManager的实现类(MyAccessDecisionManager)中,它的decide方法可以决定当前用户是否能够访问资源。decide方法的参数中可以获得当前用户的验证信息、第3步中获得的资源所需角色信息,对这些角色信息进行匹配即可决定鉴权是否通过。当然,你也可以加入自己独特的判断方法,例如只要用户具有ROLE_ADMIN角色就一律放行;

5.若鉴权成功则用户顺利访问页面,否则在decide方法中抛出AccessDeniedException异常,这个异常会被AccessDeniedHandler的实现类(MyAccessDeniedHandler)处理。它仅仅是生成了一个json对象,转换为字符串返回给客户端了。

新建一个springboot项目

创建一个springboot项目,添加一个/helloController

@RestController public class HelloController { @RequestMapping("/hello") public String hello(){ return "hello"; } }

这样,这个/hello是可以默认访问,返回一个hello字符串。

添加spring security

向pom.xml中添加security依赖

<dependency> <groupId>org.springframework.boot</groupId> <artifactId>spring-boot-starter-security</artifactId> </dependency>

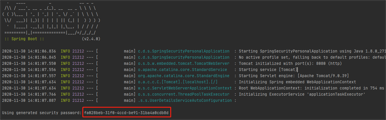
这样在启动的时候会在控制台显示随机生成的密码。

console密码显示

这时访问http://localhost:8080/hello会重定向到http://localhost:8080/login,这个页面是spring默认的。
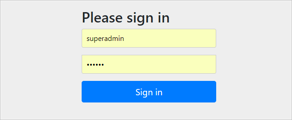
默认的登录页

登录

使用默认用户和随机生成的密码登录

spring security 默认的用户名是user,spring security启动的时候会生成默认密码(在启动日志中可以看到)。

我们填入user 和 上图显示的fa028beb-31f0-4ccd-be91-31ba4a0cdb8d,那么就会正常的访问/hello

image-20201130141751390

使用yaml文件定义的用户名、密码登录

在application.yml中定义用户名密码:

spring: 
    security: 
        user: 
            name: root 
            password: root            

使用root/root登录,可以正常访问/hello

使用代码中指定的用户名、密码登录

  • 使用configure(AuthenticationManagerBuilder) 添加认证。
  • 使用configure(httpSecurity) 添加权限
@Configuration
public class MySecurityConfiguration extends WebSecurityConfigurerAdapter {
    @Override
    protected void configure(AuthenticationManagerBuilder auth) throws Exception {
        auth
                .inMemoryAuthentication()
                .withUser("admin") // 添加用户admin
                .password("{noop}admin")  // 不设置密码加密
                .roles("ADMIN", "USER")// 添加角色为admin,user
                .and()
                .withUser("user") // 添加用户user
                .password("{noop}user") 
                .roles("USER")
                .and()
                .withUser("tmp") // 添加用户tmp
                .password("{noop}tmp")
                .roles(); // 没有角色
    }
    @Override
    protected void configure(HttpSecurity http) throws Exception {
        http
                .authorizeRequests()
                .antMatchers("/product/**").hasRole("USER") //添加/product/** 下的所有请求只能由user角色才能访问
                .antMatchers("/admin/**").hasRole("ADMIN") //添加/admin/** 下的所有请求只能由admin角色才能访问
                .anyRequest().authenticated() // 没有定义的请求,所有的角色都可以访问(tmp也可以)。
                .and()
                .formLogin().and()
                .httpBasic();
    }
}

添加AdminController、ProductController

@RestController
@RequestMapping("/admin")
public class AdminController {
    @RequestMapping("/hello")
    public String hello(){
        return "admin hello";
    }
}
@RestController
@RequestMapping("/product")
public class ProductController {
    @RequestMapping("/hello")
    public String hello(){
        return "product hello";
    }
}

通过上面的设置,访问http://localhost:8080/admin/hello只能由admin访问,http://localhost:8080/product/hello admin和user都可以访问,http://localhost:8080/hello 所有用户(包括tmp)都可以访问。

使用数据库的用户名、密码登录

添加依赖

<dependency>
    <groupId>org.springframework.boot</groupId>
    <artifactId>spring-boot-starter-data-jpa</artifactId>
</dependency>
<dependency>
    <groupId>mysql</groupId>
    <artifactId>mysql-connector-java</artifactId>
</dependency>

添加数据库配置

spring:
  datasource:
    url: jdbc:mysql://localhost:3306/demo?useUnicode=true&characterEncoding=utf8&serverTimezone=Asia/Shanghai
    username: root
    password: root
    driver-class-name: com.mysql.cj.jdbc.Driver

配置spring-security认证和授权

@Configuration
public class MySecurityConfiguration extends WebSecurityConfigurerAdapter {

    @Autowired
    private UserDetailsService userDetailsService;

    @Override
    protected void configure(AuthenticationManagerBuilder auth) throws Exception {
        auth.userDetailsService(userDetailsService)// 设置自定义的userDetailsService
                .passwordEncoder(passwordEncoder());
    }

    @Override
    protected void configure(HttpSecurity http) throws Exception {
        http
                .authorizeRequests()
                .antMatchers("/product/**").hasRole("USER")
                .antMatchers("/admin/**").hasRole("ADMIN")
                .anyRequest().authenticated() //
                .and()
                .formLogin()
                .and()
                .httpBasic()
                .and().logout().logoutUrl("/logout");
    }

    @Bean
    public PasswordEncoder passwordEncoder() {
        return NoOpPasswordEncoder.getInstance();// 使用不使用加密算法保持密码
//        return new BCryptPasswordEncoder();
    }
}

如果需要使用BCryptPasswordEncoder,可以先在测试环境中加密后放到数据库中:

@Test
void encode() {
    BCryptPasswordEncoder bCryptPasswordEncoder = new BCryptPasswordEncoder();
    String password = bCryptPasswordEncoder.encode("user");
    String password2 = bCryptPasswordEncoder.encode("admin");
    System.out.println(password);
    System.out.println(password2);
}

配置自定义UserDetailsService来进行验证

@Component("userDetailsService")
public class CustomUserDetailsService implements UserDetailsService {

   @Autowired
   UserRepository userRepository;

   @Override
   public UserDetails loadUserByUsername(String login) throws UsernameNotFoundException {
         // 1. 查询用户
      User userFromDatabase = userRepository.findOneByLogin(login);
      if (userFromDatabase == null) {
         //log.warn("User: {} not found", login);
       throw new UsernameNotFoundException("User " + login + " was not found in db");
            //这里找不到必须抛异常
      }

       // 2. 设置角色
      Collection<GrantedAuthority> grantedAuthorities = new ArrayList<>();
      GrantedAuthority grantedAuthority = new SimpleGrantedAuthority(userFromDatabase.getRole());
      grantedAuthorities.add(grantedAuthority);

      return new org.springframework.security.core.userdetails.User(login,
            userFromDatabase.getPassword(), grantedAuthorities);
   }

}

配置JPA中的UserRepository

@Repository
public interface UserRepository extends JpaRepository<User, Long> {
    User findOneByLogin(String login);
}

添加数据库数据

image-20201130200749622

CREATE TABLE `user` (
  `id` int(28) NOT NULL,
  `login` varchar(255) COLLATE utf8mb4_general_ci DEFAULT NULL,
  `password` varchar(255) COLLATE utf8mb4_general_ci DEFAULT NULL,
  `role` varchar(255) COLLATE utf8mb4_general_ci DEFAULT NULL,
  PRIMARY KEY (`id`)
) ENGINE=InnoDB DEFAULT CHARSET=utf8mb4 COLLATE=utf8mb4_general_ci;
INSERT INTO `demo`.`user`(`id`, `login`, `password`, `role`) VALUES (1, 'user', 'user', 'ROLE_USER');
INSERT INTO `demo`.`user`(`id`, `login`, `password`, `role`) VALUES (2, 'admin', 'admin', 'ROLE_ADMIN');

默认角色前缀必须是ROLE_,因为spring-security会在授权的时候自动使用match中的角色加上ROLE_后进行比较。

获取登录信息

@RequestMapping("/info")
public String info(){
    String userDetails = null;
    Object principal = SecurityContextHolder.getContext().getAuthentication().getPrincipal();
    if(principal instanceof UserDetails) {
        userDetails = ((UserDetails)principal).getUsername();
    }else {
        userDetails = principal.toString();
    }
    return userDetails;
}

使用SecurityContextHolder.getContext().getAuthentication().getPrincipal();获取当前的登录信息。

Spring Security 核心组件

SecurityContext

SecurityContext是安全的上下文,所有的数据都是保存到SecurityContext中。

可以通过SecurityContext获取的对象有:

  • Authentication

SecurityContextHolder

SecurityContextHolder用来获取SecurityContext中保存的数据的工具。通过使用静态方法获取SecurityContext的相对应的数据。

SecurityContext context = SecurityContextHolder.getContext();

Authentication

Authentication表示当前的认证情况,可以获取的对象有:

UserDetails:获取用户信息,是否锁定等额外信息。

Credentials:获取密码。

isAuthenticated:获取是否已经认证过。

Principal:获取用户,如果没有认证,那么就是用户名,如果认证了,返回UserDetails。

UserDetails

public interface UserDetails extends Serializable {

    Collection<? extends GrantedAuthority> getAuthorities();
    String getPassword();
    String getUsername();
    boolean isAccountNonExpired();
    boolean isAccountNonLocked();
    boolean isCredentialsNonExpired();
    boolean isEnabled();
}

UserDetailsService

UserDetailsService可以通过loadUserByUsername获取UserDetails对象。该接口供spring security进行用户验证。

通常使用自定义一个CustomUserDetailsService来实现UserDetailsService接口,通过自定义查询UserDetails。

AuthenticationManager

AuthenticationManager用来进行验证,如果验证失败会抛出相对应的异常。

PasswordEncoder

密码加密器。通常是自定义指定。

BCryptPasswordEncoder:哈希算法加密

NoOpPasswordEncoder:不使用加密

spring security session 无状态支持权限控制(前后分离)

spring security会在默认的情况下将认证信息放到HttpSession中。

但是对于我们的前后端分离的情况,如app,小程序,web前后分离等,httpSession就没有用武之地了。这时我们可以通过configure(httpSecurity)设置spring security是否使用httpSession。

@Configuration
public class MySecurityConfiguration extends WebSecurityConfigurerAdapter {
    // code...
    @Override
    protected void configure(HttpSecurity http) throws Exception {
        http
                .sessionManagement()
                //设置无状态,所有的值如下所示。
                .sessionCreationPolicy(SessionCreationPolicy.STATELESS)
                // code...
    }
    // code...
}

共有四种值,其中默认的是ifRequired。

  • always – a session will always be created if one doesn’t already exist,没有session就创建。
  • ifRequired – a session will be created only if required (default),如果需要就创建(默认)。
  • never – the framework will never create a session itself but it will use one if it already exists
  • stateless – no session will be created or used by Spring Security 不创建不使用session

由于前后端不通过保存session和cookie来进行判断,所以为了保证spring security能够记录登录状态,所以需要传递一个值,让这个值能够自我验证来源,同时能够得到数据信息。选型我们选择JWT。对于java客户端我们选择使用jjwt

添加依赖

<dependency>
    <groupId>io.jsonwebtoken</groupId>
    <artifactId>jjwt-api</artifactId>
    <version>0.11.2</version>
</dependency>
<dependency>
    <groupId>io.jsonwebtoken</groupId>
    <artifactId>jjwt-impl</artifactId>
    <version>0.11.2</version>
    <scope>runtime</scope>
</dependency>
<dependency>
    <groupId>io.jsonwebtoken</groupId>
    <artifactId>jjwt-jackson</artifactId> <!-- or jjwt-gson if Gson is preferred -->
    <version>0.11.2</version>
    <scope>runtime</scope>
</dependency>

创建工具类JWTProvider

JWTProvider需要至少提供两个方法,一个用来创建我们的token,另一个根据token获取Authentication。

provider需要保证Key密钥是唯一的,使用init()构建,否则会抛出异常。

@Component
@Slf4j
public class JWTProvider {
    private Key key;    // 私钥
    private long tokenValidityInMilliseconds; // 有效时间
    private long tokenValidityInMillisecondsForRememberMe; // 记住我有效时间
    @Autowired
    private JJWTProperties jjwtProperties; // jwt配置参数
    @Autowired
    private UserRepository userRepository; 
    @PostConstruct
    public void init() {
        byte[] keyBytes;
        String secret = jjwtProperties.getSecret();
        if (StringUtils.hasText(secret)) {
            log.warn("Warning: the JWT key used is not Base64-encoded. " +
                    "We recommend using the `jhipster.security.authentication.jwt.base64-secret` key for optimum security.");
            keyBytes = secret.getBytes(StandardCharsets.UTF_8);
        } else {
            log.debug("Using a Base64-encoded JWT secret key");
            keyBytes = Decoders.BASE64.decode(jjwtProperties.getBase64Secret());
        }
        this.key = Keys.hmacShaKeyFor(keyBytes); // 使用mac-sha算法的密钥
        this.tokenValidityInMilliseconds =
                1000 * jjwtProperties.getTokenValidityInSeconds();
        this.tokenValidityInMillisecondsForRememberMe =
                1000 * jjwtProperties.getTokenValidityInSecondsForRememberMe();
    }
    public String createToken(Authentication authentication, boolean rememberMe) {
        long now = (new Date()).getTime();
        Date validity;
        if (rememberMe) {
            validity = new Date(now + this.tokenValidityInMillisecondsForRememberMe);
        } else {
            validity = new Date(now + this.tokenValidityInMilliseconds);
        }
        User user = userRepository.findOneByLogin(authentication.getName());
        Map<String ,Object> map = new HashMap<>();
        map.put("sub",authentication.getName());
        map.put("user",user);
        return Jwts.builder()
                .setClaims(map) // 添加body
                .signWith(key, SignatureAlgorithm.HS512) // 指定摘要算法
                .setExpiration(validity) // 设置有效时间
                .compact();
    }
    public Authentication getAuthentication(String token) {
        Claims claims = Jwts.parserBuilder()
                .setSigningKey(key)
                .build()
                .parseClaimsJws(token).getBody(); // 根据token获取body
        User principal;
        Collection<? extends GrantedAuthority> authorities;
        principal = userRepository.findOneByLogin(claims.getSubject());
        authorities = principal.getAuthorities();
        return new UsernamePasswordAuthenticationToken(principal, token, authorities);
    }
}

注意这里我们创建的User需要实现UserDetails对象,这样我们可以根据principal.getAuthorities()获取到权限,如果不实现UserDetails,那么需要自定义authorities并添加到UsernamePasswordAuthenticationToken中。

@Data
@Entity
@Table(name="user")
public class User implements UserDetails {
    @Id
    @Column
    private Long id;
    @Column
    private String login;
    @Column
    private String password;
    @Column
    private String role;
    @Override
    // 获取权限,这里就用简单的方法
    // 在spring security中,Authorities既可以是ROLE也可以是Authorities
    public Collection<? extends GrantedAuthority> getAuthorities() {
        return Collections.singleton(new SimpleGrantedAuthority(role));
    }
    @Override
    public String getUsername() {
        return login;
    }
    @Override
    public boolean isAccountNonExpired() {
        return true;
    }
    @Override
    public boolean isAccountNonLocked() {
        return false;
    }
    @Override
    public boolean isCredentialsNonExpired() {
        return true;
    }
    @Override
    public boolean isEnabled() {
        return true;
    }
}

创建登录成功,登出成功处理器

登录成功后向前台发送jwt。

认证成功,返回jwt:

public class MyAuthenticationSuccessHandler implements AuthenticationSuccessHandler{
    void onAuthenticationSuccess(HttpServletRequest request, HttpServletResponse response, Authentication authentication) throws IOException, ServletException{
        PrintWriter writer = response.getWriter();
        writer.println(jwtProvider.createToken(authentication, true));
    }
}

登出成功:

public class MyLogoutSuccessHandler implements LogoutSuccessHandler {
    void onLogoutSuccess(HttpServletRequest var1, HttpServletResponse var2, Authentication var3) throws IOException, ServletException{
        PrintWriter writer = response.getWriter();
        writer.println("logout success");
        writer.flush();
    }
}

设置登录、登出、取消csrf防护

登出无法对token进行失效操作,可以使用数据库保存token,然后在登出时删除该token。

@Configuration
public class MySecurityConfiguration extends WebSecurityConfigurerAdapter {
    // code...
    @Override
    protected void configure(HttpSecurity http) throws Exception {
       http
           // code...
           // 添加登录处理器
           .formLogin().loginProcessingUrl("/login").successHandler((request, response, authentication) -> {
           PrintWriter writer = response.getWriter();
           writer.println(jwtProvider.createToken(authentication, true));
       })
           // 取消csrf防护
           .and().csrf().disable() 
           // code...
           // 添加登出处理器
           .and().logout().logoutUrl("/logout").logoutSuccessHandler((HttpServletRequest request, HttpServletResponse response, Authentication authentication) -> {
           PrintWriter writer = response.getWriter();
           writer.println("logout success");
           writer.flush();
       })
            // code...
    }
    // code...
}

使用JWT集成spring-security

添加Filter供spring-security解析token,并向securityContext中添加我们的用户信息。

在UsernamePasswordAuthenticationFilter.class之前我们需要执行根据token添加authentication。关键方法是从jwt中获取authentication,然后添加到securityContext中。

在SecurityConfiguration中需要设置Filter添加的位置。

创建自定义Filter,用于jwt获取authentication:

@Slf4j
public class JWTFilter extends GenericFilterBean {

    private final static String HEADER_AUTH_NAME = "auth";

    private JWTProvider jwtProvider;

    public JWTFilter(JWTProvider jwtProvider) {
        this.jwtProvider = jwtProvider;
    }

    @Override
    public void doFilter(ServletRequest servletRequest, ServletResponse servletResponse, FilterChain filterChain) throws IOException, ServletException {
        try {
            HttpServletRequest httpServletRequest = (HttpServletRequest) servletRequest;
            String authToken = httpServletRequest.getHeader(HEADER_AUTH_NAME);
            if (StringUtils.hasText(authToken)) {
                // 从自定义tokenProvider中解析用户
                Authentication authentication = this.jwtProvider.getAuthentication(authToken);
                SecurityContextHolder.getContext().setAuthentication(authentication);
            }
            // 调用后续的Filter,如果上面的代码逻辑未能复原“session”,SecurityContext中没有想过信息,后面的流程会检测出"需要登录"
            filterChain.doFilter(servletRequest, servletResponse);
        } catch (Exception ex) {
            throw new RuntimeException(ex);
        }
    }
}

向HttpSecurity添加Filter和设置Filter位置:

public class MySecurityConfiguration extends WebSecurityConfigurerAdapter {
    // code...
    @Override
    protected void configure(HttpSecurity http) throws Exception {
        http
                .sessionManagement()
                //设置添加Filter和位置
                .and().addFilterBefore(new JWTFilter(jwtProvider), UsernamePasswordAuthenticationFilter.class);
                // code...
    }
    // code...
}

MySecurityConfiguration代码

@Configuration
@EnableGlobalMethodSecurity(prePostEnabled = true)
public class MySecurityConfiguration extends WebSecurityConfigurerAdapter {
    @Autowired
    private UserDetailsService userDetailsService;
    @Autowired
    private JWTProvider jwtProvider;
    @Override
    protected void configure(AuthenticationManagerBuilder auth) throws Exception {
        auth.userDetailsService(userDetailsService)// 设置自定义的userDetailsService
                .passwordEncoder(passwordEncoder());
    }
    @Override
    protected void configure(HttpSecurity http) throws Exception {
        http
                .sessionManagement()
                .sessionCreationPolicy(SessionCreationPolicy.STATELESS)//设置无状态
                .and()
                .authorizeRequests() // 配置请求权限
                .antMatchers("/product/**").hasRole("USER") // 需要角色
                .antMatchers("/admin/**").hasRole("ADMIN")
                .anyRequest().authenticated() // 所有的请求都需要登录
                .and()
                // 配置登录url,和登录成功处理器
                .formLogin().loginProcessingUrl("/login").successHandler((request, response, authentication) -> {
                    PrintWriter writer = response.getWriter();
                    writer.println(jwtProvider.createToken(authentication, true));
                })
                // 取消csrf防护
                .and().csrf().disable() 
                .httpBasic()
                // 配置登出url,和登出成功处理器
                .and().logout().logoutUrl("/logout")
                .logoutSuccessHandler((HttpServletRequest request, HttpServletResponse response, Authentication authentication) -> {
                    PrintWriter writer = response.getWriter();
                    writer.println("logout success");
                    writer.flush();
                })
                // 在UsernamePasswordAuthenticationFilter之前执行我们添加的JWTFilter
                .and().addFilterBefore(new JWTFilter(jwtProvider), UsernamePasswordAuthenticationFilter.class);
    }
    @Bean
    public PasswordEncoder passwordEncoder() {
        return NoOpPasswordEncoder.getInstance();
    }
    @Override
    public void configure(WebSecurity web) {
        // 添加不做权限的URL
        web.ignoring()
                .antMatchers("/swagger-resources/**")
                .antMatchers("/swagger-ui.html")
                .antMatchers("/webjars/**")
                .antMatchers("/v2/**")
                .antMatchers("/h2-console/**");
    }
}

使用注解对方法进行权限管理

需要在MySecurityConfiguration上添加@EnableGlobalMethodSecurity(prePostEnabled = true)注解,prePostEnabled默认为false,需要设置为true后才能全局的注解权限控制。

prePostEnabled设置为true后,可以使用四个注解:

添加实体类School:

@Data
public class School implements Serializable {
    private Long id;
    private String name;
    private String address;
}
  • @PreAuthorize

    在访问之前就进行权限判断

@RestController
public class AnnoController {
    @Autowired
    private JWTProvider jwtProvider;
    @RequestMapping("/annotation")
//    @PreAuthorize("hasRole('ADMIN')")
    @PreAuthorize("hasAuthority('ROLE_ADMIN')")
    public String info(){
        return "拥有admin权限";
    }
}
  • hasRole和hasAuthority都会对UserDetails中的getAuthorities进行判断区别是hasRole会对字段加上ROLE_后再进行判断,上例中使用了hasRole('ADMIN'),那么就会使用ROLE_ADMIN进行判断,如果是hasAuthority('ADMIN'),那么就使用ADMIN进行判断。

  • @PostAuthorize

    在请求之后进行判断,如果返回值不满足条件,会抛出异常,但是方法本身是已经执行过了的。

    @RequestMapping("/postAuthorize")
    @PreAuthorize("hasRole('ADMIN')")
    @PostAuthorize("returnObject.id%2==0")
    public School postAuthorize(Long id) {
        School school = new School();
        school.setId(id);
        return school;
    }

    returnObject是内置对象,引用的是方法的返回值。

    如果returnObject.id%2==0为 true,那么返回方法值。如果为false,会返回403 Forbidden。

  • @PreFilter

    在方法执行之前,用于过滤集合中的值。

    @RequestMapping("/preFilter")
    @PreAuthorize("hasRole('ADMIN')")
    @PreFilter("filterObject%2==0")
    public List<Long> preFilter(@RequestParam("ids") List<Long> ids) {
        return ids;
    }

    filterObject是内置对象,引用的是集合中的泛型类,如果有多个集合,需要指定filterTarget

    @PreFilter(filterTarget="ids", value="filterObject%2==0") public List<Long> preFilter(@RequestParam("ids") List<Long> ids,@RequestParam("ids") List<User> users,) { return ids; }

    filterObject%2==0会对集合中的值会进行过滤,为true的值会保留。

    第一个例子返回的值在执行前过滤返回2,4。

    image-20201202115120854

  • @PostFilter

    会对返回的集合进行过滤。

    @PreFilter(filterTarget="ids", value="filterObject%2==0")
    public List<Long> preFilter(@RequestParam("ids") List<Long> ids,@RequestParam("ids") List<User> users,) {
        return ids;
    }

    上面的方法返回结果为:id为0,2,4,6,8的School对象。

转自:https://www.cnblogs.com/dl610455894/p/14072960.html

唯有热爱方能抵御岁月漫长。
原文地址:https://www.cnblogs.com/syq816/p/14422875.html