版权声明:本文为博主原创文章,未经博主允许不得转载。
https是http+tls。是在http和tcp之间添加了一层ssl加密验证,ssl将http发送的信息在将要发到传输层时进行了加密,同样数据从传输层到达http层时需要ssl解密。

如果iOS通过https访问的站点(服务器)证书是ca机构颁发的话,不需要多余的代码,请求以前http的时候怎么写现在还怎么写,只是把请求url的http改成https,但是如果站点的证书是自签证书(如通过java keytool自生成),ios默认是验证不通过的,请求会失败,那么需要在http请求回调里面做两步多余的处理,回调如下:
//证书验证处理
- (void)connection:(NSURLConnection *)connection didReceiveAuthenticationChallenge:(NSURLAuthenticationChallenge *)challenge;
//信任自签证书站点
- (BOOL)connection:(NSURLConnection *)connection canAuthenticateAgainstProtectionSpace:(NSURLProtectionSpace *)protectionSpace;
具体代码:


 1 - (void)connection:(NSURLConnection *)connection didReceiveAuthenticationChallenge:(NSURLAuthenticationChallenge *)challenge {
 2     if (([challenge.protectionSpace.authenticationMethod
 3           isEqualToString:NSURLAuthenticationMethodServerTrust])) {
 4         if ([challenge.protectionSpace.host isEqualToString:TRUSTED_HOST]) {//TRUSTED_HOST主机名
 5             NSLog(@"Allowing bypass...");
 6             NSURLCredential *credential = [NSURLCredential credentialForTrust:
 7                                            challenge.protectionSpace.serverTrust];
 8             [challenge.sender useCredential:credential
 9                  forAuthenticationChallenge:challenge];
10         }
11     }
12     [challenge.sender continueWithoutCredentialForAuthenticationChallenge:challenge];
13 }
14 - (BOOL)connection:(NSURLConnection *)connection canAuthenticateAgainstProtectionSpace:(NSURLProtectionSpace *)protectionSpace
15 {
16     return [protectionSpace.authenticationMethod isEqualToString:NSURLAuthenticationMethodServerTrust];
17 }
这两个回调相当于做了https请求的全局设置,设置的作用是信任该站点的证书,一般在第一次发https请求的时候设置信任,以后客户端就可以和服务端正常地进行https通信了。
ios原生和uiwebview h5发送https请求的问题都可以通过上面代码处理,uiwebview一样对不信任证书站点会访问失败,原生里面做了对该站点的信任后对h5同样有效,也就是说一旦原生http请求对该站点信任则h5对该站点的访问也会正常。在stackoverflow上面看到一个例子,就是只有uiwebview控件需要对不信任证书站点访问的一种处理方式,既在uiviewview第一次发送https请求的时候在回调里面取消掉这次请求,既在shouldStartLoadWithRequest这个uiwebview回调的时候返回no,并同时用原生http去请求这个地址,并处理回调
设置信任后在原生请求即将收到信息回复的时候(即didReceiveResponse)取消掉该请求,并让uiwebview重新请求。这样信任了站点以后uiwebview请求该站点都可以成功。具体代码来自stackoverflow(http://stackoverflow.com/questions/11573164/uiwebview-to-view-self-signed-websites-no-private-api-not-nsurlconnection-i):
 1 #pragma mark - Webview delegate
 2
 3 // Note: This method is particularly important. As the server is using a self signed certificate,
 4 // we cannot use just UIWebView - as it doesn't allow for using self-certs. Instead, we stop the
 5 // request in this method below, create an NSURLConnection (which can allow self-certs via the delegate methods
 6 // which UIWebView does not have), authenticate using NSURLConnection, then use another UIWebView to complete
 7 // the loading and viewing of the page. See connection:didReceiveAuthenticationChallenge to see how this works.
 8 - (BOOL)webView:(UIWebView *)webView shouldStartLoadWithRequest:(NSURLRequest *)request navigationType:(UIWebViewNavigationType)navigationType;
 9 {
10     NSLog(@"Did start loading: %@ auth:%d", [[request URL] absoluteString], _authenticated);
11
12     if (!_authenticated) {
13         _authenticated = NO;
14
15         _urlConnection = [[NSURLConnection alloc] initWithRequest:_request delegate:self];
16
17         [_urlConnection start];
18
19         return NO;
20     }
21
22     return YES;
23 }
24
25
26 #pragma mark - NURLConnection delegate
27
28 - (void)connection:(NSURLConnection *)connection didReceiveAuthenticationChallenge:(NSURLAuthenticationChallenge *)challenge;
29 {
30     NSLog(@"WebController Got auth challange via NSURLConnection");
31
32     if ([challenge previousFailureCount] == 0)
33     {
34         _authenticated = YES;
35
36         NSURLCredential *credential = [NSURLCredential credentialForTrust:challenge.protectionSpace.serverTrust];
37
38         [challenge.sender useCredential:credential forAuthenticationChallenge:challenge];
39
40     } else
41     {
42         [[challenge sender] cancelAuthenticationChallenge:challenge];
43     }
44 }
45
46 - (void)connection:(NSURLConnection *)connection didReceiveResponse:(NSURLResponse *)response;
47 {
48     NSLog(@"WebController received response via NSURLConnection");
49
50     // remake a webview call now that authentication has passed ok.
51     _authenticated = YES;
52     [_web loadRequest:_request];
53
54     // Cancel the URL connection otherwise we double up (webview + url connection, same url = no good!)
55     [_urlConnection cancel];
56 }
57
58 // We use this method is to accept an untrusted site which unfortunately we need to do, as our PVM servers are self signed.
59 - (BOOL)connection:(NSURLConnection *)connection canAuthenticateAgainstProtectionSpace:(NSURLProtectionSpace *)protectionSpace
60 {
61     return [protectionSpace.authenticationMethod isEqualToString:NSURLAuthenticationMethodServerTrust];
62 }
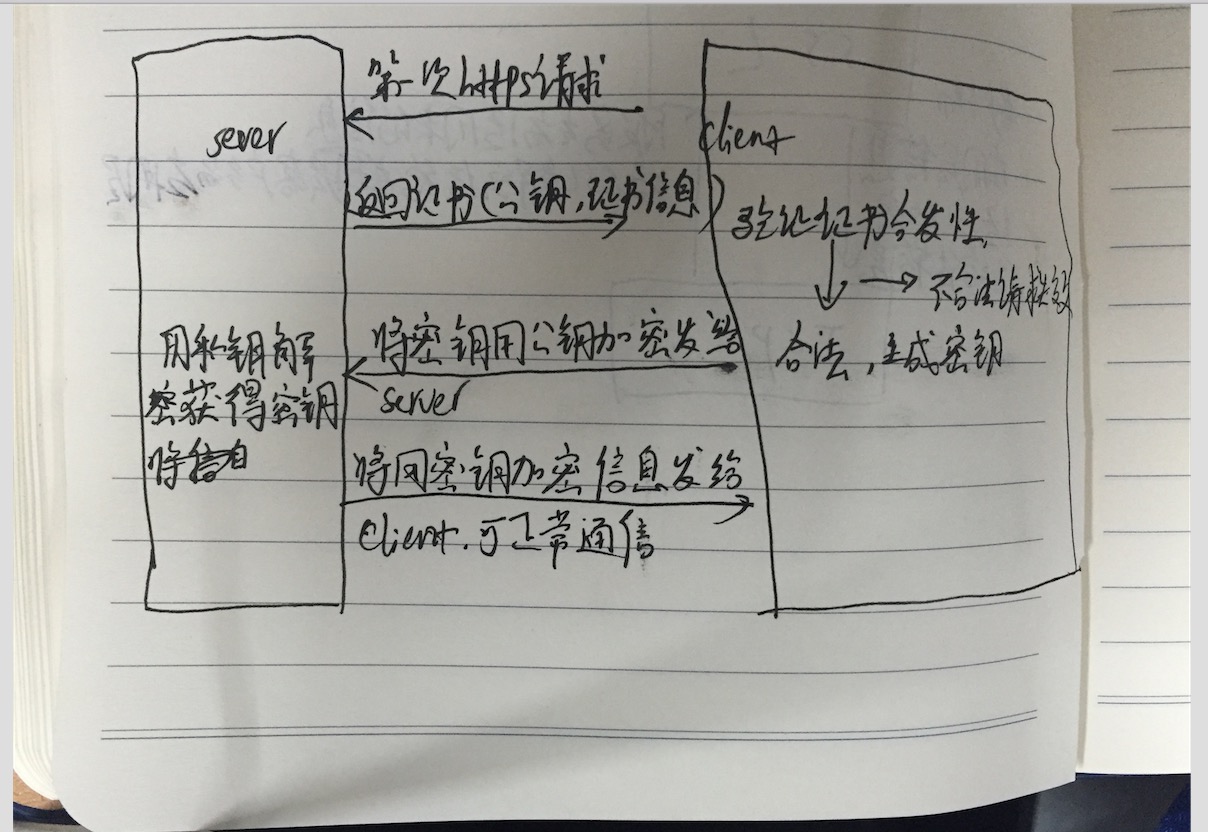
单向验证的原理网上很多,大致流程就是客户端第一次发送https请求到服务端,服务端将证书发送给客户端,该证书包含了公钥和证书的信息,客户端进行证书验证,验证颁发机构是否合法,是否过期,加密方式等。如果验证成功则生成一个随机值(秘钥),该值用来和服务端进行对称加密通信,并用公钥加密,发送给服务端。服务器用证书里的私钥解密获得客户端的密钥,然后服务端和客户端就可以进行https通信了。
个人认为ssl的处理逻辑是客户端会将验证后生成的秘钥保存在本地的某文件里,并在客户端发送https请求时从文件里读取密钥并用证书规定的加密方式加密,然后发送给传输层传输。
AFNetwork添加证书验证
    // /先导入证书
    NSString *cerPath = [[NSBundle mainBundle] pathForResource:@"xxx" ofType:@"cer"];//证书的路径
    NSData *certData = [NSData dataWithContentsOfFile:cerPath];

    // AFSSLPinningModeCertificate 使用证书验证模式
    AFSecurityPolicy *securityPolicy = [AFSecurityPolicy policyWithPinningMode:AFSSLPinningModeCertificate];

    // allowInvalidCertificates 是否允许无效证书(也就是自建的证书),默认为NO
    // 如果是需要验证自建证书,需要设置为YES
    securityPolicy.allowInvalidCertificates = YES;
    securityPolicy.validatesDomainName = NO;

    securityPolicy.pinnedCertificates = @[certData];
使用Keytool生成证书:
1、为服务器生产证书:
keytool -genkey -keyalg RSA -dname "cn=127.0.0.1,ou=inspur,o=none,l=hunan,st=changsha,c=cn" -alias server -keypass 111111 -keystore server.keystore -storepass 111111 -validity 3650
cn改成你服务器地址
l:省份
st:城市
2、生成csr
csr是用于提交CA认证的文件
keytool -certReq -alias server -keystore server.keystore -file ca.csr
3、生成cer
生成的ca.cer文件用于客户端证书导入信任服务器
keytool -export -alias server -keystore server.keystore -file ca.cer -storepass 111111
4、tomcat配置
<Connector SSLEnabled="true" clientAuth="false"
        maxThreads="150" port="8443"
        protocol="org.apache.coyote.http11.Http11Protocol"
        scheme="https" secure="true" sslProtocol="TLS"
        keystoreFile="/User/xxx/server.keystore" keystorePass="111111"/>
keystoreFile为文件路径
配置好后,重启tomcat可以使用https访问web工程,端口8443。