最近搭建了一个安卓端的APP自动化测试框架,下面就总结一些搭建的过程和思路,有不足之处还请指出
1、首先说明一下环境:
编辑器:pycharm2018.3.2
python环境:python3.6
appium环境:appium V1.15.1
另外还有生成报告用到的allure
2、再给大家看一下框架结构:
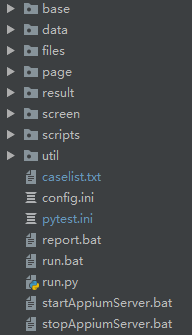
base里面放的公用的方法,比如find_element,click,sendKeys等;
data里面放的是我的测试用例所用到的一些参数,yml文件
files里面就是待测试的apk,测试用例,测试计划等,我这里还放了我测试过程需要上传的图片
page和scripts是PO模式,page放的某页面中的方法,scripts放的测试用例
result放的测试结果的log和报告
screen是放我测试过程中的一些截图的
util和base功能一样,天知道我为什么弄两个。。其实这两个文件夹合并也是可以的。
下面就是挨个文件夹介绍了。
3、因为很多地方用到了util和base里面的东西,所以我们先说这两个
util:

先说一下log.py,是用来记录log的,下面贴一下记录log的代码,这段代码严格来说不是我写的,之前看到一个公众号,感觉还不错,就拿过来改吧改吧用了,
import logging
from datetime import datetime
import os
import threading


class Log:
    def __init__(self):
        self.pro_dir = os.path.dirname(os.path.abspath(__file__))
        self.pro_dir = os.path.split(self.pro_dir)[0]

        # 下面是记录log的文件创建的过程
        self.result_path = os.path.join(self.pro_dir, "result")
        if not os.path.exists(self.result_path):
            os.mkdir(self.result_path)
        self.log_path = os.path.join(self.result_path, str(datetime.now().strftime("%Y%m%d%H%M%S")))
        if not os.path.exists(self.log_path):
            os.mkdir(self.log_path)

        self.logger = logging.getLogger()
        self.logger.setLevel(logging.INFO)
        # 创建处理器对象
        handler = logging.FileHandler(os.path.join(self.log_path, "output.log"))
        formatter = logging.Formatter('%(levelname)s  %(name)s:%(filename)s:%(lineno)s>> %(message)s')
        # 为处理器添加设置格式器对象,添加过滤器对象的方法为:handler.setFilter(filter)
        handler.setFormatter(formatter)
        self.logger.addHandler(handler)

    def get_logger(self):
        return self.logger


class MyLog:
    """
    将上面的记录log的方法放到一个线程内,让它单独启用一个线程,是为了更好的写log
    """
    log = None
    mutex = threading.Lock()

    def __init__(self):
        pass

    @staticmethod
    def get_log():
        if MyLog.log is None:
            MyLog.mutex.acquire()
            MyLog.log = Log()
            MyLog.mutex.release()
        return MyLog.log
check_devices是用来判断手机有没有连接上,以及有没有安装需要测试的APP
创建driver的时候,首先判断了手机有没有连接上,接着判断APP有没有安装,如果没有安装,再确认一下apk有没有,有的话就自动安装,安装完再测试。所以用到了下面这堆
import glob
import os
from base.base_action import BaseAction
from util.log import MyLog


# 定义全局变量
devices_list_finally = []
chose_file_num = []
log = MyLog().get_log()
logger = log.get_logger()


def is_devices_link():
    """
    检查是否有设备连接PC,有则返回True
    :return:
    """
    devices_list_start = []
    devices_cmd = os.popen('adb devices').readlines()
    devices_list_start_count = len(devices_cmd)
    devices_list_start_count = devices_list_start_count - 2
    if devices_list_start_count >= 1:
        print('find devices linked')
        for devices_num in range(devices_list_start_count):
            devices_list_start.append(devices_cmd[devices_num + 1])
            device_list_pers = devices_list_start[devices_num].index('	')
            devices_list_finally.append(devices_list_start[devices_num][:device_list_pers])
            print('devices list :' + '%d  ' % (devices_num + 1) + '%s' % devices_list_finally[devices_num])
        return True
    else:
        print('Can not find devices link...pls check device link...')
        logger.error("无法连接到手机,试试重新插拔手机")
        return False


def is_apk_installed(apk_path):
    """
    判断手机是否安装了待测试APP,安装则返回True
    :return:
    """
    app_package = BaseAction.get_app_package(apk_path)
    app_package = 'package:' + app_package + '
'
    all_packages = list(os.popen("adb shell pm list package"))
    if app_package in all_packages:
        return True
    else:
        return False


# 检查本地文件是否存在,这个文件放到了files文件夹下的apk文件夹里面
def check_local_file(apk_path):
    file_list = glob.glob(apk_path)
    file_index = len(file_list)
    if file_index != 0:
        if file_index == 1:
            return True
    else:
        logger.error("无法安装APP,请检查apk文件路径是否正确")
        exit()


# 安装应用
def install_apk(apk_path):
    for install_apk_to_devices_index in range(len(devices_list_finally)):
        os.system('adb -s' + ' ' + devices_list_finally[install_apk_to_devices_index] + ' ' + 'install' + ' ' + apk_path)
GlobalVar.py文件,写来是因为有的case需要跨文件设置全局变量,所以有了这个文件:
"""
定义全局变量,并且全局变量需要跨文件使用时,可以用该类。

比如定义全局变量的时候可以这样:
global_var = GlobalVar()
global_var.set_value("name", "value")
使用该全局变量的时候这样:
global_var.get_value("name")

"""

class GlobalVar:
    def __init__(self):
        global _global_dict
        _global_dict = {}

    @staticmethod
    def set_value(name, value):
        _global_dict[name] = value

    @staticmethod
    def get_value(name, def_value=None):
        try:
            return _global_dict[name]
        except KeyError:
            return def_value
readConfig就是读取配置文件的方法:
"""
读取配置文件的各种方法
"""
import codecs
import configparser
import os
from selenium.webdriver.common.by import By
from util.log import MyLog


log = MyLog().get_log()
logger = log.get_logger()


def dir_log(test):
    """
    捕获异常的装饰器方法
    :param test:
    :return:
    """
    def log(*args, **kwargs):
        try:
            res = test(*args, **kwargs)
            return res
        except Exception:
            raise
    return log


class ReadConfig:
    project_dir = os.path.dirname(os.path.abspath(__file__))
    project_dir = os.path.split(project_dir)[0]

    def __init__(self, config_path="config.ini"):
        # 需要读取的配置文件路径
        self.config_path = os.path.join(self.project_dir, config_path)

        try:
            with open(self.config_path, encoding="UTF-8") as fd:
                data = fd.read()
                # 判断data是否带BOM,如果带就删除
                if data[:3] == codecs.BOM_UTF8:
                    data = data[3:]
                    # 使用codecs.open打开文件,写入的时候更不容易出现编码问题,open方法只能写入str
                    with codecs.open(self.config_path, "w", encoding="UTF-8") as file:
                        file.write(data)
        except FileNotFoundError as e:
            # logging.error(str(e))
            print(e)
        # 将配置文件分割成一块一块的字典形式
        self.cfp = configparser.ConfigParser()
        self.cfp.read(self.config_path, encoding="UTF-8")

    @dir_log
    def get_db(self, name):
        value = self.cfp.get("DATABASE", name)
        return value

    @dir_log
    def get_test(self, name):
        value = self.cfp.get("TEST", name)
        return value
接下来是读取数据库的方法:
#encoding=utf-8
"""
读取数据库的方法
"""

import pymysql
from util.read_config import ReadConfig
from util.log import MyLog


class MyDB(object):
    def __init__(self):
        self.log = MyLog.get_log()
        self.logger = self.log.get_logger()
        local_read_config = ReadConfig()
        host = local_read_config.get_db("host")
        username = local_read_config.get_db("username")
        password = local_read_config.get_db("password")
        port = local_read_config.get_db("port")
        database = local_read_config.get_db("database")
        self.config = {
            'host': str(host),
            'user': username,
            'password': password,
            'port': int(port),
            'db': database
        }

        self.db = None
        self.cursor = None

    @classmethod
    def __new__(cls, *args, **kwargs):
        """每一次实例化的时候,都返回同一个instance对象"""
        if not hasattr(cls, "_instance"):
            cls._instance = super(MyDB, cls).__new__(cls)
        return cls._instance

    def connect_db(self):
        try:
            self.db = pymysql.connect(**self.config)
            self.cursor = self.db.cursor()
            self.logger.info("连接数据库成功")
        except ConnectionError as ex:
            self.logger.error(str(ex))

    def execute_sql(self, sql, params=None):
        self.connect_db()
        self.cursor.execute(sql, params)
        self.db.commit()
        return self.cursor

    def get_all(self, cur):
        value = cur.fetchall()
        return value

    def close_db(self):
        self.db.close()
        self.logger.info("关闭数据库")
上面这些涉及到了读取配置文件的东西,所以把 config.ini文件贴一下:
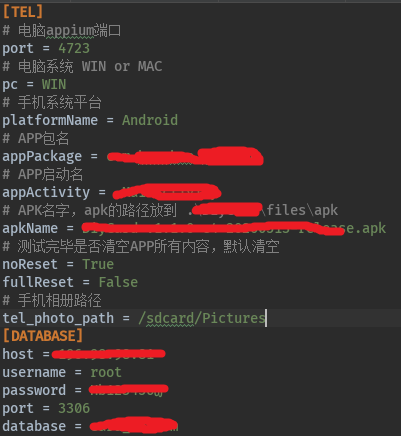
上面的TEL里面的内容是连接手机用到的
[DATABASE]下面是连接数据库相关的信息
其余的内容有时间再更新~~~