四.Nginx配置
1.默认虚拟主机
vi /usr/local/nginx/conf/nginx.conf
include vhost/*.conf;    //在结束符号 } 上面加入这行配置。所有/usr/local/nginx/conf/vhost下所有文件以.conf结尾文件都会加载,这样我们就可以把所有虚拟主机文件放到vhost目录下
mkdir /usr/local/nginx/conf/vhost
cd /usr/local/nginx/conf/vhost
vi default.conf //写入下面内容
server {
listen 80 default_server;    //有这个 default_server 标记的就是默认虚拟主机
server_name aaa.com;
index  index.html  index.htm index.php;
root  /data/nginx/default;
}
/usr/local/nginx/sbin/nginx -t  //检验上面配置
nginx: the configuration file /usr/local/nginx/conf/nginx.conf syntax is ok nginx: configuration file /usr/local/nginx/conf/nginx.conf test is successful     //说明配置没有问题
/usr/local/nginx/sbin/nginx -s reload     //重载配置,这样就不用重启了
mkdir -p /data/nginx/default/
echo "default_server" > /data/nginx/default/index.html     //创建索引页
curl -x127.0.0.1:80 aaa.com
curl -x127.0.0.1:80 1212.com//访问一个没有定义过的域名,也会访问到aaa.com

2.用户认证
cd /usr/local/nginx/conf/vhost/
vi test.com.conf
server
{
listen 80;
server_name test.com;
index index.html index.htm index.php;
root /data/nginx/test.com;
location /
{
auth_basic  "Auth";
auth_basic_user_file  /usr/local/nginx/conf/htpasswd;
}
}
yum install -y httpd   //安装httpd,也可以使用之前的Apache
htpasswd -c /usr/local/nginx/conf/htpasswd  sxt    //创建用户
/usr/local/nginx/sbin/nginx -t
/usr/local/nginx/sbin/nginx -s reload
核心配置语句两行。auth_basic打开认证,auth_basic_user_file指定用户密码文件,前提:用户密码文件存在。生成用户密码文件工具需要借助httpd的htpasswd。
mkdir /data/nginx/test.com
echo "test.com" > /data/nginx/test.com/index.html
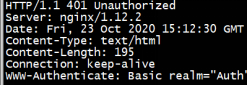
curl -I -x127.0.0.1:80 test.com
401说明网站需要验证
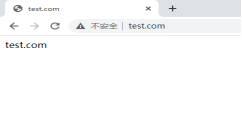
在浏览器中访问test.com
401说明网站需要验证在浏览器中访问test.com
如果是针对某个目录做用户认证,需要修改location后面的路径:
location /admin/
{
auth_basic  "Auth";
auth_basic_user_file  /usr/local/nginx/conf/htpasswd;
}
3.域名重定向
server
{
listen 80;
server_name test.com test1.com test2.com;
index index.html index.htm index.php;
root /data/nginx/test.com;
if  ($host != 'test.com' ){
rewrite ^/(.*)$ http://test.com/$1  permanent;
}
}
Nginx中,server_name 后面可以跟多个域名。permanent为永久重定向,相当于httpd的R=301;还有个redirect,为临时重定向,相当于R=302
/usr/local/nginx/sbin/nginx -t
/usr/local/nginx/sbin/nginx -s reload
curl -x127.0.0.1:80 test1.com/123.txt -I

4.nginx的访问日志
grep -A2 log_format /usr/local/nginx/conf/nginx.conf
和httpd类似,也是在主配置文件中定义的日志格式 :
combined_realip 日志格式的名字,后面可以调用它;
$remote_addr 访问网站的用户的出口ip;
$http_x_forwarded_for 代理服务器的ip,如果使用了代理则会记录代理的ip; $time_local 当前的时间;
$host 访问的主机名;
$request_uri 访问的URL地址;
$status 状态码;
$http_referer referer地址;
$http_user_agent user_agent。
vi test.com.conf
server
{
listen 80;
server_name test.com test1.com test2.com;
index index.html index.htm index.php;
root /data/nginx/test.com;
if ($host != 'test.com' ){
rewrite ^/(.*)$ http://test.com/$1  permanent;
}
access_log /tmp/1.log  combined_realip;  //使用access_log来指定日志的存储路径,最后面指定日志的格式名字
}
/usr/local/nginx/sbin/nginx -t
/usr/local/nginx/sbin/nginx -s reload
curl -x127.0.0.1:80  test.com/111
<html>
<head><title>404 Not Found</title></head>
<body bgcolor="white">
<center><h1>404 Not Found</h1></center>
<hr><center>nginx/1.12.2</center>
</body>
</html>
cat /tmp/1.log
127.0.0.1 - [23/Oct/2020:12:16:47 -0400] test.com "/111" 404 "-" "curl/7.29.0"
vi /usr/local/sbin/nginx_log_rotate.sh
#! /bin/bash
## 假设nginx的日志存放路径为/data/logs/
d= `data -d "-1 day" +%Y%m%d`
logdir="/data/logs"
 nginx_pid="/usr/local/nginx/logs/nginx.pid"
cd $logdir
for log in `ls *.log`
do
mv  $log  $log-$d
done
/bin/kill  -HUP  `cat  $nginx_pid`
写完脚本之后,还需要增加任务计划:
0 0 * * * /bin/bash /usr/local/sbin/nginx_log_rotate.sh
5.配置静态文件不记录日志并添加过期时间
vi test.com.conf
server
{
listen 80;
server_name test.com test1.com test2.com;
index index.html index.htm index.php;
root /data/nginx/test.com;
if ($host != 'test.com' ){
rewrite ^/(.*)$ http://test.com/$1  permanent;
}
location ~ .*.(gif|jpg|jpeg|png|bmp|swf)$//指定对于的静态文件
{
expires 7d;                       //配置过期时间
access_log off;                    //off就不记录访问日志了
}
location ~ .*.(js|css)$
{expires 12h;
access_log off;
}
access_log /tmp/1.log  combined_realip;
}
/usr/local/nginx/sbin/nginx -t
echo "111111111111" > /data/nginx/test.com/1.js     //创建js文件
echo "222222222222" > /data/nginx/test.com/2.jpg    //创建jpg文件
touch /data/nginx/test.com/1.jss                   //创建一个对比文件
curl -I -x127.0.0.1:80 test.com/1.js
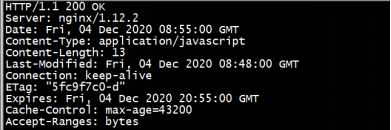
(43200秒即12小时,js文件过期时间为12h)
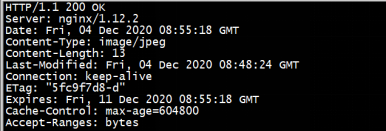
curl -I -x127.0.0.1:80 test.com/2.jpg
curl -I -x127.0.0.1:80 test.com/1.jss


6.nginx防盗链
vi test.com.conf
server
{
listen 80;
server_name test.com test1.com test2.com;
index index.html index.htm index.php;
root /data/nginx/test.com;
if ($host != 'test.com' ){
rewrite ^/(.*)$ http://test.com/$1  permanent;
}
location ~* ^.+.(gif|jpg|png|swf|flv|rar|zip|doc|pdf|gz|bz2|jpeg|bmp|xls)$
{
expires 7d;
valid_referers none blocked server_names *.test.com ;
if ($invalid_referer){
return 403;
}
access_log off;
}
}
/usr/local/nginx/sbin/nginx -t
/usr/local/nginx/sbin/nginx -s reload
curl -x127.0.0.1:80 -e "http://123.com/1.txt" test.com/2.jpg -I
curl -x127.0.0.1:80 -e "http://test.com/1.txt" test.com/2.jpg -I
7.访问控制
location /admin/ {
allow 192.168.33.128;
allow 127.0.0.1;
deny all; }
/usr/local/nginx/sbin/nginx -t
/usr/local/nginx/sbin/nginx -s reload
mkdir /data/nginx/test.com/admin/
echo "123" > /data/nginx/test.com/admin/1.html
curl -x127.0.0.1:80 test.com/admin/1.html
curl -x192.168.134.130:80 test.com/admin/1.html
配置文件中的IP也可以为IP段,比如可以写成allow 192.168.33.0/24。如果只是拒绝几个IP,可以写成这样:
location /admin/ {
deny 192.168.134.130;
deny 127.0.0.1; }
Nginx默认就是允许所有,所以不需要写allow all.另外,还可以根据正则匹配来限制:
location ~ .*(abc|image)/.*.php$ //禁止解析PHP
{
return 403;
}
|为分隔符,表示“或”的意思,这样就可以把访问的URL中带有abc或者image字符串,并且是PHP的请求拒绝访问。在Nginx里,也可以针对user_agent做一些限制:
if ($http_user_agent ~ `Spider/3.0|YoudaoBot|Tomato`)
{
return 403;
}
~为匹配符,只要user_agent中含有Spider3.0或者YoudaoBot或者Tomato字符串的,都会被拒绝。8.Nginx解析PHP
vi test.com.conf
location ~ .php$
{
include fastcgi_params;
fastcgi_pass unix:/tmp/php-fcgi.sock;
fastcgi_index index.php;
fastcgi_param SCRIPT_FILENAME  /data/nginx/test.com$fastcgi_script_name;
}
access_log /tmp/1.log  combined_realip;
}
其中fastcgi_pass用来指定php-fom的地址,fastcgi_param SCRIPT_FILENAME后面跟的路径为该站点的根目录,必须和前面定义的root的路径保持一致,否则会报502错误。
9.Nginx代理
vi proxy.conf
server
{
listen 80;server_name ask.apelearn.com;
location /
{proxy_pass http://121.201.9.155/;
proxy_set_header Host $host;
proxy_set_header X-Real-IP $remote_addr;
proxy_set_header X-Forwarded-For $proxy_add_x_forwarded_for;
}
}
Proxy_pass 指定要代理的域名所在的服务器IP; 后面的三行为定义发往后端web服务取的请求头,第二行必须有,否则代理不会成功,它表示后端web服务器的域名和当前配置文件中的server_name保持一致; $remote_addr 访问网站的用户的出口ip; $http_x_forwarded_for 代理服务器的ip,如果使用了代理则会记录代理的ip。
配置文件保存后,重新加载Nginx服务并验证:
/usr/local/nginx/sbin/nginx -t
/usr/local/nginx/sbin/nginx -s reload
dig www.qq.com(没有dig安装yum -y install bind-utils)

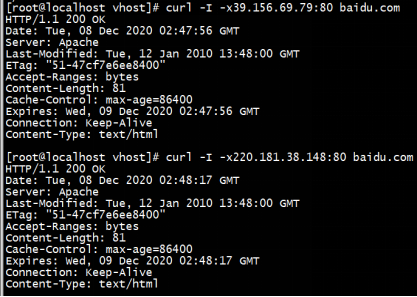
负载均衡: vi /usr/local/nginx/conf/vhost/load.conf
upstream baidu_com
{ip_hash;
 server 39.156.69.79;
 server 220.181.38.148;
}
server
{
listen 80;
server_name baidu.com;
location /
{proxy_pass http://baidu_com;
 proxy_set_header Host $host;
 proxy_set_header X-Real-IP $remote_addr;
 proxy_set_header X-Forwarded-For $proxy_add_x_forwarded_for;
}
}
ip_hash为负载均衡的算法,他表示根据ip地址把请求分到不同的服务器上。
/usr/local/nginx/sbin/nginx -t
/usr/local/nginx/sbin/nginx -s reload
curl -I -x127.0.0.1:80 baidu.com
10.Nginx配置ssl
HTTPS通信的过程大致如下:
浏览器发送一个HTTPS请求给服务器
服务器要有一套数字证书,可以自己制作,也可以向相关组织申请。区别就是自己的证书需要客户端验证通过,才可以继续访问,而使用受信任的公司申请的证书则不会弹出提示页面,这套证书就是一对公钥和私钥
服务器会把公钥传输给客户端
客户端(浏览器)收到公钥后,会验证其是否合法有效,无效会有警告提醒,有效则会生成一串随机字符串,并用收到的公钥加密
客户端把加密后的随机字符串传输给服务器
服务器收到加密随机字符串后,先用私钥解密(公钥用来加密,私钥用来解密),获取到这一串随机字符串后,再用这串随机字符串加密传输的数据(这种加密就是“对称加密”)
服务器把加密后的数据传输给客户端
客户端收到数据后,再用自己的私钥(也就是那串随机字符串)解密
Nginx配置SSL的具体配置过程如下: 生成私钥和公钥:
cd /usr/local/nginx/conf/
openssl genrsa -des3 -out tmp.key 2048    //openssl命令生成key文件(私钥),2048为加密字符串长度.........
openssl rsa -in tmp.key -out sxt.key    //把刚刚生成的tmp.key再转换成lzx.key,目的是删除刚刚设置的密码,如果key文件有密码,Nginx在加载它时必须每次都输入密码,会很不方便
rm -f tmp.key
openssl req  -new -key sxt.key -out sxt.csr    //生成证书请求文件,key文件和csr文件一起生成最终的公钥文件

openssl x509 -req -days 365 -in sxt.csr -signkey sxt.key -out sxt.crt

vi /usr/local/nginx/conf/vhost/ssl.conf
server
{
 listen 443;
server_name sxt.com;
index index.html index.php;
root /data/nginx/sxt.com;
ssl on;
ssl_certificate sxt.crt;
ssl_certificate_key sxt.key;
ssl_protocols TLSv1 TLSv1.1 TLSv1.2;
location ~ .php$
{
include fastcgi_params;
fastcgi_pass unix:/tmp/php-fcgi.sock;
fastcgi_index index.php;
fastcgi_param  SCRIPT_FILENAME  /data/nginx/sxt.com$fastcgi_script_name;
}
 access_log /tmp/1.log combined_realip;
}
/usr/local/nginx/sbin/nginx -t
cd /usr/local/src/nginx-1.12.1
./configure --prefix=/usr/local/nginx --with-http_ssl_module(有错误如下:
make./configure: error: SSL modules require the OpenSSL library.
You can either do not enable the modules, or install the OpenSSL library
into the system, or build the OpenSSL library statically from the source
with nginx by using --with-openssl= option安装yum install openssl openssl-devel -y)
make && make install
/usr/local/nginx/sbin/nginx -t
/usr/local/nginx/sbin/nginx -s reload
mkdir -p /data/nginx/sxt.com
echo "<?php phpinfo(); ?>" > /data/nginx/sxt.com/1.php
/etc/init.d/nginx restart    //重启Nginx服务
编辑hosts文件,写入一行:
192.168.134.130  sxt.com
五.Php-fpm配置
1.php-fpm的pool
vi /usr/local/php-fpm/etc/php-fpm.conf
[global]
pid =/usr/local/php-fpm/var/run/php-fpm.pid
error_log =/usr/local/php-fpm/var/log/php-fpm.log
include=etc/php-fpm.d/*.conf  //新增这一行,必须写上etc目录,注意等号后面路径
创建配置目录和子配置文件:
mkdir /usr/local/php-fpm/etc/php-fpm.d
cd /usr/local/php-fpm/etc/php-fpm.d
vi www.conf
[www]
listen = /tmp/www.sock
listen.mode = 666
user = php-fpm
group = php-fpm
pm = dynamic
pm.max_children = 50
pm.start_servers = 20
pm.min_spare_servers = 5
pm.max_spare_servers = 35
pm.max_requests = 500
rlimit_files = 1024
vi aming.conf
[aming]
listen = /tmp/aming.sock
listen.mode = 666
user = php-fpm
group = php-fpm
pm = dynamic
pm.max_children = 50
pm.start_servers = 20
pm.min_spare_servers = 5
pm.max_spare_servers = 35
pm.max_requests = 500
rlimit_files = 1024
这样就有了两个pool了,第一个pool监听/tmp/www.sock,第二个pool监听/tmp/aming.sock。这样,就可以在Nginx不同的虚拟主机中调用不同的pool,从而达到相互隔离的目的,两个pool互不影响。
/usr/local/php-fpm/sbin/php-fpm -t
/etc/init.d/php-fpm restart
ls /tmp/*.sock
2.php-fpm的慢执行日志
vi /usr/local/php-fpm/etc/php-fpm.d/www.conf
request_slowlog_timeout = 1    //定义超时时间,即PHP的脚本执行时间超过1秒就会记录日志
slowlog = /usr/local/php-fpm/var/www-slow.log    //定义慢执行日志的路径和名字
3.php-fpm定义open_basedir
定义open-basedir的目的就是为了安全,httpd可以针对每个虚拟主机设置一个open-basedir,php-fpm也可以针对每个pool设置不同的open_basedir。
vi /usr/local/php-fpm/etc/php-fpm.d/aming.conf
php_admin_value[open_basedir]=/data/www/:/tmp/
4.php-fpm进程管理
pm = dynamic //定义php-fpm的子进程启动模式,dynamic为动态模式,根据实际需求,动态地增加或减少子进程,最多不超过pm.max_children定义的数值 pm.max_children = 50 //另外一种是static,这种模式下子进程数量由pm.max_children决定,一次性启动这么多,不增加也不减少
pm.start_servers = 20 //针对dynamic模式,定义在启动服务时产生的子进程的数量
pm.min_spare_servers = 5 //针对dynamic模式,定义空闲时段子进程数的最小值
pm.max_spare_servers = 35 //针对dynamic模式,定义空闲时段子进程数的最大值
pm.max_requests = 500 //针对dynamic模式,定义一个子进程最多处理的请求数,达到这个数值时,它会自动退出