LVS
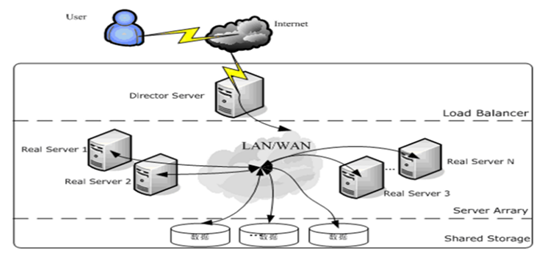
Lvs体系结构
Lvs工作模式(3种)
NAT-网络地址转换模式
当用户请求到达调度器时,调度器将请求报文的目标地址(即虚拟IP地址)改写成选定的Real Server地址,同时报文的目标端口也改成选定的Real Server的相应端口,最后将报文请求发送到选定的Real Server。在服务器端得到数据后,Real Server返回数据给用户时,需要再次经过负载调度器将报文的源地址和源端口改成虚拟IP地址和相应端口,然后把数据发送给用户,完成整个负载调度过程。
TUN-ip隧道模式
它的连接调度和管理与VS/NAT方式一样,只是它的报文转发方法不同,VS/TUN方式中,调度器采用IP隧道技术将用户请求转发到某个Real Server,而这个Real Server将直接响应用户的请求,不再经过前端调度器,
SR-直接路由模式
它的连接调度和管理与VS/NAT和VS/TUN中的一样,但它的报文转发方法又有不同,VS/DR通过改写请求报文的MAC地址,将请求发送到Real Server,而Real Server将响应直接返回给客户,免去了VS/TUN中的IP隧道开销。这种方式是三种负载调度机制中性能最高最好的.
LVS调度算法
常用:
rr:轮询调度(也叫1:1调度,把用户请求平均分配给real server)
wrr:加权轮询(根据Real Server的不同处理能力来调度访问请求调度器还可以自动查询Real Server的负载情况,并动态地调整其权值。,)
lc:最小连接数调度(动态地将网络请求调度到已建立的连接数最少的服务器上)
wlc:加权最小连接数调度(系统管理员可以动态的设置相应的权值,权值表示其处理能力)
---------------------------------------------------------------------------------------------------------------------------------------------------------
LVS-DR模式工作原理
首先CIP请求被发送到Director的VIP,然后Director使用相同的VIP将目的IP地址请求发送到集群节点或Real Server。最后,集群某个节点将回复该数据包,并将该数据包直接发送到客户端计算机(不经过director),并且以此回复数据包使用的目的VIP 地址作为源IP地址。
LVS-DR
一、环境准备
Directory centos7.3 192.168.138.11(VIP:192.168.138.110)
Rs1 centos7.3 192.168.138.12
Rs2 centos7.3 192.168.138.16
测试机器 centos7.3 192.168.138.14
配置域名解析
#cat /etc/hosts
192.168.138.11 directory
192.168.138.12 rs1
192.168.138.16 rs2
同步时间
ntpdate ntp.gwadar.cn
配置http服务(在Real server操作)
1) 安装
yum install -y httpd
2)准备测试页面
[root@rs1 ~]# cat /var/www/html/index.html
<html>
<head>
<title> This is a web test page </title>
</head>
<body>
<h1><center>Welcom to my web , my ip is 192.168.138.12</center></h1>
</body>
</html>
[root@rs2 ~]# cat /var/www/html/index.html
<html>
<head>
<title> This is a web test page </title>
</head>
<body>
<h1><center>Welcom to my web , my ip is 192.168.138.16</center></h1>
</body>
</html>
3)启动并测试http服务
[root@rs1 ~]# systemctl start httpd
[root@rs1 ~]# elinks -dump http://192.168.138.12
Welcom to my web , my ip is 192.168.138.12
二.Lvs安装及配置
1.安装
[root@direstory ~]# yum install -y ipvsadm
加载到内核
[root@direstory ~]# ipvsadm
查看
[root@direstory ~]# lsmod | grep ip_vs
ip_vs 141092 0
nf_conntrack 111302 1 ip_vs
libcrc32c 12644 2 xfs,ip_v
2.配置lvs负载均衡服务
1)配置VIP地址
方法一:
[root@direstory ~]# cd /etc/sysconfig/network-scripts/
cp ifcfg-ens33 ifcfg-ens33:110
[root@direstory network-scripts]# cat ifcfg-ens33:110
BOOTPROTO=none
DEVICE=ens33:110
ONBOOT=yes
DNS1=114.114.114.114
TYPE=Ethernet
IPADDR1=192.168.138.110
PREFIX=24
GATEWAY=192.168.138.2
方法二
查看网卡接口
[root@direstory ~]#nmcli con sh
增加ip地址
[root@direstory ~]# nmcli con mod "System ens33" +ipv4.addr 192.168.138.110/24
3. 手工执行配置添加LVS服务并增加两台RS
[root@direstory ~]# ipvsadm -A -t 192.168.138.110:80 -s rr
[root@direstory ~]# ipvsadm -a -t 192.168.138.110:80 -r 192.168.138.16:80 -g
[root@direstory ~]# ipvsadm -a -t 192.168.138.110:80 -r 192.168.138.12:80 –g
查看配置的服务
[root@direstory ~]# ipvsadm -l
IP Virtual Server version 1.2.1 (size=4096)
Prot LocalAddress:Port Scheduler Flags
-> RemoteAddress:Port Forward Weight ActiveConn InActConn
TCP 192.168.138.110:80 rr
-> 192.168.138.12:80 Route 1 0 0
-> 192.168.138.16:80 Route 1 0 0
相关参数解释
-A 添加虚拟服务器
-t 设置群集地址(VIP,Virtual IP)
-s 指定负载调度算法
-a 添加真实服务器
-d 删除真实服务器
-r 指定真实服务器(Real Server)的地址
-m 使用NAT模式;-g、-i分别对应DR、TUN模式
-w 为节点服务器设置权重,默认为1
配置好的lvs服务保存/恢复
保存:
[root@direstory ~]# ipvsadm -S > ipvsadm.cfg
[root@direstory ~]# more ipvsadm.cfg
-A -t 192.168.138.110:http -s rr
-a -t 192.168.138.110:http -r rs1:http -g -w 1
-a -t 192.168.138.110:http -r rs2:http -g -w 1
恢复:
[root@direstory ~]# ipvsadm -R < ipvsadm.cfg
[root@direstory ~]# ipvsadm –l
IP Virtual Server version 1.2.1 (size=4096)
Prot LocalAddress:Port Scheduler Flags
-> RemoteAddress:Port Forward Weight ActiveConn InActConn
TCP 192.168.138.110:http rr
-> rs1:http Route 1 0 0
-> rs2:http Route 1 0 0
删除示例:
[root@direstory ~]# ipvsadm -D -t 192.168.138.110:80
[root@direstory ~]# ipvsadm -d-t 192.168.138.110:80 -r 192.168.138.16:80
4. 手工在RS端绑定VIP
[root@rs1 ~]# cd /etc/sysconfig/network-scripts/
[root@rs1 network-scripts]# cp ifcfg-lo ifcfg-lo:110
[root@rs1 network-scripts]# vim ifcfg-lo:110
DEVICE=lo:110
IPADDR=192.168.138.110
NETMASK=255.255.255.255
ONBOOT=yes
Rs2 同上
5.调整内核参数,关闭arp响应(在每台real server执行)
内核参数配置文件:/etc/sysctl.conf
当前生效
[root@RS1 ~]# echo "1" >
/proc/sys/net/ipv4/conf/lo/arp_ignore
[root@RS1 ~]# echo "2"
> /proc/sys/net/ipv4/conf/lo/arp_announce
[root@RS1 ~]# echo
"1" > /proc/sys/net/ipv4/conf/all/arp_ignore
[root@RS1 ~]# echo
"2" > /proc/sys/net/ipv4/conf/all/arp_announce
永久生效
[root@rs1 ~]# cat /etc/sysctl.conf
net.ipv4.conf.lo.arp_ignore=1
net.ipv4.conf.lo.arp_announce=2
net.ipv4.conf.all.arp_ignore=1
net.ipv4.conf.all.arp_announce=2
rs2同上
三、测试lvs-dr集群
[root@localhost ~]# for ((i=1;i<=10;i++)); do elinks -dump http://192.168.138.110; done
Welcom to my web , my ip is 192.168.138.16
Welcom to my web , my ip is 192.168.138.12
Welcom to my web , my ip is 192.168.138.16
Welcom to my web , my ip is 192.168.138.12
Welcom to my web , my ip is 192.168.138.16
Welcom to my web , my ip is 192.168.138.12
Welcom to my web , my ip is 192.168.138.16
Welcom to my web , my ip is 192.168.138.12
Welcom to my web , my ip is 192.168.138.16
Welcom to my web , my ip is 192.168.138.12