1. Hive简介
1.1 什么是Hive
Hives是基于Hadoop的一个数据仓库工具,可以将结构化的数据文件映射为一张数据库表,并提供类SQL查询功能。
1.2 为什么使用Hive
① 直接使用Hadoop面临人员学习成功太高、项目周期要求太短、MapReduce实现复杂查询逻辑开发难度太大等问题;
② Hive操作接口采用类SQL语法,提供快速开发的能力,避免了去写MapReduce,减少开发人员的学习成本,扩展功能很方便。
1.3 Hive的特点
可扩展:Hive可以自由的扩展集群的规模,一般情况下不需要重启服务;
延展性:Hive支持用户自定义函数,用户可以根据自己的需求来实现自己的函数;
容错:良好的容错性,节点出现问题SQL仍可完成执行;
2. Hive架构
2.1 架构图
2.2 基本组件及其基本功能
用户接口:主要有三个,即CLI、JDBC/ODBC、WebGUI。其中,CLI为shell命令行;JDBC/ODBC是Hive的Java实现,与传统数据库JDBC类似;WebGUI是通过浏览器访问Hive。
元数据存储:通常将元数据存储在关系数据库如mysql,derby中。Hive中的元数据包括表的名字,表的列和分区及其属性,表的属性(是否为外部表等),表的数据所在目录等。
解释器、编译器、优化器、执行器。它们完成HQL查询语句从词法分析、语法分析、编译、优化以及查询计划的生成、生成的查询计划存储在HDFS中,并在随后由MapReduce调用执行。
3. Hive与Hadoop的关系
Hive利用HDFS存储数据,利用MapReduce查询数据
图省略
4. Hive与传统数据库对比

总结:hive具有sql数据库的外表,但应用场景完全不同,hive只适合用来做批量数据统计分析。
5. Hive与Hbase对比
两者的共同点:
hbase与hive都是架构在hadoop之上的,都是用hadoop作为底层存储。
两者的区别:
1. Hive是建立在Hadoop之上为了减少MapReduce jobs编写工作的批处理系统,HBase是为了支持弥补Hadoop对实时操作的缺陷的项目;
2. 操作RMDB数据库,如果是全表扫描,就用Hive+hadoop,如果是索引访问,就用HBase+Hadoop;
3. Hive query就是MapReduce jobs可以从5分钟到数小时不止,HBase是非常高效的,肯定比Hive高效的多。
4. Hive本身不存储和计算数据,它完全依赖于HDFS和MapReduce,Hive中的表纯逻辑;
5. Hive借用hadoop的MapReduce来完成一些hive中的命令的执行;
6. HBase是物理表,不是逻辑表,提供一个超大的内存hash表,搜索引擎通过它来存储索引,方便查询操作;
7. HBase是列存储。所以HBase可以对数据进行增删改等操作,但是Hive是行的,只能追加数据;
8. hdfs作为底层存储,hdfs是存放文件的系统,而HBase负责组织文件;
6. Hive的数据存储
(1) Hive中所有的数据都存储在HDFS中,没有专门的数据存储格式(可支持Text,SequenceFile,ParquetFile,RCFILE等);
(2) 只需要在创建表的时候告诉Hive数据中的列分隔符和行分隔符,Hive就可以解析数据;
(3) Hive中包含以下数据模型:DB、Table、External Table、Partition、Bucket。
a) DB:在HDFS中表现为${hive.metastore.warehouse.dir}目录下一个文件夹;
b) Table:在HDFS中表现所属DB目录下一个文件夹;
c) External Table:外部表,与Table类似,不过其数据存放位置可以在任意指定路径。
普通表:删除表后,HDFS上的文件都删了;
External外部表删除后,HDFS上的文件没有删除,只是把文件删除了。
d) Partition:在HDFS中表现为Table目录下的子目录;
e) Bucket:桶,在HDFS中表现为同一个表目录下根据hash散列之后的多个文件,会根据不同的文件把数据放到不同的文件中。
7. Hive的安装部署
hive的安装配置过程,包括Mysql、Hive及MetaStore的安装配置。
7.1. 概述
7.1.1. Hive Metastore的配置方式
MetaStore有三种配置方式:
- Embedded Metastore Database(Derby)内嵌模式
- Local Metastore Server 本地元存储
- Remote Metastore Server 远程元存储
7.1.2. Metastore、MetaStore作用
- metadata即元数据。元数据包含用Hive创建的database、table等的元信息。元数据存储在关系型数据库中,如Derby、Mysql等
- Metastore的作用是:客户端连接metastore服务,metastore再去连接Mysql数据库来存取元数据。有个metastore服务,就可以有多个客户端同时连接,而且这些客户端不需要知道Mysql数据库的用户名和密码,只需要metastore服务即可。
7.1.3. 三种配置方式区别
- 内嵌模式使用的是内嵌数据库Derby数据库来存储元数据,也不需要额外起Metastore服务。这个是默认的,配置简单,但是一次只能一个客户端连接,适用于用来实验,不适用于生产环境。
- 本地元存储和远程元存储都采用外部数据库来存储元数据,目前支持的数据库有:Mysql、Postgres、Oracle、MS SQL Server。在这里我们使用Mysql。
- 本地元存储和远程元存储的区别是:本地元存储不需要单独起metastore服务,用的是跟hive在同一个进程里的metastore服务。远程元存储需要单独起metastore服务,然后每个客户端都在配置文件里配置连接到该metastore服务。远程元存储的metastore服务和hive运行在不同的进城里。
在生产环境中,建议用远程元存储来配置Hive Metastore。
7.2. Hive及hiveserver2的安装部署
7.2.1. Hive的本地元存储部署
节点规划如下:
192.168.1.200   hive  mysql
192.168.1.201   hive
192.168.1.202   hive
192.168.1.203   hive
说明:
mysql安装在200上, 200-203都安装hive,这样多个客户端可以同时执行Hive命令,在执行以下步骤之前,请确保已经安装了Hadoop集群。
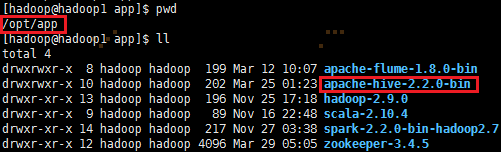
1. 利用Xftp工具将hive二进制安装包上传到HADOOP集群第一个节点node1上的/opt/uploads/目录,并解压,只需安装在hadoop集群上的其中一个节点就行

输入命令: tar -zxvf apache-hive-2.2.0-bin.tar.gz
移动apache-hive-2.2.0-bin到/opt/app/目录: mv apache-hive-2.2.0-bin /opt/app/

2. 配置环境变量,编辑/etc/profile,并生效环境变量,输入如下命令:
sudo vi /etc/profile
添加如下内容:
export HIVE_HOME=/opt/app/apache-hive-2.2.0-bin
export PATH=$HIVE_HOME/bin:$PATH

source /etc/profile
3. 修改hive配置文件
进入hive配置文件的目录,cd /opt/app/apache-hive-2.2.0-bin/conf/
修改hive-env.sh文件,将以下内容写入到hive-env.sh文件中:
export HADOOP_HOME=/opt/app/hadoop-2.9.0
export JAVA_HOME=/usr/lib/java/jdk1.8.0_151
export HIVE_HOME=/opt/app/apache-hive-2.2.0-bin
4. 修改hive-log4j2.properties.template文件复制一份,重命名为hive-log4j2.properties
进入hive配置文件的目录,cd /opt/app/apache-hive-2.2.0-bin/conf/
cp hive-log4j2.properties.template hive-log4j2.properties
5. 配置hive-site.xml
touch hive-site.xml
将以下信息写入到hive-site.xml文件中,内容如下:
<configuration>
    <property>
        <name>javax.jdo.option.ConnectionURL</name>
        <value>jdbc:mysql://192.168.187.200:3306/hive?createDatabaseIfNotExist=true&useSSL=false</value>
        <description>JDBC connect string for a JDBC metastore</description>
    </property>

    <property>
        <name>javax.jdo.option.ConnectionDriverName</name>
        <value>com.mysql.jdbc.Driver</value>
        <description>Driver class name for a JDBC metastore</description>
    </property>

    <property>
        <name>javax.jdo.option.ConnectionUserName</name>
        <value>root</value>
        <description>username to use against metastore database</description>
    </property>

    <property>
        <name>javax.jdo.option.ConnectionPassword</name>
        <value>admin</value>
        <description>password to use against metastore database</description>
    </property>
</configuration>
6. 安装mysql并配置hive数据库及权限
①安装mysql数据库及客户端并启动,如果mysql已安装则忽略
yum install mysql-server
yum install mysql
service mysqld start
②配置hive元数据库
create database hivedb
③对hive元数据库进行赋权,开放远程连接,开放localhost连接
grant all privileges on *.* to root@"%" identified by "root" with grant option;
grant all privileges on *.* to root@"localhost" identified by "root" with grant option;
flush privileges;
④放置jdbc驱动类
通过Xftp工具,把mysql-connector-java-5.1.27.jar包放置在hive安装目录下lib里面。
7. 初始化schema
./schematool -initSchema -dbType mysql createDatabaseIfNotExist=true (这个是hive2.20版本以上的,新增)
8. 运行hive命令即可启动hive
hive
7.2.2. Hive的远程元存储部署
节点规划如下:
192.168.1.200     hive  metastore  mysql
192.168.1.201     hive  metastore
192.168.1.202     hive
192.168.1.203     hive
说明:
把metastore服务安装在200-201,200-203都安装hive,这样多个客户端可以同时执行hive命令。在执行以下步骤之前,请确保已经安装了Hadoop集群
步骤1-4可以采用节点7.2.1. Hive的本地元存储部署的1-4步骤
5.1. 服务端hive-site.xml配置
服务端指的是Metastore服务所在的机器,即安装metastore的机器,这里是200和201.
<configuration>
    <property>
        <name>javax.jdo.option.ConnectionURL</name>
        <value>jdbc:mysql://192.168.187.200:3306/hive?createDatabaseIfNotExist=true&useSSL=false</value>
        <description>JDBC connect string for a JDBC metastore</description>
    </property>

    <property>
        <name>javax.jdo.option.ConnectionDriverName</name>
        <value>com.mysql.jdbc.Driver</value>
        <description>Driver class name for a JDBC metastore</description>
    </property>

    <property>
        <name>javax.jdo.option.ConnectionUserName</name>
        <value>root</value>
        <description>username to use against metastore database</description>
    </property>

    <property>
        <name>javax.jdo.option.ConnectionPassword</name>
        <value>admin</value>
        <description>password to use against metastore database</description>
    </property>

    <property>
        <name>hive.metastore.warehouse.dir</name>
        <value>/usr/hive/warehouse</value>
    </property>
    <property>
        <name>hive.exec.scratchdir</name>
        <value>/usr/hive/tmp</value>
    </property>
    <property>
        <name>hive.querylog.location</name>
        <value>/usr/hive/log</value>
    </property>
</configuration>
5.2. 客户端hive-site.xml配置
<property>
    <name>hive.metastore.uris</name>
    <value>thrift://node1:9083,node2:9083</value>
    <description>IP address (or fully-qualified domain name) and port of the metastore host</description>
</property>

<property>
    <name>hive.metastore.warehouse.dir</name>
    <value>/usr/hive/warehouse</value>
</property>

<property>
    <name>hive.exec.scratchdir</name>
    <value>/usr/hive/tmp</value>
</property>

<property>
    <name>hive.querylog.location</name>
    <value>/usr/hive/log</value>
</property>
步骤6可以采用节点7.2.1. Hive的本地元存储部署的6步骤
7.启动hive
1. 启动Mysql
systemctl start mysqld
2. 启动metastore服务
hive -server metastore
3. 启动Hive Cli或者hiveserver2
hive / hiveserver2
8.Hive的使用方式
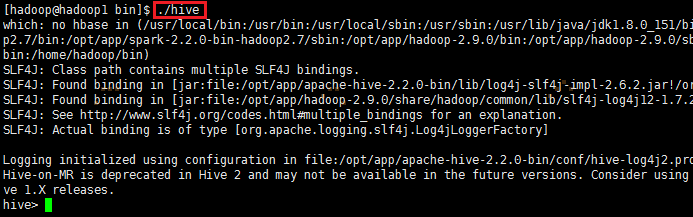
8.1 通过Hive交互shell
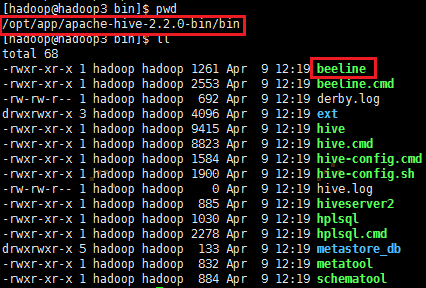
进入在Hive的安装目录下bin目录里找到命令 hive

输入命令 ./hive 进入hive的shell命令界面

8.2 通过Hive thrift服务
这种方式是把Hive启动为一个服务器,其他节点可以用beeline去连接Hive服务器。
进入到Hive安装目录下bin目录里,通过hiveserver2命令启动hive作为一个服务器
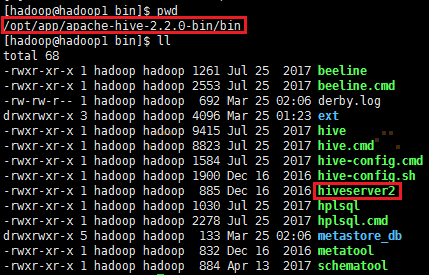
通过hiveserver2启动,启动方式有两种:
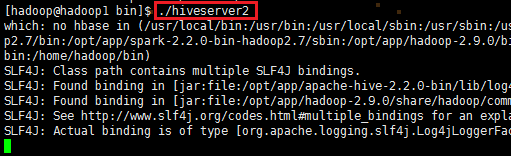
①启动为前台:./hiveserver2
②启动为后台: nohup ./hiveserver2 1>/var/log/hiveserver.log 2>/var/log/hiveserver.err &

启动成功后,可以在别的节点上用Hive安装目录下bin目录里的beeline命令去连接
方式(1)
./beeline 回车,进入beeline的命令界面
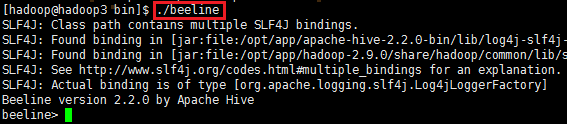
输入命令连接hiveserver2
beeline> !connect jdbc:hive2://hadoop1:10000 (hadoop1是hiveserver2所启动的那台主机名,端口默认是10000)

方式(2)
启动就连接
./beeline -u jdbc:hive2://hadoop1:10000 -n hadoop

接下来就可以执行正常sql查询了
9. HQL基本命令说明
9.1 DDL操作(Data Definition Language数据定义语言,包括建表,修改表结构)
9.1.1 创建表
建表语法
CREATE [EXTERNAL] TABLE [IF NOT EXISTS] table_name
[(col_name data_type [COMMENT col_comment], ...)]
[COMMENT table_comment]
[PARTITIONED BY (col_name data_type [COMMENT col_comment], ...)]
[CLUSTERED BY (col_name, col_name, ...) [SORTED BY (col_name [ASC|DESC],...)] INTO num_buckets BUCKETS]
[ROW FORMAT row_format]
[STORED AS file_format]
[LOCATION hdfs_path]
说明:
1、CREATE TABLE 创建一个指定名字的表。如果相同名字的表已经存在,则抛出异常;用户可以用IF NOT EXISTS选项来忽略这个异常;
2、EXTERNAL 关键字可以让用户创建一个外部表,在建表的同时指定一个指向实际数据的路径(LOCATION),Hive创建内内部表时,会将数据移动到数据仓库指向的路径;若创建外部表,仅记录数据所在的路径,不对数据的位置做任何改变。在删除表的时候,内部表的元数据和数据会被一起删除,而外部表只删除元数据,不删除数据。
3、LIKE 允许用户复制现有的表结构,但是不复制数据。
4、CLUSTERED BY (col_name, col_name, ...) [SORTED BY (col_name[ASC|DESC],...)] INTO num_buckets BUCKETS]
对于每一个表(table)或者分区(partition),Hive可以进一步组织成桶,也就是说桶是更为细粒度的数据范围划分。Hive也是针对某一列进行桶的组织。Hive采用对列值哈希hash,然后除以桶的个数求余的方式决定该条记录存放在哪个桶当中。
把表(或者分区)组织成桶(Bucket)有两个理由:
(1)获得更高的查询处理效率。桶为表加上了额外的结构,Hive在处理某些查询时能利用这个结构。具体而言,连接两个在(包含连接列的)相同列上划分了桶的表,可以使用Map端连接(Map-side join)高效的实现。比如JOIN操作,对于JOIN操作两个表有一个相同的列,如果对这两个表都进行了桶操作。那么将保存相同列值的桶进行JOIN操作就可以,可以大大减少JOIN的数据量。
(2)使取样(sampling)更高效。在处理大规模数据集时,在开发和修改查询的阶段,如果能在数据集的一小部分数据上试运行查询,会带来很多方便。
5、ROW FORMAT DELIMITED [FIELDS TERMINATED BY char]
[COLLECTION ITEMS TERMINATED BY char]
[MAP KEYS TERMINATED BY char]
[LINES TERMINATED BY char]
| SERDE serde_name [WITH SERDEPROPERTIES (property_name=property_value, property_name=property_value, ...)]
用户在建表的时候可以自定义SerDe 或者使用自带的SerDe。如果没有指定ROW FORMAT 或者ROW FORMAT DELIMITED,将会使用自带的SerDe。在建表的时候,用户还需要为表指定列,用户在指定表的列的同时也会指定自定义的SerDe,Hive通过SerDe确定表的具体的列的数据。
6、STORED AS file_format。file_format的类型有 SEQUENCEFILE、TEXTFILE、RCFILE
如果文件数据是纯文本,可以使用STORED AS TEXTFILE。如果数据需要压缩,使用STORED AS SEQUENCEFILE。
具体实例:
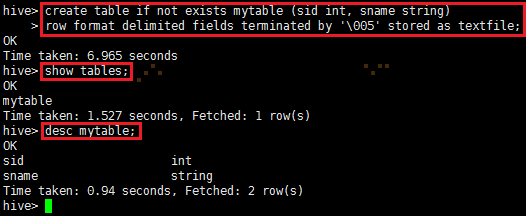
1、创建内部表mytable
create table if not exists mytable (sid int, sname string)
row format delimited fields terminated by '�05' stored as textfile;
查看表是否存在: show tables;
查看表的详细结构:desc mytable;
2、创建外部表pageview
create external table if not exists pageview(
pageid int,
page_url string comment 'The page URL'
)
row format delimited fields terminated by ','
location 'hdfs://192.168.187.201:9000/user/hive/warehouse';
查看表是否存在: show tables;
查看表的详细结构:desc pageview;

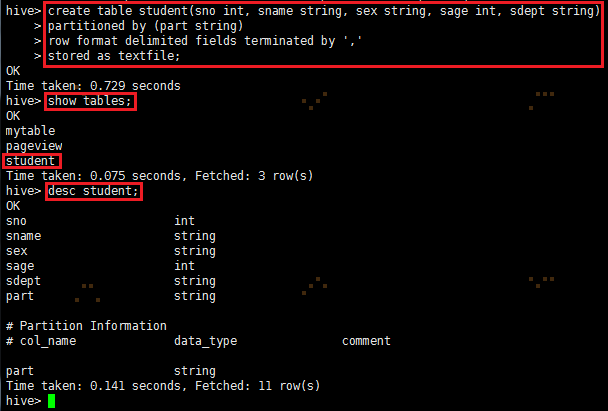
3、创建分区表invites
create table student(sno int, sname string, sex string, sage int, sdept string)
partitioned by (part string)
row format delimited fields terminated by ','
stored as textfile;
查看表是否存在: show tables;
查看表的详细结构:desc student;
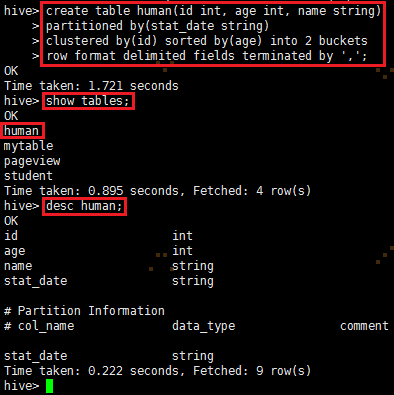
4、创建带桶的表human
create table human(id int, age int, name string)
partitioned by(stat_date string)
clustered by(id) sorted by(age) into 2 buckets
row format delimited fields terminated by ',';
查看表是否存在: show tables;
查看表的详细结构:desc human;
9.1.2 修改表
增加/删除分区
语法结构:
ALTER TABLE table_name ADD [IF NOT EXISTS]
partition_spec [ LOCATION 'location1']
partition_spec [ LOCATION 'location2'] ...
ALTER TABLE table_name DROP partition_spec,partition_spec,...
partition_spec代表 PARTITION(partition_col=partition_col_value,partition_col=partition_col_value, ...)
具体实例:
添加student表的分区:alter table student add partition(part='a') partition(part='b');
添加student表的分区:alter table student add partition(part='c') location '/user/hive/warehouse/student' partition(part='d');
删除student表的分区:alter table student drop partition(part='a');
查看student表的分区:show partitions student;

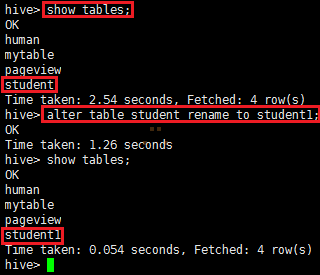
重命名表
语法结构:
ALTER TABLE table_name RENAME TO new_table_name;
具体实例:
alter table student rename to student1;
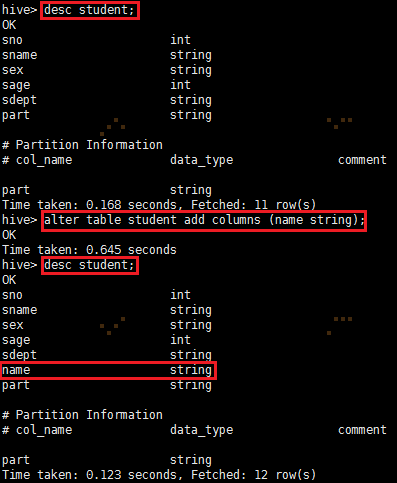
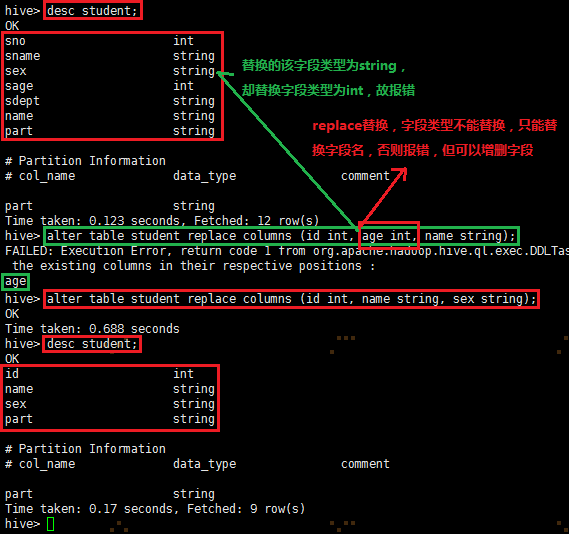
增加/更新列
语法结构:
ALTER TABLE table_name ADD|REPLACE COLUMNS (col_name data_type [COMMENT col_comment], ...)
注意:ADD是代表新增一字段,字段位置在所有列后面(partition 列前),REPLACE则是表示替换表中所有字段。
ALTER TABLE table_name CHANGE [COLUMN] col_old_name col_new_name column_type [COMMENT col_comment] [FIRST|AFTER column_name]
具体实例:
ADD增加列:
REPLACE替换字段:
9.1.3显示命令
show tables;
show databases;
show partitions table_name;
show functions;
desc extended table_name;
desc formatted table_name;
9.2 DML操作(Data Manipulation Language数据操作语言,包括数据载入导出)
9.2.1 Load
语法结构:
LOAD DATA [LOCAL] INPATH 'filepath' [OVERWRITE] INTO TABLE tablename [PARTITION(partcol1=val1, partcol2=val2 ...)]
说明:
1、Load 操作只是单纯的复制/移动操作,将数据文件移动到Hive表对应的位置。
2、LOCAL关键字
如果指定了LOCAL,load命令会去查找本地文件系统中的filepath;如果没有指定LOCAL关键字,则根据inpath中的url查找文件。
3、filepath:
相对路径,例如:project/data1
绝对路径,例如:/user/hive/project/data1
包含模式的完整URI,例如:hdfs://namenode:9000/user/hive/project/data1
4、OVERWRITE关键字
如果使用了OVERWRITE关键字,则目标表(或者分区)中的内容会被删除,然后再将filepath指向的文件/目录中的内容添加到表/分区中。如果目标表(分区)已经有一个文件,并且文件名和filepath中的文件名冲突,那么现有的文件会被新文件所替代。
具体实例:
1、加载相对路径数据
~目录本地路径文件buckets.txt:
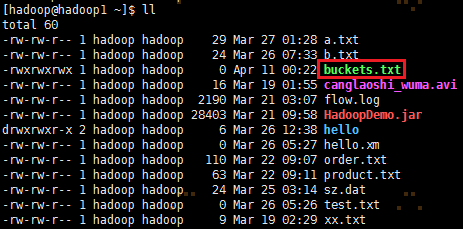
buckets.txt文件内容为:

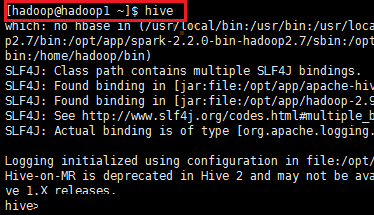
~目录下进入hive的shell界面:
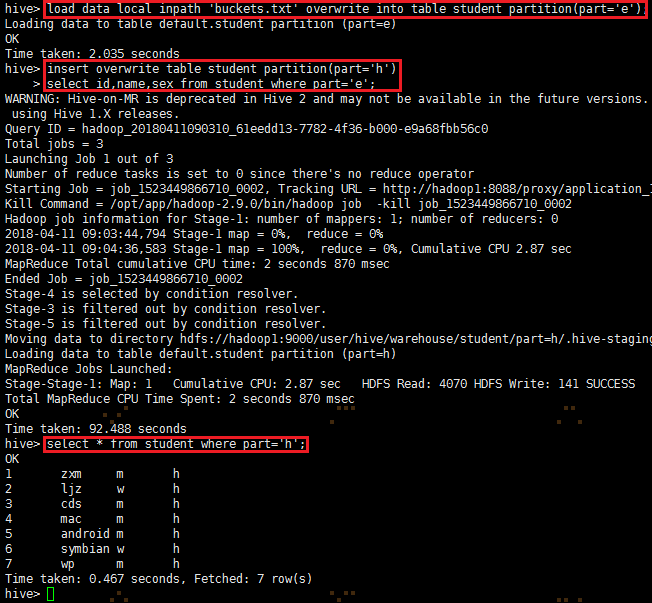
输入命令:load data local inpath 'buckets.txt' into table student partition(part='e');
查看hdfs上是否有文件:dfs -ls /user/hive/warehouse/student/part=e; 不能使用hadoop fs -ls /user/hive/warehouse/student/part=e;

2、加载绝对路径数据
输入命令:load data local inpath '/opt/test/derby.log' into table student partition(part='f');
查看hdfs上是否有文件:dfs -ls /user/hive/warehouse/student/part=f;

3、加载包含uri模式数据
输入命令:load data inpath 'hdfs://192.168.187.201:9000/wordcount/input/README.txt' into table student partition(part='g');
查看hdfs上是否有文件:dfs -ls /user/hive/warehouse/student/part=g;

4、OVERWRITE关键字使用
输入命令:load data local inpath '/opt/test/derby.log' overwrite into table student partition(part='g');
查看hdfs上是否有文件:dfs -ls /user/hive/warehouse/student/part=g;

9.2.2 Insert
①将查询结果插入Hive表
语法结构:
Basic inserts:
INSERT OVERWRITE TABLE tablename1 [PARTITION (partcol1=val1, partcol2=val2 ...)] select statement1 FROM tablename
Multiple inserts:
FROM tablename
INSERT OVERWRITE TABLE tablename1 [PARTITION (partcol=val1, partcol2=val2 ...)] select statement1
[INSERT OVERWRITE TABLE tablename2 [PARTITION (partcol=val1, partcol2=val2 ...)] select_statement2] ...
Dynamic partition inserts:
INSERT OVERWRITE TABLE tablename PARTITION (partcol1[=val1], partcol2[=val2] ...) select statement FROM tablename
具体实例:
1、基本模式插入
将part='e'的查询结果插入part='h'的分区表里面:
insert overwrite table student partition(part='h')
select id,age,name from student where part='e';
查询part='h'的数据记录:select * from student where part='h';
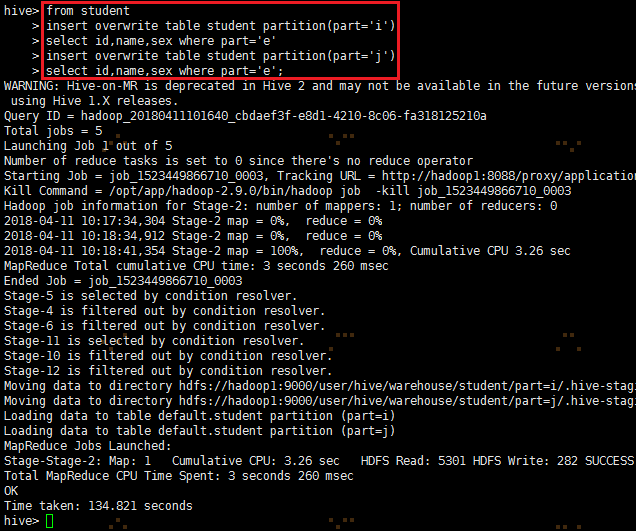
2、多插入模式
from student
insert overwrite table student partition(part='i')
select id,name,sex where part='e'
insert overwrite table student partition(part='j')
select id,name,sex where part='e';
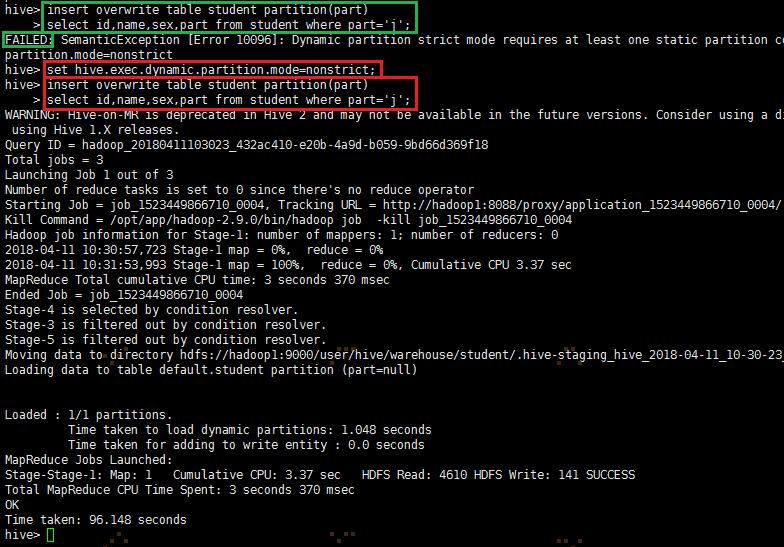
3、自动分区模式
要动态插入分区必需设置:set hive.exec.dynamic.partition.mode=nonstrict;
insert overwrite table student partition(part)
select id,name,sex,part from student where part='j';
② 导出表数据
语法结构:
Basic inserts:
INSERT OVERWRITE [LOCAL] DIRECTORY directory1 SELECT ... FROM ...
Multiple inserts:
FROM tablename
INSERT OVERWRITE [LOCAL] DIRECTORY directory1 SELECT ... FROM ...
[INSERT OVERWRITE [LOCAL] DIRECTORY directory2 SELECT ... FROM ...] ...
具体实例
1、导出文件到本地
insert overwrite local directory '/home/hadoop/student'
select * from student;
执行上面的命令可能会报错Hive IllegalStateException Ambiguous Input path,如图:
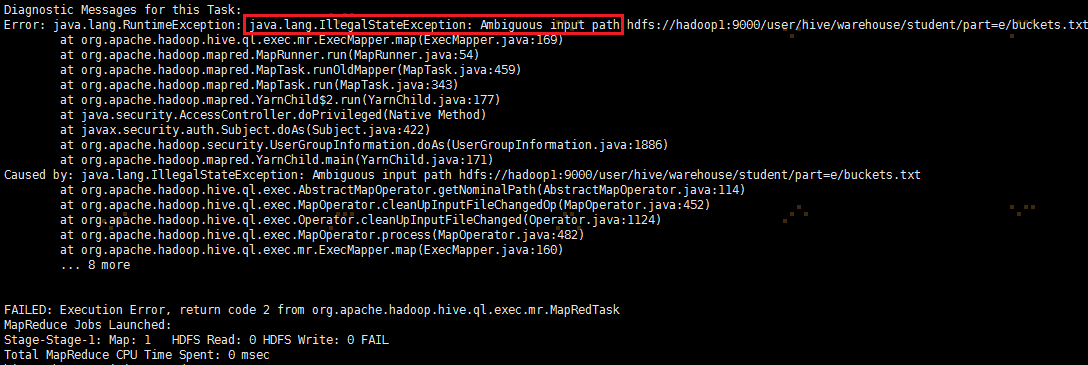
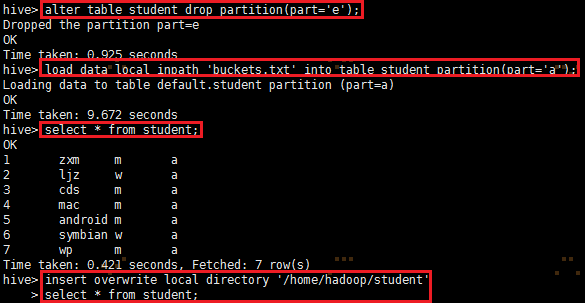
这时需要删除student表的所有分区,然后重新load数据文件到指定新建分区,这样就可以恢复正常,如图:
参考资料:https://stackoverflow.com/questions/41725389/hive-illegalstateexception-ambiguous-input-path
正常执行该命令的情况:
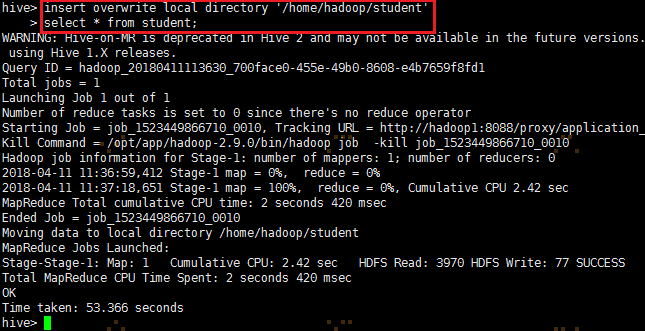
导出到本地的/home/hadoop/student文件查看:

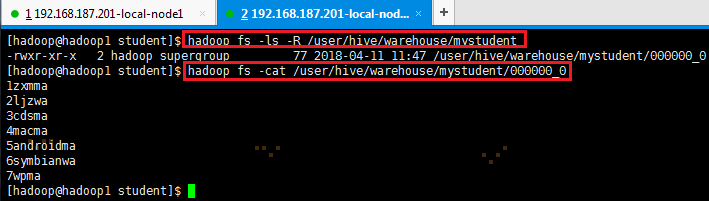
2、导出数据到HDFS
insert overwrite directory 'hdfs://192.168.187.201:9000/user/hive/warehouse/mystudent'
select * from student;
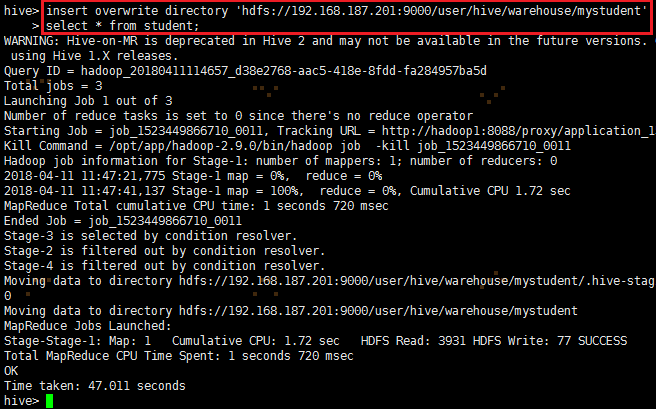
导出到HDFS的hdfs://192.168.187.201:9000/user/hive/warehouse/mystudent文件查看:
9.2.3 SELECT
基本的select操作
语法结构:
SELECT [ALL | DISTINCT] select_expr, select_expr, ...
FROM table_reference
[WHERE where_condition]
[GROUP BY col_list [HAVING condition]]
[CLUSTER BY col_list | [DISTRIBUTE BY col_list] [SORT BY | ORDER BY col_list] ]
[LIMIT number]
说明:
1、order by 会对输入做全局排序,因此只有一个reducer,会导致当输入规模较大时,需要较长的计算时间;
2、sort by 不是全局排序,其在数据进入reducer前完成排序。因此,如果用sort by进行排序,并且设置mapred.reduce.tasks>1,则sort by只保证每个reducer的输出有序,不保证全局有序;
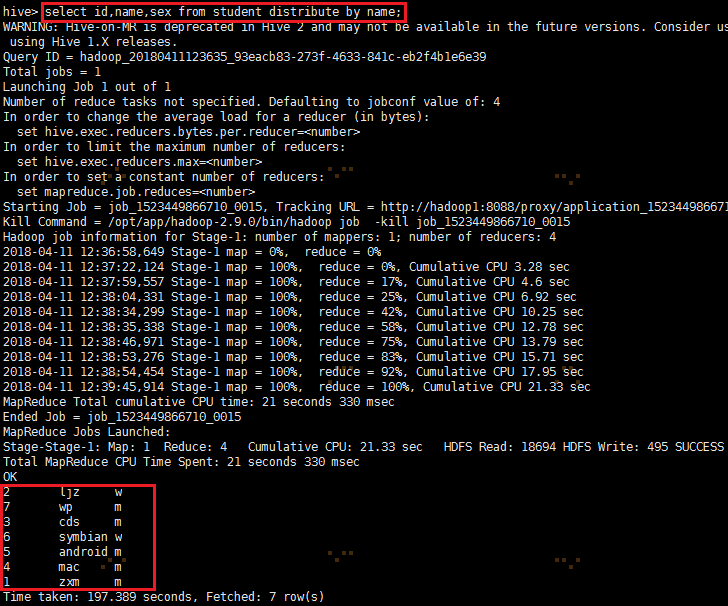
3、distribute by根据distribute by指定的内容将数据分到同一个reducer。
4、Cluster by 除了具有Distribute by的功能外,还会对该字段进行排序。因此,常常认为cluster by = distribute by + sort by
具体实例:
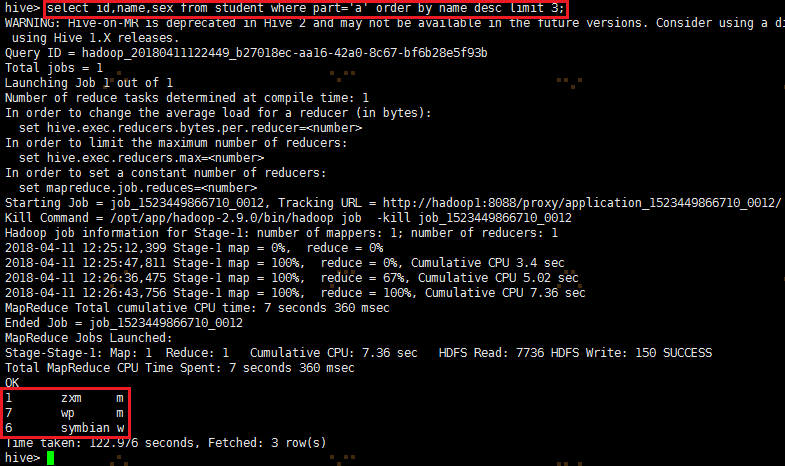
1、获取前3个学生
select id,name,sex from student where part='a' order by name desc limit 3;
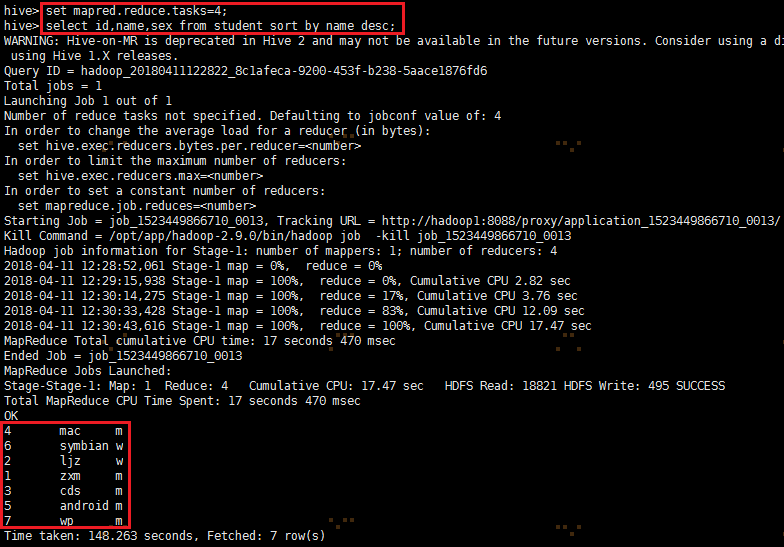
2、查询学生信息按年龄,降序排序。
set mapred.reduce.tasks=4;
select id,name,sex from student sort by name desc;
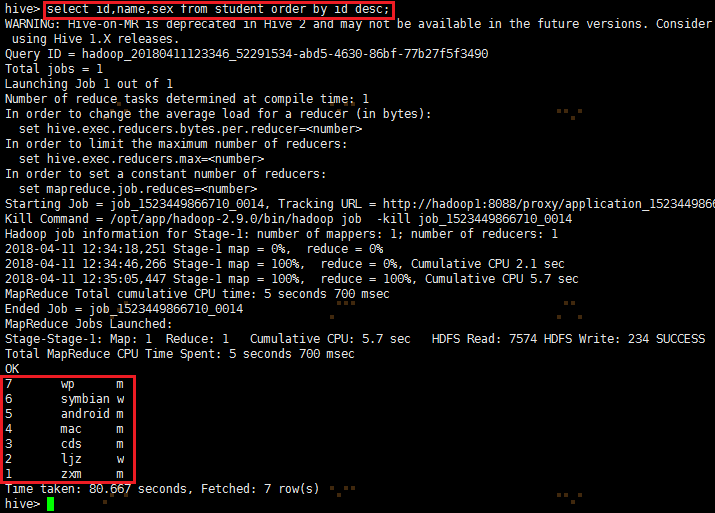
select id,name,sex from student order by id desc;
select id,name,sex from student distribute by name;
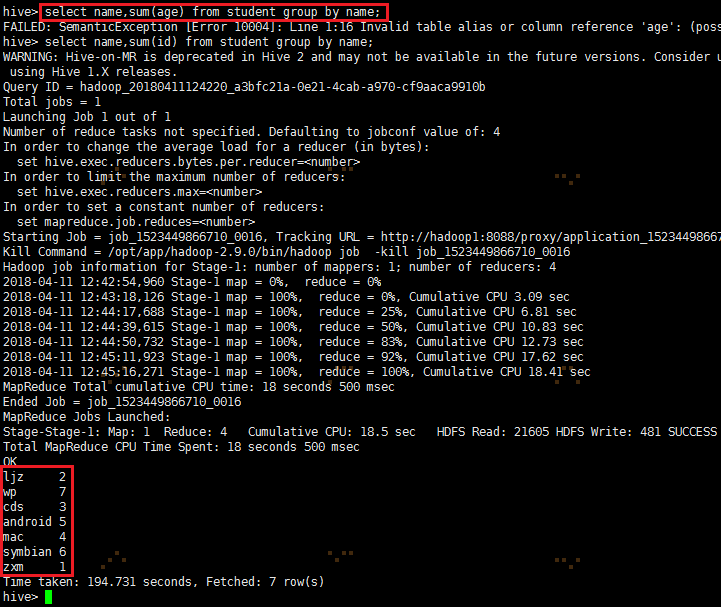
3、按学生名称汇总学生年龄。
select name,sum(age) from student group by name;
9.2.4 Hive Join
语法结构
join table:
table_reference JOIN table_factor [join_condition]
| table_reference {LEFT | RIGHT | FULL} [OUTER] JOIN table_reference join_condition
| table_reference LEFT SEM | JOIN table_reference join_condition
Hive支持等值连接(equality joins)、外连接(outer joins)和(left/right joins)。
Hive不支持非等值的连接,因为非等值连接非常难转化到map/reduce任务。另外,Hive支持多于2个表的连接。
写Join查询时,需要注意几个关键点:
1. 只支持等值join
2. 可以 join 多于 2 个表。
3.join 时,每次 map/reduce 任务的逻辑:
4.LEFT,RIGHT 和 FULL OUTER 关键字用于处理 join 中空记录的情况
Join 发生在 WHERE 子句之前。
Join 是不能交换位置的。无论是 LEFT 还是 RIGHT join,都是左连接的。
总结
【参考资料】
https://www.cnblogs.com/xing901022/p/5775954.html
https://blog.csdn.net/zimou5581/article/details/82383906
https://blog.csdn.net/HeatDeath/article/details/78917574
https://blog.csdn.net/lifuxiangcaohui/article/details/40589881 hive导入导出功能
https://www.cnblogs.com/linbingdong/p/5829369.html Hive安装配置指北(含Hive Metastore详解)