Spring Boot集成Swagger
前言
为了完成项目自带文档的需求,花了一定的时间研究
Spring Boot集成Swagger。看了官方文档和一些博客,差不多搭出一个比较通用的架子。文末会分享出案例项目。
基本概述
本文使用
Spring Boot+Spring Fox的方式集成Swagger框架。
案例
引入依赖
<properties>
    <swagger.version>2.7.0</swagger.version>
</properties>
<dependencies>
    <!-- swagger2 -->
    <dependency>
        <groupId>io.springfox</groupId>
        <artifactId>springfox-swagger2</artifactId>
        <version>${swagger.version}</version>
    </dependency>
    <!-- swagger2 ui -->
    <dependency>
        <groupId>io.springfox</groupId>
        <artifactId>springfox-swagger-ui</artifactId>
        <version>${swagger.version}</version>
    </dependency>
</dependencies>
Swagger配置
@Configuration
@EnableSwagger2
public class SwaggerConfig {
    @Bean
    public Docket createRestApi() {
        return new Docket(DocumentationType.SWAGGER_2)
                .apiInfo(apiInfo())
                .select()
                .apis(RequestHandlerSelectors.basePackage("com.switchvov.swagger"))
                .paths(PathSelectors.any())
                .build()
                .securitySchemes(securitySchemes())
                .securityContexts(securityContexts());
    }

    /**
     * 配置认证模式
     */
    private List<ApiKey> securitySchemes() {
        return newArrayList(new ApiKey("Authorization", "Authorization", "header"));
    }

    /**
     * 配置认证上下文
     */
    private List<SecurityContext> securityContexts() {
        return newArrayList(SecurityContext.builder()
                .securityReferences(defaultAuth())
                .forPaths(PathSelectors.any())
                .build());
    }

    private List<SecurityReference> defaultAuth() {
        AuthorizationScope authorizationScope = new AuthorizationScope("global", "accessEverything");
        AuthorizationScope[] authorizationScopes = new AuthorizationScope[1];
        authorizationScopes[0] = authorizationScope;
        return newArrayList(new SecurityReference("Authorization", authorizationScopes));
    }

    /**
     * 项目信息
     */
    private ApiInfo apiInfo() {
        return new ApiInfoBuilder()
                .title("Swagger测试项目 RESTful APIs")
                .version("1.0")
                .build();
    }
}
配置方式
基本概述
Swagger官方Wiki 注解
swagger2常用注解说明
swagger注释API详细说明PS:以上几篇文章已经将
Swagger注解的使用方式及作用阐述的非常清楚了。这里只给出代码案例。PS:
springfox-swagger2:2.7.0已经支持泛型返回对象。
注意:千万不要在@ApiOperation注解里限定response(),让框架推断类型就行了。
控制器
@RestController
@RequestMapping(value = "/user", produces = "application/json")
@Api(value = "User", tags = {"User"}, description = "用户相关")
public class UserController {
@Autowired
private UserService userService;
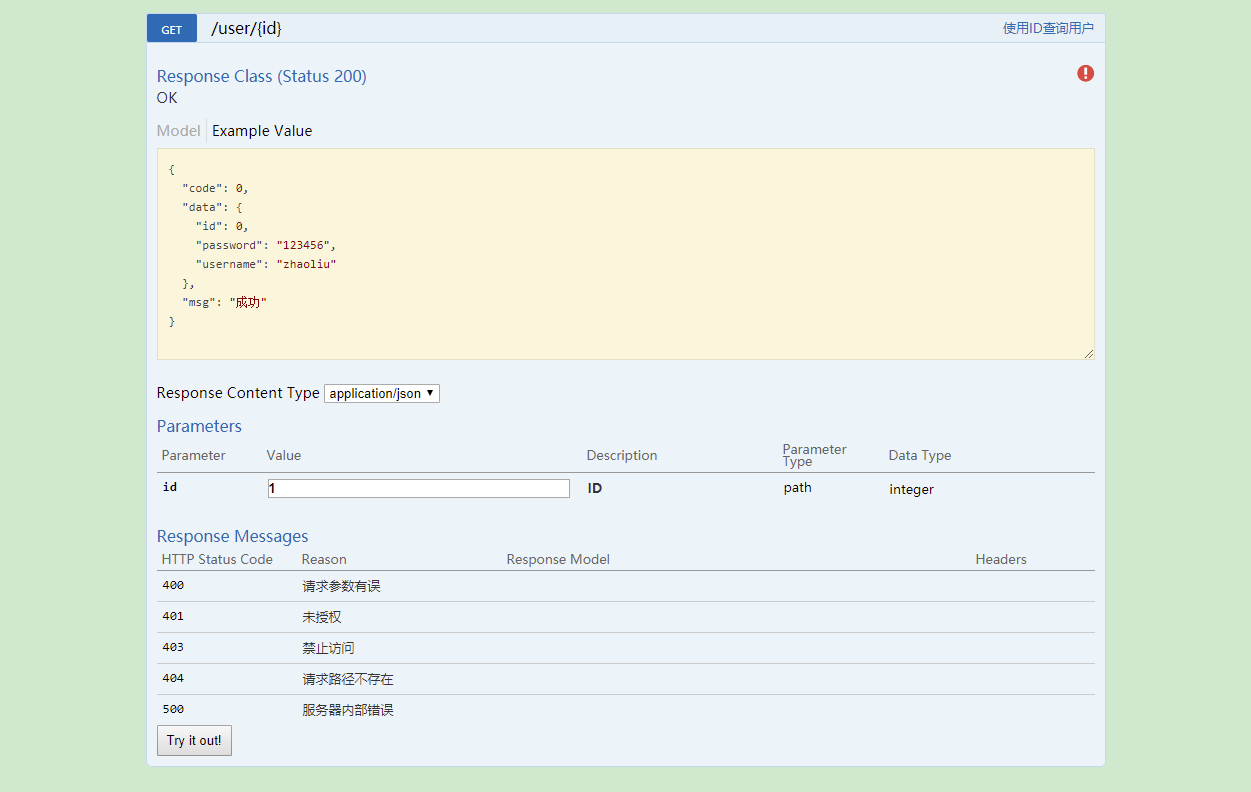
@GetMapping("/{id}")
@ApiOperation(value = "使用ID查询用户")
@ApiImplicitParams({
@ApiImplicitParam(value = "ID", name = "id", dataType = "int", paramType = "path", required = true, defaultValue = "1")
})
@ApiResponses({
@ApiResponse(code = 400, message = "请求参数有误"),
@ApiResponse(code = 401, message = "未授权"),
@ApiResponse(code = 403, message = "禁止访问"),
@ApiResponse(code = 404, message = "请求路径不存在"),
@ApiResponse(code = 500, message = "服务器内部错误")
})
public ResponseResult<User> getById(@PathVariable("id") Integer id) {
User user = userService.getById(id);
return ResponseResult.successWithData(user);
}
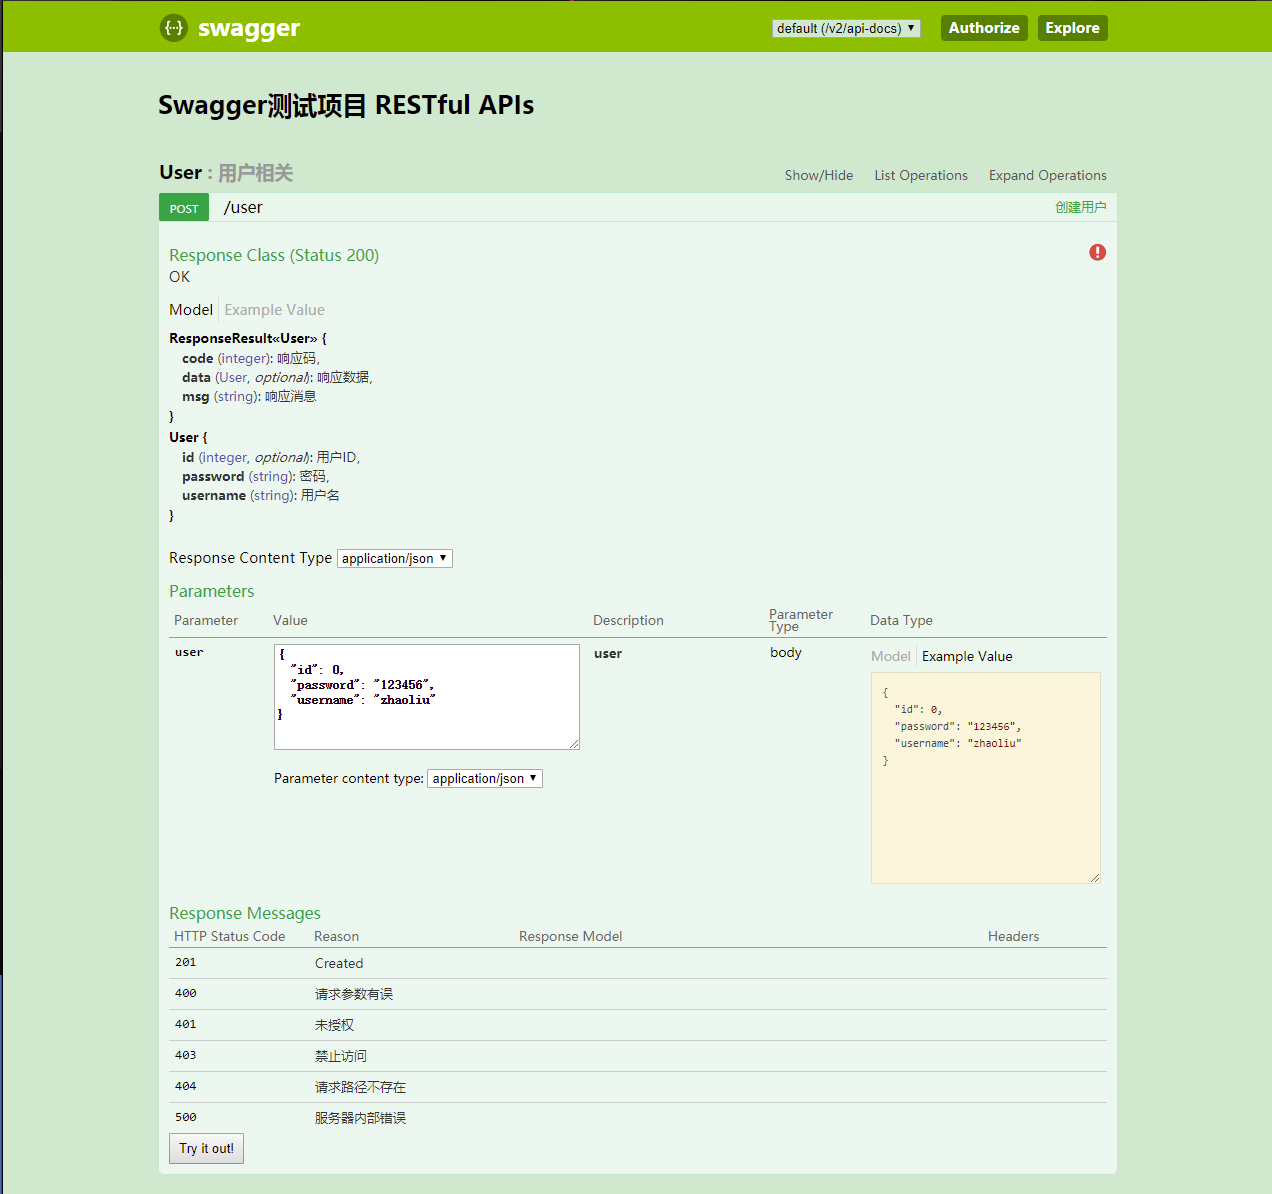
@PostMapping("")
@ApiOperation(value = "创建用户")
@ApiResponses({
@ApiResponse(code = 400, message = "请求参数有误"),
@ApiResponse(code = 401, message = "未授权"),
@ApiResponse(code = 403, message = "禁止访问"),
@ApiResponse(code = 404, message = "请求路径不存在"),
@ApiResponse(code = 500, message = "服务器内部错误")
})
public ResponseResult<User> createUser(@Validated @RequestBody User user) {
User dbUser = userService.createUser(user);
return ResponseResult.successWithData(dbUser);
}
}
统一响应类
@ApiModel(description = "响应对象")
public class ResponseResult<T> {
    private static final int SUCCESS_CODE = 0;
    private static final String SUCCESS_MESSAGE = "成功";

    @ApiModelProperty(value = "响应码", name = "code", required = true, example = "" + SUCCESS_CODE)
    private int code;

    @ApiModelProperty(value = "响应消息", name = "msg", required = true, example = SUCCESS_MESSAGE)
    private String msg;

    @ApiModelProperty(value = "响应数据", name = "data")
    private T data;

	// 省略get、set方法等等,详见源代码
}
用户Model
PS:用户model使用了
lombok、jpa、validator,只需要关注@Api开头的注解就行了。
@Data
@Entity(name = "users")
@ApiModel(description = "用户Model")
public class User {
    @Id
    @GeneratedValue(strategy = GenerationType.AUTO)
    @Null(message = "id必须为空")
    @ApiModelProperty(value = "用户ID", name = "id")
    private Integer id;

    @Column
    @NotBlank(message = "用户名不能为空")
    @ApiModelProperty(value = "用户名", name = "username", required = true, example = "zhaoliu")
    private String username;

    @Column
    @NotBlank(message = "密码不能为空")
    @ApiModelProperty(value = "密码", name = "password", required = true, example = "123456")
    private String password;
}
文档界面
源码
GitHub:swagger-demo
参考信息
- SpringFox官网
- Swagger官方Wiki 注解
- Spring Boot中使用Swagger2构建强大的RESTful API文档
- 第四章 springboot + swagger
- Spring启动RESTful API文档使用Swagger 2
- swagger2常用注解说明
- swagger注释API详细说明
- Swagger2 添加HTTP head参数
- Swagger2 非全局、无需重复输入的Head参数(Token)配置
分享并记录所学所见