使用javax.mail实现邮件的发送(使用qq邮箱发送)
1、引入javax.mail依赖
  <dependency>
            <groupId>org.springframework.boot</groupId>
            <artifactId>spring-boot-starter-mail</artifactId>
 </dependency>
2、在application.properties文件中配置
mail.config.SMTP_host=smtp.qq.com
mail.config.SMTP_port=25   #端口号,一般有ssl的时候端口号是其他的
mail.config.SMTP_auth=true  #连接校验
mail.config.STMP_user=xxxx@qq.com  #发件人用户
mail.config.STMP_pass=xxxxx #授权码
mail.config.SMTP_from=2428202862@qq.com  #发件人
mail.config.SMTP_fromnick=xxx对方邮箱显示的不是qq号而是nickname
3、配置类bean
package lut.mail;
public class MailConfig {
     private String SMTP_host;
     private  int SMTP_port;
     private boolean SMTP_auth;
     private String STMP_user;
     private String STMP_pass;
     private String SMTP_from;
     private String SMTP_fromnick;
 getter/setter......
}
4、配置类注入
package lut.mail;
import org.springframework.beans.factory.annotation.Value;
import org.springframework.boot.context.properties.ConfigurationProperties;
import org.springframework.context.annotation.Bean;
import org.springframework.context.annotation.Configuration;
@Configuration
public class MailConfiguration {
    @Value("${mail.config.SMTP_host}")
    private String SMTP_host;
    @Value("${mail.config.SMTP_port}")
    private  int SMTP_port;
    @Value("${mail.config.SMTP_auth}")
    private boolean SMTP_auth;
    @Value("${mail.config.STMP_user}")
    private String STMP_user;
    @Value("${mail.config.STMP_pass}")
    private String STMP_pass;
    @Value("${mail.config.SMTP_from}")
    private String SMTP_from;
    @Value("${mail.config.SMTP_fromnick}")
    private String SMTP_fromnick;
    @Bean
    public MailConfig getmailConfig(){
        MailConfig mc = new MailConfig();
         mc.setSMTP_host(SMTP_host);
         mc.setSMTP_port(SMTP_port);
         mc.setSMTP_auth(SMTP_auth);
         mc.setSTMP_user(STMP_user);
         mc.setSTMP_pass(STMP_pass);
         mc.setSMTP_from(SMTP_from);
         mc.setSMTP_fromnick(SMTP_fromnick);
        return mc;
    }
}
5、实现Authenticator抽象类(此类做session实例化是会用到)
package lut.mail;
import javax.mail.Authenticator;
import javax.mail.PasswordAuthentication;
public class MailSMTPAuthenticator extends Authenticator{
   private String sName;
   private String sPassword;
   public PasswordAuthentication getPasswordAuthentication() {
        return new PasswordAuthentication(sName, sPassword);
    }
public String getsName() {
    return sName;
}
public void setsName(String sName) {
    this.sName = sName;
}
public String getsPassword() {
    return sPassword;
}
public void setsPassword(String sPassword) {
    this.sPassword = sPassword;
}
}
6、mail邮件发送实现
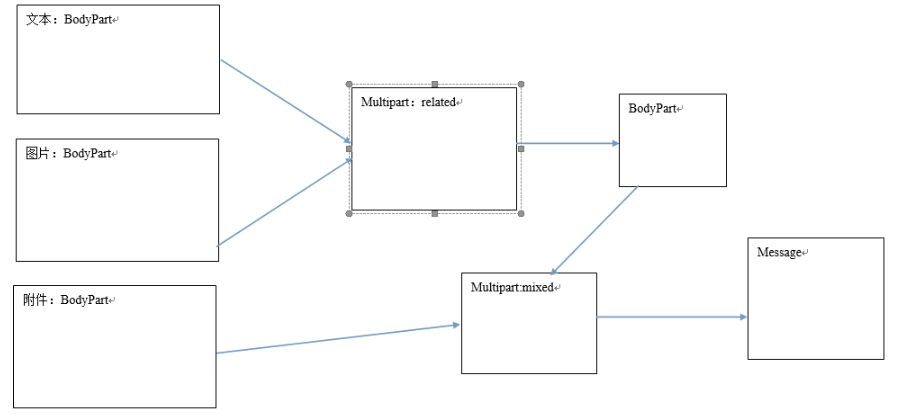
package lut.mail;


import java.io.UnsupportedEncodingException;
import java.util.Date;
import java.util.Properties;

import javax.activation.DataHandler;
import javax.activation.FileDataSource;
import javax.mail.Message;
import javax.mail.MessagingException;
import javax.mail.Multipart;
import javax.mail.Session;
import javax.mail.Transport;
import javax.mail.internet.*;

import org.springframework.beans.factory.annotation.Autowired;
import org.springframework.stereotype.Component;


@Component
@SuppressWarnings("unused")
public class MailService {


@Autowired
private MailConfig mailconfig;
public void senMail(){
    System.out.println(mailconfig.toString());
    MimeMessage mMessage = null;
    Session mailSession = null;
    //1、连接邮件服务器的参数配置附件名称过长乱码解决,关键词false
    System.setProperty("mail.mime.splitlongparameters","false");
    Properties props = new Properties();
    props.setProperty("mail.smtp.host", mailconfig.getSMTP_host());
    props.setProperty("mail.smtp.port", mailconfig.getSMTP_port()+"");
    props.setProperty("mail.smtp.auth", mailconfig.getSMTP_auth()+"");
    // 设置SMTP连接和发送邮件的超时时间,因为缺省是无限超时,单位毫秒
    props.setProperty("mail.smtp.connectiontimeout", "15000");//SMTP服务器连接超时时间
    props.setProperty("mail.smtp.timeout","60000");//发送邮件超时时间
    if(mailconfig.getSMTP_auth()){
        MailSMTPAuthenticator smtpAutr= new MailSMTPAuthenticator();
                smtpAutr.setsName(mailconfig.getSTMP_user());
                smtpAutr.setsPassword("sunwei951025");
       mailSession = Session.getInstance(props, smtpAutr);
    }else{
           mailSession = Session.getInstance(props);
    }

    mailSession.setDebug(true);
    mMessage = new MimeMessage(mailSession);
    try {
         //发件人
        InternetAddress formAddress = new InternetAddress(mailconfig.getSMTP_from());
        formAddress.setPersonal("了然于心");
        mMessage.setFrom(formAddress);
        //发送时间
        mMessage.setSentDate(new Date());
        //收件人
         InternetAddress[] toAddress =  {new InternetAddress("sunw@hrocloud.com"),new InternetAddress("sunwei1995sh@126.com")};
         mMessage.setRecipients(Message.RecipientType.TO,toAddress);
         //主题
         mMessage.setSubject("孙维主题");

        //内容
         MimeBodyPart contentBodyPart = new MimeBodyPart();
        contentBodyPart.setContent("此邮件为系统自己主动发送<img src='cid:a'><img src='cid:a'>","text/html;charset=UTF-8"); //cid必须和相关图片的ContentID相同才会在邮件正文显示图片。
//图片
MimeBodyPart imgAff = new MimeBodyPart();
       imgAff.setDataHandler(new DataHandler(new FileDataSource("d:\IO.jpg")));
       imgAff.setContentID("a");
MimeMultipart addM = new MimeMultipart();
      addM.addBodyPart(contentBodyPart);
      addM.addBodyPart(imgAff);
     addM.setSubType("related");
 // 图班与正文的 body
MimeBodyPart affContent = new MimeBodyPart();
    affContent.setContent(addM);
//附件
MimeBodyPart affDoc = new MimeBodyPart();
   affDoc.setDataHandler(new DataHandler(new FileDataSource("d:\业务流程脚本.sql")));
   affDoc.setFileName(MimeUtility.encodeText("业务流程脚本.sql"));
   affDoc.setContentID("UUud");
MimeMultipart text = new MimeMultipart();
text.addBodyPart(affContent);
text.addBodyPart(affDoc);
text.setSubType("mixed");
mMessage.setContent(text);
mMessage.saveChanges();
Transport transport = null;
transport = mailSession.getTransport("smtp");
transport.connect(mailconfig.getSTMP_user(),mailconfig.getSTMP_pass());
transport.sendMessage(mMessage, mMessage.getAllRecipients());
transport.close();
} catch (
MessagingException | UnsupportedEncodingException e) { // TODO Auto-generated catch block  e.printStackTrace(); } } }
带图片的邮件概念图