状态模式的关键是区分事物内部的状态,事物内部状态的改变往往会带来事物的行为改变。
一、电灯程序
1.1 不用状态模式的电灯程序实现
    var Light = function(){
        this.state = 'off'; // 给电灯设置初始状态off
        this.button = null; // 电灯开关按钮
    };

  //在页面中创建一个真实的button 节点
    Light.prototype.init = function(){
        var button = document.createElement( 'button' ),
        self = this;
        button.innerHTML = '开关';
        this.button = document.body.appendChild( button );
        this.button.onclick = function(){
            self.buttonWasPressed();
        }
    };

  //开关按下后触发的方法,封装了开关按下后的所有行为
    Light.prototype.buttonWasPressed = function(){
        if ( this.state === 'off' ){
            console.log( '开灯' );
            this.state = 'on';
        }else if ( this.state === 'on' ){
            console.log( '关灯' );
            this.state = 'off';
        }
    };

    var light = new Light();
    light.init();

    //改造
    Light.prototype.buttonWasPressed = function(){
        if ( this.state === 'off' ){
            console.log( '弱光' );
            this.state = 'weakLight';
        }else if ( this.state === 'weakLight' ){
            console.log( '强光' );
            this.state = 'strongLight';
        }else if ( this.state === 'strongLight' ){
            console.log( '关灯' );
            this.state = 'off';
        }
    };
我们来考虑一下上述程序的缺点:
- 很明显buttonWasPressed 方法是违反开放-封闭原则的,每次新增或者修改light 的状态,都需要改动buttonWasPressed 方法中的代码,这使得buttonWasPressed 成为了一个非常不稳定的方法。
- 所有跟状态有关的行为,都被封装在buttonWasPressed 方法里,如果以后这个电灯又增加了强强光、超强光和终极强光,那我们将无法预计这个方法将膨胀到什么地步。当然为了简化示例,此处在状态发生改变的时候,只是简单地打印一条log 和改变button 的innerHTML。在实际开发中,要处理的事情可能比这多得多,也就是说,buttonWasPressed方法要比现在庞大得多。
- 状态的切换非常不明显,仅仅表现为对state 变量赋值,比如this.state = 'weakLight'。在实际开发中,这样的操作很容易被程序员不小心漏掉。我们也没有办法一目了然地明白电灯一共有多少种状态,除非耐心地读完buttonWasPressed 方法里的所有代码。当状态的种类多起来的时候,某一次切换的过程就好像被埋藏在一个巨大方法的某个阴暗角落里。
- 状态之间的切换关系,不过是往buttonWasPressed 方法里堆砌if、else 语句,增加或者修改一个状态可能需要改变若干个操作,这使buttonWasPressed 更加难以阅读和维护。
1.2 状态模式改进电灯程序
通常我们谈到封装,一般都会优先封装对象的行为,而不是对象的状态。但在状态模式中刚好相反,状态模式的关键是把事物的每种状态都封装成单独的类,跟此种状态有关的行为都被封装在这个类的内部,所以button 被按下的的时候,只需要在上下文中,把这个请求委托给当前的状态对象即可,该状态对象会负责渲染它自身的行为。同时我们还可以把状态的切换规则事先分布在状态类中, 这样就有效地消除了原本存在的大量条件分支语句。
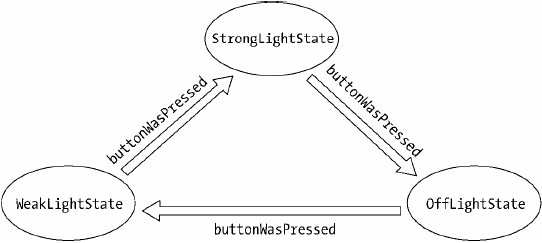
    // // OffLightState:
    var OffLightState = function( light ){
        this.light = light;
    };
    OffLightState.prototype.buttonWasPressed = function(){
        console.log( '弱光' ); // offLightState 对应的行为
        this.light.setState( this.light.weakLightState ); // 切换状态到weakLightState
    };

    // WeakLightState:
    var WeakLightState = function( light ){
        this.light = light;
    };
    WeakLightState.prototype.buttonWasPressed = function(){
        console.log( '强光' ); // weakLightState 对应的行为
        this.light.setState( this.light.strongLightState ); // 切换状态到strongLightState
    };

    // StrongLightState:
    var StrongLightState = function( light ){
        this.light = light;
    };
    StrongLightState.prototype.buttonWasPressed = function(){
        console.log( '关灯' ); // strongLightState 对应的行为
        this.light.setState( this.light.offLightState ); // 切换状态到offLightState
    };

    //为每个状态类都创建一个状态对象
    var Light = function(){
        this.offLightState = new OffLightState( this );
        this.weakLightState = new WeakLightState( this );
        this.strongLightState = new StrongLightState( this );
        this.button = null;
    };

    //Context 通过self.currState.buttonWasPressed()将请求委托给当前持有的状态对象去执行
    Light.prototype.init = function(){
        var button = document.createElement( 'button' ),
            self = this;
        this.button = document.body.appendChild( button );
        this.button.innerHTML = '开关';
        this.currState = this.offLightState; // 设置当前状态
        this.button.onclick = function(){
            self.currState.buttonWasPressed();
        }
    };

    //状态对象可以通过这个方法来切换light对象的状态
    Light.prototype.setState = function( newState ){
        this.currState = newState;
    };

    var light = new Light();
    light.init();
使用状态模式的好处很明显,它可以使每一种状态和它对应的行为之间的关系局部化,这些行为被分散和封装在各自对应的状态类之中,便于阅读和管理代码。
另外,状态之间的切换都被分布在状态类内部,这使得我们无需编写过多的if、else 条件分支语言来控制状态之间的转换。
假设现在light 对象多了一种超强光的状态,那就先增加SuperStrongLightState类:
    var SuperStrongLightState = function( light ){
        this.light = light;
    };
    SuperStrongLightState.prototype.buttonWasPressed = function(){
        console.log( '关灯' );
        this.light.setState( this.light.offLightState );
    };
然后在Light 构造函数里新增一个superStrongLightState 对象:
    var Light = function(){
        this.offLightState = new OffLightState( this );
        this.weakLightState = new WeakLightState( this );
        this.strongLightState = new StrongLightState( this );
        this.superStrongLightState = new     SuperStrongLightState( this ); // 新增superStrongLightState 对象
        this.button = null;
    };
最后改变状态类之间的切换规则,从StrongLightState---->OffLightState 变为StrongLight-State---->SuperStrongLightState ---->OffLightState:
    StrongLightState.prototype.buttonWasPressed = function(){
        console.log( '超强光' ); // strongLightState 对应的行为
        this.light.setState( this.light.superStrongLightState ); // 切换状态到offLightState
    };
二、状态模式的定义
GoF 中对状态模式的定义:
允许一个对象在其内部状态改变时改变它的行为,对象看起来似乎修改了它的类。
第一部分的意思是将状态封装成独立的类,并将请求委托给当前的状态对象,当对象的内部状态改变时,会带来不同的行为变化。
第二部分是从客户的角度来看,我们使用的对象,在不同的状态下具有截然不同的行为,这个对象看起来是从不同的类中实例化而来的,实际上这是使用了委托的效果。
三、状态模式的通用结构
在前面的电灯例子中,我们完成了一个状态模式程序的编写。首先定义了Light 类,Light类在这里也被称为上下文(Context)。随后在Light 的构造函数中,我们要创建每一个状态类的实例对象,Context 将持有这些状态对象的引用,以便把请求委托给状态对象。用户的请求,即点击button 的动作也是实现在Context 中的,代码如下:
    var Light = function(){
        this.offLightState = new OffLightState( this ); // 持有状态对象的引用
        this.weakLightState = new WeakLightState( this );
        this.strongLightState = new StrongLightState( this );
        this.superStrongLightState = new SuperStrongLightState( this );
        this.button = null;
    };

    Light.prototype.init = function(){
        var button = document.createElement( 'button' ),
        self = this;
        this.button = document.body.appendChild( button );
        this.button.innerHTML = '开关';
        this.currState = this.offLightState; // 设置默认初始状态
        this.button.onclick = function(){ // 定义用户的请求动作
            self.currState.buttonWasPressed();
        }
    };
编写各种状态类,light 对象被传入状态类的构造函数,状态对象也需要持有light 对象的引用,以便调用light 中的方法或者直接操作light 对象
    var OffLightState = function( light ){
        this.light = light;
    };

    OffLightState.prototype.buttonWasPressed = function(){
        console.log( '弱光' );
        this.light.setState( this.light.weakLightState );
    };
四、缺少抽象类的变通方式
JavaScript 既不支持抽象类,也没有接口的概念。所以在使用状态模式的时候要格外小心,如果我们编写一个状态子类时,忘记了给这个状态子类实现buttonWasPressed 方法,则会在状态切换的时候抛出异常。因为Context 总是把请求委托给状态对象的buttonWasPressed 方法。
解决办法是让抽象父类的抽象方法直接抛出一个异常,这个异常至少会在程序运行期间就被发现。
    var State = function(){};
    State.prototype.buttonWasPressed = function(){
        throw new Error( '父类的buttonWasPressed 方法必须被重写' );
    };
    var SuperStrongLightState = function( light ){
        this.light = light;
    };

    SuperStrongLightState.prototype = new State(); // 继承抽象父类
    SuperStrongLightState.prototype.buttonWasPressed = function(){ // 重写buttonWasPressed 方法
        console.log( '关灯' );
        this.light.setState( this.light.offLightState );
    };
五、文件上传
控制文件上传的流程需要两个节点按钮,第一个用于暂停和继续上传,第二个用于删除文件。

文件在不同的状态下,点击这两个按钮将发生的行为:
- 文件在扫描状态中,是不能进行任何操作的,既不能暂停也不能删除文件,只能等待扫描完成。扫描完成之后,根据文件的md5 值判断,若确认该文件已经存在于服务器,则直接跳到上传完成状态。如果该文件的大小超过允许上传的最大值,或者该文件已经损坏,则跳往上传失败状态。剩下的情况下才进入上传中状态。
- 上传过程中可以点击暂停按钮来暂停上传,暂停后点击同一个按钮会继续上传。
- 扫描和上传过程中,点击删除按钮无效,只有在暂停、上传完成、上传失败之后,才能删除文件。
5.1 不使用状态模式实现
上传是一个异步的过程, 所以控件会不停地调用JavaScript 提供的一个全局函数window.external.upload,来通知JavaScript 目前的上传进度,控件会把当前的文件状态作为参数state 塞进window.external.upload。
我们将简单地用setTimeout 来模拟文件的上传进度,window.external.upload 函数在此例中也只负责打印一些log:
    window.external.upload = function( state ){
        console.log( state ); // 可能为sign、uploading、done、error
    };
在页面中放置一个用于上传的插件对象:
    var plugin = (function(){
        var plugin = document.createElement( 'embed' );
        plugin.style.display = 'none';
        plugin.type = 'application/txftn-webkit';
        plugin.sign = function(){
            console.log( '开始文件扫描' );
        }
        plugin.pause = function(){
            console.log( '暂停文件上传' );
        };
        plugin.uploading = function(){
            console.log( '开始文件上传' );
        };
        plugin.del = function(){
            console.log( '删除文件上传' );
        }
        plugin.done = function(){
            console.log( '文件上传完成' );
        }
        document.body.appendChild( plugin );
        return plugin;
    })();
    var Upload = function( fileName ){
        this.plugin = plugin;
        this.fileName = fileName;
        this.button1 = null;
        this.button2 = null;
        this.state = 'sign'; // 设置初始状态为waiting
    };
Upload.prototype.init 方法会进行一些初始化工作,包括创建页面中的一些节点。在这些节点里,起主要作用的是两个用于控制上传流程的按钮,第一个按钮用于暂停和继续上传,第二个用于删除文件:
    Upload.prototype.init = function(){
        var that = this;
        this.dom = document.createElement( 'div' );
        this.dom.innerHTML =
        '<span>文件名称:'+ this.fileName +'</span>
        <button data-action="button1">扫描中</button>
        <button data-action="button2">删除</button>';
        document.body.appendChild( this.dom );
        this.button1 = this.dom.querySelector( '[data-action="button1"]' ); // 第一个按钮
        this.button2 = this.dom.querySelector( '[data-action="button2"]' ); // 第二个按钮
        this.bindEvent();
    };
给两个按钮分别绑定点击事件:
    Upload.prototype.bindEvent = function(){
        var self = this;
        this.button1.onclick = function(){
            if ( self.state === 'sign' ){ // 扫描状态下,任何操作无效
                console.log( '扫描中,点击无效...' );
            }else if ( self.state === 'uploading' ){ // 上传中,点击切换到暂停
                self.changeState( 'pause' );
            }else if ( self.state === 'pause' ){ // 暂停中,点击切换到上传中
                self.changeState( 'uploading' );
            }else if ( self.state === 'done' ){
                console.log( '文件已完成上传, 点击无效' );
            }else if ( self.state === 'error' ){
                console.log( '文件上传失败, 点击无效' );
            }
        };

        this.button2.onclick = function(){
            if ( self.state === 'done' || self.state === 'error' || self.state === 'pause' ){
                // 上传完成、上传失败和暂停状态下可以删除
                self.changeState( 'del' );
            }else if ( self.state === 'sign' ){
                console.log( '文件正在扫描中,不能删除' );
            }else if ( self.state === 'uploading' ){
                console.log( '文件正在上传中,不能删除' );
            }
        };
    };
Upload.prototype.changeState 方法,它负责切换状态之后的具体行为,包括改变按钮的innerHTML,以及调用插件开始一些“真正”的操作:
    Upload.prototype.changeState = function( state ){
        switch( state ){
            case 'sign':
            this.plugin.sign();
            this.button1.innerHTML = '扫描中,任何操作无效';
            break;
            case 'uploading':
            this.plugin.uploading();
            this.button1.innerHTML = '正在上传,点击暂停';
            break;
            case 'pause':
            this.plugin.pause();
            this.button1.innerHTML = '已暂停,点击继续上传';
            break;
            case 'done':
            this.plugin.done();
            this.button1.innerHTML = '上传完成';
            break;
            case 'error':
            this.button1.innerHTML = '上传失败';
            break;
            case 'del':
            this.plugin.del();
            this.dom.parentNode.removeChild( this.dom );
            console.log( '删除完成' );
            break;
        }
        this.state = state;
    };
测试:
    var uploadObj = new Upload( 'JavaScript 设计模式与开发实践' );
    uploadObj.init();

    window.external.upload = function( state ){ // 插件调用JavaScript 的方法
        uploadObj.changeState( state );
    };

    window.external.upload( 'sign' ); // 文件开始扫描

    setTimeout(function(){
        window.external.upload( 'uploading' ); // 1 秒后开始上传
    }, 1000 );

    setTimeout(function(){
        window.external.upload( 'done' ); // 5 秒后上传完成
    }, 5000 );
5.2状态模式重构文件上传程序
第一步仍然是提供window.external.upload 函数,在页面中模拟创建上传插件,这部分代码没有改变:
    window.external.upload = function( state ){
        console.log( state ); // 可能为sign、uploading、done、error
    };
    var plugin = (function(){
        var plugin = document.createElement( 'embed' );
        plugin.style.display = 'none';
        plugin.type = 'application/txftn-webkit';
        plugin.sign = function(){
            console.log( '开始文件扫描' );
        }
        plugin.pause = function(){
            console.log( '暂停文件上传' );
        };
        plugin.uploading = function(){
            console.log( '开始文件上传' );
        };
        plugin.del = function(){
            console.log( '删除文件上传' );
        }
        plugin.done = function(){
            console.log( '文件上传完成' );
        }
        document.body.appendChild( plugin );
        return plugin;
    })();
第二步,改造Upload 构造函数,在构造函数中为每种状态子类都创建一个实例对象:
    var Upload = function( fileName ){
        this.plugin = plugin;
        this.fileName = fileName;
        this.button1 = null;
        this.button2 = null;
        this.signState = new SignState( this ); // 设置初始状态为waiting
        this.uploadingState = new UploadingState( this );

        this.pauseState = new PauseState( this );
        this.doneState = new DoneState( this );
        this.errorState = new ErrorState( this );
        this.currState = this.signState; // 设置当前状态
    };
第三步,Upload.prototype.init 方法无需改变,仍然负责往页面中创建跟上传流程有关的DOM节点,并开始绑定按钮的事件:
    Upload.prototype.init = function(){
        var that = this;
        this.dom = document.createElement( 'div' );
        this.dom.innerHTML =
        '<span>文件名称:'+ this.fileName +'</span>
        <button data-action="button1">扫描中</button>
        <button data-action="button2">删除</button>';
        document.body.appendChild( this.dom );
        this.button1 = this.dom.querySelector( '[data-action="button1"]' );
        this.button2 = this.dom.querySelector( '[data-action="button2"]' );
        this.bindEvent();
    };
第四步,负责具体的按钮事件实现,在点击了按钮之后,Context 并不做任何具体的操作,而是把请求委托给当前的状态类来执行:
    Upload.prototype.bindEvent = function(){
        var self = this;
        this.button1.onclick = function(){
            self.currState.clickHandler1();
        }
        this.button2.onclick = function(){
            self.currState.clickHandler2();
        }
    };
第四步中的代码有一些变化,我们把状态对应的逻辑行为放在Upload 类中:
    Upload.prototype.sign = function(){
        this.plugin.sign();
        this.currState = this.signState;
    };
    Upload.prototype.uploading = function(){
        this.button1.innerHTML = '正在上传,点击暂停';
        this.plugin.uploading();
        this.currState = this.uploadingState;
    };
    Upload.prototype.pause = function(){

        this.button1.innerHTML = '已暂停,点击继续上传';
        this.plugin.pause();
        this.currState = this.pauseState;
    };
    Upload.prototype.done = function(){
        this.button1.innerHTML = '上传完成';
        this.plugin.done();
        this.currState = this.doneState;
    };
    Upload.prototype.error = function(){
        this.button1.innerHTML = '上传失败';
        this.currState = this.errorState;
    };
    Upload.prototype.del = function(){
        this.plugin.del();
        this.dom.parentNode.removeChild( this.dom );
    };
第五步,编写各个状态类的实现。值得注意的是,我们使用了StateFactory,从而避免因为JavaScript 中没有抽象类所带来的问题。
    var StateFactory = (function(){
        var State = function(){};
        State.prototype.clickHandler1 = function(){
            throw new Error( '子类必须重写父类的clickHandler1 方法' );
        }
        State.prototype.clickHandler2 = function(){
            throw new Error( '子类必须重写父类的clickHandler2 方法' );
        }
        return function( param ){
            var F = function( uploadObj ){
                this.uploadObj = uploadObj;
            };
            F.prototype = new State();
            for ( var i in param ){
                F.prototype[ i ] = param[ i ];
            }
            return F;
        }
    })();

    var SignState = StateFactory({
        clickHandler1: function(){
            console.log( '扫描中,点击无效...' );
        },
        clickHandler2: function(){
            console.log( '文件正在上传中,不能删除' );
        }
    });
    var UploadingState = StateFactory({
        clickHandler1: function(){
            this.uploadObj.pause();
        },
        clickHandler2: function(){
            console.log( '文件正在上传中,不能删除' );
        }
    });
    var PauseState = StateFactory({
        clickHandler1: function(){
            this.uploadObj.uploading();
        },
        clickHandler2: function(){
            this.uploadObj.del();
        }
    });
    var DoneState = StateFactory({
        clickHandler1: function(){
            console.log( '文件已完成上传, 点击无效' );
        },
        clickHandler2: function(){
            this.uploadObj.del();
        }
    });
    var ErrorState = StateFactory({
        clickHandler1: function(){
            console.log( '文件上传失败, 点击无效' );
        },
        clickHandler2: function(){
            this.uploadObj.del();
        }
    });
测试:
    var uploadObj = new Upload( 'JavaScript 设计模式与开发实践' );
    uploadObj.init();
    window.external.upload = function( state ){
        uploadObj[ state ]();
    };
    window.external.upload( 'sign' );
    setTimeout(function(){
            window.external.upload( 'uploading' ); // 1 秒后开始上传
        }, 1000 );
    setTimeout(function(){
            window.external.upload( 'done' ); // 5 秒后上传完成
    }, 5000 );
六、状态模式的优缺点
状态模式的优点如下。
- 状态模式定义了状态与行为之间的关系,并将它们封装在一个类里。通过增加新的状态类,很容易增加新的状态和转换。
- 避免Context 无限膨胀,状态切换的逻辑被分布在状态类中,也去掉了Context 中原本过多的条件分支。
- 用对象代替字符串来记录当前状态,使得状态的切换更加一目了然。
- Context 中的请求动作和状态类中封装的行为可以非常容易地独立变化而互不影响。
状态模式的缺点是会在系统中定义许多状态类,编写20 个状态类是一项枯燥乏味的工作,而且系统中会因此而增加不少对象。另外,由于逻辑分散在状态类中,虽然避开了不受欢迎的条件分支语句,但也造成了逻辑分散的问题,我们无法在一个地方就看出整个状态机的逻辑。
七、状态模式中的性能优化点
- 有两种选择来管理state 对象的创建和销毁。第一种是仅当state 对象被需要时才创建并随后销毁,另一种是一开始就创建好所有的状态对象,并且始终不销毁它们。如果state对象比较庞大,可以用第一种方式来节省内存,这样可以避免创建一些不会用到的对象并及时地回收它们。但如果状态的改变很频繁,最好一开始就把这些state 对象都创建出来,也没有必要销毁它们,因为可能很快将再次用到它们。
- 在本章的例子中,我们为每个Context 对象都创建了一组state 对象,实际上这些state对象之间是可以共享的,各Context 对象可以共享一个state 对象,这也是享元模式的应用场景之一。
八、状态模式和策略模式的关系
- 策略模式和状态模式的相同点是,它们都有一个上下文、一些策略或者状态类,上下文把请求委托给这些类来执行。
- 它们之间的区别是策略模式中的各个策略类之间是平等又平行的,它们之间没有任何联系,所以客户必须熟知这些策略类的作用,以便客户可以随时主动切换算法;而在状态模式中,状态和状态对应的行为是早已被封装好的,状态之间的切换也早被规定完成,“改变行为”这件事情发生在状态模式内部。对客户来说,并不需要了解这些细节。这正是状态模式的作用所在。
九、JavaScript 版本的状态机
前面两个示例都是模拟传统面向对象语言的状态模式实现,我们为每种状态都定义一个状态子类,然后在Context 中持有这些状态对象的引用,以便把currState 设置为当前的状态对象。
状态模式是状态机的实现之一,但在JavaScript 这种“无类”语言中,没有规定让状态对象一定要从类中创建而来。另外一点,JavaScript 可以非常方便地使用委托技术,并不需要事先让一个对象持有另一个对象。下面的状态机选择了通过Function.prototype.call 方法直接把请求委托给某个字面量对象来执行。
    var Light = function(){
        this.currState = FSM.off; // 设置当前状态
        this.button = null;
    };

    Light.prototype.init = function(){
        var button = document.createElement( 'button' ),
            self = this;
        button.innerHTML = '已关灯';
        this.button = document.body.appendChild( button );
        this.button.onclick = function(){
            self.currState.buttonWasPressed.call( self ); // 把请求委托给FSM 状态机
        }
    };
    var FSM = {
        off: {
            buttonWasPressed: function(){
                console.log( '关灯' );
                this.button.innerHTML = '下一次按我是开灯';
                this.currState = FSM.on;
            }
        },
        on: {
            buttonWasPressed: function(){
                console.log( '开灯' );
                this.button.innerHTML = '下一次按我是关灯';
                this.currState = FSM.off;
            }
        }
    };
    var light = new Light();
    light.init();
接下来尝试另外一种方法,即利用下面的delegate 函数来完成这个状态机编写。这是面向对象设计和闭包互换的一个例子,前者把变量保存为对象的属性,而后者把变量封闭在闭包形成的环境中:
   var delegate = function( client, delegation ){
        return {
            buttonWasPressed: function(){ // 将客户的操作委托给delegation 对象
                return delegation.buttonWasPressed.apply( client, arguments );
            }
        }
    };

    var FSM = {
        off: {
            buttonWasPressed: function(){
                console.log( '关灯' );
                this.button.innerHTML = '下一次按我是开灯';
                this.currState = this.onState;
            }
        },
        on: {
            buttonWasPressed: function(){
                console.log( '开灯' );
                this.button.innerHTML = '下一次按我是关灯';
                this.currState = this.offState;
            }
        }
    };

    var Light = function(){
        this.offState = delegate( this, FSM.off );
        this.onState = delegate( this, FSM.on );
        this.currState = this.offState; // 设置初始状态为关闭状态
        this.button = null;
    };

    Light.prototype.init = function(){
        var button = document.createElement( 'button' ),
            self = this;
        button.innerHTML = '已关灯';
        this.button = document.body.appendChild( button );
        this.button.onclick = function(){
            self.currState.buttonWasPressed();
        }
    };
    var light = new Light();
    light.init();
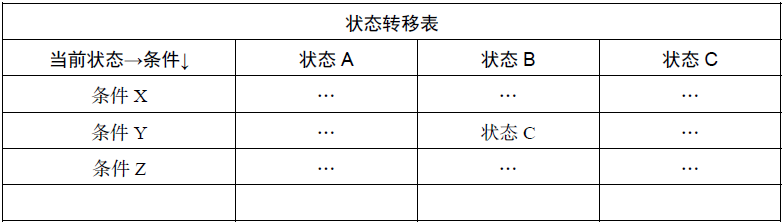
十、表驱动的有限状态机
另外一种实现状态机的方法的核心是基于表驱动的。我们可以在表中很清楚地看到下一个状态是由当前状态和行为共同决定的。这样一来,我们就可以在表中查找状态,而不必定义很多条件分支
在 https://github.com/jakesgordon/javascript-state-machine 中实现了它,通过这个库,可以很方便地创建出FSM:
    var fsm = StateMachine.create({
        initial: 'off',
        events: [
        { name: 'buttonWasPressed', from: 'off', to: 'on' },
        { name: 'buttonWasPressed', from: 'on', to: 'off' }
        ],
        callbacks: {
            onbuttonWasPressed: function( event, from, to ){
                console.log( arguments );
            }
        },
        error: function( eventName, from, to, args, errorCode, errorMessage ) {
            console.log( arguments ); // 从一种状态试图切换到一种不可能到达的状态的时候
        }
    });

    button.onclick = function(){
        fsm.buttonWasPressed();
    }
十一、实际项目中的其他状态机
在实际开发中,很多场景都可以用状态机来模拟, 比如一个下拉菜单在hover 动作下有显示、悬浮、隐藏等状态;一次TCP 请求有建立连接、监听、关闭等状态;一个格斗游戏中人物有攻击、防御、跳跃、跌倒等状态。